This walnut fudge (walnut toffee) is creamy, rich, and decadent packed with crunchy walnuts in every bite! Homemade walnut fudge makes for a delicious edible gift this Holiday season, or any other season really!

Walnut fudge or walnut toffee as it is known by some folks is a popular confection prepared during Christmas by the Goan and East Indian community in India.
Although fudge is not a traditional Indian Christmas sweet per se, people do love to include it in their ‘ kuswar ‘ (Goan Christmas sweet platter) along with the other popular traditional sweets like neureos, fruit cake, marzipan, milk toffee, kulkuls, kormolas, etc
I’ve yet to meet someone who doesn’t like fudge! What’s not to love about fudge after all, right?
There are different varieties of fudge and a number of ways to make them, either using the old-fashioned method with sugar, milk, and butter, or using marshmallows/marshmallow cream, or the quicker no-cook version of using condensed milk and melted chocolate, which is quite popular today.

- About this walnut fudge
- Ingredients needed
- How to make walnut fudge/walnut toffee – Step by step process
- Storage and shelf life
- A few tips to keep in mind
- Variations
- You may also enjoy these traditional Goan Christmas sweets
- Walnut Fudge | Walnut Toffee (Indian Christmas Sweet)
About this walnut fudge
The walnut fudge or walnut toffee recipe I’m sharing today is what I’ve learned from my aunt Carol. It uses condensed milk as the base and a bit of cocoa for a hint of chocolate flavor.
The recipe is quite similar to the milk cream I’ve shared earlier, except that milk cream uses a few cashew nuts. But since this fudge is all about the walnuts, that’s what we are going to use today.
These walnut fudge bites are truly irresistible and perfect for gifting your loved ones. These also make for a wonderful addition to your Christmas dessert or cookie platter! And it doesn’t need much elbow grease, I promise!
So, let’s see how to make this walnut fudge or walnut toffee, whatever you like to call it. It is delicious nonetheless 😀

Ingredients needed
To prepare this decadent walnut toffee at home, you will need the following ingredients;
- Sweetened condensed milk: This is the base of the fudge. The traditional method calls for reducing the milk with sugar which is essentially condensed milk. This is where we save time!
- Castor sugar: You may also use powdered sugar.
- Unsweetened cocoa powder: I’ve used Hershey’s cocoa powder. This is optional, you may skip it if you want to, but I do recommend including it in the recipe.
- Butter : I’ve used salted butter. If using unsalted butter, add about 1/8 teaspoon table salt, when adding the butter. The salt enhances and balances the overall flavor of the fudge.
- Coarsely chopped walnuts
- Vanilla extract: Optional, but a little doesn’t hurt!

How to make walnut fudge/walnut toffee – Step by step process
Step 1: Cook condensed milk, sugar, and cocoa powder
Grease a 7 or 8-inch square pan with oil/butter or non-stick oil spray. You can also use any other pan, thali, or a buttered board. Line the pan with parchment paper overhang for easy removal of the fudge. Grease the parchment paper and set the prepared pan aside. (photo 1)

Add 400 grams of sweetened condensed milk, 50 grams sugar, and 15 grams cocoa powder in a heavy-bottomed, non-stick pan. Switch on the heat to medium-low, stir continuously with a silicon or wooden spatula for about 10 minutes. (photos 2 to 5)

Step 2: Add the remaining ingredients and continue cooking
Once it begins to thicken, reduce the heat to low, add 28 grams salted butter and 1/2 teaspoon vanilla extract, cook, until it starts leaving the sides of the pan. (photos 6 and 7)

Add 100 grams of coarsely chopped walnuts. Mix well, and cook for few more minutes until the entire mixture comes together and leaves the sides of the pan. Switch off the heat. (photos 8 and 9)

Step 3: Transfer to a greased pan
Transfer the fudge mixture to a greased tray or a buttered board, spread it evenly with an offset spatula or regular spatula. Sprinkle some chopped walnuts, press it down gently with the spatula. Air-dry, uncovered, for a few hours/overnight or until it sets. (photos 10 and 11)

Step 4: Cut and serve
Once it has set, it will appear firm. Lift the fudge out of the pan. Cut into squares or diamonds. Enjoy! (photo 12)

Storage and shelf life
Store the walnut fudge in a cool, dry place for up to 1 week in an airtight container.
It does not need to be refrigerated. Even if you do refrigerate it, let it sit out till it reaches room temperature before serving.
A few tips to keep in mind
Good quality non-stick pan: To make this recipe as hassle-free as possible, use a good quality non-stick pan or wok as the fudge mixture won’t stick much, and it also leaves the sides of the pan nicely, indicating that it is done. If you don’t have one or avoid using a non-stick pan, use a good, heavy-bottomed pan.
Pay attention to the heat: Use low to medium-low heat while cooking the mixture, or it may burn at the bottom.
Grease the spatula with oil or butter while spreading the mixture in the tray: Doing so, will prevent the fudge from sticking to the spatula, and you can spread it evenly.
Alternatively, you can also grease one side of the parchment paper with some butter, place the greased side on the surface of the fudge, and press it down to flatten it nicely. Check out the pics below for reference.

Or spread the fudge mixture on a buttered board, place a parchment paper over the surface and roll it out to the desired thickness.
If the fudge has not set after a day: This happens when you have removed the fudge earlier off the heat. Usually, in Indian homes, no one really uses a candy thermometer to check it has reached the right consistency. People often use their judgment, which almost never fails.
If you are a beginner, you may not be able to judge and that is okay. Either way, the fudge is still edible, even if it doesn’t set. It will be like the soft, and chewy, Lonavala type of walnut fudge that can be eaten with a spoon. Delicious!
If it is too sticky, transfer it back to the pan, cook it on low heat for a couple of minutes. Then transfer it to the prepared greased pan, spread it out, and leave it to air-dry.
It takes practice, believe me, I’ve been there, done that! But you will get it right!

Variations
- Other nuts: You can add other coarsely chopped nuts like cashew nuts, pecans, almonds, pistachios, etc.
- More chocolate: if you prefer a more chocolatey flavor, you can add 1/4 cup of cocoa powder. You can increase the sugar by a few more tablespoons to compensate for the added cocoa powder or skip adding more sugar if you don’t want it sweeter.
- Shape the fudge in moulds: If you’d like to shape in moulds like milk toffee, make a fine powder of the walnuts. You will also need to check if the consistency of the fudge mixture is right in order to be able to shape then. When the mixture leaves the sides of the pan, test it by dropping a small amount of mixture in a bowl of water, try to form a ball. If you can form a ball, it is done. If it disintegrates, it needs to cook more. Have a look at my milk toffee post for pictorial reference.
You may also enjoy these traditional Goan Christmas sweets
- Marzipan (no-cook/egg-free)
- Bebinca
- Guava cheese
- Milk Cream
- Coconut Toffee
- Baath cake
- Doce de grao (chana dal fudge)
- Karanji/Neureos
- Kormolas
- Shankapali
- No-cook coconut ice
- Rich fruit cake
You can also follow me on Facebook , Pinterest, Instagram & Twitter

Walnut Fudge | Walnut Toffee (Indian Christmas Sweet)
Ingredients1x2x3x
- 400 grams sweetened condensed milk
- 50 grams castor sugar or powdered sugar, approx 1/4 cup
- 15 grams unsweetened cocoa powder, 2 tablespoons
- 28 grams salted butter, 2 tablespoons
- 1/2 teaspoon vanilla extract
- 100 grams coarsely chopped walnut, about 1 cup
Instructions
- Grease a 7 or 8-inch square pan with oil/butter or non-stick oil spray. You can also use any other pan, thali, or a buttered board. Line the pan with parchment paper overhang for easy removal of the fudge. Grease the parchment paper and set the prepared pan aside.
- Add condensed milk, sugar, and cocoa powder in a heavy-bottomed, non-stick pan. Switch on the heat to medium-low, stir continuously with a silicon or wooden spatula for about 10 minutes.
- Once it begins to thicken, reduce the heat to low, add butter and vanilla extract, cook until it starts leaving the sides of the pan.
- Add the coarsely chopped walnuts. Mix well, and cook for few more minutes until the entire mixture comes together and leaves the sides of the pan. Switch off the heat.
- Transfer the fudge mixture to a greased tray or a buttered board, spread it evenly with an offset spatula or regular spatula. Sprinkle some chopped walnuts, press it down gently with the spatula. Air-dry, uncovered, for a few hours/overnight or until it sets.
- Once it has set, it will appear firm. Lift the fudge out of the pan. Cut into squares or diamonds. Enjoy!
Video
Notes
Nutrition

Walnut Fudge | Walnut Toffee (Indian Christmas Sweet)
Ingredients
- 400 grams sweetened condensed milk
- 50 grams castor sugar or powdered sugar, approx 1/4 cup
- 15 grams unsweetened cocoa powder, 2 tablespoons
- 28 grams salted butter, 2 tablespoons
- 1/2 teaspoon vanilla extract
- 100 grams coarsely chopped walnut, about 1 cup
Instructions
- Grease a 7 or 8-inch square pan with oil/butter or non-stick oil spray. You can also use any other pan, thali, or a buttered board. Line the pan with parchment paper overhang for easy removal of the fudge. Grease the parchment paper and set the prepared pan aside.
- Add condensed milk, sugar, and cocoa powder in a heavy-bottomed, non-stick pan. Switch on the heat to medium-low, stir continuously with a silicon or wooden spatula for about 10 minutes.
- Once it begins to thicken, reduce the heat to low, add butter and vanilla extract, cook until it starts leaving the sides of the pan.
- Add the coarsely chopped walnuts. Mix well, and cook for few more minutes until the entire mixture comes together and leaves the sides of the pan. Switch off the heat.
- Transfer the fudge mixture to a greased tray or a buttered board, spread it evenly with an offset spatula or regular spatula. Sprinkle some chopped walnuts, press it down gently with the spatula. Air-dry, uncovered, for a few hours/overnight or until it sets.
- Once it has set, it will appear firm. Lift the fudge out of the pan. Cut into squares or diamonds. Enjoy!
Video
Notes
Nutrition
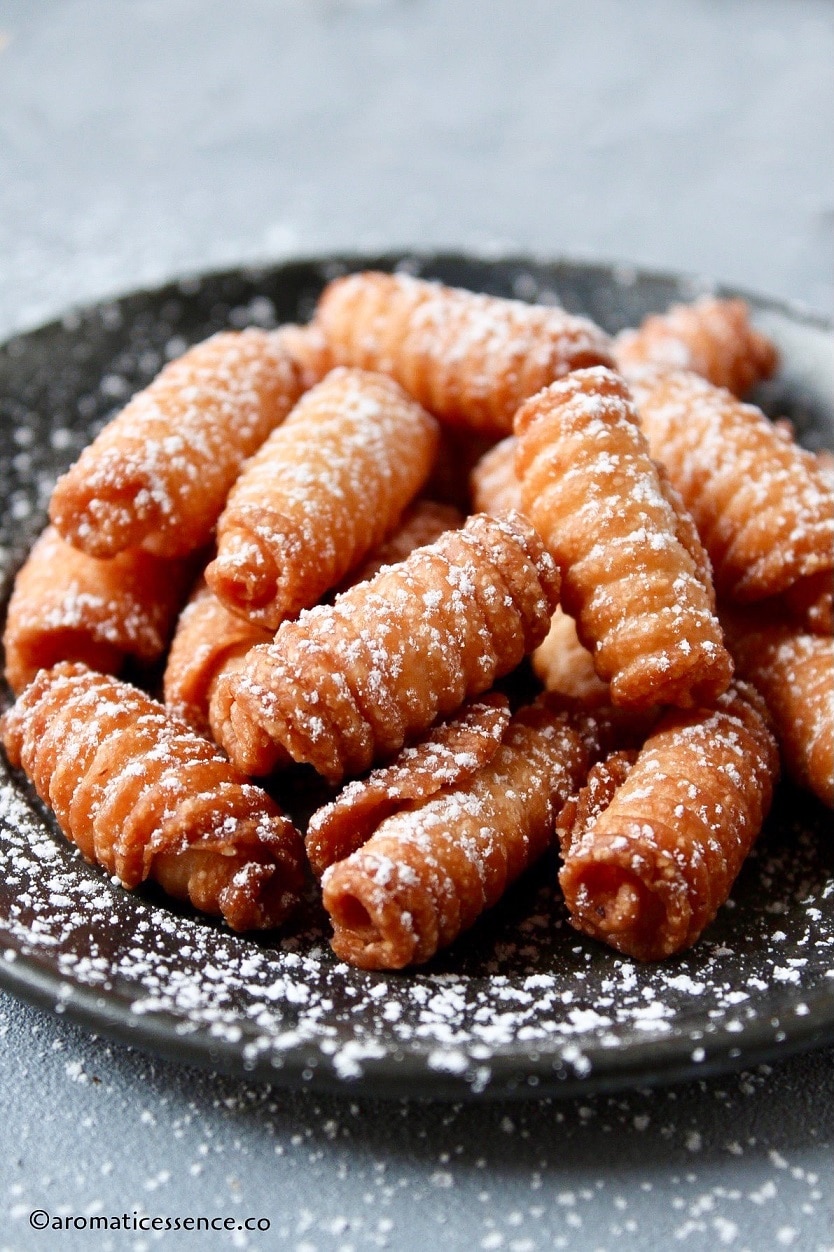
Kalkal or kul kul is a traditional, deep-fried, Goan pastry shaped into small curls. It is popularly made during Christmas in India!
Here is a step-by-step recipe along with a quick video that shows you how to make kulkuls from scratch! These little curls are crispy, flaky, and moreish! Do try them this season!
Can you believe we are just a few days away from Christmas? Our home sure smells like the Holidays with the various goodies being prepared. So far, I’ve made coconut ice, walnut fudge, baath cake, milk toffee, and guava cheese.
When I think of kalkal, I remember the good old days when I would help my grandaunt prepare them. Since she lived alone, she’d request me to help her in preparing Christmas sweets. Kulkuls was one of the many sweets she’d make without fail every Christmas. My task was to shape the kulkuls, and I remember having a lot of fun doing it.
Christmas is all about the beautiful memories that I have experienced as a child with my family and friends. I remember the excitement in putting up the Christmas tree and decorating it, brainstorming ideas for the crib, and all the late-night sweet preparations with my Mom and younger sister.
I’m trying to keep those traditions alive, so my kids can have beautiful memories, and hopefully carry it forward and teach their own. Here is a pic of my daughter, Katelyn helping me out 🙂 My job just got easier or maybe not 😀 Kidding! She did a fantastic job rolling out the dough balls!

- About this kul kul recipe
- Different ways to make and serve these crispy and flaky curls
- Ingredients and equipment needed to make kulkuls
- How to make kalkal without eggs – Step by step process
- Storage
- A few tips to keep in mind while making kul kuls…
- You may also enjoy these traditional Goan Christmas sweets
- Kalkal Recipe | Goan Kulkuls {Eggless}
About this kul kul recipe
Traditionally, kalkal is made with eggs, but this recipe is an eggless version, and trust me you don’t miss the eggs at all. This is my Mum-in-law’s recipe which has been shared earlier on the blog to make shankarpali and kormolas. It is essentially the same dough but can be shaped differently. Her recipe does not include eggs, which is perfect for sharing with those who don’t eat eggs.
If you ask me, making shankarpali is the easiest amongst the three. Kormolas and kalkal can really test your patience if you sit to do it alone. But if you have 3-4 folks helping you out, a lot of the workload is reduced.
Kalkals are crispy, flaky, and melt-in-the-mouth. They are also known as ‘kidyo’ in Konkannim, perhaps because they resemble worms. That definitely doesn’t sound appetizing, but, trust me, it is very addictive once you start munching on them. After all, what’s not to love about carbs, fat, and sugar!

Different ways to make and serve these crispy and flaky curls
There are different versions to make kulkul where,
- The dough is sweetened by adding icing sugar
- The kulkuls are dipped in a sugar syrup after frying, which on drying form a white glaze
- Some like to skip the glaze and dust the kulkuls with icing sugar.
Which way do you prefer them?
They taste great either way! I’m sharing the first version, where we add icing sugar to the dough. Even with the sugar in the dough, these have a very tiny hint of sweetness, it is subtle. After all, everything on the ‘ kuswar ‘ served is sweet and so these kalkals help cut through that and balance out everything.
Ingredients and equipment needed to make kulkuls
To make this crispy, flaky cookie, you will need the following ingredients;
- All-purpose flour (maida)
- Semolina: Use the fine variety also known as Bombay rava. Some recipes exclude this ingredient, but adding it definitely adds more crunch. You may skip it if you want to.
- Table salt
- Ghee : I’ve used homemade ghee, you can also use melted unsalted butter.
- Icing sugar/confectioner’s sugar: Icing sugar also has a tiny bit of cornstarch, and that helps in making the kulkuls lighter.
- Coconut milk or dairy milk/water: Traditionally, a fresh extract of coconut milk is used. That’s what I’ve used in the recipe. You can also use regular dairy or just water too. Either works well.
- Kulkul roller: Plastic rollers are easily available in shops that sell baking accessories. So that’s what I’ve used. If you don’t have one or can’t find one you can use a fork or a brand new unused comb to shape the dough curls.

How to make kalkal without eggs – Step by step process
Step 1: Prepare the dough
In a large mixing bowl, add 2 cups (285 grams) of all-purpose flour, 1/2 cup (100 grams) semolina, 1/2 teaspoon table salt. Mix well. (Photos 1 to 4)

Add the warm ghee and mix. Rub the ghee into the flour to resemble breadcrumbs. If you hold a portion of the flour-ghee mixture with your fist, it should hold its shape. If not, add another 1-2 tablespoons of warm ghee. (Photos 5 and 6)

Now add 2/3 cup icing sugar (80 grams), mix well. (Photos 7 and 8)

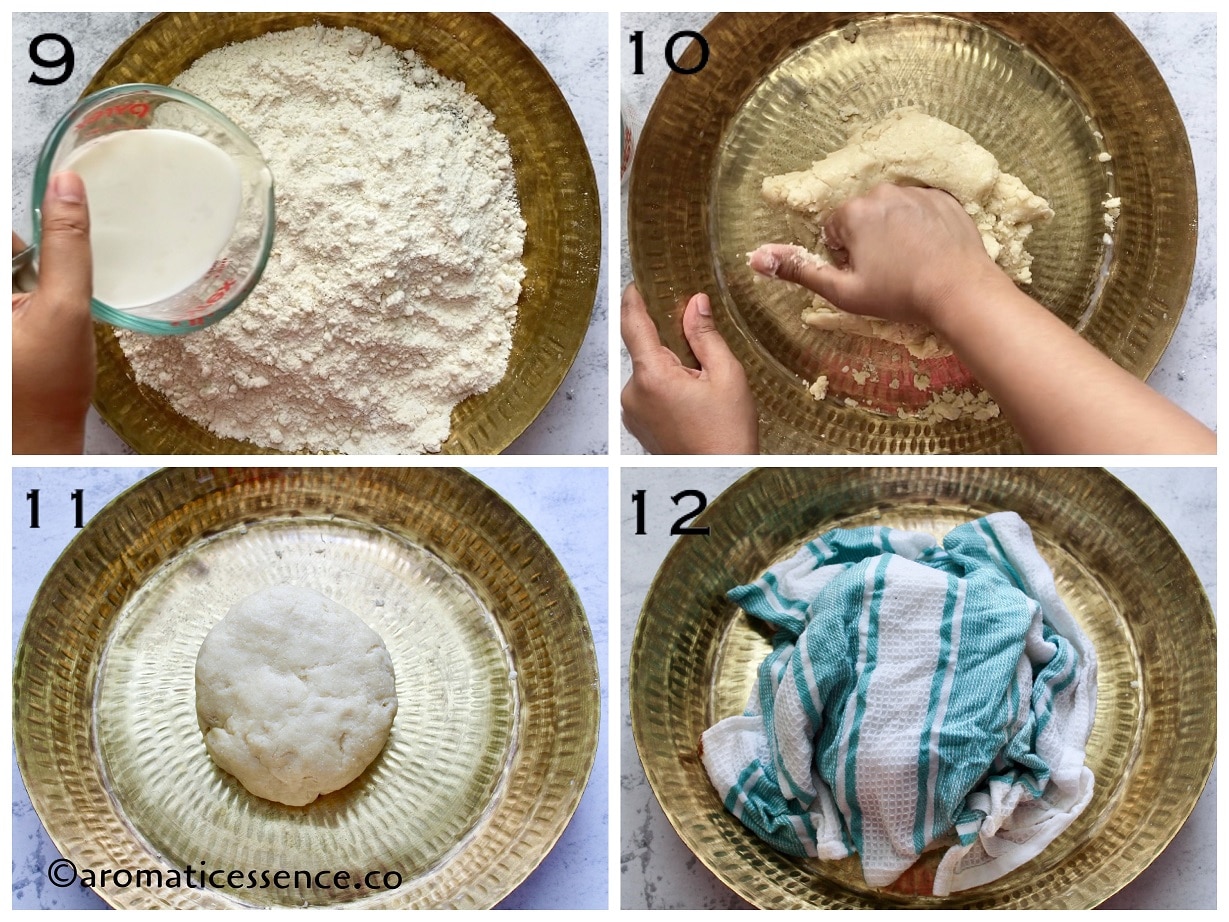
Add coconut milk, a little at a time, to knead a soft dough. Do not knead a tight dough as the semolina will absorb water and make it firmer. I used a little less than 150 ml.
Cover with a clean damp kitchen napkin and leave it aside for 30 minutes. (Photos 9 to 12)
Step 2: Shape the kalkal
After the resting time, pinch a marble-sized portion of the dough, roll it between your palms to make a ball. Repeat until you are done with the rest of the dough. (Photos 13 to 14)

Take a ball and flatten it by spreading it gently with your fingers over the kalkal roller. Start rolling from one end to the other to form a curl. Seal the edges very lightly. Place it on a tray lined with parchment paper. (Photos 15 to 20)

Repeat with the rest of the dough balls. (Photo 21)

You can also use the back of a fork or a brand new comb to shape the dough. (Photos 22 to 25)

Step 3: Frying the kulkuls
Heat oil on medium heat in a heavy-bottomed kadhai. Drop one piece in the oil, if it comes up instantly, the oil is ready. (Photos 26 and 27)

Deep-fry kulkuls on medium-low heat until golden brown on both sides, turning them constantly. Do not let them brown too much, as they will continue cooking in the residual heat and become darker.
Remove with a slotted spoon and transfer to a tray lined with an absorbent napkin. Fry all the pieces, in batches, depending on the size of your kadai. (Photos 28 to 32).


I did try baking a small batch, and while they turned crispy and had a nice golden brown color, they weren’t flaky, I baked them at 180 C for 18 minutes. (Photos 33 and 34)

I do not suggest baking them using this recipe, it does need some modifications. If you still want to try baking them, do add a pinch of baking powder to make them lighter and help them puff up.
Storage
Once the kulkuls have cooled down completely, store them in an airtight container for up to 2 weeks at room temperature.
A few tips to keep in mind while making kul kuls…
- Involve your friends and family to help you out: Making kulkuls all by yourself is a time-consuming task. You can still pull it off if you make the recipe using these quantities. But if you scale it up, you definitely need help unless you are a pro and quick in working around.
- Soft dough: Knead a soft and elastic dough. The rava absorbs liquid and swells up, the dough will have the perfect consistency before shaping the kalkal. If the dough turns dry and hard after the resting period, add some more coconut milk and knead to a soft dough, or else the dough will keep tearing when you try to roll it into curls.
- Oil temperature: Make sure you deep-fry the kulkuls on medium to medium-low heat. If you fry on high heat, they will brown quickly on the outside and remain soft and raw inside. If you use a candy thermometer, it should register 350° F/180° C.
- Avoid overcrowding the wok: Deep-fry kulkuls in batches, depending on the size of your wok. If you add too many, it will bring down the temperature of the oil. You can always test the temperature of the oil by dropping a small piece of dough before frying the next batch. Adjust the heat accordingly.

You may also enjoy these traditional Goan Christmas sweets
- Marzipan (no-cook/egg-free)
- Bebinca
- Guava cheese
- Milk Cream
- Coconut Toffee
- Baath cake
- Doce de grao (chana dal fudge)
- Karanji/Neureos
- Kormolas
- Shankapali
- No-cook coconut ice
- Rich fruit cake
- Walnut fudge
You can also follow me on Facebook , Pinterest, Instagram & Twitter
I’m winding up with my posts on Christmas sweets this year. As usual, I wanted to share more recipes like date rolls, rose cookies, almond toffee, jujubes, and dodol. I hope to share the rest of it next year. I’m still getting used to my blogging routine after a break of 5 months.
If you have any special requests for recipes, please feel free to reach to me via the contact form and I’ll try my best to share them here.
Merry Christmas everyone! Have a wonderful time with your family <3

Kalkal Recipe | Goan Kulkuls {Eggless}
Ingredients1x2x3x
- 2 cups all-purpose flour 285 grams
- 1/2 cup rava 100 grams
- 2/3 cup icing sugar 80 grams
- 1/2 tsp table salt
- 1/4 cup warm ghee 50 grams
- 150 ml freshly extracted coconut milk or dairy/water, You may need more or less. I used a little under 150 ml
- 1.5 cups vegetable oil, I used sunflower oil 320 grams
Instructions
- In a large mixing bowl, add all-purpose flour, semolina, table salt. Mix well.
- Add the warm ghee and mix. Rub the ghee into the flour to resemble breadcrumbs. If you hold a portion of the flour-ghee mixture with your fist, it should hold its shape. If not, add another 1-2 tablespoons of warm ghee.
- Now add icing sugar, mix well.
- Add coconut milk, a little at a time, to knead a soft and elastic dough. Cover with a clean damp kitchen napkin and leave it aside for 30 minutes.
- After the resting time, pinch a marble-sized portion of the dough, roll it between your palms to make a ball. Repeat until you are done with the rest of the dough.
- Take a ball and flatten it by spreading it gently with your fingers over the kalkal roller. Start rolling from one end to the other to form a curl. Seal the edges very lightly. Place it on a tray lined with parchment paper.
- Repeat with the rest of the dough balls.
- You can also use the back of a fork or a brand new comb to shape the dough.
- Heat oil on medium heat in a heavy-bottomed kadhai. Drop one piece in the oil, if it comes up instantly, the oil is ready.
- Deep-fry kulkuls on medium-low heat until golden brown on both sides, turning them constantly. Do not let them brown too much, as they will continue cooking in the residual heat and become darker.
- Remove with a slotted spoon and transfer to a tray lined with an absorbent napkin. Fry all the pieces, in batches, depending on the size of your kadai.
