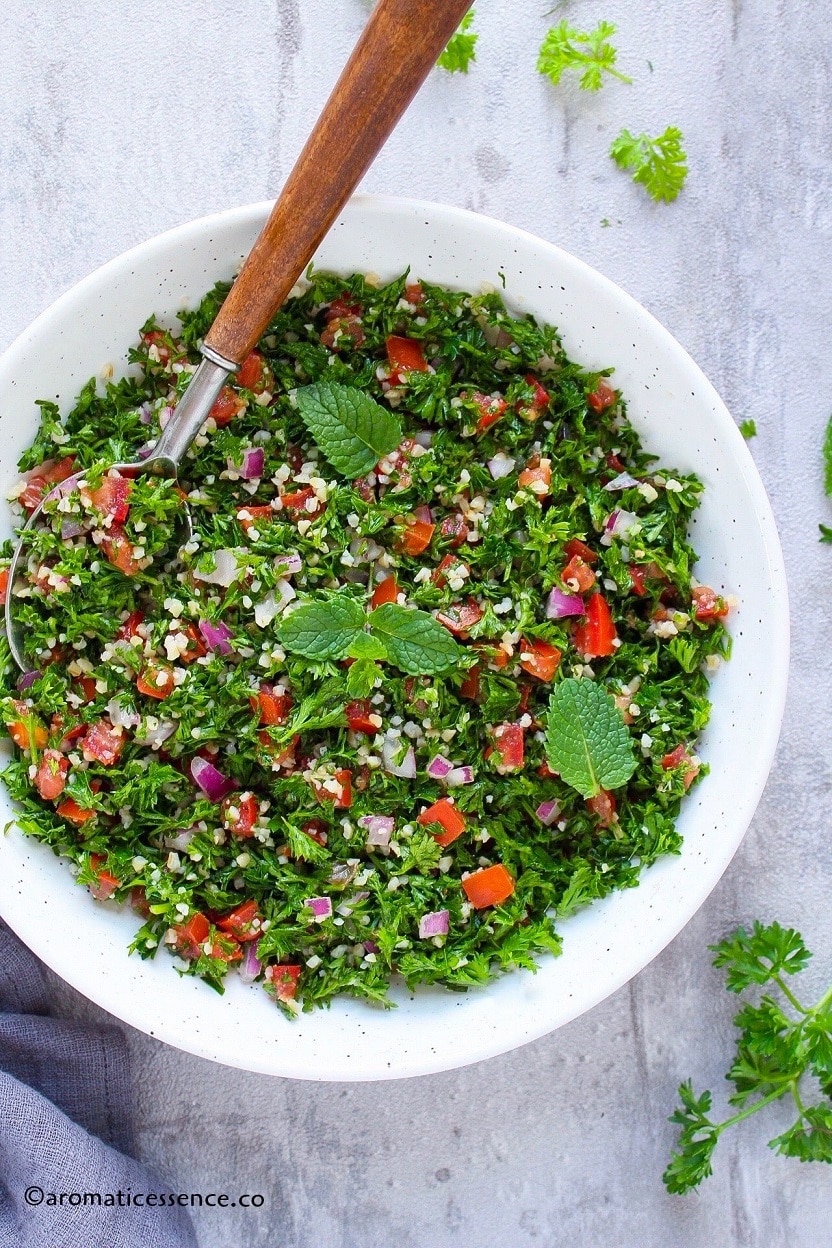
Tabouli salad also spelled as tabbouleh is a classic Middle Eastern salad. It is delicious and refreshing, made with lots of parsley, bulgar, mint, finely chopped vegetables, tossed with fresh lemon juice, and extra virgin olive oil! Tabbouleh is packed with zesty and herby notes with a subtle, nutty flavor from the bulgar wheat.
Whether it is hummus, falafel, baba ganoush , or pita bread, who doesn’t love Middle Eastern food? As much as I enjoy eating Arabic food, I also love recreating them in my kitchen. My husband worked for almost 5 years in the Middle East and he has so many wonderful stories to tell me about the food, be it how the shwarma was served up at one particular place, and how it was the best he’d eaten to numerous other delicious food stories.
- What is tabouli?
- Lebanese tabbouleh ingredients
- You will love this Lebanese tabbouleh salad recipe because
- How to make tabouli salad – Step by step instructions
- Serving suggestions
- Make-ahead
- Can you freeze this salad?
- Switch it up
- You may also enjoy these salad recipes
- Tabouli Salad {Lebanese Tabbouleh Salad}
What is tabouli?
The Levantine Arabic tabbūle is derived from the Arabic word tābil , meaning “seasoning” or more literally “dip”. (Source-Wiki)
Tabouli has many spellings and variations as each region or family has their own version of this salad. It really doesn’t matter whether you spell it as tabbouleh, tabouleh, tabouli, taboule, or any other spelling there is out there. This salad is really so refreshing and tasty! It is not only one of the most popular salads in the Middle Eastern countries but has gained popularity worldwide for quite a few years now.
At its core, tabouli is a delicious, vegan salad made with lots and lots of fresh parsley, bulgur wheat, mint, tomatoes, and onions. The herbs and vegetables are finely chopped and tossed with extra virgin olive oil and fresh lemon juice.
Tabouli is essentially a parsley salad and not a bulgar salad. Parsley, a herb that is used mainly as a garnish, is in fact, the star of this salad. The Americanized version of tabbouleh usually has more bulgar and less parsley, so people often think of tabbouleh as a bulgar salad. But the opposite is true!
There is a version in Turkey, known as kisir, where they add more bulgar and less parsley in the salad. However, in the Lebanese version, parsley dominates all the way.
If you really want to make the authentic version, use more of parsley and just enough of bulgar to dot the salad with little specks of grain. At least, the tabbouleh prepared by my favorite Lebanese restaurant back in Lafayette always had more parsley and very little of the bulgar.

Lebanese tabbouleh ingredients
Parsley
This is the most important ingredient in this salad. I’ve used flat-leaf parsley, but you can also use curly parsley if that is all you have.
Unfortunately, there is no substitute for parsley in tabbouleh salad because, in essence, it is called a parsley salad after all. Tabbouleh without parsley is just NOT tabbouleh.
Pro tip:
Prep the parsley a few hours in advance: Parsley needs to be washed thoroughly. Pat dry with a clean kitchen napkin or paper towel and then let it dry completely before storing it in the refrigerator. You could use a salad spinner to get rid of the excess water.
Use a sharp knife to chop the parsley: It is best to chop the parsley with a sharp knife, slicing through it gently. Using a dull knife will cause the parsley leaves to bruise easily.
It is time-consuming to chop up everything this fine, but hey, no pain no gain! Right?
Can you use a food processor? You can, but if you do, please make sure the parsley is absolutely dry. Or else, you will end up a watery, mushy parsley mixture not suitable to be used in the salad. This is where the first pointer of prepping the parsley in advance will also come in handy.
Bulgar
Also known as burghul or burgol, is a whole-grain made from cracked wheat that has been parboiled, dried, milled, and then sorted by size. It is a good source of dietary fiber, proteins, vitamins, and minerals. It has been used in Mediterranean and Middle Eastern cuisine for thousands of years.
Bulgar is commercially available in 4 grades, based on the color or size i.e fine, medium, coarse, and very coarse. #1 bulgar wheat, which is the fine variety, is used to make tabbouleh. It is quite fine and does not need any cooking. A quick soak for 5 minutes is more than enough.
I’ve used the medium variety of bulgar because that’s what I had in my pantry, and it needs a longer soaking time as compared to the fine variety. I prefer the texture of the medium variety as opposed to the fine one.
Many folks treat the fine variety of bulgar differently in this salad.
- Some soak it in lemon juice and then add it to the salad.
- Some just rinse and add it along with the rest of the ingredients, and let the bulgar soak up all the liquid in the salad.
- While some soak it in water for a few minutes, drain and use it.
If you use the coarse variety of bulgar, you may need to soak it for a longer time, about an hour.
Bulgar is cracked wheat grains, so it is not gluten-free. You can still enjoy a gluten-free version of this salad by swapping bulgar wheat with an equivalent quantity of quinoa (a favorite), brown rice, riced cauliflower, millet, or gluten-free orzo pasta. If gluten is not an issue, you could also try using couscous.
Mint leaves
I’ve used fresh mint leaves. In a pinch, you can also use dried mint leaves or a mix of both fresh and dried. You can make this salad without mint, it is not that important an ingredient. But, I love the pop of freshness it adds to the salad.
Tomatoes
Choose firm and ripe tomatoes. When tomatoes are not in season, you could use cherry tomatoes instead.
Pro tip:
De-seed the tomatoes: Scoop out the seeds to prevent excess liquid from making the salad soggy.
Onion
I prefer using red onions in my tabouli salad, for the flavor and the pop of color. A lot of versions use the white and green portion of green onion stalks. Some only use the green portion. Some folks also use white onion. You could also use shallots or chives for that onion flavor. As I’ve said, every household has their own version of this salad. So feel free to use whatever you prefer.
Lemon juice
Use fresh always! The bottled stuff is just not cut out for this salad.
Pro tip:
Be generous with the lemon juice: Tabouli salad should not be dry, it needs to have enough moisture but not be soggy. The bright flavor of the lemon complements the peppery flavor of the parsley and also softens the herbs. For an extra lemony flavor, you could also use the lemon zest.
Olive oil
Use a good quality extra-virgin olive oil!
Salt and freshly cracked pepper
To season!
Pro tip:
Hold off the salt if you intend to refrigerate it for a longer period of time: The salt will draw out excess moisture from the vegetables, and make the salad watery. You can add the salt an hour before you intend to serve it. Or check out this handy make-ahead tip if you want to make this a couple of days in advance.
Spices and other ingredients
Some versions of tabouli call for seven spices. You could also add a pinch of either of these spices: allspice, sumac, coriander, cloves, cinnamon, or baharat spice mix. Add a pinch of cayenne for some kick, if you like.
Some versions also call for pomegranate molasses or juice. I’ve skipped adding any of these. But if you have these ingredients lying around, you could probably try adding them.
I like to keep my tabouli salad simple because I mostly serve it with other dishes that are already packed with a lot of spices. So this salad adds a nice, refreshing element to the whole meal.

You will love this Lebanese tabbouleh salad recipe because
- Easy to make with a few ingredients that are available year-round
- A super refreshing salad with herby and zesty flavors
- It is healthy since it loaded with a chock full of highly nutritious ingredients that are good-for-you
- Vegan-friendly
- Can be easily customized to make it gluten-free
How to make tabouli salad – Step by step instructions
Step 1: Soaking bulgur for tabouli
Place 1/4 cup of fine bulgar in a bowl, add 1/4 cup of hot water, cover and soak for 5 minutes.
I used the medium variety and soaked it for 30 minutes. Drain, squeeze the bulgar well to remove excess moisture. While the bulgar is soaking, start chopping the other ingredients.

Soakedbulgur
Step 2: Prep the rest of the ingredients for the salad
Chop off the thick stems of 2 bunches of parsley. I like to leave some of the tender stalks because they are flavorful. But feel free to just use the leaves. Chop the parsley finely. Chop the mint leaves finely, do not use the stems. You should have about 3 cups of chopped parsley leaves and 1/4 cup of chopped mint leaves for this recipe.

Core 2 medium tomatoes, cut lengthwise into halves, de-seed, and dice into small pieces.

Also, dice 1/2 a red onion finely.

Step 3: Add all the ingredients in a bowl and mix
Place the chopped parsley in a big bowl, add mint leaves, diced tomatoes, red onions, and drained bulgar.
Add 4 tablespoons each of lemon juice and olive oil along with 1/2 teaspoon of kosher salt, and 1/4 teaspoon of freshly cracked black pepper. Toss to combine well. Taste and adjust with more salt or lemon juice, as needed.

Step 4: Refrigerate for at least an hour
Refrigerate the tabouli for at least an hour before serving. Check once again for salt and lemon juice, and adjust if needed right before serving. Tabouli salad is best served chilled or at room temperature, never warm.
Store leftovers in an airtight container in the fridge for up to 1-2 days, drain excess liquid if any as that will make the salad watery.

Notes
- You can substitute the red onion with 2-3 stalks of green onion, dice up the white and green portion finely.
- If you don’t care much for parsley, feel free to increase the quantity of the bulgar wheat.
Serving suggestions
You can enjoy Tabouli salad the way it served traditionally, by scooping in crisp, Romaine lettuce leaf and eaten with hands. You could also serve it as a part of mezze along with hummus, falafel, baba ganoush, etc. It is also great with baked pita chips.
Or serve it as a side along with kabobs, grilled meat, grilled halloumi, grape leaves, kibbeh, etc
Make-ahead
If you like to serve the salad after 2-3 days, it is best to prep up the components and then assemble it an hour before serving.
Soak the bulgar, drain and refrigerate it. Wash, dry, and chop all of the ingredients and place them in a dry bowl. Cover with a cling wrap or with a lid. When you are ready to serve, add the bulgar, salt, olive oil, and lemon juice, mix and refrigerate for an hour before serving.
Can you freeze this salad?
No, I do not recommend freezing this salad. The texture will change, the herbs and veggies will turn limp and wilt. It is best to enjoy this within 2 days or follow the make-ahead alternative mentioned above.
Switch it up
This beloved Levantine salad is great just as it is. But, like always, I’d like to list a few variations, which we also love. I know purists will disapprove of any of these, but if you are in an experimental mood, you could probably try one of these options.
- Lentils: Use green or brown lentils, about 1/4 to 1/2 cup of dry lentils, depending on the proportion of lentil to parsley you’d like. Cook until they are tender, yet firm to the bite, as per package instructions. Let it cool, add it to the rest of the ingredients.
- Farro: Use a 1/4 cup of farro instead of bulgar. The ratio of farro to water is 1:3. So combine 1/4 cup farro and 3/4 cup water in a saucepan, bring to boil, reduce the heat to low, cover and simmer until the farro is tender. Once it has cooled down completely, squeeze out excess moisture and add it to the rest of the ingredients. Farro is not gluten-free.
- Millet: This is yet another fantastic, grain-free alternative to bulgar in this salad. I like to use a 1:2 ratio to cook millet when it comes to pilaf or salad. I also suggest toasting the millet for a few minutes before cooking it. Again, you could use 1/4 cup or more of millet.
- Basil: Try substituting 1/2 of the parsley with finely chopped basil leaves.
- Cucumber: Though not part of the traditional Lebanese recipe, some of the Syrian and Egyptian versions include it, and I think it adds a nice crunch to this salad. If you do choose to add cucumber, use 2-3 Persian cucumbers or 1/2 of an English cucumber, these are seedless and have a thin skin. If using regular cucumbers, peel, remove the seeds, and dice it up.
- Chickpeas or other beans: Add a 15-oz can of rinsed and drained chickpeas or other beans like black beans, kidney beans, etc. This would make for a healthy and filling lunch to take to work.
- Pomegranate: You can throw in about a 1/4 cup of pomegranate arils to add some color and texture to the salad.
You may also enjoy these salad recipes
- Strawberry Spinach Salad
- Caprese Salad
- Watermelon Cucumber Feta Salad
- Mediterranean Quinoa and Chickpea Salad
- Blood Orange Salad with blood orange dressing
- Greek salad
You can also follow me on Facebook , Pinterest, Instagram & Twitter

Tabouli Salad {Lebanese Tabbouleh Salad}
Ingredients1x2x3x
- About 3 cups finely chopped parsley, 2 bunches of flat-leaf parsley
- 1/4 cup loosely packed chopped mint leaves, or 2 teaspoons of dried mint
- 1/4 cup bulgar wheat #1
- 2 medium tomatoes
- 1/2 cup finely chopped red onion
- 4 tablespoons lemon juice, or more to taste
- 4 tablespoons olive oil, or more to taste
- 1/2 teaspoon Kosher salt, or to taste
- 1/4 teaspoon freshly cracked black pepper, optional
Instructions
- Place 1/4 cup of fine bulgar in a bowl, add 1/4 cup of hot water, cover and soak for 5 minutes. I used the medium variety and soaked it for 30 minutes. Drain, squeeze the bulgar well to remove excess moisture. While the bulgar is soaking, start chopping the other ingredients.
- Chop off the thick stems of the parsley. I like to leave some of the tender stalks because they are flavorful. But feel free to just use the leaves. Chop the parsley finely. Chop the mint leaves finely, do not use the stems.
- Core the tomatoes, cut lengthwise into halves, deseed, and dice into small pieces.
- Also, dice the red onion finely.
- Place the chopped parsley in a big bowl, add mint leaves, diced tomatoes, red onions, and drained bulgar.
- Add lemon juice, olive oil, kosher salt, and black pepper. Toss to combine well gently. Taste and adjust with more salt or lemon juice, as needed.
- Refrigerate the tabouli for at least an hour before serving. Check once again for salt and lemon juice, and adjust if needed right before serving. Tabouli salad is best served chilled or at room temperature, never warm.
- Store leftovers in an airtight container in the fridge for up to 1-2 days, drain excess liquid if any as that will make the salad watery.
Notes
- You can substitute the red onion with 2-3 stalks of green onion, dice up the white and green portion finely.
- If you don’t care much for parsley, feel free to increase the quantity of the bulgar wheat.
- Nutrition Disclaimer: Nutrition values listed are estimates calculated using an online nutrition calculator. If you rely on them for your diet, please use your preferred nutrition calculator.
- Measuring cup used, 1 cup = 250 ml, 1 teaspoon = 5 ml
Nutrition

Tabouli Salad {Lebanese Tabbouleh Salad}
Ingredients
- About 3 cups finely chopped parsley, 2 bunches of flat-leaf parsley
- 1/4 cup loosely packed chopped mint leaves, or 2 teaspoons of dried mint
- 1/4 cup bulgar wheat #1
- 2 medium tomatoes
- 1/2 cup finely chopped red onion
- 4 tablespoons lemon juice, or more to taste
- 4 tablespoons olive oil, or more to taste
- 1/2 teaspoon Kosher salt, or to taste
- 1/4 teaspoon freshly cracked black pepper, optional
Instructions
- Place 1/4 cup of fine bulgar in a bowl, add 1/4 cup of hot water, cover and soak for 5 minutes. I used the medium variety and soaked it for 30 minutes. Drain, squeeze the bulgar well to remove excess moisture. While the bulgar is soaking, start chopping the other ingredients.
- Chop off the thick stems of the parsley. I like to leave some of the tender stalks because they are flavorful. But feel free to just use the leaves. Chop the parsley finely. Chop the mint leaves finely, do not use the stems.
- Core the tomatoes, cut lengthwise into halves, deseed, and dice into small pieces.
- Also, dice the red onion finely.
- Place the chopped parsley in a big bowl, add mint leaves, diced tomatoes, red onions, and drained bulgar.
- Add lemon juice, olive oil, kosher salt, and black pepper. Toss to combine well gently. Taste and adjust with more salt or lemon juice, as needed.
- Refrigerate the tabouli for at least an hour before serving. Check once again for salt and lemon juice, and adjust if needed right before serving. Tabouli salad is best served chilled or at room temperature, never warm.
- Store leftovers in an airtight container in the fridge for up to 1-2 days, drain excess liquid if any as that will make the salad watery.
Notes
- You can substitute the red onion with 2-3 stalks of green onion, dice up the white and green portion finely.
- If you don’t care much for parsley, feel free to increase the quantity of the bulgar wheat.
- Nutrition Disclaimer: Nutrition values listed are estimates calculated using an online nutrition calculator. If you rely on them for your diet, please use your preferred nutrition calculator.
- Measuring cup used, 1 cup = 250 ml, 1 teaspoon = 5 ml
Nutrition
These Oven Baked Buffalo Wings are super crispy and fall-off-the-bone tender. After trying this technique of cooking chicken wings in the oven, you will never go back to the traditional method of deep frying them ever again! Serve with blue cheese dip and celery sticks.

I have always enjoyed chicken wings in the form of lollipops , a popular Indian-Chinese appetizer. The wings are frenched, the meat is pushed down to one end of the bone to make it appear like a lollipop. These lollipops are coated in a seasoned cornstarch batter, deep-fried, and served with a spicy schezwan sauce .
I was introduced to these buffalo chicken wings after moving to the US. And I really loved those crispy wings smothered with spicy, tangy and buttery buffalo sauce. What’s not to love about crispy, fried food? 😀
- Why is it called a buffalo wing?
- The best way to make crispy chicken wings at home- Bake them!
- Ingredients needed to make baked hot wings?
- Tips to make the best crispy hot wings in the oven
- How to make oven baked buffalo wings at home – Step by step instructions
- Why you will love this homemade oven baked hot wings
- Oven Baked Buffalo Wings
Why is it called a buffalo wing?
The name has nothing to do with a buffalo! The dish gets its name from the place it originated, at the Anchor Bar in Buffalo, New York, by Teressa Bellissimo, who owned the bar with husband Frank in 1964. (Source- Wikipedia )
Chicken wings are the go-to food for those long-awaited game days or game nights, or any party for that matter. As my husband says ‘A bowl of spicy wings and a frosty beer, makes my game night dear’ 😀
The best way to make crispy chicken wings at home- Bake them!
While I enjoy my fair share of fried food when we dine out, I really really hate deep-frying anything at home, unless I have to as a last resort. I hate all that mess, grease, excess oil (by the way, never ever discard it down the drain), the smell lingering in the kitchen, and don’t even get me started on the calories.
Let’s be realistic, you really can’t bake everything that calls for deep-frying. Sometimes, there is absolutely no substitute. But these no-fry buffalo wings are a delicious exception to that rule.
The first time I tried this new technique of baking hot wings in the oven, it really blew my mind. The recipe calls for the use of baking powder and trust me it is the magic ingredient that makes all the difference. They were that good and crispy and the best part was no extra calories.
The only time-consuming part of this recipe, though not laborious per se, is separating the wings into the flats, also known as wingettes and drumettes. Other than that, there is hardly anything else to do. To make this recipe practically effortless, simply buy the party style wings from your local vendor.
Because this recipe for homemade baked buffalo wings is so darn easy, you can;
A. Indulge in one of your favorite restaurant foods more often in the comfort of your home.
B. Enjoy it guilt-free 🙂
These are seriously the best crispy oven baked chicken wings I’ve ever made! With this method, making buffalo wings at home is easier than you think and I promise you won’t miss the deep-fried ones at all!
You can enjoy these crispy, oven-baked buffalo wings with other wing sauces like BBQ, Asian, honey garlic, etc to name a few! Just follow the same technique of baking the wings and switch it up as you desire.

Ingredients needed to make baked hot wings?
There are 2 components in this recipe;
- The baked wings
- Buffalo sauce
Baked wings:
- Whole wings or party style wings
- Baking powder: The secret ingredient in this recipe that makes these wings extra crispy.
- Salt and pepper
These oven baked buffalo wings do not need flour or cornstarch, which also makes them gluten-free! Just make sure the baking powder you use is free from gluten. You can also season the wings with garlic powder, smoked paprika, etc.
For the buffalo sauce:
It is so easy to make your own buffalo sauce at home, as you can customize it to suit your taste. You just need;
- Cayenne pepper sauce such as Frank’s Red Hot
- Melted unsalted butter
Mix these two ingredients in a bowl, add the baked wings and toss to coat! Easy-peasy! Although, if you are in the mood to cheat a little, you can use Frank’s buffalo wing sauce or any other bottled buffalo sauce will work just as well 🙂
You can also add an optional ingredient i.e honey or brown sugar , or stevia or monk fruit or other such sweeteners for a keto version. Though honey is not traditionally used in the classic buffalo sauce recipe, I like the touch of sweetness it adds.
Tips to make the best crispy hot wings in the oven
Before we head on to the recipe, I’d like to share some important tips to make some delicious, extra crispy buffalo wings!
Make sure the wings are absolutely dry
Use paper towels to pat dry the wings, squeezing out excess moisture. This will ensure they are completely dry and the skin turns ultra-crispy on baking instead of steaming.
Aluminum-free baking powder
The baking powder helps draw out excess moisture to the surface and dries out the skin so that they turn super crispy on baking while the inside still remains moist and juicy.
Try and use aluminum-free baking powder to avoid that metallic after-taste.
Use an oven-safe rack
It is essential to line the baking sheet with a rack for 2 simple reasons;
- To catch the drippings
- For even heat flow
The rack elevates the wings so that they don’t sit on the grease that drips below. This allows the wings to turn crispy on all sides. I also line my tray with aluminum foil, makes clean up a breeze 🙂
Use a hot sauce of your choice
For that true classic flavor, I love to use Franks’s red hot sauce. I like the fact that the sauce is not too spicy, but has just the right amount of kick and tang. Feel free to use any hot sauce like Tabasco, Cholula, Sriracha, etc of your choice.
I’d also like to share another handy tip. Before dredging the baked wings, do a taste-test of the prepared sauce to see if it is to your liking.
A 1:1 ratio of hot sauce and butter works well for us. If you want more heat, increase the ratio of hot sauce. If it is too spicy, add more butter and/or honey or brown sugar.
Bake the wings first, then coat with the sauce
For best results, bake the wings without the sauce. The wings will not crisp up if you douse them in sauce, besides the sauce might also get burnt.

How to make oven baked buffalo wings at home – Step by step instructions
Step 1:Prepare the baking sheet and the chicken wings
Adjust oven rack in the upper-middle position. Preheat the oven to 400°F. Line a rimmed baking sheet with aluminum foil, place an oven-safe, nonstick rack on top. Grease the rack with cooking spray or oil.
In a large bowl, add 2 pounds of chicken wings. Pat dry with kitchen paper napkins, squeeze out as much moisture as possible. Add 2 teaspoons of baking powder, 1/2 teaspoon of kosher salt, and 1/2 teaspoon of freshly cracked pepper and toss to coat the wings evenly.

Step 2: Bake
Place the wings in a single layer. Bake for 30 minutes, flip and cook the other side for another 20-25 minutes or until the chicken wings cook through and the skin turns golden brown and crispy.

Step 3: Make buffalo sauce and toss the wings with it
While the wings are baking, you can prep up the buffalo sauce. In a large bowl, add 1/4 cup each of melted butter and hot sauce, 2 teaspoons of honey or brown sugar. Mix until well combined and set aside.
Add baked wings and toss to coat. If you do not like coating the wings with the sauce, you can serve them separately with the buffalo sauce on the side.
I served these wings with my homemade blue cheese dip and celery sticks, but you could also serve it with Ranch if that’s what you prefer.

Notes
- If you have time to spare, you can place the baking sheet with the wings in the refrigerator, uncovered, for 8 hours to overnight. This will dry out the skin completely. But it works just as well without the extra step.
- If using frozen wings, thaw and then proceed with the recipe. It is important to pat dry the wings thoroughly.
- You can easily double or triple this recipe as per your needs.
- We prefer our baked wings pretty saucy. Add as much of the prepared buffalo sauce you’d like, or return the glazed wings onto the rack again and broil on low for 2-3 minutes or until the sauce has caramelized. Keep an eye while broiling.
- You can also air-fry the wings at 400°F for 25 minutes, tossing them every 5 to 7 minutes, or until the chicken wings cook through and the skin turns crispy.
- Leftovers: These oven baked buffalo wings are best eaten as soon as they are tossed in the sauce. They will remain crisp for some time after pouring the sauce, but eventually, they will begin to lose their crispiness. If you have leftovers, store it in an airtight container, and refrigerate for up to 3 to 4 days.
- To freeze: Place the wings in a freezer-safe bag, squeeze out excess air, seal the bag, label, lay the bag flat so each that the wings are not sticking to each other, and freeze up to 1 month. Alternatively, you can also freeze the wings on a baking sheet for 1-2 hours, then place them in containers or freezer-safe bags. Thaw in the refrigerator overnight.
- To reheat: Once thawed, place the wings on a rack over the rimmed baking sheet and reheat in a preheated oven at 350° F for 15-20 minutes or until heated through. You can also reheat wings in the air fryer at 400°F for 6-8 minutes or until heated through. Do keep in mind that the wings will not turn crispy like before because they are coated with the sauce.
- Make-ahead: Bake the wings as directed in the instructions above. Once it cools down, transfer them to an airtight container and refrigerate until ready to eat. Reheat in the oven at 400°F on a rack over a rimmed baking sheet for 10-15 minutes to crisp them up again.
Why you will love this homemade oven baked hot wings
- The skin is crispy and the meat is so flavorful, tender and juicy, everything you’d want from a chicken wing!
- Easy cleanup, no stress of having to deal the mess, leftover oil, and the fried smell lingering in the kitchen for days
- So convenient and much more economical to whip up a batch at home.
- Fewer calories = less guilt 😀

You can also follow me on Facebook , Pinterest, Instagram & Twitter

Oven Baked Buffalo Wings
Ingredients1x2x3x
- 2 lb chicken wings, separated into flats and drumettes, reserve the tips for homemade stock
- 2 teaspoons aluminum-free baking powder, do not substitute with baking soda
- 1/2 teaspoon kosher salt
- 1/4 to 1/2 teaspoon freshly cracked black pepper
For the buffalo wing sauce
- 1/4 cup melted unsalted butter
- 1/4 cup Frank’s red hot sauce, or any other hot sauce of choice
- 2 teaspoons honey or brown sugar, optional
To serve
- Homemade blue cheese dip or store-bought
- Celery sticks
Instructions
- Adjust oven rack in the upper-middle position. Preheat the oven to 400°F. Line a rimmed baking sheet with aluminum foil, place an oven-safe, nonstick rack on top. Grease the rack with cooking spray or oil.
- In a large bowl, add chicken. Pat dry with kitchen paper napkins, squeeze out as much moisture as possible. Add baking powder, salt, and pepper, whisk to combine well. Add the wings and toss to coat evenly.
- Place the wings in a single layer. Bake for 30 minutes, flip and cook the other side for another 20-25 minutes or until the chicken wings cook through and the skin turns golden brown and crispy.
- While the wings are baking, you can prep up the buffalo sauce. In a large bowl, add melted butter, Hot sauce, and honey or brown sugar. Mix until well combined and set aside.
- Add the baked wings and toss to coat.
- Serve with blue cheese dip and celery sticks.
Notes
- If you have time to spare, you can place the baking sheet with the wings in the refrigerator, uncovered, for 8 hours to overnight. This will dry out the skin completely. But it works just as well without the extra step.
- If using frozen wings, thaw and then proceed with the recipe. It is important to pat dry the wings thoroughly.
- You can easily double or triple this recipe as per your needs.
- We prefer our baked wings pretty saucy. Add as much of the prepared buffalo sauce you’d like, or return the glazed wings onto the rack again and broil on low for 2-3 minutes or until the sauce has caramelized. Keep an eye while broiling.
- You can also air-fry the wings at 400°F for 25 minutes, tossing them every 5 to 7 minutes, or until the chicken wings cook through and the skin turns crispy.
- Leftovers: These oven baked buffalo wings are best eaten as soon as they are tossed in the sauce. They will remain crisp for some time after pouring the sauce, but eventually, they will begin to lose their crispiness. If you have leftovers, store it in an airtight container, and refrigerate for up to 3 to 4 days.
- To freeze: Place the wings in a freezer-safe bag, squeeze out excess air, seal the bag, label, lay the bag flat so each that the wings are not sticking to each other, and freeze up to 1 month. Alternatively, you can also freeze the wings on a baking sheet for 1-2 hours, then place them in containers or freezer-safe bags. Thaw in the refrigerator overnight.
- To reheat: Once thawed, place the wings on a rack over the rimmed baking sheet and reheat in a preheated oven at 350° F for 15-20 minutes or until heated through. You can also reheat wings in the air fryer at 400°F for 6-8 minutes or until heated through. Do keep in mind that the wings will not turn crispy like before because they are coated with the sauce.
- Make-ahead: Bake the wings as directed in the instructions above. Once it cools down, transfer them to an airtight container and refrigerate until ready to eat. Reheat in the oven at 400°F on a rack over a rimmed baking sheet for 10-15 minutes to crisp them up again.
- Inspired by Serious Eats
