This fresh strawberry mousse is light, fluffy, delicious, and bursting with strawberry flavor! Made with just 4 ingredients, this mousse is the perfect dessert to be served for any occasion! Eggless and gelatin-free!

If you are looking for an easy, eggless, no-bake dessert for Valentine’s or simply to welcome Spring, then you will love this refreshing strawberry mousse recipe. It is airy and creamy with the perfect balance of fruity strawberry flavor that is not overly sweet and neither is it too tart!
Each spoonful of this luscious strawberry mousse is like savoring a fluffy cloud of creamy strawberry goodness!
Strawberries are in season for a very short time in India, from late November to early March. So I’m making the best of these seasonal strawberries.
This eggless strawberry mousse is a big hit with my family! It was polished off as soon as I was done taking the pictures!
Now that the market is flooded with strawberries, I really hope you will make some and enjoy it as much as my family does!

- Why you will love this recipe?
- Ingredients required
- How to make eggless strawberry mousse – Step-by-step process
- Storage instructions
- Recipe tips
- Variations
- Frequently asked questions
- You may also enjoy these strawberry recipes
- Strawberry Mousse (Without Gelatin)
Why you will love this recipe?
This creamy strawberry mousse;
☑ Is an easy, 4-ingredient, beginner-friendly recipe
☑ Is one of the simplest seasonal strawberry-based desserts
☑ Looks elegant
☑ Is bursting with strawberry flavor
☑ Is made without dairy, gelatin, agar-agar, or eggs
☑ Can be made ahead making it perfect for entertaining
☑ Makes for a great date night dessert
Ingredients required
To make this mousse, you will need the following ingredients,
Strawberries: Use fresh, sweet, plump, and ripe strawberries for the best-tasting mousse.
Whipping cream: I’ve used non-dairy whipping cream, which forms the base of the mousse! Make sure it’s cold before you start whipping it.
Sugar: I’ve used castor sugar, regular granulated sugar will also work fine. The quantity of sugar can be adjusted depending on the tartness of the strawberries.
Lemon juice : The acidity of the lemon juice balances the sweetness and enhances the flavor of the strawberries giving the sauce a depth of flavor.
Garnishes: I’ve garnished this mousse with whipping cream and strawberry halves. You can also use grated chocolate, edible flowers, mint leaves, etc.

How to make eggless strawberry mousse – Step-by-step process
Step 1: Prepare the strawberry reduction sauce
Add 450 grams of roughly chopped strawberries into a blender. Blend to a smooth puree. You should end up with approx 2 cups of strawberry puree. (Photos 1 and 2)
Pro tip: You may strain the puree for a smoother mousse. I left it as such since I don’t mind it.
Transfer the puree to a saucepan, and add 1/3 cup of castor sugar and 2 teaspoons of lemon juice. (Photos 3 and 4)
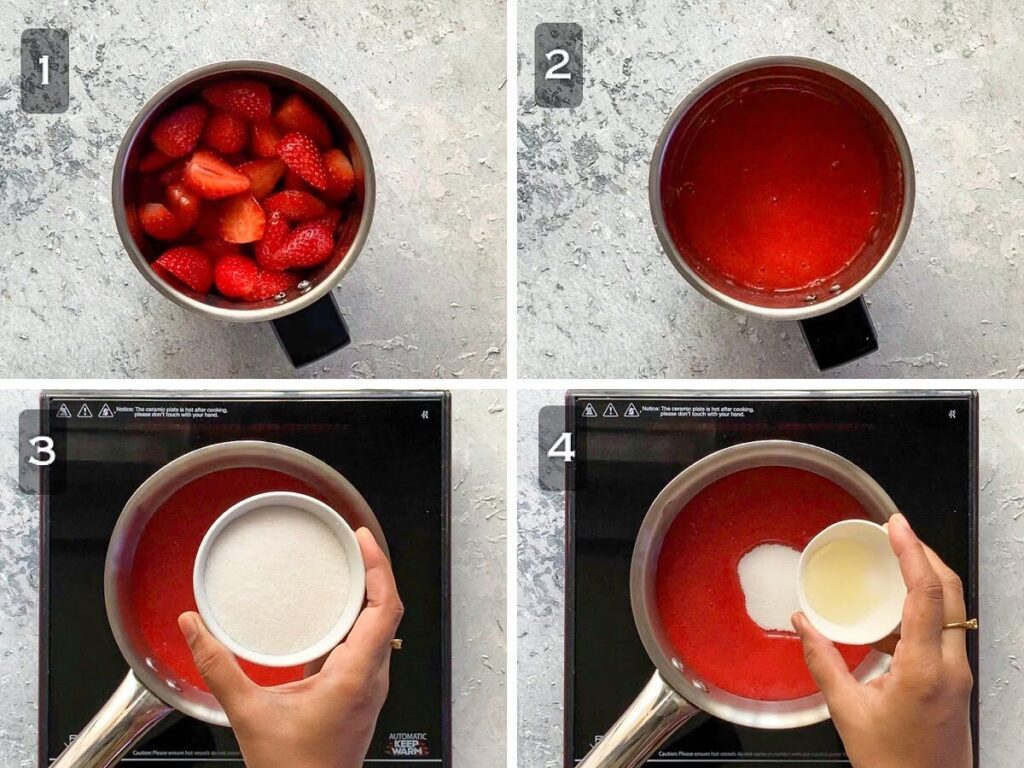
Mix well and bring to a boil over medium heat, stirring occasionally.
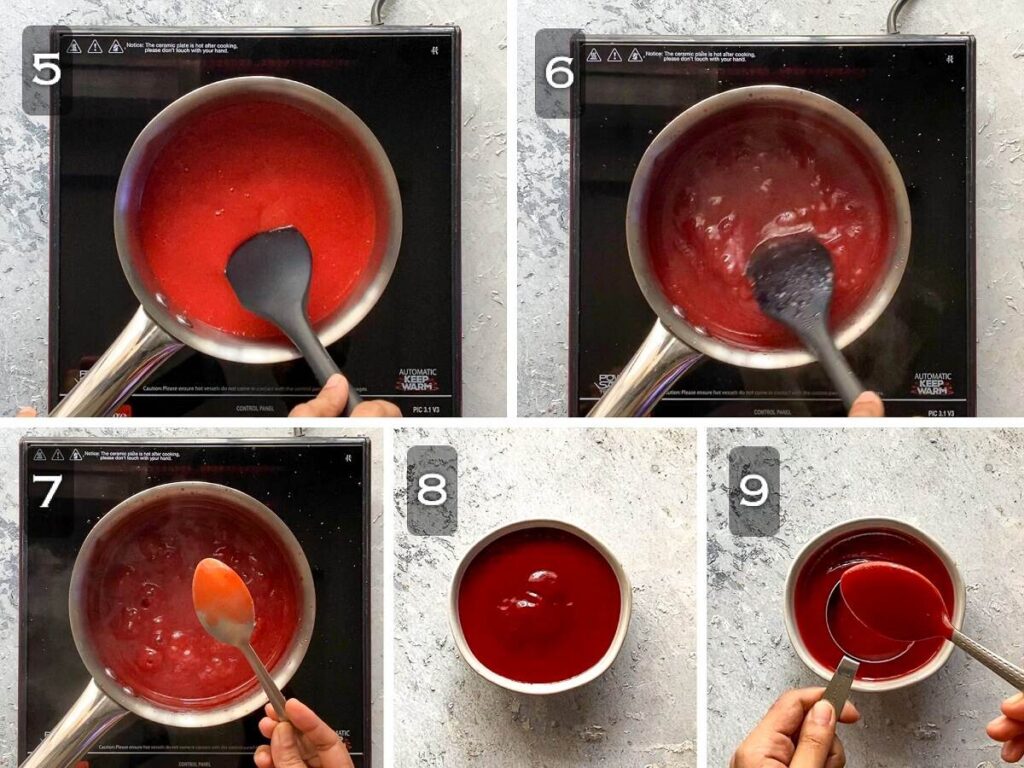
Reduce the heat to medium-low, and continue cooking, stirring often, until it thickens and coats the back of a spoon. The sauce should reduce to 1 cup (250 grams). (Photos 5 to 7)
It takes approximately 8 to 10 minutes. You may skim off any foam that rises to the surface.
Transfer to a bowl and reserve 1/4 cup of the sauce and set aside to cool completely. (Photos 8 and 9)
Refrigerate the sauce for another 1-2 hours. It will thicken further on cooling.
Step 2: Whip the heavy cream
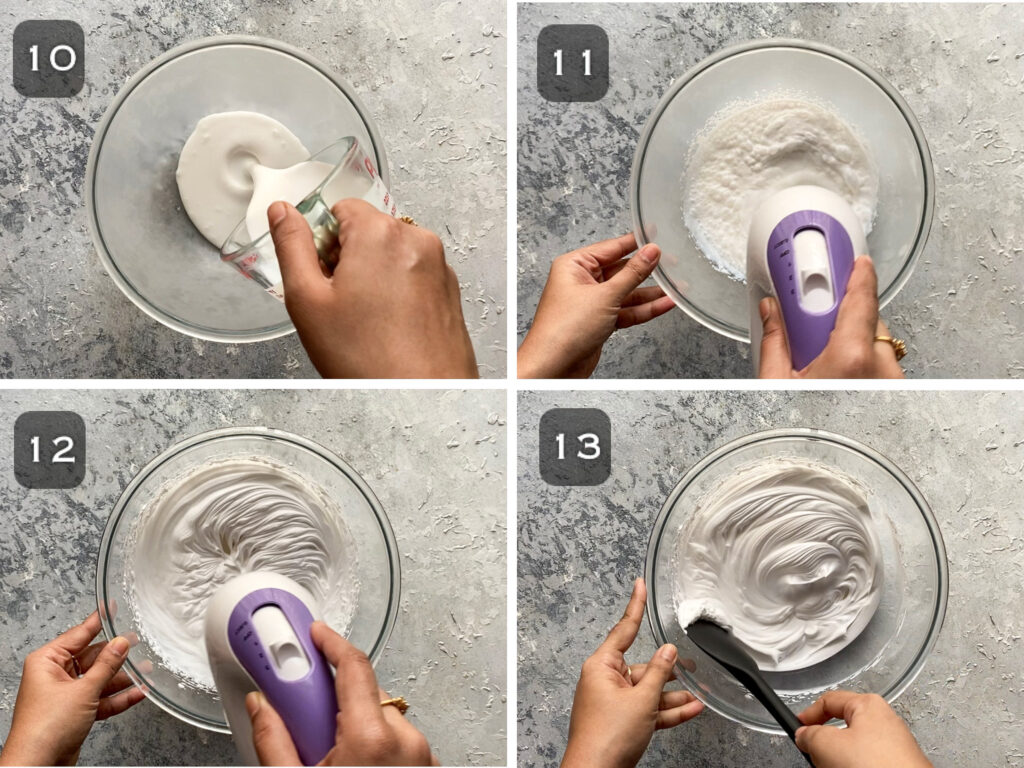
Add chilled whipping cream into a chilled mixing bowl. (Photo 10)
Whip on medium-high speed until it reaches the stiff peak consistency. (Photos 11 to 13)
The cream stays put and doesn’t move when you invert the bowl.
Note: Non-dairy whipping cream is already sweet, hence I’ve skipped adding extra sugar.
Step 3: Fold the strawberry reduction into the cream
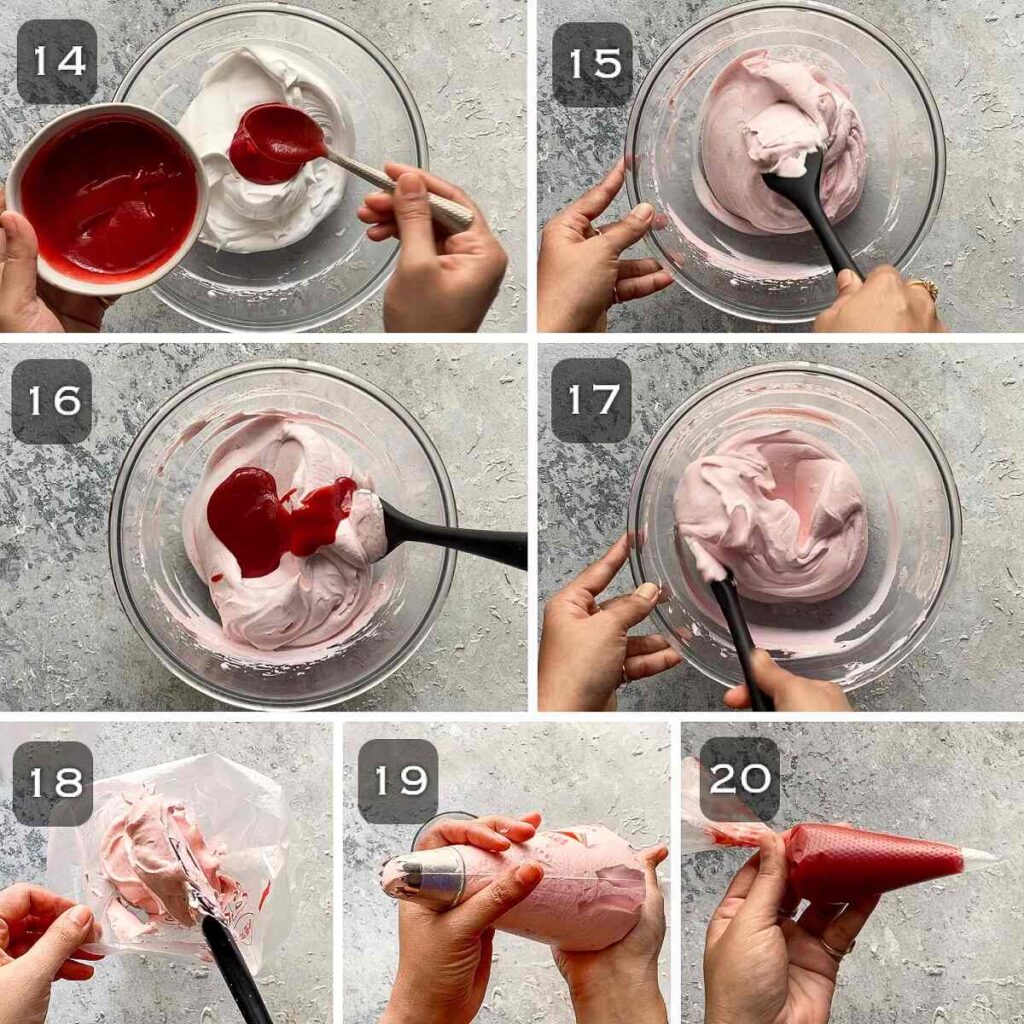
Add the cooled strawberry sauce to the whipped cream in two batches, and fold it gently. (Photos 14 to 17)
Transfer the mousse to a piping bag fitted with a large, closed star nozzle or any other nozzle of your choice. You may skip the nozzle, and simply snip off the tip. (Photos 18 and 19)
Also, transfer the reserved strawberry reduction to a piping bag and snip off the tip just before you are ready to pipe. (Photo 20 )
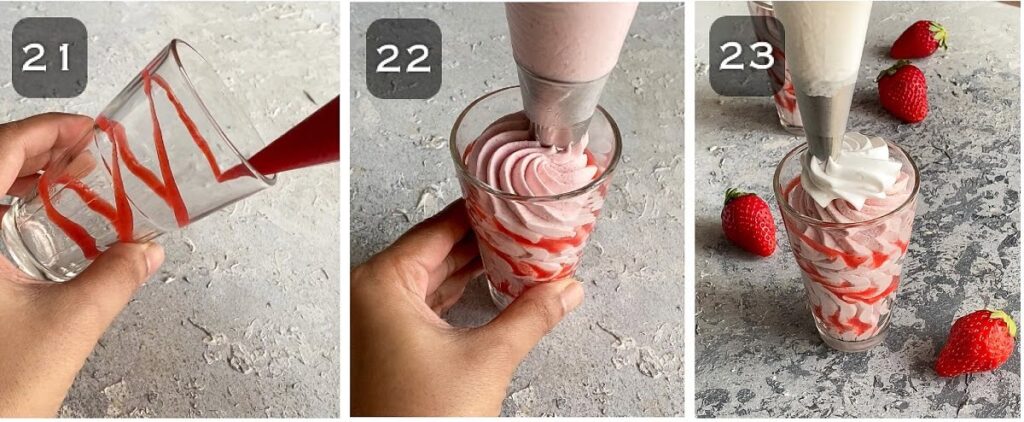
Step 4: Pipe the mousse into serving glasses
Drizzle strawberry reduction along the insides of the glass. (Photo 21)
Pipe the mousse into desired serving bowls/cups or jars. (Photo 22)
Cover with cling wrap or lids if using jars, and refrigerate for about 3 to 4 hours or overnight for best results.
When you are ready to serve, top with more whipped cream, and strawberry halves! Enjoy! (Photo 23)
Storageinstructions
Freeze: You may freeze the mousse in freezer-safe jars (like Ball Mason jars) for up to 2 months. This makes for a delicious frozen strawberry mousse. You could also thaw it overnight in the refrigerator but be sure to consume it within a day.
Recipe tips
Strawberry reduction sauce is a must: Do not be tempted to use the fresh strawberry puree as such. You have to cook it down to a thick sauce! Cooking down the mixture removes the moisture in the puree allowing for a thick, luscious sauce with concentrated strawberry flavor! The resultant mousse is also fluffy, and creamy, and holds its shape without any stabilizers.
Refrigerate the strawberry reduction before folding it with whipped cream: This helps the mousse set well and hold its shape.
Chill the bowl and beaters: Chilling the bowl and beaters/whisk in the fridge or freezer for at least 20 to 30 minutes will ensure that the cream whips up faster.
Variations
Mixed berries: Instead of strawberries, you can use a mix of other berries like blueberries, raspberries, blackberries, mulberries, etc. Blend the berries to a smooth puree and prepare the reduction sauce as mentioned above. Do strain the puree if using other berries to get rid of the seeds.
Jam or strawberry crush: If you want to make this a no-cook recipe, you can use a good quality strawberry jam or strawberry crush. Since store-bought jams are quite sweet, start with 1/4 cup of jam or crush and add more as needed until you are satisfied with the sweetness and strawberry flavor.
Layered dessert: You can make alternate layers of biscuits crumbs or cake pieces, mousse, and strawberry compote or reduction sauce in dessert cups or glasses. That way you can stretch this recipe to yield more servings.
Nuts: You can top it with slivered almonds or pistachios to add some crunch.
Vanilla/strawberry extract: You can flavor the whipped cream with vanilla or strawberry extract for more strawberry flavor.

Can I make this recipe with heavy cream?
Yes, you can! Make sure that it has a minimum of 36% milk fat. Do not overbeat the cream, or you will end up with butter. You will also need to add at least 2 tablespoons of sifted icing sugar to sweeten the cream.
I tried this recipe with Amul cream containing 30% fat and I couldn’t pipe the mousse. I just spooned it into serving glasses. It failed to set well on refrigeration and had a sort of runny consistency. It did have a better texture when frozen though.
Heavy cream with 36% milk fat or anything above that should work much better.
Can I make this mousse with frozen strawberries?
Yes, absolutely! Frozen strawberries are usually packaged at the peak of ripeness and hence they are great to be used in this recipe. So it’s a great dessert to make all year round 😀
Thaw the strawberries, blend to a smooth puree, and follow the recipe for the sauce as you would with fresh strawberries.
Can I use this as icing for cakes/cupcakes?
Yes, this strawberry mousse made with non-dairy whipping cream is pretty stable to be used as a filling or to pipe swirls.
If you prefer to use dairy heavy cream instead, I’d suggest stabilizing it with gelatin or agar agar if you intend to use it as a frosting.

You may also enjoy these strawberry recipes
Strawberry fool
Strawberry lassi
Strawberry topping
Strawberry cream
I would love to hear from you! Please be sure to share your feedback and/or give this recipe a rating in the comment below. Your reviews help others know the recipe better too.
You can also FOLLOW me on Facebook , Pinterest, Instagram & Twitter

Strawberry Mousse (Without Gelatin)
Ingredients1x2x3x
- 450 grams strawberries, rinsed, drained, hulled, and roughly chopped
- 75 grams castor or granulated sugar, 1/3 cup
- 2 teaspoons lemon juice
- 250 ml whipping cream, I’ve used non-dairy
To garnish
- Sweetened whipped cream, optional, as needed
- Fresh strawberry halves or slices
Instructions
Prepare the strawberry reduction sauce
- Add roughly chopped strawberries into a blender. Blend to a smooth puree. You should end up with approx 2 cups of strawberry puree.
- Pro tip: You may strain the puree for a smoother mousse. I left it as such since I don’t mind it.
- Transfer the puree to a saucepan, add sugar and lemon juice.
- Mix well and bring to a boil over medium heat, stirring occasionally.
- Reduce the heat to medium-low, and continue cooking, stirring often, until it thickens and coats the back of a spoon. The sauce should reduce to 1 cup (250 grams).
- It takes approximately 8 to 10 minutes. You may skim off any foam that rises to the surface.
- Transfer to a bowl and reserve 1/4 cup of the sauce and set aside to cool completely.
- Refrigerate the sauce for another 1-2 hours. It will thicken further on cooling.
Whip the heavy cream
- Add chilled whipping cream into a chilled mixing bowl.
- Whip on medium-high speed until it reaches the stiff peak consistency.
- The cream stays put and doesn’t move when you invert the bowl.
Fold the strawberry reduction into the cream
- Add the cooled strawberry sauce to the whipped cream in two batches, and fold it gently.
- Transfer the mousse to a piping bag fitted with a large, closed star nozzle or any other nozzle of your choice. You may skip the nozzle, and simply snip off the tip.
- Also, transfer the reserved strawberry reduction to a piping bag and snip off the tip just before you are ready to pipe.
Pipe the mousse into serving glasses
- Drizzle strawberry reduction along the insides of the glass.
- Pipe the mousse into desired serving bowls/cups or jars.
- Cover with cling wrap or lids if using jars, and refrigerate for about 3 to 4 hours or overnight for best results.
- When you are ready to serve, top with more whipped cream, and strawberry halves! Enjoy!
Video
Notes
Nutrition

Strawberry Mousse (Without Gelatin)
Ingredients
- 450 grams strawberries, rinsed, drained, hulled, and roughly chopped
- 75 grams castor or granulated sugar, 1/3 cup
- 2 teaspoons lemon juice
- 250 ml whipping cream, I’ve used non-dairy
To garnish
- Sweetened whipped cream, optional, as needed
- Fresh strawberry halves or slices
Instructions
Prepare the strawberry reduction sauce
- Add roughly chopped strawberries into a blender. Blend to a smooth puree. You should end up with approx 2 cups of strawberry puree.
- Pro tip: You may strain the puree for a smoother mousse. I left it as such since I don’t mind it.
- Transfer the puree to a saucepan, add sugar and lemon juice.
- Mix well and bring to a boil over medium heat, stirring occasionally.
- Reduce the heat to medium-low, and continue cooking, stirring often, until it thickens and coats the back of a spoon. The sauce should reduce to 1 cup (250 grams).
- It takes approximately 8 to 10 minutes. You may skim off any foam that rises to the surface.
- Transfer to a bowl and reserve 1/4 cup of the sauce and set aside to cool completely.
- Refrigerate the sauce for another 1-2 hours. It will thicken further on cooling.
Whip the heavy cream
- Add chilled whipping cream into a chilled mixing bowl.
- Whip on medium-high speed until it reaches the stiff peak consistency.
- The cream stays put and doesn’t move when you invert the bowl.
Fold the strawberry reduction into the cream
- Add the cooled strawberry sauce to the whipped cream in two batches, and fold it gently.
- Transfer the mousse to a piping bag fitted with a large, closed star nozzle or any other nozzle of your choice. You may skip the nozzle, and simply snip off the tip.
- Also, transfer the reserved strawberry reduction to a piping bag and snip off the tip just before you are ready to pipe.
Pipe the mousse into serving glasses
- Drizzle strawberry reduction along the insides of the glass.
- Pipe the mousse into desired serving bowls/cups or jars.
- Cover with cling wrap or lids if using jars, and refrigerate for about 3 to 4 hours or overnight for best results.
- When you are ready to serve, top with more whipped cream, and strawberry halves! Enjoy!
Video
Notes
Nutrition
These baked vegan pumpkin donuts with cinnamon sugar are soft, fluffy, light, and moist! They are packed with warm spices and make for a delicious fall treat that the whole family will love!

These fluffy vegan pumpkin donuts are made using simple ingredients and are infused with the mild, earthy flavor of pumpkin and a blend of warm and fragrant spices like cinnamon, nutmeg, and cloves.
This vegan pumpkin donuts recipe is one of the simplest pumpkin treats you can whip up. It comes together pretty quickly, making it a great option to enjoy for breakfast or just as a snack.
Since these pumpkin donuts are baked and not fried, they have a cake-like texture and obviously cannot be compared to their deep-fried counterparts. But they are good in their own way!
Bursting with warm, spiced, sweet, fall flavors in every bite, these vegan pumpkin donuts will certainly bring to mind beautiful memories of the fall season!! Vegan or not, either way, you will love this recipe, so go give it a try 🙂

- Why should you try this recipe?
- Ingredients needed
- How to make vegan pumpkin donuts – Step-by-step process
- Serving suggestions
- Storage instructions
- Recipe Tips & Variations
- Frequently asked questions
- Vegan Pumpkin Donuts With Cinnamon Sugar
Why should you try this recipe?
These easy pumpkin donuts;
☑ Are the perfect fall treat
☑ Come together pretty quickly, about 10 minutes of prep is all you need
☑ Are baked hence no mess of deep-frying
☑ Don’t require any fancy equipment
☑ Are packed with warm and cozy flavors
☑ Are vegan
Ingredients needed
Here’s what you will need to make these vegan pumpkin donuts. Please note the complete list of ingredients with quantities is mentioned in the recipe card at the bottom of the post.
Flour: I’ve used homemade cake flour for this recipe but you can use store-bought cake flour as well. You may also make this recipe with just all-purpose flour, but the cake flour tends to yield donuts that are light and tender.
Leavening agents: Baking powder and baking soda.
Pumpkin puree: Be sure to use canned pumpkin and not pumpkin pie filling. Just like my eggless pumpkin bread , the pumpkin puree used here acts like an egg replacer for this recipe.
Sugar: I’ve used castor sugar. You may also use cane sugar or raw sugar. You can also swap the cane sugar with light or dark brown sugar or a mix of the two.
Oil: Use a neutral-flavored oil, I’ve used sunflower oil.
Buttermilk: I’ve used homemade buttermilk by curdling unsweetened soy milk with white distilled vinegar. You can also use lemon juice in lieu of vinegar.
Vanilla extract: Enhances the flavor of these donuts!
Pumpkin pie spice mix: Use store-bought mix or your own homemade blend.
Salt: Just a pinch, to bring out the flavor of the other ingredients.

How to make vegan pumpkin donuts – Step-by-step process
Step 1: Make vegan buttermilk
Preheat the oven to 350° F/180° C. Brush or grease a donut pan generously with oil or with oil spray. ( Photo 1 )
Add 1/2 tablespoon vinegar into a measuring cup, and add soy milk up to the 1/2 cup line. Mix well and set aside for a couple of minutes. It will curdle and thicken. Your homemade vegan buttermilk is ready to use. ( Photos 2 to 5 )

Step 2: Dry ingredients
In a large bowl, sift 1 cup cake flour, 1 teaspoon baking powder, ¼ teaspoon baking soda, ¼ teaspoon salt, and 1½ teaspoon pumpkin pie spice mix. ( Photos 6 to 10 )
Whisk the ingredients well with a wire whisk and set aside. ( Photo 11 )

Step 3: Wet ingredients
In a medium mixing bowl, add ⅓ cup pumpkin puree, ⅓ cup sugar, ½ cup buttermilk, 2 tablespoons oil, and 1 teaspoon vanilla extract. ( Photos 12 to 16 )
Whisk the wet ingredients until well incorporated. ( Photo 17 )

Step 4: Combine wet and dry ingredients
Pour the wet ingredients into the bowl containing the dry ingredients, and mix just until combined and no more flour pockets are visible. ( Photos 18 & 19 )
Avoid overmixing the batter as that can that will yield dry, chewy, and dense donuts.
Transfer the batter to a piping bag or use a resealable zip-top bag and snip off the tip of the bag. ( Photo 20 )

Step 5: Bake
Pipe the batter into the greased donut baking pan, filling each cavity about 3/4 full. Tap the pan on the counter to release air bubbles. ( Photos 21 & 22 )
Bake for 12 to 14 minutes, or until the top spring back when lightly pressed. ( Photos 23 & 24 )
Remove the pan from the oven and transfer to a wire rack to cool for 5 minutes. Turn them out onto the wire rack to cool completely. ( Photos 25 to 2 6)

Step 6: Cinnamon sugar coating
In a small, shallow bowl, whisk together 1/4 cup of sugar and 1 teaspoon of ground cinnamon until well combined. ( Photos 27 & 2 8)
Lightly brush the top and bottom of the donut with melted vegan butter, and twist to coat with cinnamon sugar. ( Photos 29 & 30)
You may only coat the top if desired if you don’t like them too sweet. Repeat with the rest of the donuts! ( Photo 32 )

Serving suggestions
These pumpkin spice donuts are best enjoyed warm with a cup of freshly brewed coffee, pumpkin spice latte, tea, or hot chocolate!
They are great for breakfast, snacking, or even for dessert!
Storage instructions
Though these vegan pumpkin donuts will keep well for up to 2 days, they are best enjoyed the day they are made.
Room temperature
- Allow the donuts to cool down completely. Place the donuts in a single layer in an airtight glass or plastic container.
- If there is more than 1 layer, separate the layers with parchment or wax paper to prevent them from sticking to each other.
- Store for up to 1 to 2 days in a cool, dry place.
- If it is hot and humid where you live, refrigerate the donuts.
- The longer you store them, the cinnamon sugar will become less crispy and may melt which will make the donuts soggy.
Freeze
- Once the donuts have cooled down completely, wrap individual donuts with cling film and place them in a freezer-safe bag or freezer-safe container.
- Label the contents and freeze them for up to 2 to 3 months.
- Thaw on the countertop for about 20 to 30 minutes before serving.
- Brush donuts with melted butter and sprinkle with cinnamon sugar just before serving.

Recipe Tips & Variations
Grease the pan: Do remember to grease your pan generously with oil or oil spray even if it is nonstick. This will help the baked donuts slide out easily. If they don’t slide out easily, gently nudge the donuts around the edges with the help of a spatula to loosen them. That should help them slide out of the pan.
Measure the flour correctly: For best results, I always suggest weighing your ingredients. If you don’t have a weighing scale, remember to use the spoon and sweep method of measuring flour. To do that, first fluff the flour in the container, then spoon it into your measuring cup until overflowing, and level it off with the back of a knife.
Pumpkin puree: Use pumpkin puree and not pumpkin pie filling. The latter is sweetened and will make the donuts too sweet. I haven’t tested this recipe with homemade pumpkin puree. I suggest using canned one for this recipe since homemade pumpkin puree tends to have more moisture and it can affect the outcome of the recipe.
To fill the donut pan: Use a Ziploc bag or piping bag to pipe the batter as it is mess-free.
Baking time: Baking time could vary from one oven to another. So keep an eye, overbaking will yield very dry, dense, and gummy donuts.
Sweetness: The donut itself is mildly sweetened since it is topped with a cinnamon sugar coating. If you intend to skip the coating, increase the sugar by another 2 to 3 tablespoons.
Try a different topping: Maple glaze, pumpkin spice sugar (use pumpkin spice mix instead of cinnamon), cream cheese glaze, and chocolate glaze are all great alternatives to spruce up these pumpkin spice donuts! It is best to have a thick glaze consistency here because the donuts absorb the thinner glaze in a couple of hours.

Can I make these pumpkin spice donuts without a donut pan?
You could simply use a standard muffin pan, and make muffins instead. You will just need to bake it for longer. Most standard muffins bake for 18 to 20 minutes. Check for doneness with a toothpick, if it comes out clean, they’re done. But then technically, they won’t be donuts.
You can also use a mini cupcake pan to make pumpkin donut holes.
I suggest investing in a donut pan since it is pretty inexpensive and also it is available at most stores or even online. It is so handy to make a batch of donuts when those donut cravings strike! Also, if you really detest deep-frying donuts, this is the pan you need to make your favorite donuts!
Can I double this recipe?
Yes, you can! If you have 2 donut pans or a bigger donut pan with 12 to 18 cavities, you can make a bigger batch.
Can I skip the oil in the recipe?
Yes, you can! Swap the oil with applesauce.
Can I make this recipe gluten-free?

Vegan Pumpkin Donuts With Cinnamon Sugar
Ingredients1x2x3x
Dry ingredients
- 1 cup cake flour 140 grams
- 1 teaspoon baking powder
- ¼ teaspoon baking soda
- ¼ teaspoon salt
- 1½ teaspoon pumpkin pie spice mix 3 grams
Wet ingredients
- ⅓ cup pumpkin puree 85 grams
- ⅓ cup castor/cane sugar 75 grams
- ½ cup unsweetened soy milk 125 ml
- ½ tablespoon distilled white vinegar 7.5 ml
- 2 tablespoons neutral flavored oil or melted vegan butter 28 grams
- 1 teaspoon vanilla extract 5 ml
Cinnamon sugar
- ¼ cup sugar 56 grams
- ½ tablespoon ground cinnamon or pumpkin pie spice
- 1½ tablespoons melted vegan butter 21 grams
Instructions
Make vegan buttermilk
- Preheat the oven to 350° F/180° C. Brush or grease a donut pan generously with oil or with oil spray.
- Add vinegar into a measuring cup, and add soy milk up to the 1/2 cup line. Mix well and set aside for a couple of minutes. It will curdle and thicken. Your homemade vegan buttermilk is ready to use.
Dry ingredients
- In a large bowl, sift flour, baking powder, baking soda, salt, and pumpkin pie spice mix.
- Whisk the ingredients well with a wire whisk and set aside. (Photo 11)
Wet ingredients
- In a medium mixing bowl, add pumpkin puree, sugar, buttermilk, oil, and vanilla extract.
- Whisk the wet ingredients until well incorporated.
Combine wet and dry ingredients
- Pour the wet ingredients into the bowl containing the dry ingredients, and mix just until combined and no more flour pockets are visible. (Photos 18 & 19)
- Avoid overmixing the batter as that can that will yield dry, chewy, and dense donuts.
- Transfer the batter to a piping bag or use a resealable zip-top bag and snip off the tip of the bag.
Bake
- Pipe the batter into the greased donut baking pan, filling each cavity about 3/4 full. Tap the pan on the counter to release air bubbles.
- Bake for 12 to 14 minutes, or until the top spring back when lightly pressed.
- Remove the pan from the oven and transfer to a wire rack to cool for 5 minutes. Turn them out onto the wire rack to cool completely. (Photos 25 to 26)
Cinnamon sugar coating
- In a small, shallow bowl, whisk together sugar and ground cinnamon until well combined.
- Lightly brush the top and bottom of the donut with melted vegan butter, and twist to coat with cinnamon sugar.
- You may only coat the top if desired if you don’t like them too sweet. Repeat with the rest of the donuts!
