Strawberry lassi is a creamy, delicious, and refreshing yogurt-based Indian beverage bursting with fruity flavors! Fresh seasonal strawberries are blended with yogurt to make an easy and refreshing strawberry yogurt drink that is great for the summers!

Strawberries are in season for a short while here in India. Therefore we are making the most of the strawberry season. Even though I enjoy eating them as such, I love incorporating them in recipes too.
Today’s strawberry lassi recipe calls for 5 ingredients and can be made in 10 minutes. It is absolutely yummy and kid-friendly. My kids have been enjoying a glass of this strawberry yogurt drink often since last week.
Lassi is like an Indian version of a smoothie that originated in Punjab, India. Traditionally, it is made by churning curd/yogurt with sugar and milk/water using a madani (wooden hand churner) . Another popular variant of lassi is mango lassi , which happens to be quite popular in most Indian restaurants across North America.
If the weather is too cold to enjoy a glass of this strawberry lassi, no worries! Just make sure you freeze bags of seasonal strawberries so that you can enjoy this lassi often during the scorching summers season.

- Why you will enjoy this lassi recipe?
- Ingredients needed to make this strawberry yogurt drink
- How to make Indian strawberry lassi – Step by step process
- Storage suggestions
- Recipe tips
- Variations
- You may also enjoy these fresh strawberry recipes
- Strawberry Lassi (Indian Strawberry Yogurt Drink)
Why you will enjoy this lassi recipe?
This strawberry lassi;
☑ Is a simple and fuss-free recipe
☑ Makes for a quick breakfast, perfect for busy mornings
☑ Is also great as a post-workout snack or after school snack
☑ Can be topped with some whipped cream or ice cream and enjoy it as a dessert
☑ Can be easily scaled
Ingredients needed to make this strawberry yogurt drink
Strawberries: I have used fresh strawberries, but frozen will also work well. In fact, it will make the lassi thicker, so you may need to adjust the consistency by adding milk or water. There is no need to thaw frozen strawberries. Use them as such.
Sweetener: I’ve used castor sugar, as it dissolves easily. Traditionally, lassi is sweetened with sugar. If you avoid refined sugar in your diet, you can use other sweeteners such as stevia, monk fruit, honey, agave, or maple syrup. Feel free to use any sweetener of your choice.
Yogurt/dahi: Try and use fresh yogurt, make sure that it is not too sour. I also suggest using full-fat yogurt for best results. You can also use low-fat yogurt but the lassi won’t be as creamy.
Milk: Milk is added to adjust the consistency of the lassi.
Cardamom powder: It adds a lovely sweet floral flavor that compliments the strawberries beautifully. Skip it if you wish to.
Strawberries are a great source of vitamins, minerals, fibers, and antioxidants. Yogurt is a great probiotic, it helps in improving gastrointestinal health and boosting immunity. Overall, this strawberry lassi is a pretty healthy beverage if you leave out the sugar.

How to make Indian strawberry lassi – Step by step process
Step 1:Strawberry puree
Add 250 grams chopped strawberries and 2 tablespoons castor sugar to a blender, blend to a smooth puree.

Step 2: Blend the puree with the rest of the ingredients

Add 250 grams full-fat yogurt, 30 ml of milk, and 1/4 teaspoon cardamom powder, blend until smooth and creamy. Serve immediately. You can add some crushed ice or ice cubes in a serving glass and then pour the lassi.
Storage suggestions
Strawberry lassi or any kind of lassi tastes best when it is freshly made. So try to consume it immediately. If you do have leftovers, refrigerate for up to a day.

Recipe tips
Strawberries: Be sure to use ripe, plump, and firm strawberries that have a bright red color. Avoid using strawberries that are soft, wrinkly, and those that have bruises. They will ruin the taste of the lassi. Prep the strawberries ahead of time by chopping them and placing them in an airtight container a few hours before you intend to make the lassi. The reason for this brings us to the next tip below.
Make sure the ingredients are cold: If you start with cold ingredients, you can skip adding any ice. I personally don’t like to add ice cubes while blending the lassi since it waters the lassi down. If the lassi is not too cold for your liking, then add some ice in a serving glass and pour the lassi.
More strawberry flavor: The strawberry flavor is quite prominent in this lassi. However, if you’d like more strawberry flavor, you can add strawberry crush, strawberry jam, or strawberry flavored yogurt. If using flavored yogurt, adjust the sweetener accordingly because they already contain sugar.
Sweetness: The strawberries that I used were pretty sweet so 2 tablespoons of sugar were enough for us. If you prefer a sweeter lassi, increase the sweetener to your liking.
Richer and creamier lassi: You can add about 1/4 cup of cream along with yogurt to make the lassi more creamy.
Cardamom powder: I’ve used store-bought cardamom powder which does not tend to be as strong. If using homemade cardamom powder, reduce it to 1/8 teaspoon or it may overpower the delicate flavor of the strawberries.
Vegan: Swap the yogurt and milk with your favorite plant-based yogurt and milk.
Mint leaves: For a refreshing flavor, lightly crush some mint leaves in a glass, then pour the lassi. You could also use dried mint leaves.

Variations
Greek yogurt: You could also use Greek yogurt to make this lassi. Adjust the consistency by adding milk or water.
Strawberry mango lassi: Swap half of the strawberries with mango chunks or mango pulp.
Blueberry lassi: Swap the strawberries with blueberries for another fun fruity flavored lassi. Instead of just using blueberries, you could use a mix of berries.
Rose-strawberry lassi: You can add a little rose syrup or rose water to add a floral note to this lassi. The floral and fruity pairing works amazingly well in this lassi.
You may also enjoy these fresh strawberry recipes
Strawberry Fool
Strawberry Cream
Strawberry topping for Cheesecake
Instant Pot strawberry jam
You can also follow me on Facebook , Pinterest, Instagram & Twitter

Strawberry Lassi (Indian Strawberry Yogurt Drink)
Ingredients1x2x3x
- 250 grams chopped strawberries, approx 1.75 cup
- 2 to 3 tablespoons sugar or preferred sweetener of choice adjust as per required sweetness
- 250 grams full-fat yogurt, 1 cup
- 30 ml milk 1/8 cup, or add as required to adjust the consistency
- 1/4 tsp green cardamom powder optional
Instructions
- Add strawberries and sugar to a blender, blend to a smooth puree.
- Add yogurt, milk, and cardamom powder, blend until smooth. Serve immediately. You can add some crushed ice or ice cubes in a serving glass and then pour the lassi.
Video
Notes
Nutrition

Strawberry Lassi (Indian Strawberry Yogurt Drink)
Ingredients
- 250 grams chopped strawberries, approx 1.75 cup
- 2 to 3 tablespoons sugar or preferred sweetener of choice adjust as per required sweetness
- 250 grams full-fat yogurt, 1 cup
- 30 ml milk 1/8 cup, or add as required to adjust the consistency
- 1/4 tsp green cardamom powder optional
Instructions
- Add strawberries and sugar to a blender, blend to a smooth puree.
- Add yogurt, milk, and cardamom powder, blend until smooth. Serve immediately. You can add some crushed ice or ice cubes in a serving glass and then pour the lassi.
Video
Notes
Nutrition
This aromatic Thai basil fried rice with chicken is easy to make and tastes incredibly delicious! This recipe is packed with a punch from the Thai chile peppers and a unique flavor from the fresh Thai basil leaves.
If you love Thai cuisine as much as we do, you ought to try this spicy Thai basil fried rice. It is packed with authentic flavors and is nothing short of amazing. This recipe tastes pretty close to your favorite Thai restaurant version.
There is a little prep work involved, but once you get past that, the entire dish comes together pretty quickly. The fresh Thai basil leaves added towards the end totally elevate the entire dish and take it to a whole new level of yum!
I have loads of Thai recipes lined up, and I will definitely be sharing them in the coming months.
Let’s go through the list of ingredients you’d need to whip up this amazing spicy basil fried rice recipe which is truly the best and just perfect for busy weeknights!

- Ingredients needed for this recipe
- Why you will love this recipe?
- How to make Thai basil fried rice – Step by step process
- Serving suggestions
- Storage suggestions
- Recipe tips
- Variations
- Frequently asked questions (FAQs)
- You may also enjoy these Thai recipes
- Thai Basil Fried Rice With Chicken
Ingredients needed for this recipe
Chicken: I’ve used boneless chicken breasts. You could also use boneless chicken thighs.
Rice: To keep this recipe as authentic as possible, I’ve used cooked jasmine rice. But feel free to use your favorite rice.
Cooking fat: I’ve used vegetable oil. Again, feel free to use your preferred cooking oil.
Bird’s eye chili + fresh garlic cloves: Bird’s eye chili, also referred to as Thai red chiles and fresh garlic cloves are pounded together in a mortar and pestle. When sautéed in oil, it flavors the oil which in turn adds a ton of flavors to the rice. Highly recommend including these in the recipe.
Sauce mixture: This is a mix of oyster sauce, fish sauce, and sugar. I’ve used light brown sugar here, you could use palm sugar or regular granulated sugar. The sugar helps balance the salty, savory flavors of the oyster and fish sauces. Do not be intimidated by the fish sauce, I promise it will not make the fried rice taste fishy!
I’ve also added some dark soy sauce, purely for color. You could also use Thai black soy sauce instead. For an authentic flavor, do use the oyster and fish sauce combination. Soy sauce is typically not used in this recipe.
Vegetables: Just some white onions and red peppers. Check out the variations listed below for more options.
Thai basil: This makes the recipe what it is and is the star ingredient here. Added towards the end, it infuses the rice with delicate licorice and peppery flavor. You should be able to source Thai basil from any Asian grocery store.
Cilantro (not pictured below): Added to garnish the fried rice. Skip it if you are not a fan.

Why you will love this recipe?
This Thai basil rice recipe is;
☑ An excellent way to use up leftover rice
☑ A super simple recipe that comes together in no time once all the ingredients are prepped
☑ Uber delicious, aromatic, and moreish
☑ Easily adaptable, so you could make it vegan or vegetarian
How to make Thai basil fried rice – Step by step process
Step 1:Marinate the chicken(optional)
Marinate 200 grams of chicken chunks with 1/2 tablespoon light soy sauce and 1/4 teaspoon ground black pepper. This is an optional step, but I feel it infuses the meal with some flavor. ( Photos 1 to 3 )

Step 2: Pound Bird’s eye chili and garlic
Pound 5 garlic cloves and 5 red chilies (increase for more heat) in a mortar and pestle until it turns into a coarse paste. Set aside. ( Photos 4 to 7 )

Step 3:Prepare the sauce mixture
Add 2 tablespoons of Thai oyster sauce, 1 tablespoon of Thai fish sauce, 1 teaspoon of dark soy sauce, and 1/2 tablespoon of dark or light brown sugar in a small bowl. Mix until well combined. ( Photos 8 to 12 )

Step 4: Cook the basil fried rice
Heat 2 tablespoons of oil in a wok or a heavy-bottomed skillet/cast iron pan over medium, add garlic and chili mixture, saute until fragrant. Do not burn the red chili-garlic mixture. ( Photos 13 to 15 )
Tip: Make sure to turn on your kitchen exhaust fan, range hood, or open the kitchen windows to avoid inhaling the chili pepper fumes.

Add chicken strips in a single layer, leave undisturbed for about a minute or so (depending on how thick the pieces are) to get a good sear. ( Photos 16 & 17 )
Then stir-fry the chicken until is almost cooked through and turns a light golden color. ( Photos 18 & 19 )

Next, add 1/2 cup each of sliced onions and bell peppers, saute until onions turn translucent and peppers turn crisp-tender. ( Photos 20 & 21 )
Add the sauce mixture, cook for another minute. ( Photos 22 & 23 )

Add 3 cups of cooked jasmine rice. Cook, tossing the rice until everything is combined and heated through, about 3 to 4 minutes. ( Photos 24 & 25 )
Check for seasoning and add salt if needed. I didn’t need to add any salt.
Add Thai basil leaves, switch off the heat, toss gently, until the leaves wilt. ( Photos 26 & 27 )

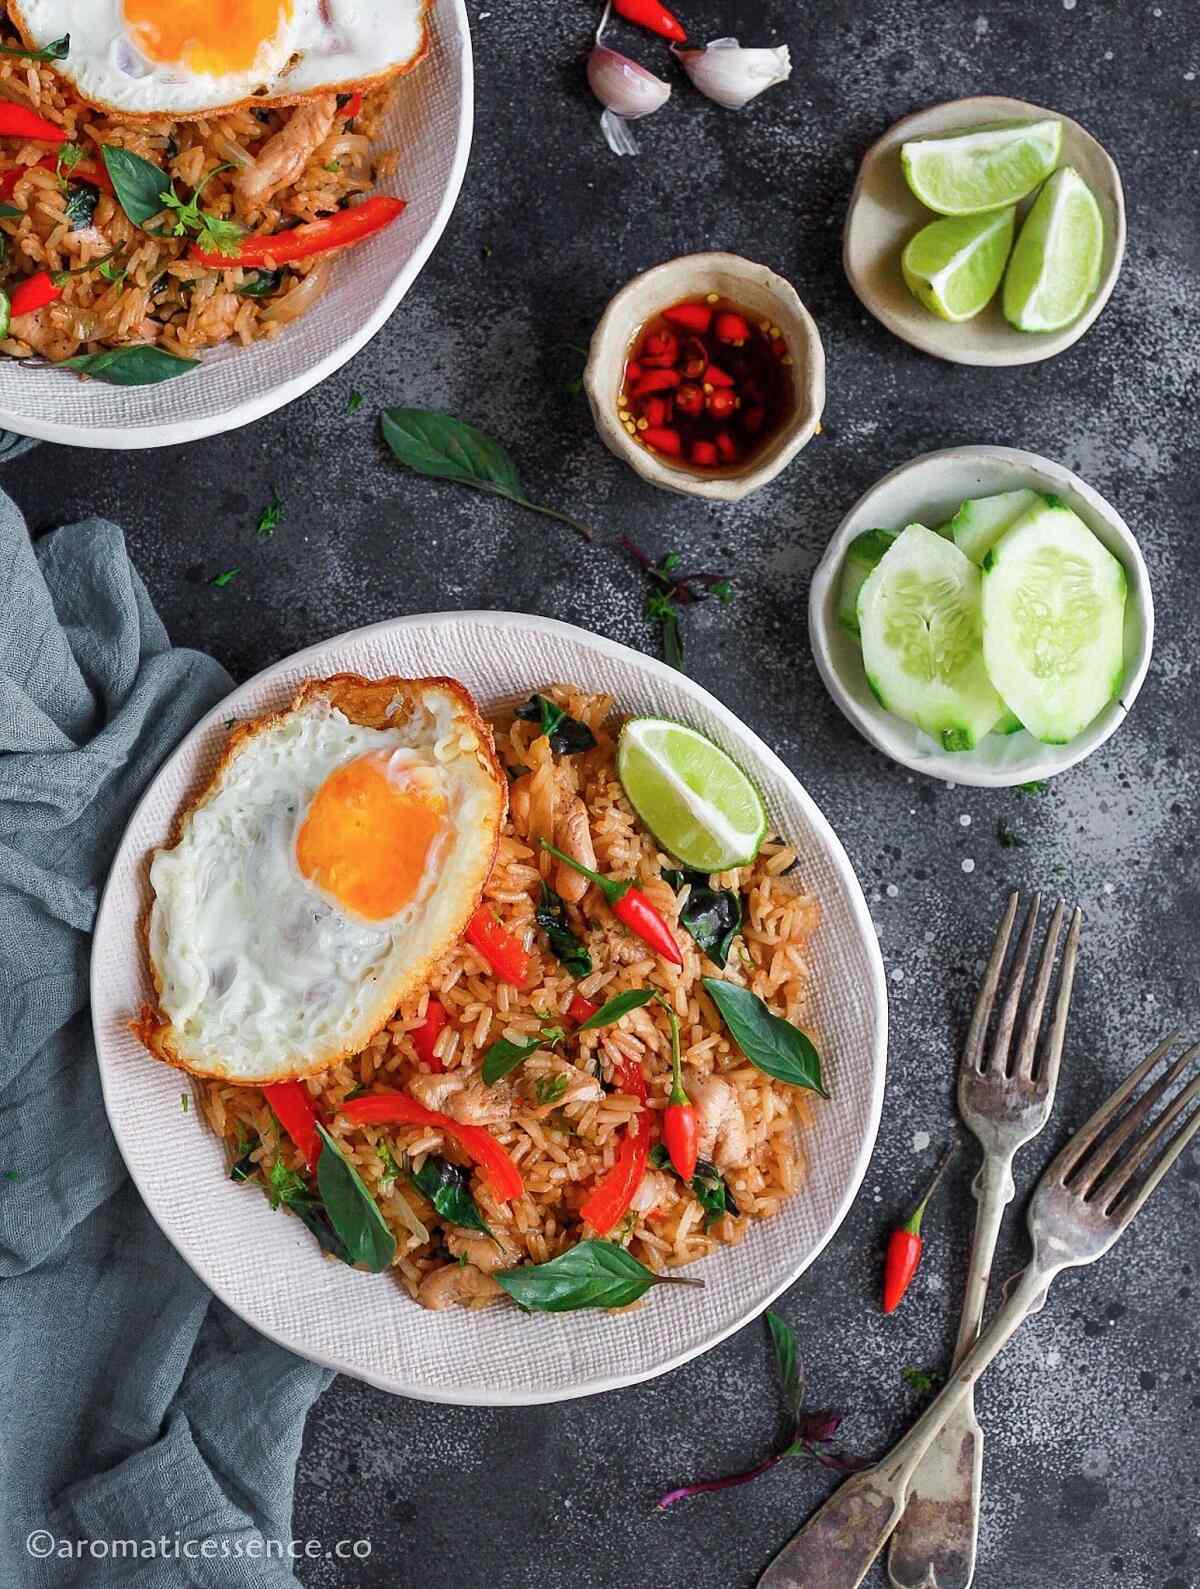
Serving suggestions
I served this spicy basil fried rice with some lime wedges, cold cucumber slices, and Prik nam pla (Thai dipping sauce).
Since I skipped scrambling the eggs in the wok, I served it with a crispy fried egg.
This dish is pretty great on its own, but you could also serve alongside your favorite Thai curry.
Storage suggestions
This Thai chili basil fried rice is best enjoyed hot straight from the wok.
Leftovers: Refrigerate leftovers in an airtight container within 2 hours of preparation. It should last for up to 4 to 5 days.
Freeze: Transfer the rice to freezer-safe bags (squeezing out as much air as possible) or freezer-safe containers, freeze for up to 3 months. Thaw the rice in the fridge. When you are ready to eat, reheat as instructed below.
Reheating: To reheat, heat some oil in a wok or skillet, add the fried rice, and sprinkle 1 to 2 tablespoons of water per cup of rice, re-fry the rice on medium heat until it is heated through. You could also warm it in the microwave. Transfer the rice to a microwave-safe bowl or plate, add 1 to 2 tablespoons water per cup of rice, and cover with a damp paper towel. Microwave on high power in 30-second intervals, up to 2 to 3 minutes or until steaming hot. The internal temperature of the rice should be 165° F or higher.

Recipe tips
Pound the chili and garlic: Pounding the chile peppers and fresh garlic cloves help in releasing the volatile oil in these ingredients which in turn add tons of flavor to the overall fried rice. Since these ingredients form the base of this recipe, I suggest you follow this step. If you don’t have a mortar and pestle, you could chop the garlic and chile peppers with a sharp knife. If your skin is very sensitive, be sure to wear gloves while chopping hot chiles to avoid the capsaicin burn.
Heat: On a scale of 1/5, the recipe is about 3 in terms of spiciness. If you are unsure about the spice levels, start off with 1 or 2 Thai chilies. It is much easier to add spice later instead of removing it from a dish.
Rice: This recipe does need a little planning. Make sure that you cook the rice ahead of time, a day prior preferably, and refrigerate it. You will need pre-cooked cold rice to make this fried rice. Using freshly cooked warm rice will just make this fried rice too wet and turn it into a big mush and gloppy mess. Not appetizing at all! If freshly cooked rice is all you have, then spread out the rice onto a tray, and refrigerate it, uncovered, for about 1 to 2 hours to dry it out.
Break the clumps of rice before adding to the wok: Use a fork or your clean hands to break apart any rice that has clumped before adding it to the wok. This will help all the rice grains to remain distinct and not break while frying the rice. In order to avoid the rice from clumping too much, you should rinse it well to remove all the starch before cooking it.
Thai basil leaves: This ingredient adds a unique and fresh flavor to this rice. It is what makes this dish tastes like the ones that you get in your favorite restaurants. You can use Italian sweet basil, but just know that the taste will be quite different, nonetheless, it will still taste good. (Personal experience of using it once!).
When you add the sauce mixture matters: Adding the sauce mixture to the stir-fried chicken and veggies definitely helps take the edge of that fishy smell of the fish sauce. Besides, it also helps in adding some flavor to the meat, especially if you have not marinated it. If you add the sauce mixture after adding the rice, some of the fishy smell may still be prevalent. Depending on your preference, feel free to add the sauce mixture before or after adding the rice. I personally make it just as written in the recipe.
Variations
If you are making this recipe for the first time, I suggest trying it as such. Then feel free to play around with these variations to switch things up.
Other meats: You could swap out the chicken with thinly cut strips of pork or beef. You can even use shrimp, just make sure that you cook just until it changes color. Overcooking will make it rubbery. You can saute the shrimp separately, set it aside, and then stir it in towards the end along with the Thai basil.
Ground meat: Instead of tender meat strips, you could also make this recipe with ground chicken, turkey, beef, or pork.
Scrambled eggs: If you like scrambled eggs in your fried rice, then add them after sauteing the onion and bell peppers. Move everything to one side of the wok, add two lightly beaten eggs, scramble until almost set.
More vegetables: To make it heartier, you can throw in more vegetables such as shredded carrots, diced zucchini, squash, sugar snap peas, broccoli, bamboo shoots, baby corn, or even mushrooms, etc.
Vegan or vegetarian: Omit the chicken, you can use baked or fried tofu instead. Swap the oyster sauce with a vegetarian oyster sauce or mushroom stir-fry sauce and the fish sauce with light soy or coconut aminos.
Make it with quinoa or noodles: You could also swap the rice with pre-cooked chilled quinoa or rice noodles instead.
Sambal oelek: If you can’t find Thai red chilies, add about 1 tablespoon (or 1 teaspoon for less spice) of sambal oelek. It is nothing but an Indonesian chili paste and will add some punch and heat to the fried rice.
Curry powder: Add about 1-2 teaspoons of curry powder for some variation in flavor.
Pineapple: Add about 1 cup of fresh or canned and drained pineapple cubes along with the basil leaves. Cook until the pineapple cubes are heated through and the basil leaves wilt.
Nuts: Consider adding some roasted cashew nuts or peanuts for extra crunch and texture.

Does Thai basil fried rice use brown or white rice? If not, which is the best rice to use for this recipe?
Traditionally, jasmine rice is used to make this fried rice. It has a subtle nutty flavor and a pleasant floral aroma. If you don’t have it in your pantry, you could substitute it with your favorite white rice or brown rice. But make sure that you use cold day-old rice.
Can I use other peppers instead of Bird’s eye chiles?
If you don’t have access to these chiles, you can substitute them with jalapeños or serranos, or spicy green Indian chiles.
What is the difference between basil and Thai basil?
As you can see pictured below are Italian sweet basil and Thai basil. They both differ in appearance as well as taste.
Thai basil has purple stems and flowers, small leaves, and a black licorice-like flavor. This type of basil is native to Southeast Asia.
It is not to be confused with Thai holy basil (also known as Rama tulsi in India). Holy basil is known as Kra Pao in Thailand. It has a spicy, peppery flavor. You can use this variety of basil in this recipe to make holy basil fried rice.
Sweet basil on the other hand has green stems and light green, oblong-shaped leaves that curve downwards. As for the taste profile, it has a mild peppery and spicy flavor as compared to the Thai varieties of basil. It adds a hint of sweetness when added to any dish. This is the kind of basil that you will most probably find in most grocery stores in the US.

You may also enjoy these Thai recipes
Instant Pot Thai yellow chicken curry
Chicken satay with peanut sauce
You can also follow me on Facebook , Pinterest, Instagram & Twitter

Thai Basil Fried Rice With Chicken
Ingredients1x2x3x
For the chicken marinade
- 1 boneless, skinless chicken breast, around 200 grams
- 1/2 tablespoon light soy sauce
- 1/4 teaspoon ground black pepper
For the sauce mix
- 2 tablespoons Thai oyster sauce
- 1 tablespoon Thai fish sauce
- 1 to 2 teaspoons dark soy sauce, optional
- 1/2 tablespoon dark or light brown sugar
For the basil fried rice
- 3 cups cooked jasmine rice, approx 450 grams
- 2 tablespoons vegetable oil
- 5 large garlic cloves 18 grams
- 5 to 6 Thai bird’s eye chiles. diced finely 4 grams
- 1/2 cup sliced white onion or shallot, 60 grams
- 1/2 cup thinly sliced red bell pepper, 70 grams
- 1 cup Thai basil leaves 18 grams
- lime to serve
- Cold cucumber slices, to serve
Instructions
- Marinate chicken with light soy sauce and ground black pepper. This is an optional step, but I feel it infuses the meat with some flavor.
- Pound garlic cloves and Bird’s eye chiles in a mortar and pestle until it turns into a coarse paste. Set aside.
- Add oyster sauce, fish sauce, dark soy sauce, and dark or light brown sugar in a small bowl. Mix until well combined.
- Heat oil in a wok or a heavy-bottomed skillet/cast iron pan over medium, add garlic and Thai chili mixture, saute until fragrant. Do not burn the red chili-garlic mixture. Tip: Make sure to turn on your kitchen exhaust fan, range hood, or open the kitchen windows to avoid inhaling the chili pepper fumes.
- Add chicken strips in a single layer, leave undisturbed for about a minute or so (depending on how thick the pieces are) to get a good sear. Then stir-fry the chicken until is almost cooked through and turns a light golden color.
- Next, add sliced onions and red bell peppers, saute until onions turn translucent and peppers turn crisp-tender.
- Add the sauce mixture, cook for another minute.
- Add jasmine rice and cook, tossing the rice until everything is combined and heated through, about 3 to 4 minutes.
- Check for seasoning and add salt if needed. I didn’t need to add any salt.
- Add Thai basil leaves, switch off the heat, toss gently, until the leaves wilt.
