Idli or Idly is one of the most popular South Indian breakfast dishes. Learn how to make the perfect fermented idli batter that yields spongy, fluffy and soft idli every single time.

WHAT IS IDLI | IDLY?
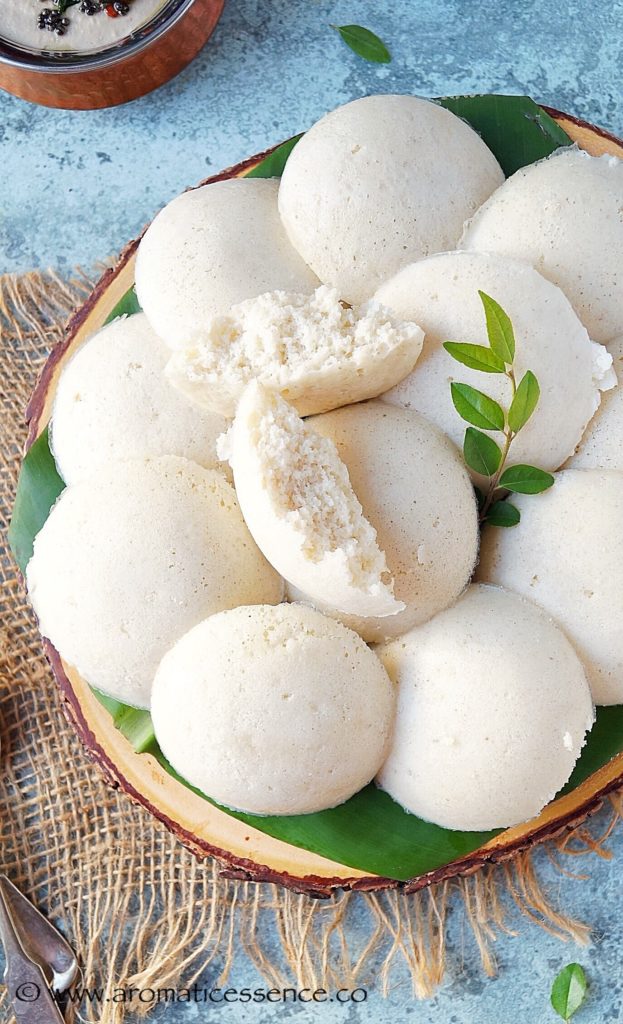
Idlis are South Indian savory rice cakes that are prepared by steaming a fermented batter of rice and black lentils. Idli chutney and sambhar is a staple breakfast in most South Indian households. It is perfect with podi (spiced powder), a spicy chutney, piping hot sambar and along with filter coffee, breakfast is sorted!
I have to admit, I love South Indian food to the core. I could live on it every day. Masala dosa’s, idli sambar , puri bhaji, medu vada, upma were a weekly staple in Mumbai until I moved here to the US. Unfortunately, there aren’t any restaurants here in my little town that offer South Indian cuisine. So like most things, I had to learn how to prepare them, to satisfy my idli and dosa cravings.
If you’d like to know about who invented idly or the history of idly , then here is an interesting read from Wiki .

Idlis are one of the most delicious and healthiest breakfasts one can have. Once you have mastered the art of making the perfect idli batter, making this South Indian delight is a breeze! Sure you get readymade idli mix or idli dosa batter in the Indian stores, here in the US, but they contain preservatives and other unwanted ingredients! So I never venture into buying those!
My quest for making idlis began in 2014, the year we moved to the US. I tried various recipes from the web. The end result- big batches of batter down the drain. It’s not that the recipes were at fault, but it somehow went awry all the time. I definitely had to be doing something wrong! The idlis would turn out pasty, so inedible !!

I had to learn it the hard way. There were times when I almost gave up! It all started with using the wrong rice in the first place. Secondly, I would use split urad dal, which further worsened the problem resulting in a very poor volume of the batter. Third, I added very little water for grinding the batter. All of these yielded me the most disastrous idlis!

Now the idli batter can be used for making dosas too by thinning the batter down. But that was a pretty unsuccessful attempt & never yielded me good results either. The batter would stick to the skillet and a host of other issues followed.
I was determined not to give up. I was more intrigued as to how to get this right. And I was glad to have stumbled upon this site that provided some really great tips, which have helped me to successfully make soft idli, and eventually, dosas too. Idlis, stuffed idlis, plain dosa, cheese dosa, masala dosa et al, are a breeze to pull off now. I’m finally at peace now that I can whip some idlis, whenever we wish to indulge in some South Indian fare.
If you are in the same boat as I was, then read on! I’m sharing tips and tricks to make idli batter, which is going to be very helpful if you live in the USA, UK or any other country! If you live in India, I bet you don’t really have issues with batter fermentation!
Idli batter can be made with idli rice or idli rava. Today’s post is all about making an idli batter recipe using idli rice. The same can be used as a dosa batter to make crispy dosas.
The idli batter all depends on the ratios of idli rice and urad dal, the water used for grinding, the consistency of the batter and the weather.
IN THIS DETAILED STEP BY STEP POST FOR SOFT IDLI RECIPE, YOU WILL LEARN HOW TO MAKE IDLI BATTER WHICH INCLUDES IMPORTANT POINTERS, ESPECIALLY FOR BEGINNERS. HERE ARE THE POINTS THAT I WILL BE COVERING IN DETAILS
- Idli batter proportion- A tried and tested idli rice and urad dal ratio and their soaking times.
- The amount of water that is required for grinding.
- How long to grind the batter.
- Idli batter consistency.
- Idli batter fermentation process
The basic problem of making idlis starts if you don’t have a stone wet grinder. What’s the difference between a stone wet grinder and a regular mixer for grinding the batter? Here’s are some basic points-
- Wet-grinders use stone for grinding, and the mixer uses a blade for grinding.
- One of the most important things for grinding idli batter- Aeration, it is what gives a nice volume to the urad dal batter, which can be easily achieved in a stone wet grinder, due to its wide-open mouth, it gives volume to the urad dal batter. That is not the case in a mixer grinder, the design and volume of a stone grinder and mixer grinder are completely different.
- Make sure to have sufficient space inside the mixer jar in order to get some volume for the urad dal. Always grind in batches. Do not stuff the entire urad dal in one go.

SOFT IDLI INGREDIENTS | WHAT ARE THE INGREDIENTS OF IDLI BATTER?
- You will need basically two ingredients- idli rice and black gram to make idli batter.
- Fenugreek seeds aid in fermentation, however, it is not a necessary ingredient.
- Poha or cooked rice helps in making softer idlis, and that too is optional.
WHICH RICE IS USED FOR IDLI?
To make idli you need ‘Idli rice’.
Wondering what is idli rice? It is nothing but a parboiled, fat and short grained rice. It is easily available in stores.
DIFFERENCE BETWEEN IDLI RICE AND PARBOILED RICE
Idli rice and parboiled rice is the same thing. Parboiled rice is boiled in the husk. And since it contains a high percentage of a special starch, it is the rice of choice to make spongy and soft idlis.
THE TYPE OF URAD DAL (BLACK GRAM) TO USE
Always use whole dehusked black gram (urad gota). I have got great results with 1.5 cups of urad dal to 3 cups of rice for dosa and idli, it yields fluffy, soft idlis and crispy dosas every time.
IDLI BATTER RATIO
To make it easier, remember it is 1:2 (urad dal:rice) part by volume i.e 1/2 cup of urad dal for every cup of rice for idli batter proportion in the mixie . If you have a stone grinder you can use 1:4 or 1:3 (urad dal:rice) ratio.
OTHER INGREDIENTS (OPTIONAL)
Like I mentioned above, fenugreek seeds and poha (flattened rice) or cooked rice can be added. They aid in fermentation and help in achieving soft idli.
GRINDING THE BATTER, CONSISTENCY OF THE BATTER AND IDLI BATTER FERMENTATION
I have shared all the detailed instructions for the perfect idli batter in the steps below with pictorials for reference.
HOW TO MAKE IDLI WITHOUT IDLI MAKER?
Follow the same recipe and steam the fermented idli batter in small steel containers like it is done for Goan sannas (Goan idlis) . You can refer to that post here for pics.
Simply take a big vessel, put some water. Place a stand and place all the containers over the stand. The water level should be at least half an inch below the stand. Proceed with steaming the idlis as mentioned in the instructions below.
IS IDLI HEALTHY?
Idlis are healthy and packed with many nutritious benefits.
Each idli contains just 39 calories. Idlis contain no fat, no saturated fat and no cholesterol. In a single idli, you consume 2 grams of protein, 2 grams of dietary fiber and 8 grams of carbohydrates. One idli contains 1 milligram of iron, and trace amounts of calcium, folate, potassium and vitamin A. The iron is mostly from the black lentils, with about 25 percent of it from the rice. (Source- here )
HOW TO EAT IDLI?
I love to douse idlis in sambar and enjoy them piping hot. Or you could serve the idli and sambar separately, then break off small pieces of idli, and dip it in sambar and/or chutney, slurp some sambar and enjoy it that way too. Either way, it simply tastes great!
The secret for soft idli or crispy dosas is a well-fermented idli dosa batter. Once you get past that then making idli or dosa or uttapam etc are really effortless.
You should have successful results with all these details, please go through all the steps carefully. All I can say is, with practice eventually you will master the skill of making really good and super soft idli 🙂 Patience is the key!
It is best to make idlis on the first day, you can make d ifferent recipes with idli batter like dosa, uttapam/ uthappam, paniyaram etc the following day.
DIFFERENT VARIETIES OF IDLI
- stuffed idli
- poha idli
- Kanchipuram idli
- rava idli
- oats idli
- oats and rava idli
- quinoa idli, ragi idli
- daliya idli
- masala idli
- idlis with veggie puree etc.
I hope to share them soon in the coming months!
It took me this long to share a post on soft idli on the blog because I wanted to make sure I share a fail-proof procedure. I’ve tried and tested this a little too much, that I think it’s time to share it with you guys!
And before we hop on to the recipe, did you know this fun fact? Since the past three years, March 30th has been celebrated as world idli day 🙂
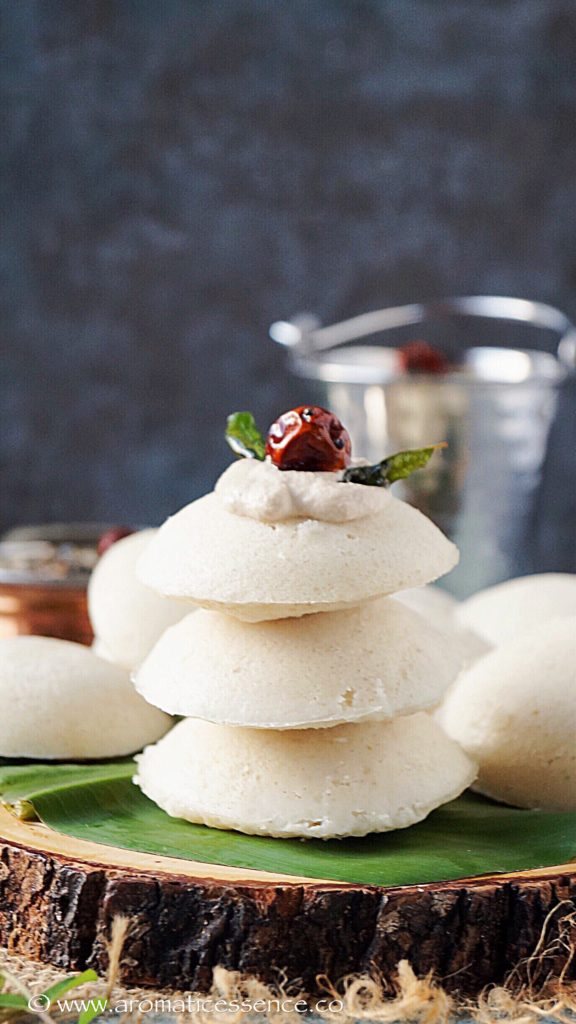
This image is inspired by Reem Khan, one of our foodie group members, whom we fondly call as Reem di. I fell in love with the pic when she posted it and created my version of the same 🙂
DON’T FORGET TO CHECK OUT THESE DELICIOUS ACCOMPANIMENTS TO SERVE ALONG WITH SOFT IDLI
- Coconut chutney
- Coconut coriander chutney
- or try Coconut peanut chutney
- Spicy and tangy tomato chutney
- Sambar
STEP BY STEP INSTRUCTIONS TO MAKE SOFT IDLI | IDLI BATTER RECIPE
SOAKING THE RICE AND DAL
1.Rinse the idli rice well, soak in about 5 cups of filtered water, preferably 8 hours or at least 4 hours.

2.One hour before you begin to grind the batter, wash and drain the urad dal about 2-3 times. Soak the urad dal with enough water, about 3-4 cups of filtered water. Also, soak the fenugreek seeds along with the dal.

3.Just 15 minutes before you begin grinding the dal and rice, soak poha in sufficient filtered water. Then drain, squeeze excess water and add it to the rice whilst grinding.

HOW TO GRIND IDLI BATTER IN THE MIXIE?
1.After the specified soaking time, drain the urad dal & methi (reserve the water for grinding). Add ice cubes to the reserved water, plus use more filtered water as required for grinding, add ice cubes to that as well.
- Transfer 1/2 of the drained urad dal to your grinder/mixer along with 1/2 cup water, run the mixer on the lowest speed for 30 seconds.
- Open the lid and let the jar rest for another 30 seconds.
- Add another 1/2 cup water, cover the mixer and grind for another 30 seconds.
- Repeat the grinding process 2 to 3 times more if required with a resting time of 30 seconds, the batter should be fluffy and smooth . Do not let the mixer heat up. (I ground the batter in 2 batches & used a total of 2 cups ice cold reserved water). Then transfer this batter to a large vessel, with sufficient volume as the batter will rise during fermentation.

2.Next, drain the rice, and grind along with poha or cooked rice in the mixer to a slightly coarse batter, adding little water as required. (I ground the rice in 3 batches and used a total of 1 & 1/2 cups water, 1/2 cup ice cold reserved water per batch. Follow the same procedure of grinding the rice, grind 30 seconds then rest for 30 seconds, repeat one more time.) Do not add too much water in one go. When you touch the batter, you should feel tiny rice granules. Do not grind to a smooth batter. Transfer this batter to the vessel containing the urad dal batter.

HOW TO FERMENT IDLI BATTER?
1.Add salt and whisk the batter for 2-3 minutes. Incorporate the batters using clean hands. The final batter must be thick and flowy, not watery and runny . Add salt only while you mix the batter with hands, not when you are grinding the rice and urad dal. Cover with a lid and keep aside in a warm place to ferment overnight. (I switch on the oven to 180 degrees F for 10 minutes, then turn it off, switch on the oven light and let the batter ferment in the warm oven. The warmth of the oven light also aids in fermentation). If you do not have a big vessel, you can divide the batter into two containers/vessels. If the weather is warm and humid where you live, you can leave the container on the countertop, away from a draft-free place.


2.Next morning, give the fermented batter one or two gentle swirls. Do not mix it vigorously. It took a total of 15 hours to ferment the batter in this chilly winter, I think it was 3 degrees C the day I made this batter. During the summer it should ferment in 8 hours. If your batter did not rise to the brim or didn’t even overflow, it doesn’t mean that your batter did not ferment. To check, take a ladle full of batter from the vessel if the batter in the vessel has air bubbles and you can feel the fermented smell then your batter is ready to use.


HOW TO STEAM IDLI AND HOW LONG TO STEAM IDLI?
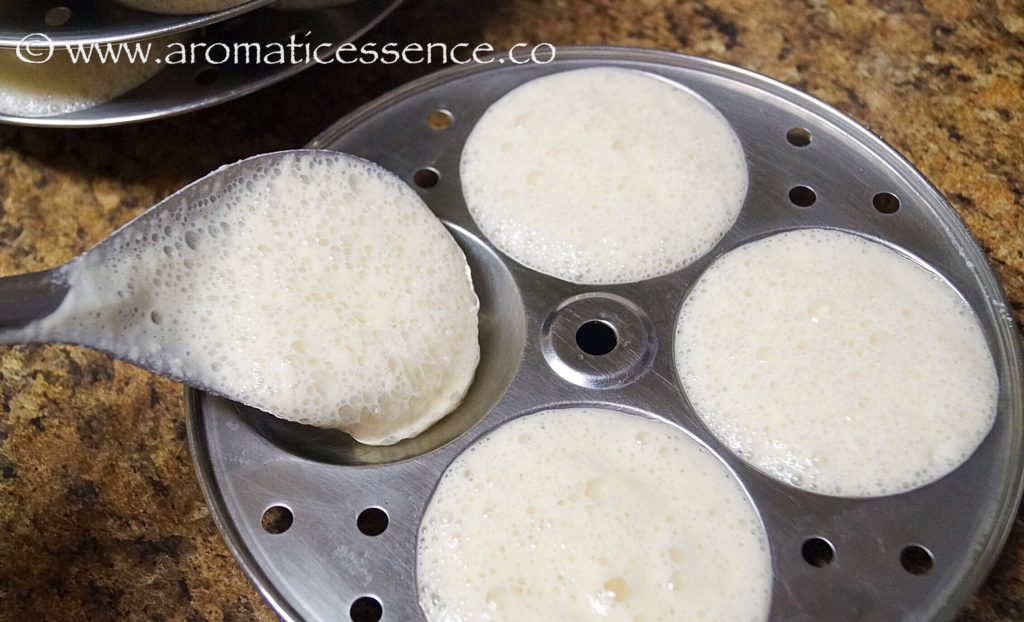
1.Bring water to a simmer in the idli steamer. Pour spoonful’s of batter into greased idli molds.
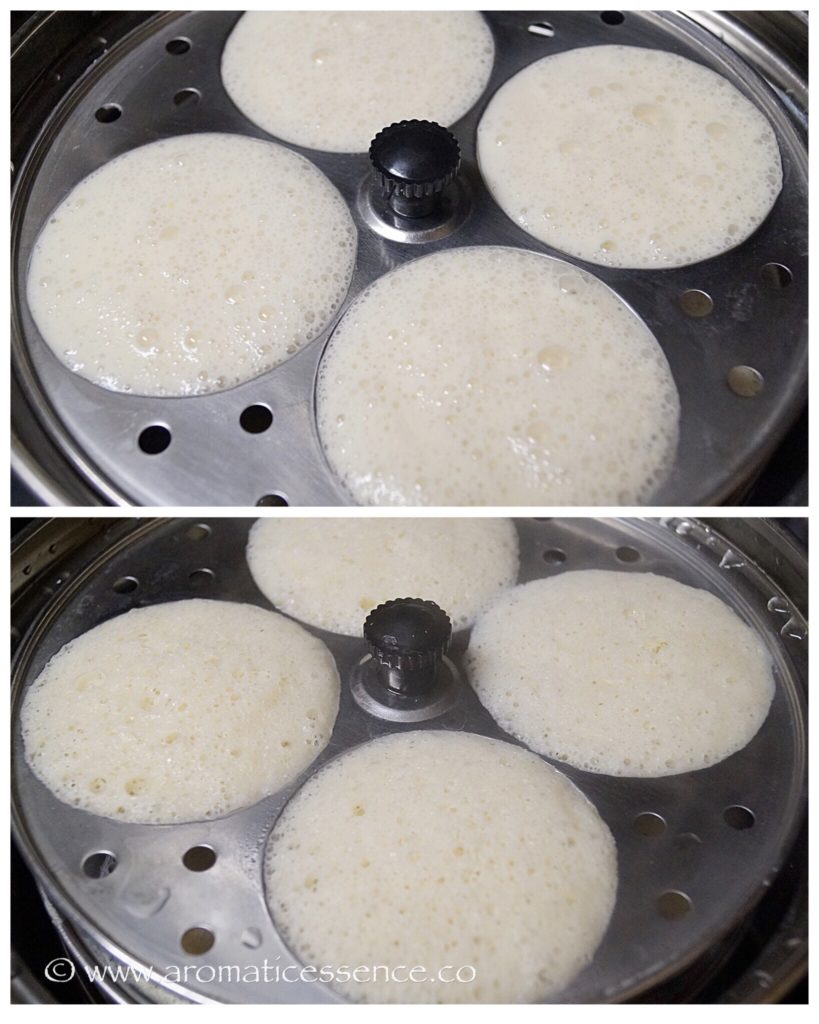
2.Steam it for about 10-12 minutes. Insert a toothpick or knife in one of the idlis to check for doneness. They are done when the toothpick comes out clean. Unmold the idlis using a butter knife or a spoon. Repeat the same procedure for other idli batches. Serve hot with sambar, coconut chutney, and podi.

NOTES, TIPS, AND TRICKS TO MAKE SOFT IDLI PERFECT IDLI BATTER IN THE MIXIE
- Do not let the mixer heat up whilst grinding the batter. When the batter heats up, it does not ferment well as the heat kills the good bacteria in the batter. Hence ice cold water helps to avoid that to an extent. At any point, if you feel your mixer is heating up, simply stop and let it cool down and continue.
- The above-mentioned ratio has yielded me excellent and soft idli. However, if the urad dal quality is good, 1: 4:: urad dal: rice works well too.
- The quality of urad dal is another important factor for a successful fermentation, so make sure your urad dal is fresh or not from an old batch.
- Soak urad dal for a shorter period. This helps in giving volume to the batter.
- Do not use split urad dal, it will not give the required volume to the batter.
- Do not go stingy on the water, the water proportions that I have mentioned have always given me good results. I do not know about the amount of water required to grind the batter in a stone wet grinder. But if you use a mixer grinder these water proportions should work fine. Still, it is always good to add water gradually, since the quality of rice and dal differs.
- During the winters if you want your batter to ferment quicker, you can add 1/4 to 1/2 tsp baking soda or powder to the batter, before fermenting it.
- Fenugreek does 3 things-
- Helps in fermentation.
- It gives a nice aroma to the batter which in turn passes to the aroma of the idli and dosa.
- Imparts a nice golden color to the dosas.
HOW TO MAKE SOFT IDLI?

Soft Idli Recipe | Idli | How To Make Idli & Dosa Batter In The Mixer Grinder
Ingredients
Measuring cup used, 1 cup = 250 ml, 1 tsp = 5 ml
- 3 cups idli rice/parboiled rice
- 1.25 to 1.5 cup whole urad dal/urad dal gota, skinless whole black lentils
- 1 tsp fenugreek (methi seeds)
- 1/2 cup thick poha/cooked rice
- 1 tbsp salt or to taste
Instructions
SOAKING THE RICE AND DAL
- Rinse the idli rice well, soak in about 5 cups of filtered water, preferably 8 hours or at least 4 hours.
- One hour before you begin to grind the batter, wash and drain the urad dal about 2-3 times. Soak the urad dal with enough water, about 3-4 cups of filtered water. Also, soak the fenugreek seeds along with the dal.
- .Just 15 minutes before you begin grinding the dal and rice, soak poha in sufficient filtered water. Then drain, squeeze excess water and add it to the rice whilst grinding.
HOW TO GRIND IDLI BATTER IN THE MIXIE?
- .After the specified soaking time, drain the urad dal & methi (reserve the water for grinding). Add ice cubes to the reserved water, plus use more filtered water as required for grinding, add ice cubes to that as well.
- Transfer 1/2 of the drained urad dal to your grinder/mixer along with 1/2 cup water, run the mixer on the lowest speed for 30 seconds.
- Open the lid and let the jar rest for another 30 seconds.
- Add another 1/2 cup water, cover the mixer and grind for another 30 seconds.
- Repeat the grinding process 2 to 3 times more if required with a resting time of 30 seconds, the batter should be fluffy and smooth. Do not let the mixer heat up. (I ground the batter in 2 batches & used a total of 2 cups ice cold reserved water). Then transfer this batter to a large vessel, with sufficient volume as the batter will rise during fermentation.
- Next, drain the rice, and grind along with poha or cooked rice in the mixer to a slightly coarse batter, adding little water as required. (I ground the rice in 3 batches and used a total of 1 & 1/2 cups water, 1/2 cup ice cold reserved water per batch. Follow the same procedure of grinding the rice, grind 30 seconds then rest for 30 seconds, repeat one more time.) Do not add too much water in one go. When you touch the batter, you should feel tiny rice granules. Do not grind to a smooth batter. Transfer this batter to the vessel containing the urad dal batter.
HOW TO FERMENT IDLI BATTER?
- Add salt and whisk the batter for 2-3 minutes. Incorporate the batters using clean hands. The final batter must be thick and flowy, not watery and runny. Add salt only while you mix the batter with hands, not when you are grinding the rice and urad dal. Cover with a lid and keep aside in a warm place to ferment overnight. (I switch on the oven to 180 degrees F for 10 minutes, then turn it off, switch on the oven light and let the batter ferment in the warm oven. The warmth of the oven light also aids in fermentation). If you do not have a big vessel, you can divide the batter into two containers/vessels. If the weather is warm and humid where you live, you can leave the container on the countertop, away from a draft-free place.
- Next morning, give the fermented batter one or two gentle swirls. Do not mix it vigorously. It took a total of 15 hours to ferment the batter in this chilly winter, I think it was 3 degrees C the day I made this batter. During the summer it should ferment in 8 hours. If your batter did not rise to the brim or didn’t even overflow, it doesn’t mean that your batter did not ferment. To check, take a ladle full of batter from the vessel if the batter in the vessel has air bubbles and you can feel the fermented smell then your batter is ready to use.
HOW TO STEAM IDLI AND HOW LONG TO STEAM IDLI?
- Bring water to a simmer in the idli steamer. Pour spoonful’s of batter into greased idli molds.
- Steam it for about 10-12 minutes. Insert a toothpick or knife in one of the idlis to check for doneness. They are done when the toothpick comes out clean. Unmold the idlis using a butter knife or a spoon. Repeat the same procedure for other idli batches. Serve hot with sambar, coconut chutney, and podi.
Notes
- Do not let the mixer heat up whilst grinding the batter. When the batter heats up, it does not ferment well as the heat kills the good bacteria in the batter. Hence ice cold water helps to avoid that to an extent. At any point, if you feel your mixer is heating up, simply stop and let it cool down and continue.
- The above-mentioned ratio has yielded me excellent and soft idli. However, if the urad dal quality is good, 1: 4:: urad dal: rice works well too.
- The quality of urad dal is another important factor for a successful fermentation, so make sure your urad dal is fresh or not from an old batch.
- Soak urad dal for a shorter period. This helps in giving volume to the batter.
- Do not use split urad dal, it will not give the required volume to the batter.
- Do not go stingy on the water, the water proportions that I have mentioned have always given me good results. I do not know about the amount of water required to grind the batter in a stone wet grinder. But if you use a mixer grinder these water proportions should work fine. Still, it is always good to add water gradually, since the quality of rice and dal differs.
- During the winters if you want your batter to ferment quicker, you can add 1/4 to 1/2 tsp baking soda or powder to the batter, before fermenting it.
- Fenugreek does 3 things- Helps in fermentation. It gives a nice aroma to the batter which in turn passes to the aroma of the idli and dosa. Imparts a nice golden color to the dosas.

I would love to hear from you! Please feel free to share your feedback with photos and suggestions to me at aromaticessence77@gmail.com
You can also follow me on,
Facebook @ Aromaticessence
Pinterest @ Aromatic Essence
Instagram @ aromatic_essence77
Twitter @ freda_dias
Regards,
Freda

Soft Idli Recipe | Idli | How To Make Idli & Dosa Batter In The Mixer Grinder
Ingredients
Measuring cup used, 1 cup = 250 ml, 1 tsp = 5 ml
- 3 cups idli rice/parboiled rice
- 1.25 to 1.5 cup whole urad dal/urad dal gota, skinless whole black lentils
- 1 tsp fenugreek (methi seeds)
- 1/2 cup thick poha/cooked rice
- 1 tbsp salt or to taste
Instructions
SOAKING THE RICE AND DAL
- Rinse the idli rice well, soak in about 5 cups of filtered water, preferably 8 hours or at least 4 hours.
- One hour before you begin to grind the batter, wash and drain the urad dal about 2-3 times. Soak the urad dal with enough water, about 3-4 cups of filtered water. Also, soak the fenugreek seeds along with the dal.
- .Just 15 minutes before you begin grinding the dal and rice, soak poha in sufficient filtered water. Then drain, squeeze excess water and add it to the rice whilst grinding.
HOW TO GRIND IDLI BATTER IN THE MIXIE?
- .After the specified soaking time, drain the urad dal & methi (reserve the water for grinding). Add ice cubes to the reserved water, plus use more filtered water as required for grinding, add ice cubes to that as well.
- Transfer 1/2 of the drained urad dal to your grinder/mixer along with 1/2 cup water, run the mixer on the lowest speed for 30 seconds.
- Open the lid and let the jar rest for another 30 seconds.
- Add another 1/2 cup water, cover the mixer and grind for another 30 seconds.
- Repeat the grinding process 2 to 3 times more if required with a resting time of 30 seconds, the batter should be fluffy and smooth. Do not let the mixer heat up. (I ground the batter in 2 batches & used a total of 2 cups ice cold reserved water). Then transfer this batter to a large vessel, with sufficient volume as the batter will rise during fermentation.
- Next, drain the rice, and grind along with poha or cooked rice in the mixer to a slightly coarse batter, adding little water as required. (I ground the rice in 3 batches and used a total of 1 & 1/2 cups water, 1/2 cup ice cold reserved water per batch. Follow the same procedure of grinding the rice, grind 30 seconds then rest for 30 seconds, repeat one more time.) Do not add too much water in one go. When you touch the batter, you should feel tiny rice granules. Do not grind to a smooth batter. Transfer this batter to the vessel containing the urad dal batter.
HOW TO FERMENT IDLI BATTER?
- Add salt and whisk the batter for 2-3 minutes. Incorporate the batters using clean hands. The final batter must be thick and flowy, not watery and runny. Add salt only while you mix the batter with hands, not when you are grinding the rice and urad dal. Cover with a lid and keep aside in a warm place to ferment overnight. (I switch on the oven to 180 degrees F for 10 minutes, then turn it off, switch on the oven light and let the batter ferment in the warm oven. The warmth of the oven light also aids in fermentation). If you do not have a big vessel, you can divide the batter into two containers/vessels. If the weather is warm and humid where you live, you can leave the container on the countertop, away from a draft-free place.
- Next morning, give the fermented batter one or two gentle swirls. Do not mix it vigorously. It took a total of 15 hours to ferment the batter in this chilly winter, I think it was 3 degrees C the day I made this batter. During the summer it should ferment in 8 hours. If your batter did not rise to the brim or didn’t even overflow, it doesn’t mean that your batter did not ferment. To check, take a ladle full of batter from the vessel if the batter in the vessel has air bubbles and you can feel the fermented smell then your batter is ready to use.
HOW TO STEAM IDLI AND HOW LONG TO STEAM IDLI?
- Bring water to a simmer in the idli steamer. Pour spoonful’s of batter into greased idli molds.
- Steam it for about 10-12 minutes. Insert a toothpick or knife in one of the idlis to check for doneness. They are done when the toothpick comes out clean. Unmold the idlis using a butter knife or a spoon. Repeat the same procedure for other idli batches. Serve hot with sambar, coconut chutney, and podi.
Notes
- Do not let the mixer heat up whilst grinding the batter. When the batter heats up, it does not ferment well as the heat kills the good bacteria in the batter. Hence ice cold water helps to avoid that to an extent. At any point, if you feel your mixer is heating up, simply stop and let it cool down and continue.
- The above-mentioned ratio has yielded me excellent and soft idli. However, if the urad dal quality is good, 1: 4:: urad dal: rice works well too.
- The quality of urad dal is another important factor for a successful fermentation, so make sure your urad dal is fresh or not from an old batch.
- Soak urad dal for a shorter period. This helps in giving volume to the batter.
- Do not use split urad dal, it will not give the required volume to the batter.
- Do not go stingy on the water, the water proportions that I have mentioned have always given me good results. I do not know about the amount of water required to grind the batter in a stone wet grinder. But if you use a mixer grinder these water proportions should work fine. Still, it is always good to add water gradually, since the quality of rice and dal differs.
- During the winters if you want your batter to ferment quicker, you can add 1/4 to 1/2 tsp baking soda or powder to the batter, before fermenting it.
- Fenugreek does 3 things- Helps in fermentation. It gives a nice aroma to the batter which in turn passes to the aroma of the idli and dosa. Imparts a nice golden color to the dosas.
This Mediterranean quinoa salad with chickpeas is quick, easy, light, filling, protein-rich, and delicious!

Hi guys! Hope you had a lovely weekend 🙂 Today’s post happens to be the 200th post on my blog, a tiny space in the web world. But it is a little milestone for me, nonetheless.
Usually, I tend to lean towards sharing a dessert for such little occasions, but I thought I’d change that up. So this time around, I have this super healthy, protein-rich Mediterranean Quinoa Salad to share with you. And with this post, I’m also pleased that quinoa has made an appearance on my blog.

I didn’t take a liking to quinoa the first time I tasted it, probably because I did not cook it right. So, I simply forgot about this seed and moved on.
I picked up this bag of frozen quinoa and chickpea salad on a whim and partly also to try quinoa again. We all know how nutritious this superfood is!! Giving it a go the second time around wouldn’t hurt, right? And I’m glad I did, I loved that salad, it was wholesome and delicious. Made me a quinoa-loving convert in an instant 🙂

Since I enjoyed that salad so much, I thought I’d recreate it at home and infuse some Mediterranean elements. I usually have most things in my pantry except for the Feta cheese. I even had a packet of quinoa sitting there, untouched, begging to be used! These cherry tomatoes are from our very own tiny little garden. Using fresh home produce just adds a little extra to any dish. Don’t you think too?
I love the crunch from the veggies, saltiness from the feta and kalamata olives, the sweetness from the cherry tomatoes, a bite from the creamy chickpeas and a simple homemade dressing that ties all of this together! We just make a meal out of it or sometimes have it as a side with some grilled chicken.
You can add more or less of the veggies, as you fancy. But there is absolutely no reason why you shouldn’t be trying this. This Mediterranean quinoa salad with chickpeas is definitely making more rounds on our table 🙂
If you are looking for some quinoa recipes, don’t forget to give this easy Mediterranean quinoa salad a go!

- How to cook quinoa?
- Enjoyed this Mediterranean quinoa salad? Then you may also like these easy salad recipes
- How to make Mediterranean quinoa salad with chickpeas – Step by step instructions
- Mediterranean Quinoa Salad With Chickpeas
How to cook quinoa?
- 1 cup of dry quinoa yields 3 cups of cooked quinoa. You will need a 1:2 ratio of quinoa to liquid, i.e. liquid has to be double the amount of quinoa, it is just like cooking rice.
- You can use 2 cups of cooked quinoa for this recipe and refrigerate the remaining quinoa in an air-tight container up to 3 days. Use it in breakfast porridges, stir-fries, smoothies or croquettes, etc.
Or use the following measures to make 2 cups of cooked quinoa-
Measure 2/3 cup dry quinoa, place it in a fine-mesh strainer, rinse under running water to remove the bitter flavor. (Most quinoa available commercially is often pre-rinsed, still, it is a good idea to rinse it).
Place the drained quinoa along with 320 ml (1 & 1/3 cups) water in a saucepan, bring to a boil, add 1/8 teaspoon of salt. You can also add dried herbs like oregano, basil, parsley, or smashed garlic, etc at this stage for additional flavor. Give it a quick mix, turn the heat to medium-low, cover the saucepan and simmer for 15 minutes or until all of the water is absorbed.
Once the quinoa is cooked, fluff it with a fork, remove it from the pot, let it cool for few minutes and use it as directed in this Mediterranean quinoa salad recipe.
Greek salad
Blood orange salad with blood orange vinaigrette
Strawberry Spinach Salad
Caprese Salad
Watermelon Cucumber Feta Salad
How to make Mediterranean quinoa salad with chickpeas – Step by step instructions
Step 1: Add all the salad ingredients in a large bowl
In a sufficiently large bowl, add 2 cups of cooked quinoa, 1-(15 oz) can of rinsed and drained chickpeas, 1 & 1/2 cups each of cherry tomatoes and diced English cucumber along with 10-12 olives (pitted, drained, and sliced), 1/2 cup thinly sliced onion, 1/2 cup loosely packed chopped parsley and 1 cup of crumbled feta cheese.
Tip: To reduce the pungency of onions, place them in a bowl of ice-cold water for 10-15 minutes. Drain and use in the recipe.

Step 2: Prepare the dressing and pour it over the salad
Whisk 1/3 cup extra virgin olive oil, 3 tablespoons lemon juice, 2 tablespoons orange juice (optional), 1 teaspoon each of honey, lemon zest, minced garlic, 1 teaspoon dried oregano, 1/2 teaspoon dried basil, a pinch of salt and freshly cracked pepper, until well blended.
Or add all the dressing ingredients in a Mason jar, close the jar, and shake vigorously until emulsified.
Pour the dressing over the salad and toss well to combine. Serve right away or refrigerate and serve later.

You can also follow me on Facebook , Pinterest, Instagram & Twitter

Mediterranean Quinoa Salad With Chickpeas
Ingredients1x2x3x
For the salad
- 2 cups cooked quinoa
- 1 (15-ounce) canned chickpeas, rinsed and drained
- 1.5 cups cherry tomatoes
- 1.5 cups peeled and diced cucumber, about 1/2 an English cucumber
- 10-12 olives, pitted, drained, and sliced
- 1/2 cup thinly sliced onions
- 1/2 cup loosely packed chopped parsley
- 1 cup crumbled feta cheese
For the dressing
- 1/3 cup extra virgin olive oil
- 3 tablespoon lemon juice
- 2 tablespoon orange juice, optional
- 1 teaspoon honey
- 1 teaspoon lemon zest
- 1 teaspoon minced garlic
- 1/2 teaspoon dried basil
- 1 teaspoon dried oregano, crushed between your palms
- Salt and freshly ground black pepper, to season
Instructions
- Add all the salad ingredients in a sufficiently large bowl.
- Add all the dressing ingredients in a bowl and whisk until well blended.
- Pour the dressing over the salad, toss well to combine. Serve right away or refrigerate and serve later.
Notes

