Sitaphal Basundi is a delicious twist to the classic basundi recipe. Thickened and mildly sweetened milk is flavored with the sweet and luscious flavor of ripe custard apple.
You need a few ingredients to make this basundi, perfect to be enjoyed during the upcoming festive seasons!

It’s been a while since I’ve posted anything on the blog. I’ve been away due to some unforeseen issues, but now that I’m back, I hope I can continue sharing a lot of delicacies in the coming months.
Let me start off with this delicious sitaphal basundi recipe. The basic basundi recipe is made by reducing the milk to half, which is then sweetened with some sugar and flavored with cardamom. That’s about it!
Basundi is great as it is, but it is so much better when it’s infused with the sweet flavor of custard apple.
This dessert is popular in the states of Western India, especially in Gujarat and Maharashtra. Basundi is a lighter version of the North Indian Rabri. The difference between the two is in the texture and consistency.
Basundi is thinner in consistency as opposed to rabri which is quite thick. Rabri is usually lachchedar (layers of milk fat) that offers a bite, while basundi is usually smooth and creamy. Rabri is also more time-consuming because the milk is reduced to almost 1/3rd of 1/4th of its original quantity.

I happened to try this Sitaphal Basundi for the first time at a restaurant that serves Gujarati thali a couple of years ago. I was in love with this version of basundi. I knew I was going to try making it at home.
I realized that I’ve never posted any custard apple dessert on the blog. So, I’m glad I can finally share something related to it on this space. Custard apples lend themselves beautifully in most dessert recipes, be it kulfis, ice creams, rabri, or milkshakes.
Custard apple is also known as sitaphal, sharifa, sugar apple, bull’s heart, and cherimoya. Besides being delicious, they offer numerous health benefits.
The recipe for sitaphal basundi is really simple, but you need to be attentive as is the case with every milk-based dessert. It is delicious, quite addictive, and something that I’m sure you guys will enjoy.
So, let’s see how it’s made!
- Ingredients needed to make custard apple basundi
- Why must you try this recipe?
- How To Make Sitaphal Basundi- Step By Step process
- Storage Suggestions
- Recipe Tips
- Variations of this recipe
- Frequently Asked Questions (FAQ’s)
- You may also enjoy these Indian milk-based desserts
- Sitaphal Basundi | Custard Apple Basundi
Ingredients needed to make custard apple basundi
To make sitaphal basundi, you will need;
Milk: I’ve used full-fat milk and I suggest sticking to the same for best results.
Sugar: To sweeten the basundi. Adjust as per the sweetness of the custard apple.
Custard apple pulp: This is the star ingredient of this basundi that adds a lovely flavor to the basundi.
Other ingredients: Besides, these three ingredients, I’ve also used cardamom to elevate the taste of this basundi. I’ve also added some slivered almonds and pistachios for texture and crunch.

Why must you try this recipe?
✔ Custard apples are currently in season in India, and that is reason enough to whip up this sweet treat
✔ It is an easy dessert that is creamy, rich, and delicious
✔ Delicious dessert to serve at potlucks or gatherings
✔ Needs minimal ingredients
✔ Perfect to be served during the upcoming festivities such as Navratri, Diwali etc
✔ Can be had on days when you observe fasts
How To Make Sitaphal Basundi- Step By Step process
Step 1: Bring milk to a boil
Heat 1-litre full-fat milk in a heavy-bottomed pan or kadai over medium heat, stirring occasionally in between. Bring to a boil. ( Photos 1 to 3 )

Step 2: Reduce the milk until thickened
Reduce the heat to low, and continue cooking the milk. Scrape the sides of the pan and stir frequently to prevent it from sticking at the bottom of the pan. Cook until the milk reduces to half (2 cups). ( Photo 4 )

Step 3: Sweeten and flavor the milk
Now, add 1/4 cup sugar, mix well and cook further for 2-3 minutes, until the sugar dissolves. ( Photos 5 and 6 )

Add 1/4 teaspoon cardamom powder, and 1/2 tablespoon each of slivered almonds and pistachios. Mix well, and cook for another 1-2 minutes. ( Photos 7 to 10 )

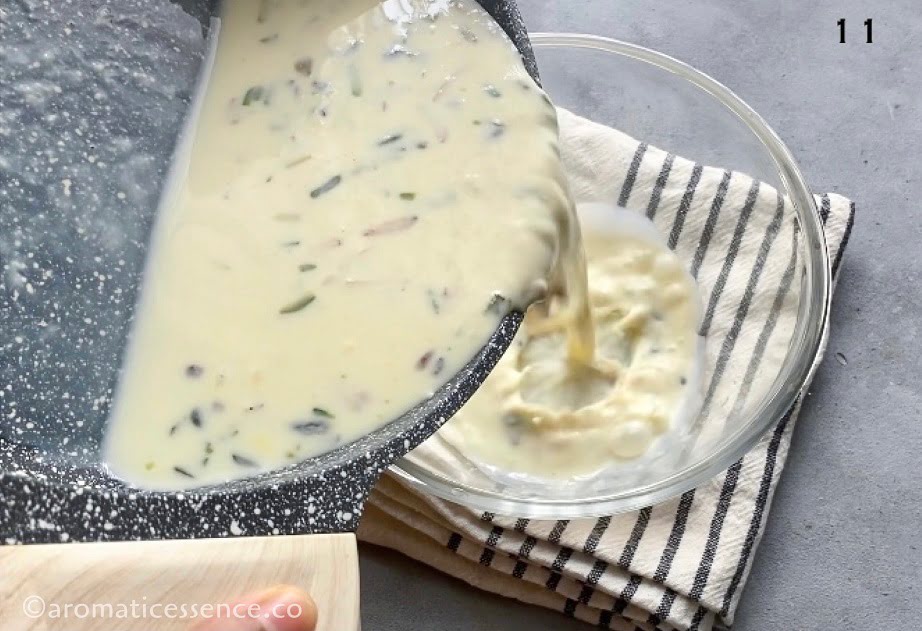
Switch off the heat, and transfer the basundi to a heat-proof bowl. Set aside to cool down completely. ( Photo 11 )
Step 4: Add custard apple pulp
Once the basundi reaches room temperature, add the custard apple pulp, and mix well. Cover the bowl, and refrigerate for 2-3 hours or until you are ready to serve. ( Photos 12 to 15 )
Transfer to serving bowls and garnish with the remaining 1/2 tablespoon each of slivered almonds and pistachios.

Storage Suggestions
Refrigerate custard apple basundi in an airtight container for up to 2 to 3 days. This tastes best when it is served chilled.

Recipe Tips
Full-fat milk: For creamy, milk-based desserts, always use full-fat milk. For a richer and creamier basundi, you can also use buffalo’s milk. If you are watching your calories, feel free to use low-fat milk.
Use a wide and thick bottomed vessel: Though not necessary, try and use a wide pan, as it has more surface area, which helps in reducing the milk faster. Whether you choose to use a kadai or a wide pan, make sure that it has a thick base, so that the milk does not scorch and brown at the bottom of the pan.
Remember to keep stirring: This is the most important point with milk-based sweets that need a long time to cook. If you walk away from the stovetop, chances are that the milk will stick to the bottom, and it may also boil, and spill over the pan. Pay attention to the milk, and keep stirring every 1 to 2 minutes.
Use ripe custard apple: Try and use fully ripe custard apples as the flesh tends to be soft and really sweet. It is also much easier to separate the seeds and pulp.
Do not add custard apple pulp to the hot basundi: Doing so might curdle the milk. Always add it once the basundi cools down completely. The pulp will also taste fresh and way better when added once the basundi cools down completely.
Adjust sugar as required: Feel free to adjust the quantity of sugar as per your desired sweetness. Taste the custard apple pulp and check for sweetness. If you end up adding too much sugar and the basundi becomes too sweet for your liking, salvage it by adding some thickened and reduced milk.
Variations of this recipe
With condensed milk: You can use condensed milk here instead of sugar for a richer, creamier, and thicker basundi. Start with 100 grams, taste, and adjust the sweetness as required. Remember to factor in the sweetness from the sitaphal pulp as well.
Saffron: You can add some saffron strands for a light golden-colored basundi. Add the strands after the milk comes to a boil, and follow the rest of the recipe as is. Do not add too much saffron as it can overpower the delicate flavor of the custard apple.
Nutmeg: You can use nutmeg in combination with cardamom, or else you can swap cardamom entirely with nutmeg powder.
Vegan: Use your favorite plant-based milk for a vegan version. If it doesn’t thicken to your liking, then add cornflour/cornstarch slurry (2 teaspoons of cornflour mixed with 1 tablespoon of plant-based milk).

How to remove the seeds from custard apple?
There are 3 ways in which you can deseed the custard apple;
- Manually: The most time-consuming process. Break apart the fruit in half lengthwise. You have to manually separate the seed from the flesh using your fingers.
- Using a fine-mesh sieve: Place a fine-mesh strainer over a bowl. Scoop the custard apple flesh using a spoon into the strainer. Use a spoon, spatula, or whisk to agitate the pulp vigorously to separate the seeds and flesh. Pick the seeds and transfer the flesh to the bowl. Refer recipe video.

- Using a food processor: This is similar to the method above. Transfer the pulp to the bowl of a food processor fitted with the blade. Pulse 1-2 times, until the seeds separate from the flesh. Do not overprocess, or you will end up with tiny bits of seeds scattered in the pulp, which is really unpleasant to eat.
Amongst the three methods mentioned above, I prefer using the bowl and strainer method.
Why is my custard apple basundi bitter?
Avoid scraping and scooping out the custard apple flesh that is closest to the skin as it will render a bitter taste and a grainy texture to the basundi.
Are Sitaphal Basundi and Sitaphal cream the same?
The two are not the same. Sitaphal cream is made by folding sitaphal pulp in sweetened whipped cream. It is similar to this mango cream recipe . If you’d like to make it, just swap the mango with sitaphal pulp.
You may also enjoy these Indian milk-based desserts
Rasmalai
Kalakand
Mango kheer
You can also follow me on Facebook , Pinterest, Instagram & Twitter

Sitaphal Basundi | Custard Apple Basundi
Ingredients1x2x3x
- 1 litre full-fat milk, 4 cups
- 50 grams sugar, approx 1/4 cup
- 200 grams custard apple pulp, about 3/4 cup
- 1/4 teaspoon cardamom powder
- 1 tablespoon slivered pistachios, divided
- 1 tablespoon slivered almonds, divided
- dried rose petals, as required for garnishing, optional
Instructions
- Heat milk in a heavy-bottomed pan or kadai over medium heat, stirring occasionally in between. Bring to a boil.
- Reduce the heat to low, and continue cooking the milk. Scrape the sides of the pan and stir frequently to prevent it from sticking at the bottom of the pan. Cook until the milk reduces to half (2 cups).
- Now, add sugar, mix well and cook further for 2-3 minutes, until the sugar dissolves.
- Add cardamom powder, and half of the slivered almonds and pistachios. Mix well, and cook for another 1-2 minutes.
- Switch off the heat, and transfer the basundi to a heat-proof bowl. Set aside to cool down completely.
- Once the basundi reaches room temperature, add the custard apple pulp, and mix well. Cover the bowl, and refrigerate for 2-3 hours or until you are ready to serve.
- Transfer to serving bowls and garnish with the remaining 1/2 tablespoon each of slivered almonds and pistachios.
Video
Notes
Nutrition

Sitaphal Basundi | Custard Apple Basundi
Ingredients
- 1 litre full-fat milk, 4 cups
- 50 grams sugar, approx 1/4 cup
- 200 grams custard apple pulp, about 3/4 cup
- 1/4 teaspoon cardamom powder
- 1 tablespoon slivered pistachios, divided
- 1 tablespoon slivered almonds, divided
- dried rose petals, as required for garnishing, optional
Instructions
- Heat milk in a heavy-bottomed pan or kadai over medium heat, stirring occasionally in between. Bring to a boil.
- Reduce the heat to low, and continue cooking the milk. Scrape the sides of the pan and stir frequently to prevent it from sticking at the bottom of the pan. Cook until the milk reduces to half (2 cups).
- Now, add sugar, mix well and cook further for 2-3 minutes, until the sugar dissolves.
- Add cardamom powder, and half of the slivered almonds and pistachios. Mix well, and cook for another 1-2 minutes.
- Switch off the heat, and transfer the basundi to a heat-proof bowl. Set aside to cool down completely.
- Once the basundi reaches room temperature, add the custard apple pulp, and mix well. Cover the bowl, and refrigerate for 2-3 hours or until you are ready to serve.
- Transfer to serving bowls and garnish with the remaining 1/2 tablespoon each of slivered almonds and pistachios.
Video
Notes
Nutrition
Learn how to make pure mawa (khoya) the way it is made traditionally from scratch using just one ingredient, i.e. whole milk. Take your sweet treats a notch up this festive season with this homemade khoya!

Diwali is round the corner and I’m sure everyone is busy gearing up for the upcoming festival of lights.
I’m also sure you have made a list of things to make, buy and all the decor needed to spruce up your homes. Any Indian festival is incomplete without all the variety of amazing food and sweets.
I’ve planned on sharing some Diwali delicacies this season, but first, I would like to talk about homemade khoya. It has been on my to-do list for a while now.
If you are up to the challenge of making mawa from scratch, then this is the post you need. It is really simple, I promise!
All you need to do is follow all the tips in the post and you are good to go.

- What is mawa?
- Why make khoya at home?
- Ingredients needed
- How To Make Homemade Mawa Recipe – Step by step process
- Storage instructions
- What can I make using this homemade khoya?
- Recipe tips to make Indian Khoya
- Frequently asked questions (FAQs)
- Mawa Recipe | How To Make Khoya
What is mawa?
Evaporated milk solids or mawa, is prepared by simmering full-fat or whole milk until most of the water content evaporates. The milk is reduced to 1/5th of its original quantity. When the milk is reduced to this stage, you are left with a semi-solid dough, which is nothing but unsweetened khoya.
It is also known as khoya, khoa, khava, khoya, or khowa and is traditionally prepared in a deep iron wok.
There are quite a few types of mawa;
- Batti (hard variety): Batti means brick/rock and this kind of khoa is hard enough to be grated like cheese. It contains about 20% moisture by weight. This variety is also aged at times, for up to 1 year, due to which it develops a unique aroma and taste.
- Chikna (soft variety): Chickna means ‘slippery’ or ‘squishy’ and it has about 50 % of moisture. It is taken off the heat a little earlier than the batti variety and hence it is a little soft due to the extra moisture content. It is best added in savory gravies for a rich touch.
- Danedaar : This is a granular or grainy variety of khoya that has moderate moisture. Milk is coagulated with an acidic agent during the simmering process due to which it develops the granular texture. It is best used in sweets like kalakand, etc
- Dhaap or daab ka khoya: This is a less dried version, popularly used in making gulab jamun.
- Pindi koya: This is a dry variety used in making burfi and pedas.
- Hariyali Mawa: Khoa is normally white or pale yellow. If prepared in the winter, it may be saved for use in the summer and may acquire a green tinge and grainier texture from a harmless surface mold. This is called hariyali (green khoa) and is used in recipes where the khoya is thoroughly cooked, e.g., gulab jamun . With the advent of refrigeration, the production of hariyali is rare. (Source- Wiki )

There are many ways of making mawa instantly, for instance;
- With ricotta cheese and ghee
- Milk powder, milk, and ghee
- Using the microwave
But trust me, while all these instant mawa recipes are good, nothing beats homemade mawa.
If you have the time to spare I’d definitely suggest you try making this khoya recipe without the microwave. You will certainly see the difference it makes in the final outcome of all your Indian sweets.
Having said that, I will surely try to share the instant version of making mawa with milk powder in my future posts.

Why make khoya at home?
Readymade khoya is easily available in most mithai shops. Most popular brands have also started making khoya, which makes it accessible in most big cities in India.
In the United States, it is easily available in most Indian grocery stores in the frozen food aisle. If not in that aisle, you will get it easily in the powdered form known as milk-mawa powder.
So why bother making it at home? Here’s why you should try making it for yourself
- You end up with unadulterated mawa.
- It is not a tedious process, but one that does need a watchful eye.
- Homemade mawa definitely yields the most amazing, melt-in-the-mouth mithai’s :p
- If you find yourself with an excess quantity of milk, make mawa and freeze it for later use.
Ingredients needed
Milk: You only need milk for this recipe, but make sure you use full-fat or whole milk. I prefer using buffalo’s milk because of the increased fat content and thus a higher yield. You can also use cow’s milk as it is readily available.

How To Make Homemade Mawa Recipe – Step by step process
Step 1: Bring milk to a boil
Heat 1.5 litres of full-fat milk in a heavy-bottom pot or kadai over medium heat. ( Photo 1 )
Bring to a boil, stirring occasionally to prevent it from sticking at the bottom of the pan. ( Photo 2 )

Step 2: Reduce the milk until all the moisture evaporates
Once the milk comes to a boil, reduce the heat to medium-low, simmer uncovered, stirring the sides and bottom of the pan every 2-3 minutes, until the milk reduces and begins to thicken.
Once it starts thickening and appears grainy, stir continuously, scraping the bottom and the sides of the pan, until it changes into a doughy consistency and begins to leave the sides of the pan.
At this stage, the bubbling will stop which indicates the moisture in the milk has sufficiently evaporated and you are left with milk solids. ( Photo 3 to 6 )
Cook for another minute. The entire process took me about an hour and a half. ( Photo 7 )
Transfer the mawa to a container, let it cool completely. It will turn hard as it cools down. Refrigerate once it has cooled down. ( Photo 8 )

Storage instructions
If not using khoa right away, wrap it in cling wrap and place it in an air-tight container. Refrigerate for 4 to 5 days.
Or place it in a freezer-safe container, label the contents, and freeze for up to 1 month.
Thaw overnight in the refrigerator. Crumble or grate the khoa and use as required in the recipe.
What can I make using this homemade khoya?
There are numerous khoya dishes that are quite popular in India. It can be used for both, sweet and savory recipes. Following are some of my favorite recipes using mawa;
- Gulab jamun: Nothing beats gulab jamun made using khoa. I’ve shared a very detailed recipe on this no-fail, gulab jamun post . Do check it out.
- Burfi’s: You can make so many flavored burfis, for instance, chocolate, mango, coconut, pista, etc using mawa as the base.
- Peda’s: Again, pedas are quite similar to burfi except for the shapes and sizes. You can also make modak shaped pedas.
- Ladoo: Not necessarily an ingredient used as a base in ladoo recipes. It can be added to enhance the flavor and richness of ladoos.
- Halwa: Again, just like ladoos, it isn’t used here as a primary ingredient. It is mostly added towards the end to add richness to the halwa, for example, gajar halwa, moong dal halwa, and the likes.
- Kheer/basundi/rabri: A little mawa can be added to these dessertss, especially when making for any ocassion.
- Mawa cake: One of my favorite cakes has to go to be a simple mawa cake. My recipe for mawa cake at home is inspired by the ones I’ve enjoyed from the popular Irani cafe, i.e Kayani’s at Marine Lines, Mumbai.
- Kulfi: Khoya is quite a common ingredient in kulfi.
- Gujiya/ghughra/karanji: These are deep-fried crescent-shaped fritters stuffed with sweet khoya filling.
- Samosa: This is a sweet version of samosa stuffed with a similar filling used for gujiya.
- Malpua: Used as one of the ingredients to make these pancakes dunked in sweet sugar syrup.
- Savory dishes: It is used in mildly sweet savory recipes like malai kofta, khoya matar, kaju khoya gravy, khoya paneer, khoya vegetable gravy, navratan korma, etc.
Recipe tips to make Indian Khoya
The apparatus to be used: As I mentioned above, you can prepare khoa in an iron kadai the traditional way. If not, then I suggest using a wide and thick bottomed pan. This gives more surface area, and hence reduces the overall cook time.
The best milk to use: It is preferable to use full cream buffalo milk, as it has a higher fat content as compared to cow milk. This also means that you will end up with a higher yield.
Pay attention to the milk while reducing: Once the milk has reduced and thickened, do not stop stirring. It can cause the milk to scorch which will produce an unwanted burnt aroma to the khoya rendering it totally useless. Waste of time, energy, and milk!! So please be attentive while making mawa at home.

Are khoya and paneer one and the same thing?
No, they are two different milk products.
Paneer is made by curdling the milk with lemon, vinegar, or yogurt. The curdled milk solids are rinsed and drained through a muslin or cheesecloth and then pressed down for several hours using heavyweights such as a heavy pot or mortar and pestle to drain the whey completely.
You end up with a block of paneer cheese that can be diced into cubes or crumbled to make dishes such as paneer bhurji.
Whereas for khoa we only need to reduce the milk until most of the moisture is lost and the milk reaches a semi-solid, halwa-like consistency.
What is the taste and texture of khoya?
Khoya has a rich, nutty, milky, and mildly sweet taste due to slow cooking and the caramelization of sugars in the milk.
It is slightly greasy to touch and has a little granular texture. Khoya adds a rich, creamy texture and mouthfeel and that is probably why it is used as the base for a majority of Indian sweets.
How much khoa can you get from 1 liter of milk?
1.5 liters of buffalo’s milk yielded about 350 grams of khoya. You should get about 225 to 230 grams for 1 liter of milk. If you use cow’s milk, you will definitely get a slightly lower yield.
You can also follow me on Facebook , Pinterest, Instagram & Twitter

Mawa Recipe | How To Make Khoya
Ingredients1x2x3x
- 1.5 litres full-fat milk, I’ve used buffalo’s milk
Instructions
- Heat milk in a heavy-bottom pot or kadai over medium heat. Bring to a boil, stirring occasionally to prevent it from sticking at the bottom of the pan.
- Once the milk comes to a boil, reduce the heat to medium-low, simmer uncovered, stirring the sides and bottom of the pan every 2-3 minutes, until the milk reduces and begins to thicken.
- Once it starts thickening and appears grainy, stir continuously, scraping the bottom and the sides of the pan, until it changes into a doughy consistency and begins to leaves the sides of the pan.
- Cook the mawa for another minute.
- Transfer the mawa to a container, let it cool completely. It will turn hard as it cools down. Refrigerate once it has cooled down.
