These spicy Schezwan noodles are quick and delicious and make for a scrumptious meal, ready under 15 minutes!

I really don’t need a reason to indulge in Indo-Chinese cuisine!!
What’s not to love about it?
- It’s all done in a matter of minutes, just the ideal quick-fix meal we all desire sometimes.
- Needless to say, it’s delicious, the layers of umami flavor are surely what makes you drool at the thought of Indo-Chinese.
- I frankly don’t need a reason to make Indo-Chinese meals, coz no matter whatever dish you prepare, veg or non-veg, you’re palate and taste buds will thank you for the super scrumptious meal, and so will the rest of your family and friends.
Yes, the only prep part is the chopping the veggies and prepping up the meat, if you are a novice at cooking, that skill will easily come along with experience. For a shortcut, there are a variety of frozen stir fry veggie blends. That’s a great option as well 🙂

Cooking something as easy as a basic noodle can be daunting for many folks. Well ask me, I’ve had my days and shares of sticky, gluey noodles, not very appetizing to look at I say.
Mom always got her noodles right, but me! I couldn’t! I finally perfected it after a few failures, and now I never have to worry about sticky noodles.
It doesn’t matter what brand you use, whether they are egg/eggless noodles. The trick is not overcooking them, cook it like you’d cook pasta, except that noodles cook in a relatively short time.
You have to fish them out of the water as soon as it reaches the al dente stage, read instructions and pics for reference below.
Want to hear a cheat’s trick? I use angel hair pasta or sometimes even Cappellini pasta to make Chinese style noodles. Well, I love pasta and Chinese, so heck, why not??

- How to make spicy noodles | Schezwan noodles | Sichuan noodles?
- You may enjoy these spicy schezwan noodles with-
- Step by step instructions to make spicy schezwan noodles, Indian style | Szechuan stir fry noodles
- HOW TO MAKE SCHEZWAN NOODLES?
- Schezwan Noodles | How To Make Spicy Schezwan Noodles
How to make spicy noodles | Schezwan noodles | Sichuan noodles?
You can make spicy Schezwan noodles in 3 easy steps-
- Cook the noodles.
- In the meanwhile, prep up your veggies, and saute them along with the schezwan sauce.
- Add in the cooked noodles and give everything a quick toss!! That’s it, how easy was that!
These hot and spicy noodles are loaded with veggies to make it wholesome. Makes for a quick and delicious weeknight meal.
Schezwan sauce has basically everything you need, the soy sauce, vinegar, sugar and tomato ketchup. You really don’t need to add anything else in this preparation except for the schezwan sauce.
I prefer making a homemade batch, It stay’s great for months in the refrigerator. You can find the recipe here . Or simply used store bought schezwan sauce!

Homemade Schezwan sauce
You may enjoy these spicy schezwan noodles with-
Schezwan potatoes
Chilli Paneer
Step by step instructions to make spicy schezwan noodles, Indian style | Szechuan stir fry noodles
1.Prep your veggies, cut all the veggies lengthwise. Use whatever veggies you have at hand.

2.Bring water to boil in a pot, add salt and the hakka noodles. Do not break the noodles. Cook till al dente as per package instructions. Usually, 3-4 or even 2-3 minutes are sufficient.

3.Drain the cooked noodles in a colander, to get rid of any starch.

4.Drizzle 1 teaspoon oil all over the noodles, mix in gently. Set aside.

5.Heat 2 tablespoons oil in a wok on high heat. Add in the ginger- garlic, saute until aromatic. Add white portion of scallion greens (cut lengthwise). Saute for 30 seconds.

6.Next add bell peppers and carrots, saute for 1/2 a minute.

7.Throw in the cabbage next, saute for another 30 seconds.

8.Add the schezwan sauce , salt & pepper. Mix and saute for another 15 seconds.

9.Add in the noodles, mix gently with the help of two forks on high heat for another minute or two. Switch off the heat, sprinkle diagonally chopped scallion green/spring onion greens. Serve hot as is, or with any Indo-Chinese gravy.


NOTES
- For a non-veg version, saute thin strips of meat/ shrimp in little oil, until cooked through. Remove and set aside. Then proceed from step 5 until step 7. Add in the cooked meat/shrimp, mix and then proceed as mentioned under step 8 & 9.
- You can also throw in some scrambled egg on top.
- If you like your noodles a little tangy, drizzle some vinegar after adding in your noodles. Mix well.
HOW TO MAKE SCHEZWAN NOODLES?

Schezwan Noodles | How To Make Spicy Schezwan Noodles
Ingredients1x2x3x
Measuring cup used, 1 cup = 250 ml, 1 tsp = 5 ml
- 150 grams noodles
- 1 tsp minced ginger
- 1 tsp finely chopped garlic
- 1 cup green bell pepper julienne’s
- 1/2 cup yellow bell pepper julienne’s
- 1 cup carrot sticks
- 1 cup shredded cabbage
- 1 cup shredded red cabbage
- 3 spring onion/ scallion stalks
- 2-3 tbsp schezwan sauce add as per desired heat
- 2 tbsp + 1 tsp vegetable oil
Instructions
- Prep your veggies, cut all the veggies lengthwise. Use whatever veggies you have at hand.
- Bring water to boil in a pot, add salt and the hakka noodles. Do not break the noodles. Cook till al dente as per package instructions. Usually, 3-4 or even 2-3 minutes are sufficient.
- Drain the cooked noodles in a colander, to get rid of any starch.
- Drizzle 1 teaspoon oil all over the noodles, mix in gently. Set aside.
- Heat 2 tablespoons oil in a wok on high heat. Add in the ginger- garlic, saute until aromatic. Add white portion of scallion greens (cut lengthwise). Saute for 30 seconds.
- Next add bell peppers and carrots, saute for 1/2 a minute.
- Throw in the cabbage next, saute for another 30 seconds.
- Add the schezwan sauce, salt & pepper. Mix and saute for another 15 seconds.
- Add in the noodles, mix gently with the help of two forks on high heat for another minute or two. Switch off the heat
Notes
I would love to hear from you! Please feel free to share your feedback with photos and suggestions to me at aromaticessence77@gmail.com
You can also follow me on :
Regards,
Freda

Schezwan Noodles | How To Make Spicy Schezwan Noodles
Ingredients
Measuring cup used, 1 cup = 250 ml, 1 tsp = 5 ml
- 150 grams noodles
- 1 tsp minced ginger
- 1 tsp finely chopped garlic
- 1 cup green bell pepper julienne’s
- 1/2 cup yellow bell pepper julienne’s
- 1 cup carrot sticks
- 1 cup shredded cabbage
- 1 cup shredded red cabbage
- 3 spring onion/ scallion stalks
- 2-3 tbsp schezwan sauce add as per desired heat
- 2 tbsp + 1 tsp vegetable oil
Instructions
- Prep your veggies, cut all the veggies lengthwise. Use whatever veggies you have at hand.
- Bring water to boil in a pot, add salt and the hakka noodles. Do not break the noodles. Cook till al dente as per package instructions. Usually, 3-4 or even 2-3 minutes are sufficient.
- Drain the cooked noodles in a colander, to get rid of any starch.
- Drizzle 1 teaspoon oil all over the noodles, mix in gently. Set aside.
- Heat 2 tablespoons oil in a wok on high heat. Add in the ginger- garlic, saute until aromatic. Add white portion of scallion greens (cut lengthwise). Saute for 30 seconds.
- Next add bell peppers and carrots, saute for 1/2 a minute.
- Throw in the cabbage next, saute for another 30 seconds.
- Add the schezwan sauce, salt & pepper. Mix and saute for another 15 seconds.
- Add in the noodles, mix gently with the help of two forks on high heat for another minute or two. Switch off the heat
Notes
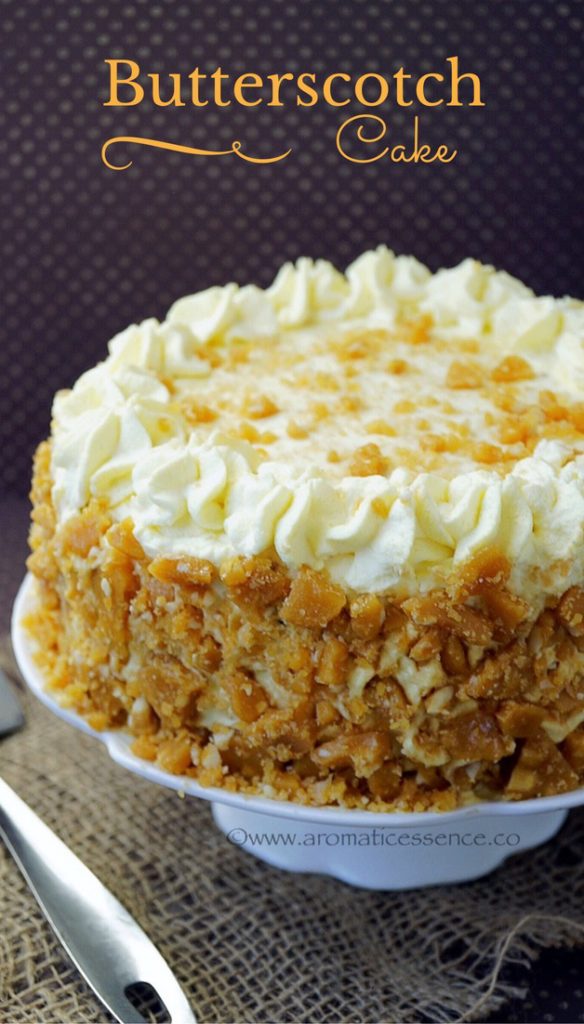
Moist and delicious, Indian bakery style Butterscotch cake with homemade praline and butterscotch flavored whipped cream frosting.
Hello everyone!
It was my little one’s 3rd birthday on October 11th! To celebrate the occasion, I wanted to make a different flavored cake rather than the conventional chocolate/vanilla cake. I absolutely love butterscotch cake, I remember eating lots of it a kid, from pastries to Swiss rolls, you name it! I was sure my son would love it too! So Butterscotch birthday cake it was!

There were a lot of elements that I had to take care of! For a professional, that would probably be a child’s play, but for a novice like me, I fret frosting cakes.
I’d bake a loaf cake or a flavored sponge cake happily, but honestly, frosting is an unnerving chore for me, as it requires so much patience and concentration.
And with my son around, that’s the last thing I can do really! I was literally up till 2 am on the 11th to get this cake done since I knew I had to do it, coz I’d made up my mind on making this cake for him!

I tried to replicate the butterscotch cake from Monginis , one of Mumbai’s famous bakeries! It’s been years I have had butterscotch cake, but one bite of this homemade butterscotch cake took me down memory lane when I would save up some pocket money and buy this yum pastry!
My kitchen was brimming with an aroma that simply made me really nostalgic! I’m so elated that the cake turned out delicious like the bakery one…. if I say so myself :p
It was so soft & moist, with the caramel-y & buttery, sponge base along with that delicious butterscotch flavored frosting and finally the crunch from all the praline! Oh Yummmmmm!!!
This is the best butterscotch cake recipe you guys, seriously give this one a go. I’d like to add that it has been tried and tested by so many readers, so you have a foolproof recipe here to make one of your favorite cakes.
- This Indian butterscotch cake is divided into 3 parts
- YOU MAY ALSO ENJOY THESE EASY CAKE RECIPES
- STEP BY STEP INSTRUCTIONS TO MAKE BUTTERSCOTCH CAKE
- HOW TO MAKE BUTTERSCOTCH CAKE?
- Butterscotch Cake {Indian Bakery Style}
This Indian butterscotch cake is divided into 3 parts
- The cake base
- The stabilized whipped cream frosting
- Preparation of the butterscotch granules which is nothing but praline.
Once all these components are taken care of then you have to only worry about getting it all together!

YOU MAY ALSO ENJOY THESE EASY CAKE RECIPES
Eggless red velvet cake with cream cheese frosting
Cassata Cake
Eggless Kit Kat Cake
STEP BY STEP INSTRUCTIONS TO MAKE BUTTERSCOTCH CAKE
For the cake base
1.Preheat the oven to 350 F, position a rack in the middle of the oven. Grease a 7-inch cake tin with little butter and dust with flour to coat the pan, or you may use parchment paper.
2.In a medium mixing bowl, sift the flour, baking powder & baking soda. Add salt, whisk the dry ingredients until well combined. Set aside.
3.In the bowl of your stand mixer fitted with the paddle attachment, beat the butter and sugar on medium-high speed until light and creamy, scraping down in between, should take about 2-3 minutes. Or you can use an electric hand mixer/beater.
4.Add in the eggs next, one at a time, continue beating on medium-high speed.
5.In goes the butterscotch essence, followed by butterscotch syrup. Continue mixing on medium speed.
6.Now reduce to the lowest possible speed , alternately add the dry ingredients and milk, starting with flour and ending with flour. ( DO NOT OVER MIX ). Transfer the batter to the prepared baking tin.
7.Bake in the middle rack, for about 35 – 45 minutes or until a toothpick inserted in the center of the cake comes out clean. Cool the cake on a rack in the tin for 15 minutes, then remove from the tin and cool on the rack completely.

For the praline preparation
1.Whilst the cake is baking, you can prepare the butterscotch. Take sugar and water in a heavy-bottomed saucepan, switch on medium heat. Do not stir. Let the sugar start melting.
2.Once the sugar starts bubbling, keep swirling the pan, until the sugar begins to caramelize and turn a nice amber color.
3.Switch off the heat, add butter and cashew nuts. Mix well until the butter has incorporated well in the caramel.

4.Transfer to the preparing baking sheet, and spread it quickly and evenly. Let it cool (be careful as it is very hot, do not touch it) It will take about 15-30 minutes to cool.
5.Once it has cooled, break roughly into pieces.

6.Transfer to a ziplock bag and crush roughly with a rolling pin, or put it in the mixer and pulse a few times to crumble it down. It’s ready to use as toppings for cakes, ice creams or anything you wish. Store in an airtight container in the refrigerator. Use as required.


For the stabilized whipped cream frosting
1.In a small saucepan, add gelatin and cold water; let it stand until it thickens. Place over low heat, stirring constantly, just until the gelatin dissolves.
2.Remove from heat and let it cool, make sure it doesn’t set.
3.In the bowl of your stand mixer fitted with the whisk attachment, add the cream, icing sugar, butterscotch essence and yellow food color.
4.Whip the cream with the sifted icing sugar, until slightly thick.
5.While slowly beating, add the gelatin to whipping cream.
6.Whip at high speed until it forms stiff peak. Do not overbeat or else it will turn into butter. Another method to check if your cream is ready is by inverting bowl if the cream stays intact without showing signs of slipping from the bowl, it’s done. Transfer the cream to a zip log bag. Refrigerate the cream in the meanwhile. Snip off the edge when you are ready to use.

Assembling the cake
1.Once the cake has completely cooled down, divide it into 3 layers with the help of a long serrated knife
2.Brush each layer with sugar syrup.
3.Pipe out the whipped cream in circular motions starting from the outer circumference towards the center. Flatten and smooth the cream with an offset spatula.
4.Sprinkle 2 tablespoons of butterscotch granules and 1 tablespoon butterscotch syrup on 2 layers.
5.Finally assemble the layers on a platter that you can rotate, for easier frosting ( Simply put a bowl and a flat plate over the bowl, place a parchment paper on the plate, and assemble the layers over it). Finally, place the last cake layer, and coat the cake with a rough crumb coating. Refrigerate it for 30 minutes.
6.Finally frost the cake, smooth out edges. Sprinkle some more butterscotch on top of the cake and the sides. You will require approx 3/4 cup of butterscotch granules. You can add more or less as you desire. Refrigerate the cake for 2-3 hours before serving. You can drizzle some more butterscotch syrup before serving!


NOTES
1.You can skip the gelatin for the frosting, but I added it to stabilize the cream. As whipped cream frosting is pretty unstable if left out for a long time, I like to use it sans the gelatin when I’m making a simple rustic frosted cake. I wanted this frosting to stay well and hold its shape and hence added gelatin.
2.You may use agar agar powder, use the same quantity and add it directly to the cream when it has thickened, and continue beating until it forms stiff peaks.
3.For an eggless butterscotch cake, you can follow my eggless rasmalai cake base recipe, another tried and tested cake recipe by many readers. Simply flavor the cake base with butterscotch essence and syrup. The rest of this cake recipe remains the same. Skip the gelatin to keep it vegetarian-friendly.
HOW TO MAKE BUTTERSCOTCH CAKE?

Butterscotch Cake {Indian Bakery Style}
Ingredients1x2x3x
Measuring cup used, 1 cup = 250 ml, 1 tsp = 5 ml, Make sure all ingredients are at room temperature.
- 1 & 1/2 cups all-purpose flour, spooned & leveled, 213 grams
- 1 cup sugar, 210 grams
- 2 large eggs + 1 egg yolk or 1/2 cup yogurt for an eggless version
- 1 & 1/2 tsp baking powder
- 1/4 tsp baking soda
- 1/2 cup unsalted butter, 113 grams
- 1/2 cup milk/buttermilk, 125 ml
- 1 tsp butterscotch essence
- 2 tbsp butterscotch syrup
- 1/2 tsp salt
For the whipped cream frosting
- 2 cups of heavy whipping cream, 35 % fat
- 1/4 cup confectioner’s sugar sifted, (add more if you want it sweeter)
- 1 tsp butterscotch essence
- 5-6 drops yellow gel food color
- 2 tsp unflavored gelatin, for stabilizing the cream (optional)
For the sugar syrup
- 1:1 :: sugar:water you can take about 2-3 tablespoons each of sugar and water, mix until it dissolves
For the praline
- 1 cup granulated sugar
- 1/4 cup water
- 3 tbsp butter
- 1/4 cup finely chopped nuts I used cashew nuts, you can use almonds too.
Instructions
For the cake base
- Preheat the oven to 350 F, position a rack in the middle of the oven. Grease a 7-inch cake tin with little butter and dust with flour to coat the pan, or you may use parchment paper.
- In a medium mixing bowl, sift the flour, baking powder & baking soda. Add salt, whisk the dry ingredients until well combined. Set aside.
- In the bowl of your stand mixer fitted with the paddle attachment, beat the butter and sugar on medium-high speed until light and creamy, scraping down in between, should take about 2-3 minutes. Or you can use an electric hand mixer/beater.
- Add in the eggs next, one at a time, continue beating on medium-high speed.
- In goes the butterscotch essence, followed by butterscotch syrup. Continue mixing on medium speed.
- Now reduce to the lowest possible speed, alternately add the dry ingredients and milk, starting with flour and ending with flour. ( DO NOT OVER MIX ). Transfer the batter to the prepared baking tin.
- Bake in the middle rack, for about 35 - 45 minutes or until a toothpick inserted in the center of the cake comes out clean. Cool the cake on a rack in the tin for 15 minutes, then remove from the tin and cool on the rack completely.
For the praline preparation
- Whilst the cake is baking, you can prepare the butterscotch. Take sugar and water in a heavy-bottomed saucepan, switch on medium heat. Do not stir. Let the sugar start melting.
- Once the sugar starts bubbling, keep swirling the pan, until the sugar begins to caramelize and turn a nice amber color.
- Switch off the heat, add in butter and cashew nuts. Mix well until the butter has incorporated well in the caramel.
- Transfer to the preparing baking sheet, and spread it quickly and evenly. Let it cool ( be careful as it is very hot, do not touch iIt will take about 15-30 minutes to cool.
- Once it has cooled, break roughly into pieces.
- Transfer to a ziplock bag and crush roughly with a rolling pin, or put it in the mixer and pulse a few times to crumble it down. It’s ready to use as toppings for cakes, ice creams or anything you wish. Store in an airtight container in the refrigerator. Use as required.
For the whipped cream frosting
- In a small saucepan, add gelatin and cold water; let it stand until it thickens. Place over low heat, stirring constantly, just until the gelatin dissolves.
- Remove from heat and let it cool, make sure it doesn’t set.
- In the bowl of your stand mixer fitted with the whisk attachment, add the cream, icing sugar, butterscotch essence and yellow food color.
- Whip the cream with the sifted icing sugar, until slightly thick.
- While slowly beating, add the gelatin to whipping cream.
- Whip at high speed until it forms stiff peak. Do not overbeat or else it will turn into butter. Another method to check if your cream is ready is by inverting bowl if the cream stays intact without showing signs of slipping from the bowl, it’s done. Transfer the cream to a zip log bag. Refrigerate the cream in the meanwhile. Snip off the edge when you are ready to use.
Assembling the cake
- Once the cake has completely cooled down, divide it into 3 layers with the help of a long serrated knife
- Brush each layer with sugar syrup.
- Pipe out the whipped cream in circular motions starting from the outer circumference towards the center. Flatten and smooth the cream with an offset spatula.
- Sprinkle 2 tablespoons of butterscotch granules and 1 tablespoon butterscotch syrup on 2 layers.
- Finally assemble the layers on a platter that you can rotate, for easier frosting (Simply put a bowl and a flat plate over the bowl, place a parchment paper on the plate, and assemble the layers over it). Finally, place the last cake layer, and coat the cake with a rough crumb coating. Refrigerate it for 30 minutes.
- Finally frost the cake, smooth out edges. Sprinkle some more butterscotch on top of the cake and the sides. You will require approx 3/4 cup of butterscotch granules. You can add more or less as you desire. Refrigerate the cake for 2-3 hours before serving. You can drizzle some more butterscotch syrup before serving!
Notes
Stabilized whipped cream frosting recipe, slightly adapted from here

I would love to hear from you, please feel free to share your feedback with photos and suggestions to me at aromaticessence77@gmail.com
You can also follow me on :
Facebook @ Aromaticessence
Pinterest @ Aromatic Essence
Instagram @ aromatic_essence77
Thanks for stopping by!
Regards,
Freda
