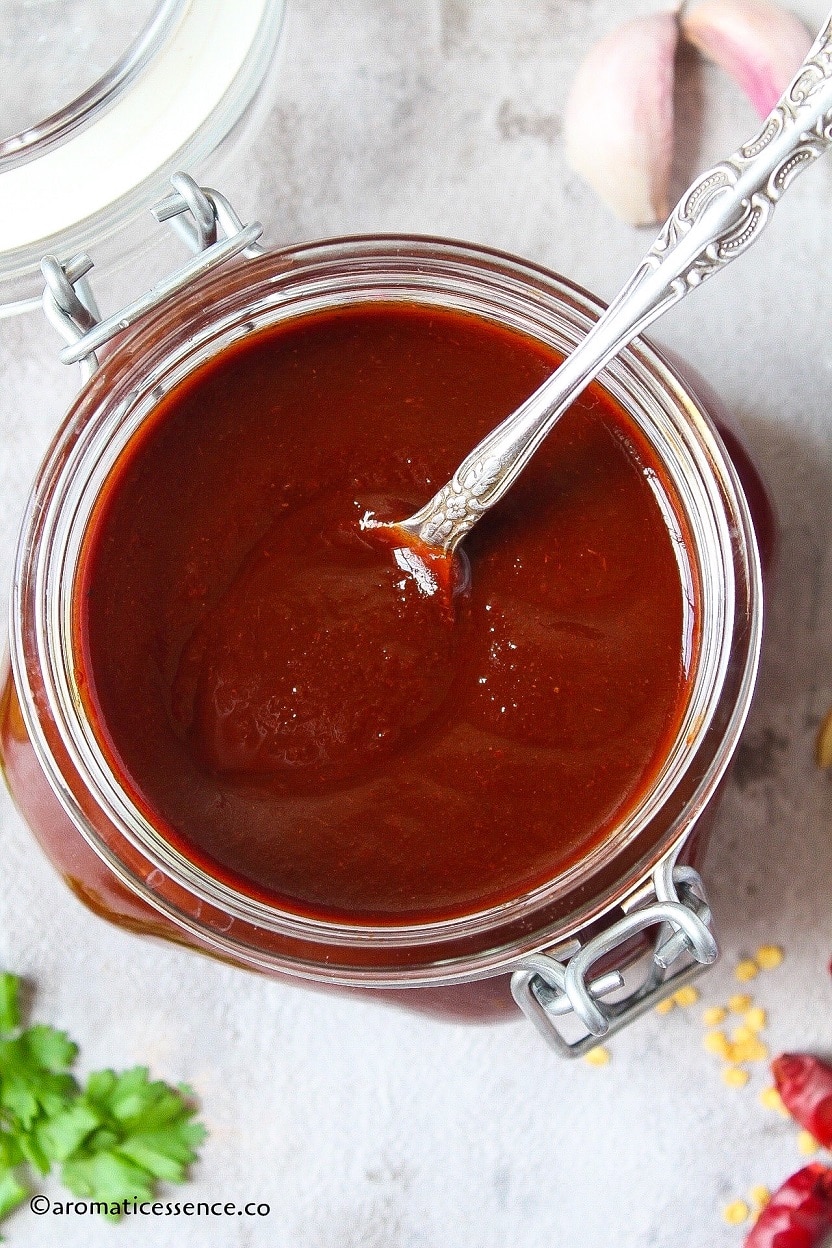
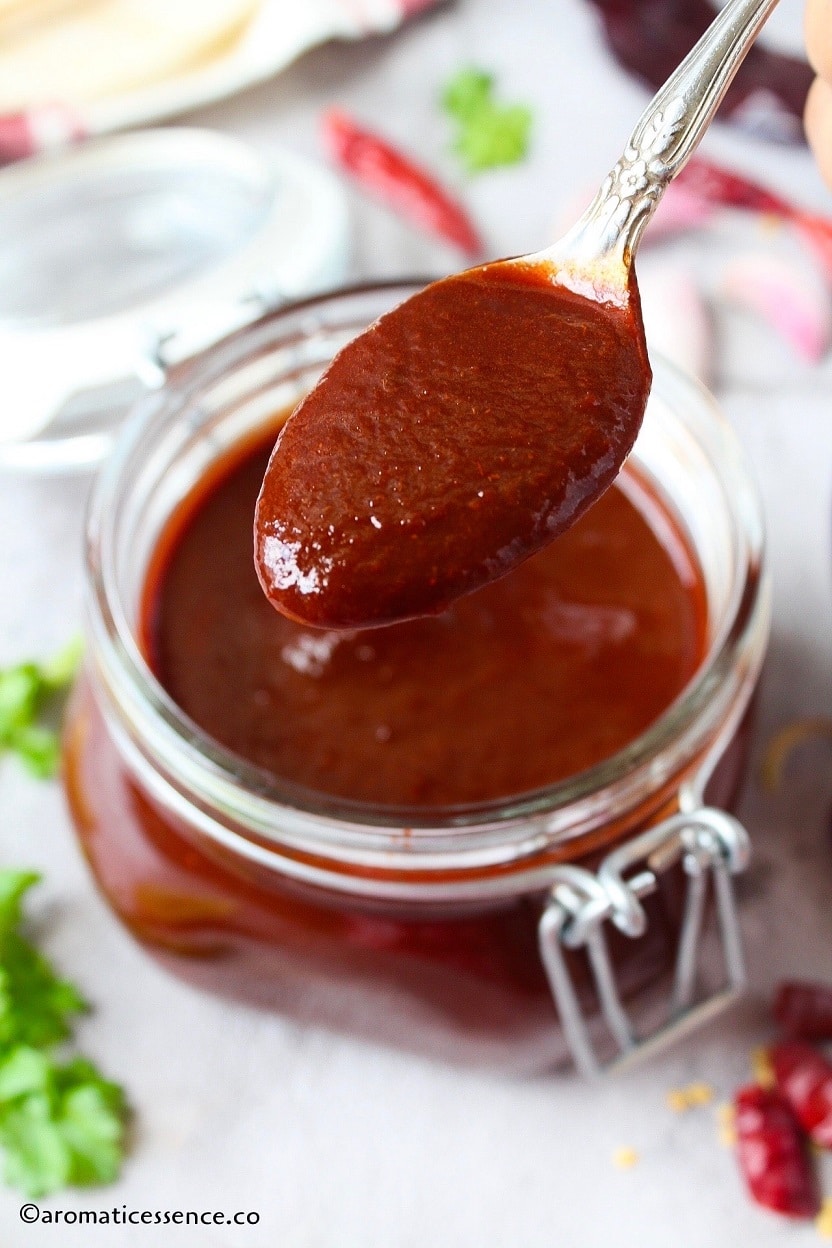
This Red Enchilada Sauce (Salsa Roja) is made from scratch using dried chile pods like guajillo, ancho, and chile de Arbol along with traditional Mexican spices. It has a gorgeous deep red color and is packed with a ton of robust, deep, and complex, chile flavors. This sauce is versatile and can be used in many Mexican dishes.

I love making condiments, dips, chutneys, salad dressings, and sauces of all kinds at home. While some recipes hardly require any effort, some are definitely time-consuming, but I believe in the mantra ‘homemade is truly the best’! It always tastes so fresh and flavorful. And this red chile enchilada sauce right here my friends, is just that!
I’ve enjoyed some really authentic Mexican food on my trip to Mexico a couple of years ago. I won’t say I was surprised to learn of the differences in Mexican food served in the US, as most cuisines are Americanized in the States, be it Indian, Mediterranean, Middle Eastern, or Thai. You’d actually be lucky to find something authentic. More often than not you may not even like it, because your palate loves a different version altogether.
You will come across a lot of recipes that use tomato sauce, chili powder, and flour to make enchilada sauce. While that is great for a quick-fix, I’d not call it an authentic version. I do make that version when I’m pressed for time, I still think it is better than the canned sauce. But, the real deal, classic Mexican enchilada sauce is made with dried chiles, and never chili powder.
Today, I’d love to share my take on this sauce inspired by the authentic basic red enchilada sauce. This wonderful sauce is not only great for enchiladas, but also great for your stews, soups, chilaquiles, huevos rancheros, tamales, and chili con carne, you name it! Pozole is a popular Mexican stew that uses this sauce as the base and it is so delicious! I also love using this sauce to make stacked enchiladas topped with a fried egg! Yum yum!!

- Ingredients and possible substitutions
- Some handy tips to make red enchilada sauce
- How to make red enchilada sauce with dried chiles – Step by step instructions
- Storage and freezing instructions
- Variations of this classic enchilada sauce recipe
- Red Enchilada Sauce | How To Make Enchilada Sauce
Ingredients and possible substitutions
The authentic recipe usually calls for dried chiles, garlic, and seasoning. But again, it may differ regionally, and some also include onion. Let me walk you through the ingredients needed for this recipe;
- Dried chile peppers
I’ve used a combination of;
- Guajillo chiles: Rich, bright, slightly smoky, earthy flavor, with mild to medium heat with a heat index ranging between 2500 to 5000 Scoville Heat Units. This chile variety has deep red, smooth, and shiny skin.
- Ancho chiles: Earthy, sweet, smoky, fruity flavor and are quite mild with a heat index ranging between 1000 to 1500 Scoville Heat Units. They are basically dried poblano peppers. It has a reddish-brown to nearly black, wrinkled skin, that somewhat looks like a big raisin.
- Chile de Arbol: These are quite hot, their heat index ranges between 15,000 to 30,000 Scoville Heat Units. I’ve used about 4 of these, to add a touch of heat to the sauce since the other two are relatively mild.
I love the combination of these three chiles, the resultant enchilada sauce has a lovely, earthy, well-rounded, savory, complex flavor. You can taste the smoky, rich flavor of the anchos and the mild heat from the other two chiles.
Unlike most enchilada sauces that are commercially available in the US, this sauce truly celebrates the flavor of the chiles.
Substitution: There is absolutely no substitute for the peppers in this recipe. It is, in fact, the heart and soul of this sauce. Using chili powder will not work in this recipe, because the dried chile paste offers so much body to the sauce without the need of a thickener.
What you can, however, do is, is experiment with other dried peppers which may be easily accessible to you. But keep in mind that the flavor profile will change depending on what pepper you use.
You can substitute guajillo with New Mexico chiles, anchos with pasilla or mulato chiles and chile de Arbol with cascabel chiles or skip it and add some cayenne pepper instead. Feel free to play around with the ratio of the chile peppers.
Interested in knowing more about the various kinds of Mexican chiles? Then you may enjoy this article .

- Aromatics
I’ve used half of a white onion, but any will work. You can also choose to skip it entirely.
- Seasoning
I’ve used ground cumin, Mexican dried oregano, and salt to season this sauce.

Some handy tips to make red enchilada sauce
Make sure the dried peppers are good to be used in the recipe: Dried chiles do go bad after some time if they were not dried properly in the first place. You will know if you see some white powdery mold on the insides, you need to discard them.
Here is a handy tip that I learned from my Mom to prolong the shelf life of the chiles. She lays the dried chiles in a single layer over a cloth in a warm and dry place. The chiles are dried in the sun for a couple of hours. This will get rid of moisture, if any, and extend the shelf life of the chiles.
Wear gloves while handling peppers: My second tip is to wear gloves while handling chiles to avoid the chili burn. If you don’t use gloves, remember to wash your hands really well after you are done handling the chiles and before you touch your face, especially eyes.
Avoid toasting the chiles for too long: Toasting enhances and brings out that chili flavor adding more depth to the sauce. However, keep in mind, that over toasting the chiles might cause them to burn, and that will lend a bitter flavor to the sauce.
Do a taste-test of the chile stock: I suggest tasting the soaking liquid first to determine the bitterness. If it is too bitter, discard it and use fresh water or stock to blend the ingredients. The real flavor comes from the chiles itself, but it is better to discard the liquid if it is too bitter.
Do not skip the step of straining the sauce: Straining does more than making the sauce smooth. It also gets rid of the unblended tough chile skin and reduces some of the bitter flavors. If you taste the sauce before and after straining, you will be able to tell the difference.
You can see all the chile peels that are left behind in the mesh-strainer in the pics and video, you do not want that in your sauce!
You must fry the sauce: This step deepens the flavor of the sauce adding a rich, complex flavor to it. Do not skip it!
Sauce too bitter? Add sugar or an acid like vinegar or lime juice to cut through the bitterness and balance the flavor. You can use honey, agave, or maple syrup, to balance out the bitter flavor. Start with as little as 1 teaspoon, taste, and adjust.
Try adding a small piece of dark or semi-sweet chocolate to add more depth to the sauce.
You may need to adjust each batch of sauce: You have to understand that the heat levels and the flavor of the chiles, dried or fresh, can vary depending on many factors such as the region, the climate, the soil, the age of pepper to name a few. It is possible that no two batches of this sauce will taste the same.
Capsaicin is the chemical compound that provides heat to the chiles. It is mostly concentrated in the membrane and not the seeds. Some of it may get transferred to the seeds since they are in close contact with it, but the seeds themselves do not contain capsaicin. The heat levels can also vary depending on the thickness of the membrane.
Make sure you remove the membrane to reduce the heat in the sauce. Also, try and discard as much of the seeds, because they can lend a bitter taste too.
Best when made in advance: This enchilada sauce isn’t going to be great as soon as it is prepared. It needs time for the flavors to marry and meld together. So plan a few hours ahead, and let it sit for a while to enjoy some kickass enchiladas! This also freezes well, great to have on hand for a quick dinner.
And though not a tip for the actual sauce itself, keep in mind that things will get messy while making this sauce. You can see the splatters on my backdrop while frying the sauce in the video! So definitely avoid wearing something nice, your clothes might get stained, and it is not easy to get rid of it.
How to make red enchilada sauce with dried chiles – Step by step instructions
(Printable recipe card at the bottom of the post)
Step 1: Toast the peppers
Wipe dried chiles with a damp paper towel to remove dust and dirt.
Heat a heavy-bottomed or cast-iron skillet over medium heat, let it heat up for a few minutes. Place the dried chile peppers(12 guajillos, 7 anchos, and 4 arbol chiles) toast for 15-20 seconds on each side, pressing with a spatula. Transfer to a bowl and set aside to cool down. Do this in batches if required.
Or place the chiles on a baking sheet in a single layer and toast it in a preheated oven 350°F for 3-5 minutes.
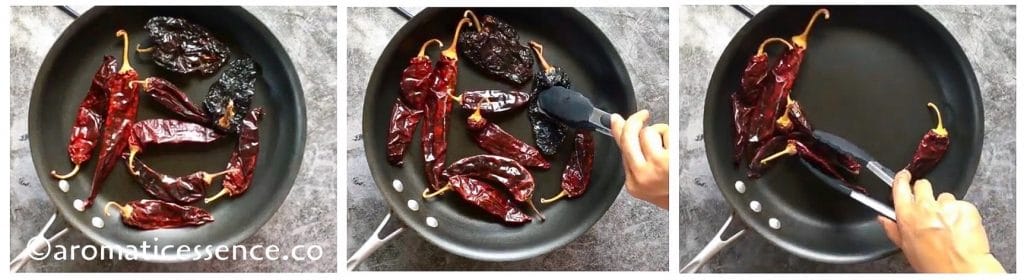
Remove and discard the stems, shake out the seeds. Cut open the pepper with a pair of kitchen scissors and remove the membrane.

Step 2: Rehydrate the chile peppers
Transfer the chiles to a big heatproof bowl. Add 1.5 quarts of boiling water. Cover and let it sit for 30 minutes or until they soften and turn plump.

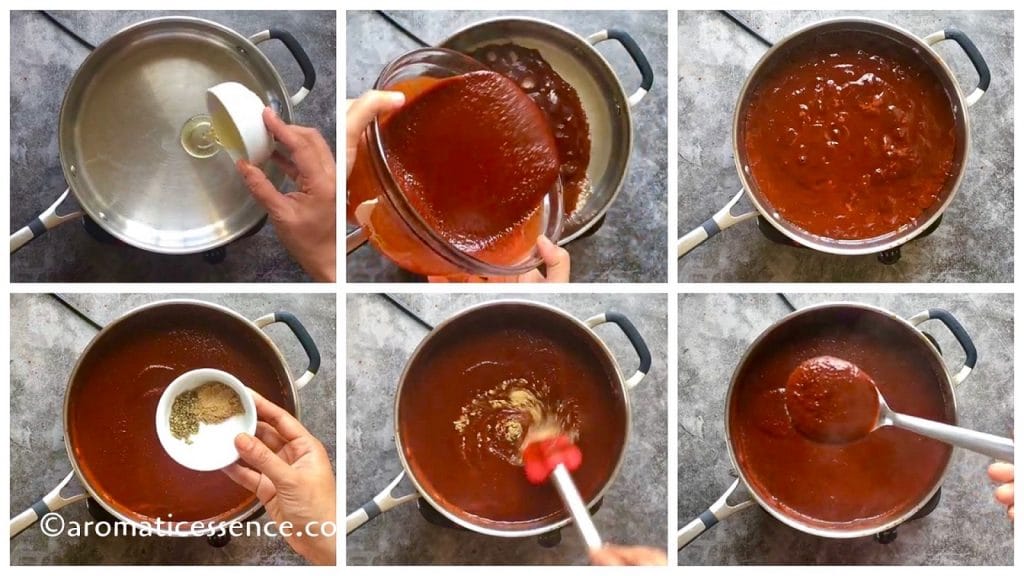
Step 3:Blend and strain
Transfer the chiles with the help of a slotted spoon or tongs into a blender, add 1/2 a white onion and 5 cloves of garlic. Taste the soaking liquid, if it is bitter, do not use, add fresh water/stock. If it is not all that bitter, then add about 2.5 to 3 cups of soaking liquid and grind until smooth.

Place a fine-mesh strainer over a big bowl. Add the sauce in batches, extract out as much of the pulp by pushing it down with the back of a spoon or spatula. Use a clean spoon to scrape the pulp on the bottom of the strainer.

Step 4: Cook the enchilada sauce
Heat 2 tablespoons oil in a heavy-bottomed skillet, add the strained sauce (about 4.25 cups). Fry the sauce for 1-2 minutes, add 1/2 teaspoon Mexican oregano, 1 teaspoon cumin, and 1 teaspoon Kosher salt.
Note: Please be careful here, and do it gently, as there will be some splattering as soon as the sauce hits the skillet.
Mix well and simmer uncovered for 15-20 minutes, stirring occasionally. Check for seasoning, adjust with more salt if needed.
Is the sauce bitter at this point? Add 1 teaspoon of sugar or honey or a small piece of dark or semi-sweet chocolate.
Sauce still thin? Continue simmering for a few more minutes, until it thickens.
Sauce too thick? Adjust the consistency by thinning it out with few tablespoons of water at a time.
The sauce for perfect for us, I didn’t find the need to add any sweetener.
Notes:
- This recipe makes about 4 cups of sauce. If you are accustomed to the tomato-based enchilada sauce and have never tried the authentic version before, chances are you may not like this at all. So, I suggest trying half of the batch. The sauce does taste better with some onions and tomatoes in it, but I’ve made it a number of times without the tomatoes, and we love it just as much!
- The sauce tastes fabulous once it is incorporated into any dish, be it enchiladas or pozole or chili con carne. I hope you do try it sometime.
- Checkpoints to avoid bitterness:
- Avoid over toasting the chiles Discard the seeds Taste-test the soaking liquid for bitterness before using it to blend Definitely strain the sauce!

Storage and freezing instructions
Once the sauce has cooled down completely, transfer it to a glass or Mason jar, refrigerate for up to 2 weeks.
Transfer it a freezer-safe bag, squeeze out excess air, label, lay the bag flat, and freeze. Or transfer the sauce in ice cube trays and freeze until solid. Then transfer the cubes to a freezer-safe bag, label, and freeze up to 3 months.
Thaw in the refrigerator overnight. Reheat in a skillet over medium heat, stirring occasionally until heated through.
Variations of this classic enchilada sauce recipe
There is absolutely no harm in experimenting with a recipe. But sometimes, I like to stick to the classics, why fix something when it is not broken? Having said that, feel free to adapt this recipe and add your own unique touch to this sauce.
Tomatoes: Tomatoes are not traditionally used to make this red chile sauce. If you like to add tomatoes, add 2 Roma tomatoes while blending. You could also use 14.5 oz canned tomatoes, whatever you have at hand, diced, crushed, whole peeled. Or add a couple of tablespoons of tomato paste when you fry the sauce.
You can incorporate onions, tomatoes, and garlic in one of the ways in this sauce:
- Charring: You can char the onions, tomatoes, and garlic until blackened and then blend with the rehydrated chiles.
- Simmering: Or add the vegetables along with peppers in a saucepan and simmer until everything has softened.
- Sauteeing: You can also saute the onion, tomatoes, and garlic with little oil in a skillet until softened. Then blend with the chiles.
I’ve simply thrown in half a raw onion and it works just as well, as the sauce simmers, it takes the edge of the raw flavor of the aromatics. But feel free to follow any of the above methods of treating the vegetables.
Spices: You can also experiment with other spices like ground cinnamon, dried marjoram, dried thyme, ground coriander, cloves, etc. If you can’t find Mexican oregano, use the Italian oregano. The flavor will differ a little, but it isn’t really that big of a deal.
Making red enchilada sauce from scratch does involve some amount of work, but if you ask me, it is absolutely worth it. I’m sure once you make some enchiladas with this homemade sauce, you will agree that it is the best red enchilada sauce ever!
You can also follow me on Facebook , Pinterest, Instagram & Twitter

Red Enchilada Sauce | How To Make Enchilada Sauce
Ingredients1x2x3x
- 12 dried Guajillo chiles
- 7 dried Ancho chiles
- 4 to 5 dried Arbol chiles, you may add more to increase the heat
- 1.5 quarts boiling water
- 1/2 white onion
- 5 garlic cloves, peeled
- 1 teaspoon kosher salt
- 1 teaspoon ground cumin
- 1/2 teaspoon Mexican oregano
- 1 to 2 teaspoons sweetener of choice or a small piece of dark or semi-sweet chocolate, optional, if required
- 2 tablespoons vegetable oil
Instructions
- Wipe dried chiles with a damp paper towel to remove dust and dirt.
- Heat a heavy-bottomed or cast-iron skillet over medium heat, let it heat up for a few minutes. Place the dried chile peppers, toast for 15-20 seconds on each side, pressing with a spatula. Transfer to a bowl and set aside to cool down. Do this in batches if required.
- Or place the chiles on a baking sheet in a single layer and toast it in a preheated oven 350°F for 3-5 minutes.
- Remove and discard the stems, shake out the seeds. Cut open the pepper with a pair of kitchen scissors and remove the membrane.
- Transfer the chiles to a big heatproof bowl. Add boiling water. Cover and let it sit for 30 minutes or until they soften and turn plump.
- Transfer the chiles into a blender, add the onions and garlic. Taste the soaking liquid, if it is bitter, do not use, add fresh water/stock. If it is not all that bitter, then add about 2.5 to 3 cups of soaking liquid and grind until smooth.
- Place a fine-mesh strainer over a big bowl. Add the sauce in batches, extract out as much of the pulp by pushing it down with the back of a spoon or spatula. Use a clean spoon to scrape the pulp on the bottom of the strainer.
- Heat oil in a heavy-bottomed skillet, add the strained sauce. Fry the sauce for 1-2 minutes, add Mexican oregano, cumin, and salt.
- Note: Please be careful here, and do it gently, as there will be some splattering as soon as the sauce hits the skillet.
- Mix well and simmer uncovered for 15-20 minutes, stirring occasionally. Check for seasoning, adjust with more salt if needed.
- Is the sauce bitter at this point? Add 1 teaspoon of sugar or honey or a small piece of dark or semi-sweet chocolate.
- Sauce still thin? Continue simmering for a few more minutes, until it thickens.
- Sauce too thick? Adjust the consistency by thinning it out with few tablespoons of water at a time.
Video
Notes
- Avoid over toasting Discard the seeds Taste-test the soaking liquid for bitterness before using it to blend Definitely strain the sauce!

Red Enchilada Sauce | How To Make Enchilada Sauce
Ingredients
- 12 dried Guajillo chiles
- 7 dried Ancho chiles
- 4 to 5 dried Arbol chiles, you may add more to increase the heat
- 1.5 quarts boiling water
- 1/2 white onion
- 5 garlic cloves, peeled
- 1 teaspoon kosher salt
- 1 teaspoon ground cumin
- 1/2 teaspoon Mexican oregano
- 1 to 2 teaspoons sweetener of choice or a small piece of dark or semi-sweet chocolate, optional, if required
- 2 tablespoons vegetable oil
Instructions
- Wipe dried chiles with a damp paper towel to remove dust and dirt.
- Heat a heavy-bottomed or cast-iron skillet over medium heat, let it heat up for a few minutes. Place the dried chile peppers, toast for 15-20 seconds on each side, pressing with a spatula. Transfer to a bowl and set aside to cool down. Do this in batches if required.
- Or place the chiles on a baking sheet in a single layer and toast it in a preheated oven 350°F for 3-5 minutes.
- Remove and discard the stems, shake out the seeds. Cut open the pepper with a pair of kitchen scissors and remove the membrane.
- Transfer the chiles to a big heatproof bowl. Add boiling water. Cover and let it sit for 30 minutes or until they soften and turn plump.
- Transfer the chiles into a blender, add the onions and garlic. Taste the soaking liquid, if it is bitter, do not use, add fresh water/stock. If it is not all that bitter, then add about 2.5 to 3 cups of soaking liquid and grind until smooth.
- Place a fine-mesh strainer over a big bowl. Add the sauce in batches, extract out as much of the pulp by pushing it down with the back of a spoon or spatula. Use a clean spoon to scrape the pulp on the bottom of the strainer.
- Heat oil in a heavy-bottomed skillet, add the strained sauce. Fry the sauce for 1-2 minutes, add Mexican oregano, cumin, and salt.
- Note: Please be careful here, and do it gently, as there will be some splattering as soon as the sauce hits the skillet.
- Mix well and simmer uncovered for 15-20 minutes, stirring occasionally. Check for seasoning, adjust with more salt if needed.
- Is the sauce bitter at this point? Add 1 teaspoon of sugar or honey or a small piece of dark or semi-sweet chocolate.
- Sauce still thin? Continue simmering for a few more minutes, until it thickens.
- Sauce too thick? Adjust the consistency by thinning it out with few tablespoons of water at a time.
Video
Notes
- Avoid over toasting Discard the seeds Taste-test the soaking liquid for bitterness before using it to blend Definitely strain the sauce!
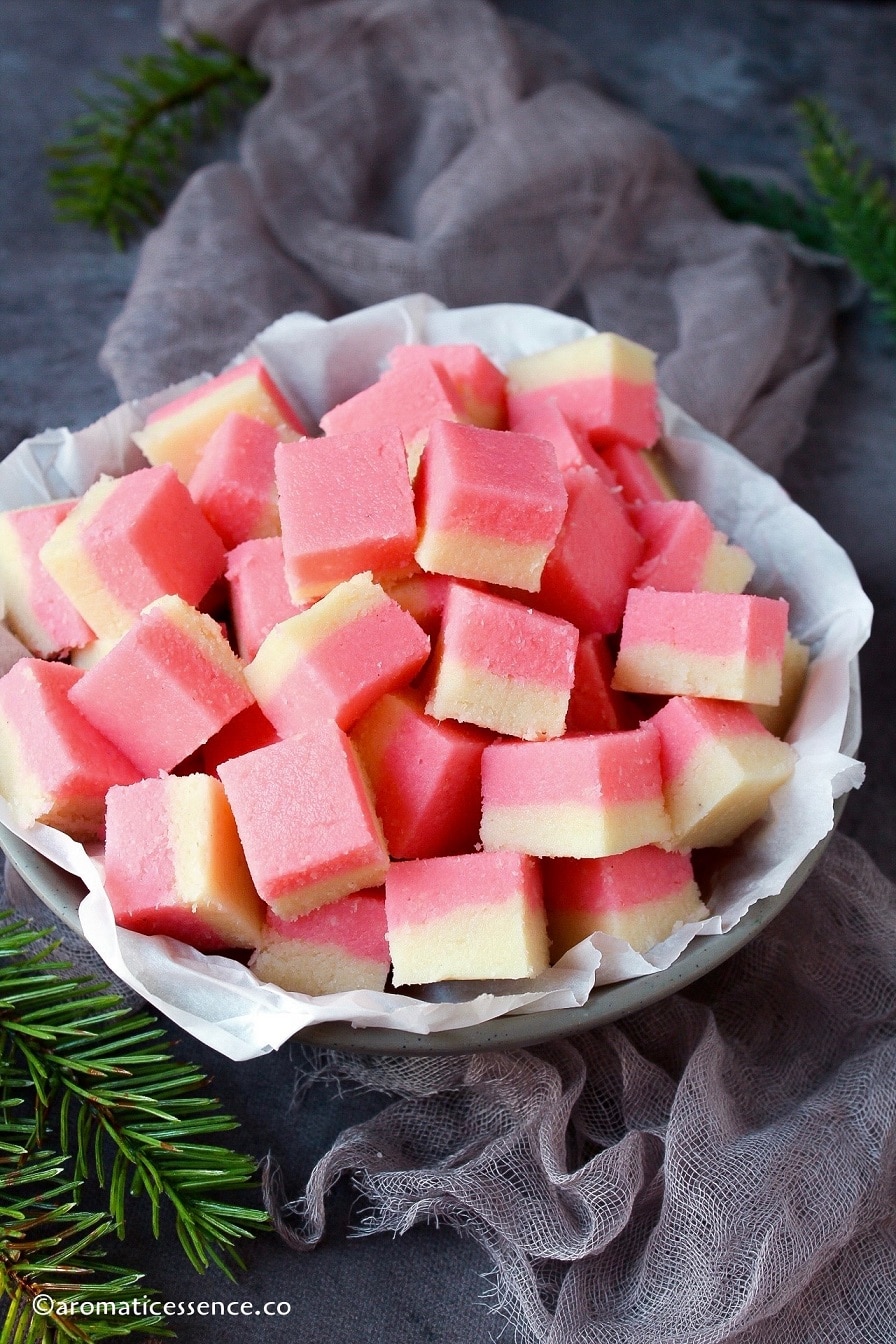
These coconut ice squares are soft and chewy, they look adorable and make a great addition to your festive Christmas dessert platter! You need just 3 ingredients to whip up these no-cook, delicious coconut treats.
Hi folks! I truly hope that everyone is doing well during these tough and challenging times. Apologies for being MIA, this was my longest break ever. I had a lot goin on, so blogging took a backseat.
I’ve missed sharing so much in the past 5 months and more so during this festive season, but I couldn’t let the holidays pass by without sharing some of my favorite recipes with you guys 🙂
I’ve already shared quite a lot of traditional Christmas sweets on the blog here like neureos , kormolas, guava cheese (Perad), milk cream, marzipan , etc to name a few.
I do intend to share more Christmas treats in the coming days. On that note, let me start off with this ridiculously easy recipe, that needs no cooking! After all, who doesn’t love a good no-cook or no-bake recipe, right? I’m always up for one, especially during the holidays when things can get hectic.
I know everyone is busy during Christmas, and trust me, a lot of our traditional Goan sweets are time consuming and laborious. I’m sure many of you will be pre-ordering the sweets and there’s absolutely no harm in it, as not everyone has the time or energy.
But if you are up to preparing something this season, that’s really as easy as 1-2-3, this is the recipe for you! Mix, layer, set, and cut into squares, bars, or any desired shapes using fancy cookie cutters. It is a fun activity to get the kids involved and spend some quality time with your family 🙂

- What is coconut ice?
- Why you will love this recipe
- Ingredients required
- How to make coconut ice squares – Step by step
- FAQs
- Variations
- Coconut Ice {Easy, No-Cook Recipe}
What is coconut ice?
Coconut ice is a British confectionery prepared using grated desiccated coconut or just grated coconut, condensed milk, and sugar, which is formed to create a solid, soft candy. It typically has a chewy, soft, and mildly grainy texture; some versions are semi-hard. It is also available in South Africa, some areas of Australia, and New Zealand.
The origin of the use of the word “ice” in the confectionery’s name is not known, but it may have derived from its general appearance and coloration. ( Wiki)

Honestly, I didn’t know one of my favorite Christmas sweets also happens to be popular in Britain. I always thought of it as a traditional Goan Christmas sweet.
Why you will love this recipe
I’m sure you will love this recipe as ;
- It tastes so good, it is highly addictive
- Requires a few ingredients
- It does not involve any cooking
- Looks attractive
- Perfect for gifting, wrap them in cellophane and tie them with ribbons for a gourmet touch
The hardest part of this recipe is just waiting for it to set!
Ingredients required
The traditional method to make this dessert involves cooking grated coconut along with milk and sugar, somewhat similar to this coconut toffee recipe that I’ve shared earlier. That is more of a firm and chewy candy, that has a bite to it.
Today, I’m sharing the no-cook method which calls for 3 ingredients;
- Unsweetened desiccated coconut, easily found in the baking aisle
- Sweetened condensed milk
- And icing sugar or confectioner’s sugar
I’ve flavored it with vanilla and rose essence. These ingredients are completely optional. You can use whatever you have at hand. Check out the variations listed further below at the bottom of the post.

How to make coconut ice squares – Step by step
Step 1: Prepare the pan
Grease a 7 or 8-inch square pan with oil or non-stick spray. Line the pan with parchment paper and set aside. (image 1)

Step 2: Prepare the white mixture
In a large bowl, add 200 grams condensed milk, 100 grams icing sugar, and 1/2 teaspoon vanilla extract. Stir well until combined. (image 2 and 3)
Next, add 175 grams of desiccated coconut, mix well until combined. You may use your hands the mix thoroughly if it gets difficult to mix. (image 4 and 5)

Press the white mixture firmly over the base of the pan, smooth out the surface with an offset spatula or your hands. Set aside. (image 6 and 7)

Step 3: Prepare the pink mixture
Wipe out the bowl, and add the remaining 200 grams condensed milk, 100 grams icing sugar, 1/4 teaspoon pink food color, and 1/4 teaspoon rose essence, stir well until combined. (image 8 and 9)
Next, add the remaining 175 grams of desiccated coconut, mix well until combined. (image 10 and 11)
You can also use 2 bowls, and prepare the separate layers simultaneously, whatever is convenient for you.

Step 4: Layer and set
Press the pink mixture over the white layer, smooth out the surface with an offset spatula, back of measuring cup, or your hands. (image 12)

Cover the pan with a cling film or aluminum foil. Refrigerate overnight. It usually sets in 2-3 hours, but for best results refrigerate it overnight. You may also let it air-dry, uncovered, at room temperature. I prefer setting it in the refrigerator as it is is a quicker alternative.
Step 5: Cut and serve
Lift the parchment paper out of the pan. Let the coconut ice stand at room temperature for 5-10 minutes. I trimmed off the edges to have clean ends, but that is completely optional. Cut into desired sized pieces. (image 13 and 14)

You may also cut them into bars but I find that it is too much of a serving portion.
How long does coconut ice last?
Once the coconut ice squares have dried out completely, store them in an airtight container in a cool, dry place for up to 2 weeks, though I highly doubt it will last that long 😀
For longer shelf life, refrigerate them in an airtight container for up to 1 month. Remove the required number of squares you intend to serve, let it sit at room temperature for about 10-15 minutes before serving.
Coconut ice not setting
That problem could arise with the traditional cooking method, which calls for milk, sugar, and coconut. In this no-cook recipe, the icing sugar helps it to set. Ideally, you should not have this problem here.
If at all you do face this problem, the simplest way to troubleshoot is by making laddoos or balls out of it and rolling it in more desiccated coconut. Place it on a parchment-lined plate or tray and leave it to dry for a few hours.
Next time, try increasing the desiccated coconut to 350 or 400 grams for it to set.
Can I skip the icing sugar?
I do not suggest skipping the icing sugar as it helps in setting the coconut ice.
I’ve tested this recipe with 3 ratios of icing sugar,
- 100 grams: More coconut flavor and very subtle in terms of sweetness, perfect if you prefer less-sweet desserts.
- 200 grams: What I’ve used in this recipe and it was just the right amount of sweetness for us.
- 350 grams: The entire dessert was way too sweet, and had less coconut flavor.
The dessert set well with all these proportions, so feel free to increase/decrease the icing sugar depending on how sweet you like it.
Can I use fresh shredded coconut in this recipe?
You cannot use it as a direct substitute in this recipe. However, you can make your own homemade desiccated coconut by dry roasting the freshly shredded coconut in a skillet over medium-low heat, to remove all the moisture. Keep stirring continuously to prevent the coconut from burning and changing color.
Then transfer onto a plate and set aside to cool down. If the shreds are big, pulse in the blender to break it down to a finer consistency. Then you can use it in the recipe.

Variations
You can get creative with the flavors and colors and make your own unique flavored coconut ice. These are some of the variations that I think you may enjoy, feel free to experiment.
- Holiday-themed: Add a few drops of peppermint extract. You can make 2 layers of red and green.
- Pistachio flavored: Add about 1/4 teaspoon of pistachio extract and green food color to one half of the mixture. Layer over the white mixture.
- Cardamom flavored: Add 1/4 teaspoon of cardamom essence or 1/2 teaspoon of powdered cardamom along with green food color to one half of the mixture. Layer over the white mixture.
- Pink coconut ice: Add about 1/2 teaspoon of strawberry/raspberry extract and pink food color.
- For the white layer , you can also use almond extract.
- Caramel flavored: Use the same amount of dulce de leche instead of the condensed milk.
- Coconut snowballs: Once you prepare the mixture, take a portion of the mixture and form balls. Coat it with more desiccated coconut.
- Chocolate coated: Melt some bittersweet or dark chocolate, dip the squares completely in the chocolate, then transfer to a wire rack or parchment-lined tray to dry completely. Avoid using milk chocolate or white chocolate as it will make the entire thing too sweet.
Avoid going overboard with the extracts, as some of them are quite strong and little goes a long way.

p.s: I hope you have already soaked the dried fruits to make the rich, boozy, Christmas fruit cake . If you haven’t, it is still not too late, here’s all that you need to know to soak the dried fruits.
You can also follow me on Facebook , Pinterest, Instagram & Twitter

Coconut Ice {Easy, No-Cook Recipe}
Ingredients1x2x3x
- 400 grams sweetened condensed milk
- 200 grams icing sugar, sifted, little less than 2 cups (Refer notes)
- 350 grams of desiccated coconut about 4 cups, tightly packed
- 1/2 teaspoon vanilla extract
- 1/4 to 1/2 teaspoon rose essence
- 1/4 teaspoon rose pink food color
Instructions
- Grease a 7 or 8-inch square pan with oil or non-stick spray. Line the pan with parchment paper and set aside.
- In a large bowl, add half of the condensed milk, half of the icing sugar, and vanilla extract, stir well until combined.
- Next, add half of the desiccated coconut, mix well until combined. You may use your hands the mix thoroughly if it gets difficult to mix.
- Press the white mixture over the base of the pan, smooth out the surface with an offset spatula or your hands. Set aside.
- Wipe out the bowl, and add the remaining condensed milk, icing sugar, along with the pink food color, and rose essence, stir well until combined.
- Next, add the rest of the desiccated coconut, mix well until combined.
- Press the pink mixture over the white layer, smooth out the surface with an offset spatula or your hands.
- Cover the pan with a cling film or aluminum foil. Refrigerate overnight. It usually sets in 2-3 hours, but for best results refrigerate it overnight. You may also let it air-dry, uncovered, at room temperature.
- Lift the parchment paper out of the pan. Let the coconut ice stand at room temperature for 5-10 minutes. Cut into desired sized pieces.
