This eggless rava cake is an incredibly easy cake recipe for beginners. It is sweet, dense, and moist. It can also be enjoyed as a quick snack.

Rava cake is a pretty popular Indian cake and is really easy to make at home. It does not require any special equipment or expertise, which makes it a perfect beginner’s cake. You can hardly mess up this cake, it is so forgiving!
- What is rava cake?
- Why you will love this sooji cake?
- Ingredients needed to make sooji cake
- How to make eggless rava cake – Step-by-step instructions
- Serving suggestions
- Storage instructions
- Recipe Tips
- Variations
- Frequently asked questions (FAQs)
- You may also enjoy these eggless cake recipes
- Rava Cake | Sooji Cake | Semolina Cake (Eggless)
What is rava cake?
Rava also known as sooji, suji, or sugee are Hindi words for semolina. Hence this cake is also known as sooji cake or suji cake!
Semolina is a product of durum wheat. It is made by grinding husked durum wheat grains. Since it is derived from wheat, rava is not gluten-free.
The use of rava is quite popular in Indian cuisine, from savory to dessert recipes.
Rava cake is a simple cake made primarily with rava and other basic ingredients that go into making a cake, and hence the name!
This sooji cake is very similar to the Middle Eastern basbousa and my Goan Baath Cake. Both these cakes are traditionally made with eggs. For baath cake, the batter needs to sit overnight before being baked.
This rava tea cake, on the other hand, is a quick one, the batter needs to sit for at least 30 minutes. This is because the semolina absorbs the liquid and fluffs up.
You can actually see each and every semolina particle perfectly fluffed up in the baked cake!

I love the rava cake from Iyengar bakery. In fact, they have such an awesome array of tea-time cakes that are really simple yet so good. Just like the kinds I love!
But honestly, you don’t need to visit the bakery to enjoy this cake, especially if you live out of India! You can easily make this cake at home and enjoy it as much as you’d from the bakery!
If you are a beginner in baking, you should start off with this easy semolina cake. It is one of the simplest cake recipes ever!
Why you will love this sooji cake?
This sooji cake;
☑ Is an easy, one-bowl cake recipe
☑ Is made without any eggs
☑ Can also be enjoyed for breakfast or as a snack
☑ Does not need any gadgets such as a stand mixer or handheld mixer
Ingredients needed to make sooji cake
Semolina: Use the fine variety of rava, also known as Bombay rava for this recipe.
Flour: A small quantity of flour is added to this recipe to give the cake a softer texture and structure. You could also use cake flour instead.
Leavening agents: Baking powder and baking soda.
Salt: Salt accentuates the flavor of the cake.
Oil: I’ve used sunflower oil. Feel free to use any neutral flavored oil.
Curd/yogurt: This is used as a substitute for the eggs.
Milk: I’ve used full-fat milk. but I think skimmed milk will work fine too.
Sugar: I’ve used castor sugar. You may also use powdered sugar.
Vanilla extract: To flavor the cake.
Tutti-frutti: These are nothing but candied papaya. I’ve added them to make an eggless tutti frutti rava cake. It adds an interesting texture and a pop of color to the cake.

How to make eggless rava cake – Step-by-step instructions
Step 1: Prepare the pan
Grease an 8-inch cake pan with a little oil or oil spray and line the bottom with parchment paper. ( Photos 1 and 2 )

Step 2: Semolina cake batter
Measure out ½ cup tutti-frutti, and add a teaspoon of flour to coat them. Set aside. ( Photos 3 and 4 )

In a sufficiently large bowl, add ½ cup curd/yogurt, and whisk it well to get rid of any lumps. ( Photos 5 and 6 )
Then add ¾ cup castor sugar, ⅓ cup vegetable oil, and 1 teaspoon vanilla extract, and mix until well combined. ( Photos 7 to 11 )

Next, add ¾ cup of whole milk, and whisk until all the ingredients are well combined. ( Photos 12 to 14 )

Add 1¼ cup of fine semolina and ¼ teaspoon table salt to the liquid ingredients, mix well, cover, and set aside for 30 minutes. ( Photos 15 to 18 )
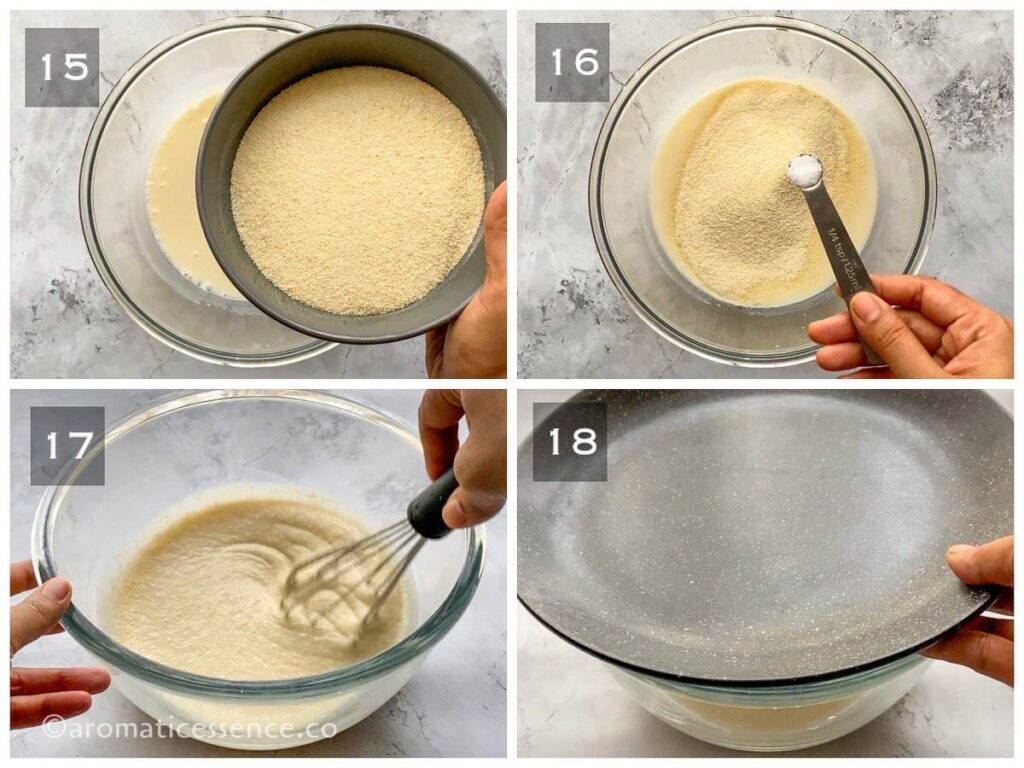
After 15 minutes of resting the batter, preheat the oven to 180° C (350° F), and position a rack in the middle of the oven.
After 30 minutes, the semolina will have absorbed the liquid, and the batter will become thicker. ( Photo 19 )
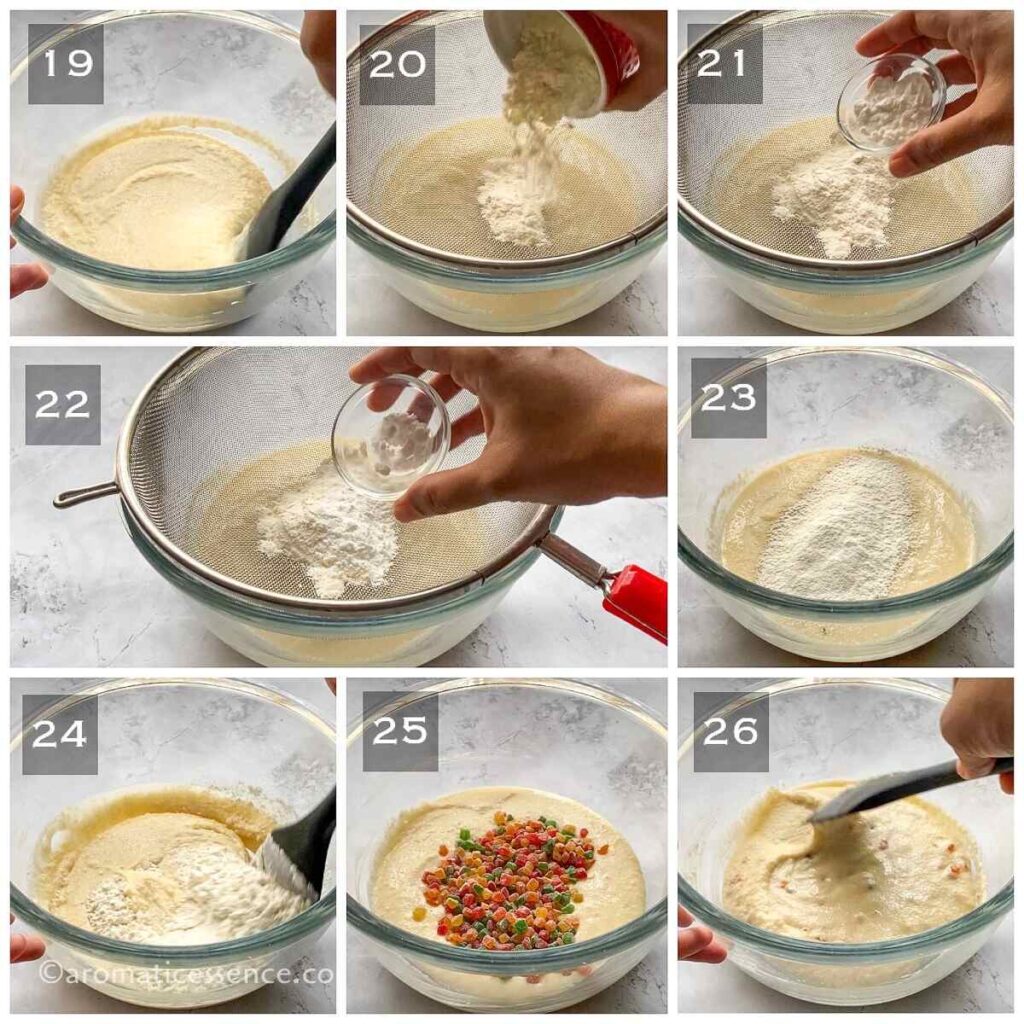
Place a fine mesh sieve over the bowl containing the semolina batter, and sift ¼ cup of all-purpose flour, 1½ teaspoon baking powder, and ¼ teaspoon baking soda. ( Photos 20 to 23 )
Fold gently using a spatula, until no more flour pockets are visible. Do not overmix the batter. ( Photo 24 )
Add the tutti frutti, and fold in gently. ( Photos 25 and 26 )
Step 3: Bake
Transfer the batter to the prepared baking pan. Gently tap the pan on the counter to release any air bubbles. Top with more tutti-frutti. ( Photos 27 to 29 )
Bake on the middle rack, for about 40 – 50 minutes or until a toothpick inserted in the center of the cake comes out clean. ( Photo 30 )

Remove the cake from the oven and let it cool in the pan on a cooling rack for 15 to 20 minutes.
Then remove from the pan and cool on the rack completely. ( Photos 31 and 32 )
Cut into desired pieces and serve.

Serving suggestions
You can serve this rava cake as such with a cup of your favorite beverage. Perfect to accompany your evening chai .
You can dress it up by topping a slice of the cake with some whipped cream and fresh berries or fruit compote. A drizzle of caramel or chocolate syrup would also great!
Storage instructions
Store this eggless rava cake in an airtight container at room temperature for 2 to 3 days.
If you live in a hot and humid place, it’s best to refrigerate the cake. It will last for about 4 to 5 days in the fridge. Bring to room temperature before serving. You may warm it in the microwave if you like.

Recipe Tips
Room temperature ingredients: Always plan ahead and let your ingredients such as curd (yogurt), and milk reach room temperature. Room temperature ingredients help them to combine better.
Fresh curd and rava: Use fresh curd for this recipe, as the sourness of the curd will ruin the taste of this cake. Also, make sure the rava you use is fresh and not stale as that can ruin the taste of this cake as well.
Sweetness: The cake is not overly sweet. You may increase the sugar to 1 cup if you prefer a sweeter cake.
For coarse variety of semolina: If you have the coarse variety of semolina, simply pulse it 4-5 times in the blender and use it in this recipe.
Color of the cake: Do not worry if your cake does not brown as shown in the pics. Overbaking to achieve the brown color will dry out the cake. In my 52 liters, Morphy Richards oven the top browned well, but the sides were a pale golden color. When I baked this cake 4 years ago in my gas range oven in the US, it browned uniformly on top and the sides. So the color of the cake will depend on your oven to an extent.
Baking time: Again, the baking time will differ from one oven to another depending on the make, the capacity, etc of the oven. Keep an eye out after 35 minutes. The cake is usually done within 50 minutes for an 8-inch pan. A 7-inch round pan will take about 60 minutes.
Cut the cake only when it is cool: The cake is quite delicate when it is still warm and slicing it will only cause it to crumble. Allow the cake to cool down completely before slicing.

Variations
Rose, saffron, and cardamom flavored rava cake: Skip the vanilla extract and add 1/2 teaspoon of rose extract and 1/2 teaspoon of cardamom powder. Replace 1/4 cup of the total 3/4 cup of milk with saffron infused milk. To do that, mix a fat pinch of saffron in 1/4 cup of hot milk and set aside until it reaches room temperature.
Other flavors: You can also use other flavors like pineapple essence/extract, orange extract + orange zest, lemon extract + lemon zest, butterscotch essence, etc to flavor this cake instead of vanilla.
Suji mango cake: Try another version of this cake, Mango semolina cupcake (eggless) . It is equally delicious!
Sooji atta cake: Swap the refined flour with 1/4 cup of atta (wheat flour).
Rava cake with eggs: If you wish to add eggs, simply replace the yogurt with 2 large eggs.
Sugar syrup: Just like basbousa, this cake can be soaked in sugar syrup to make it super moist. For the sugar syrup, combine 1 cup of water and 1 cup of sugar in a saucepan, bring to a boil, then lower the heat and simmer for 5 minutes. Switch off the heat and allow the syrup to cool down completely. When the cake is slightly warm, poke some holes into the cake with a skewer or toothpick and drizzle the cooled syrup all over the cake. If you plan on doing this, then reduce the sugar to 1/3 to 1/2 cup in the recipe to avoid an overly sweet cake.
Bundt cake or loaf cake: You can also use a 6-cup bundt pan or a standard loaf pan to make a bundt-shaped semolina cake or semolina loaf cake.
Mix-ins: Instead of tutti-frutti, you can add coarsely chopped nuts like almonds, pistachios, cashew nuts, or chocolate chips, etc. Sugar or honey syrup: For an extra moist cake, you can drizzle some simple or honey syrup as it is done for basbousa.

How to make rava cake in the pressure cooker?
Follow these steps to make the cake in the cooker;
- Use a 5-liter pressure cooker, and remove the gasket and the weight. Cover the bottom of the cooker with about a cup of salt.
- Place a heat-proof stand. Close the cooker with the lid, and preheat on medium heat for 10 minutes.
- Transfer the batter to a 7 or 8-inch round or square cake pan. Place the cake pan (no need to cover the cake pan) carefully with the help of tongs. Excercise precaution as the cooker is hot.
- Secure the lid of the cooker tightly (no gasket nor weight). Cook on medium heat for 40 to 45 minutes. Check for doneness test with a toothpick. If it is not done after 40 to 45 minutes, bake it for 5-10 minutes more.
Can I use melted butter or ghee instead of oil?
You may substitute oil with melted butter or melted ghee. But, honestly, I prefer this cake better made with oil, as it keeps it moist.
Can I substitute the sugar with jaggery?
I’ve not tried this cake with jaggery, but I think it will work out fine. I’d simply swap the same amount of sugar with powdered jaggery as I did in my eggless atta cake .
Do I need to roast the rava before using it in the recipe?
No, there is no need to roast the rava for this recipe. Use it as such.
Can I make this rava cake without curd?
Sure, you can! Condensed milk is also used as a substitute for eggs, so you can use that instead of yogurt. Use 1/2 cup of condensed milk in the recipe and reduce the sugar to 1/3 or 1/2 cup, depending on your desired sweetness.
Do I need to grind the rava to a fine powder?
Rava gives this cake a very unique, granular texture unlike regular cakes made entirely with refined flour. The texture of rava cake is like a hybrid between sooji halwa and a cake.
Cakes that are traditionally made with rava are not really ground to a finer consistency. Hence, it is strongly recommended to use the fine variety of sooji and not the coarse one that you’d use to make something like upma.
Having said that, feel free to grind the rava to a fine powder if you feel you may prefer the texture better that way. This is a very forgiving recipe, and you won’t go wrong either way!
Can I make a vegan version of this cake?
Yes, of course! Simply swap the yogurt and milk with a plant-based yogurt and milk of your choice. I would start with 1/2 cup of milk and add the remaining 1/4 cup of milk later if needed to adjust the batter consistency.
You may also enjoy these eggless cake recipes
Mango cake
Chocolate cupcakes
Easter cupcakes (Vanilla cupcakes)
Date and walnut loaf cake
Orange cupcakes
Red velvet cake with cream cheese frosting
Kit kat cake
Rasmalai cake
Have you made this recipe?
I would love to hear from you! Please be sure to share your feedback and/or give this recipe a rating in the comment below. Your reviews help others know the recipe better too.
You can also FOLLOW me on Facebook , Pinterest, Instagram & Twitter
Editor’s note: This recipe was first published on June 14, 2018. It has been republished and updated on July 23, 2022 to include new images, a video, and additional information. The original recipe used 1 cup of sugar, but I’ve reduced it to 3/4 cup since the tutti frutti that I used this time was really sweet. You can still use 1 cup if you prefer a sweeter cake.

Rava Cake | Sooji Cake | Semolina Cake (Eggless)
Ingredients1x2x3x
Dry ingredients
- 1¼ cups fine rava, 225 grams
- ¼ cup all-purpose flour, spooned & leveled, 35 grams
- 1½ tsp baking powder
- ¼ teaspoon baking soda
- ¼ teaspoon table salt
Wet ingredients
- ¾ cup castor sugar, 167 grams
- ⅓ cup flavorless oil, 70 grams
- ½ cup curd/yogurt, 125 grams
- ¾ cup whole milk 190 ml
- 1 teaspoon vanilla extract
Other ingredients
- ½ cup tutti frutti, 80 grams, plus 2 tablespoons more for topping the cake
- 1 teaspoon flour, to coat the tutti frutti
Instructions
- Grease an 8-inch cake pan with a little oil or oil spray and line the bottom with parchment paper.
- Measure out the tutti-frutti, and add a teaspoon of flour to coat them. Set aside.
- In a sufficiently large bowl, add curd/yogurt, and whisk it well to get rid of any lumps.
- Then add castor sugar, oil, and vanilla extract, and mix until well combined.
- Next, add milk, and whisk until all the ingredients are well combined.
- Add fine semolina and salt to the liquid ingredients, mix well, cover, and set aside for 30 minutes.
- After 15 minutes of resting the batter, preheat the oven to 180° C (350° F), and position a rack in the middle of the oven.
- After 30 minutes, the semolina will have absorbed the liquid, and the batter will become thicker.
- Place a fine mesh sieve over the bowl containing the semolina batter, and sift all-purpose flour, baking powder, and baking soda.
- Fold gently using a spatula, until no more flour pockets are visible. Do not overmix the batter.
- Add the tutti frutti, and fold in gently.
- Transfer the batter to the prepared baking pan. Gently tap the pan on the counter to release any air bubbles. Top with 2 tablespoons of tutti-frutti.
- Bake on the middle rack, for about 40 – 50 minutes or until a toothpick inserted in the center of the cake comes out clean.
- Remove the cake from the oven and let it cool in the pan on a cooling rack for 15 to 20 minutes.
- Then remove from the pan and cool on the rack completely.
- Cut into desired pieces and serve.
Video
Notes

Rava Cake | Sooji Cake | Semolina Cake (Eggless)
Ingredients
Dry ingredients
- 1¼ cups fine rava, 225 grams
- ¼ cup all-purpose flour, spooned & leveled, 35 grams
- 1½ tsp baking powder
- ¼ teaspoon baking soda
- ¼ teaspoon table salt
Wet ingredients
- ¾ cup castor sugar, 167 grams
- ⅓ cup flavorless oil, 70 grams
- ½ cup curd/yogurt, 125 grams
- ¾ cup whole milk 190 ml
- 1 teaspoon vanilla extract
Other ingredients
- ½ cup tutti frutti, 80 grams, plus 2 tablespoons more for topping the cake
- 1 teaspoon flour, to coat the tutti frutti
Instructions
- Grease an 8-inch cake pan with a little oil or oil spray and line the bottom with parchment paper.
- Measure out the tutti-frutti, and add a teaspoon of flour to coat them. Set aside.
- In a sufficiently large bowl, add curd/yogurt, and whisk it well to get rid of any lumps.
- Then add castor sugar, oil, and vanilla extract, and mix until well combined.
- Next, add milk, and whisk until all the ingredients are well combined.
- Add fine semolina and salt to the liquid ingredients, mix well, cover, and set aside for 30 minutes.
- After 15 minutes of resting the batter, preheat the oven to 180° C (350° F), and position a rack in the middle of the oven.
- After 30 minutes, the semolina will have absorbed the liquid, and the batter will become thicker.
- Place a fine mesh sieve over the bowl containing the semolina batter, and sift all-purpose flour, baking powder, and baking soda.
- Fold gently using a spatula, until no more flour pockets are visible. Do not overmix the batter.
- Add the tutti frutti, and fold in gently.
- Transfer the batter to the prepared baking pan. Gently tap the pan on the counter to release any air bubbles. Top with 2 tablespoons of tutti-frutti.
- Bake on the middle rack, for about 40 – 50 minutes or until a toothpick inserted in the center of the cake comes out clean.
- Remove the cake from the oven and let it cool in the pan on a cooling rack for 15 to 20 minutes.
- Then remove from the pan and cool on the rack completely.
- Cut into desired pieces and serve.
Video
Notes
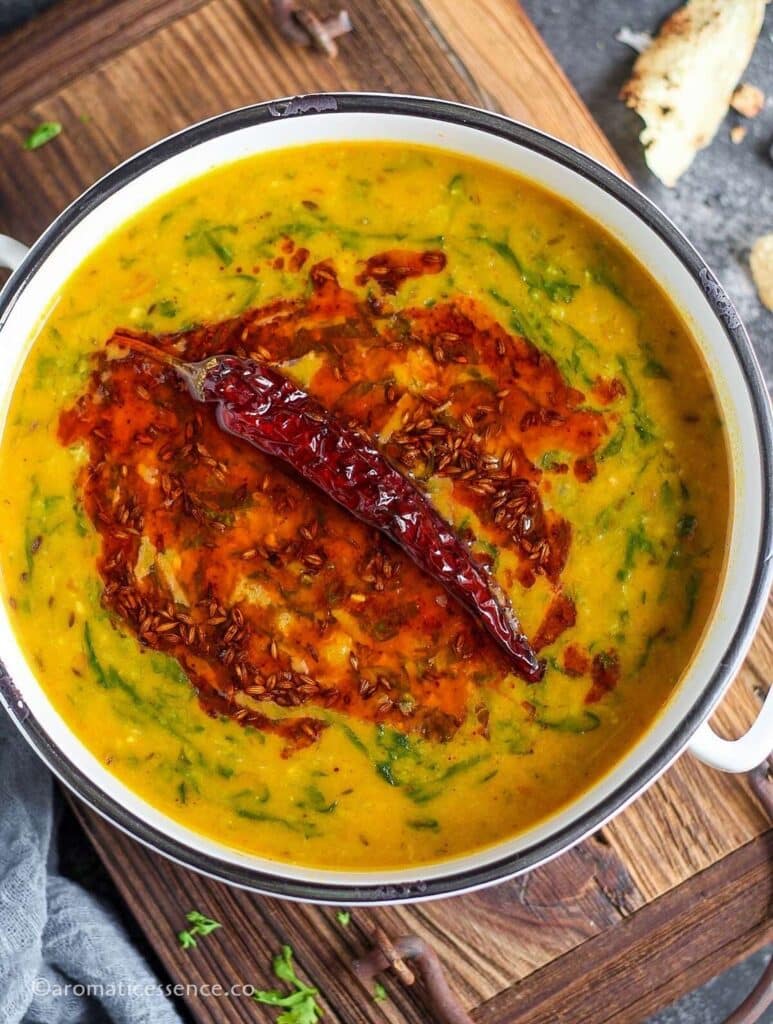
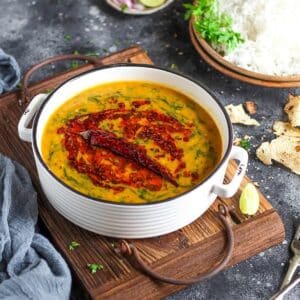
Dal Palak (Spinach Dal) is a very simple yet delicious Indian dal recipe made with yellow lentils and fresh spinach. This comforting dal palak curry is a quick and flavorsome recipe that the whole family will devour.

If you are on the lookout for quick, easy, tasty, and light weekday meal recipes, then this dal palak recipe won’t disappoint.
Dal palak is one of the many variations of Indian dal recipes. It is the type of dish that keeps your tummy and soul satisfied.
The dal or lentil used here is toor dal also known as pigeon pea lentils and spinach is known as palak in Hindi. Hence it is also called spinach dal!
This spinach dal goes down well with toddlers too. I keep it minimally spiced as my kids often enjoy a bowl of rice and dal. It is one of their favorite meals.
Dal is so versatile! Either make it for an everyday meal, which in fact is so common in Indian households, or you can also make a party-worthy dal dish like lasooni dal tadka, dal makhani, dal maharani, dal fry, etc. to name a few.
- Why you will love this recipe?
- Ingredients needed for dal palak recipe
- How to make dal palak – Step-by-step instructions
- Serving suggestions
- Storage instructions
- Tips to make the best dal palak
- Variations of this recipe
- Frequently Asked Questions (FAQs)
- You may also enjoy these dal recipes
- Dal Palak Recipe | Spinach Dal (Stovetop & Instant Pot)
Why you will love this recipe?
You will love this Punjabi palak dal tadka as it;
- Is wholesome and delicious
- Is one of the easiest ways to include greens in your diet
- Makes for a pretty inexpensive meal
- Is kid-friendly
- Comes together quickly making it perfect for lunch on busy weekdays
- Can also be enjoyed as a light soup for dinner
- Can be adapted to make it vegan
- Is nut-free and soy-free
Ingredients needed for dal palak recipe
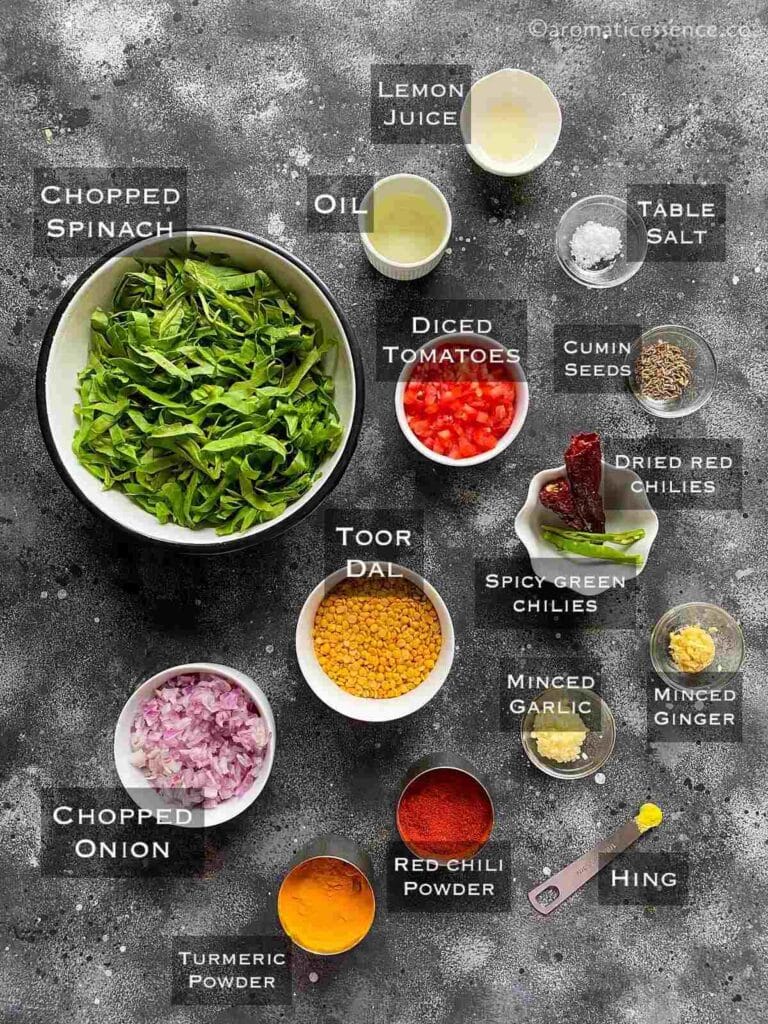
For this dal and spinach curry, you will need;
- Lentils: I’ve used toor dal also known as tuvar dal or arhar dal, a yellow lentil (pigeon pea lentil) but you can use any kind of lentil for this recipe.
- Spinach/palak greens: I’ve used regular spinach in this recipe, but you could use baby spinach as well. Add them as such without chopping if you like to reduce some prep time.
- Aromatics: Finely chopped onions, freshly minced ginger, and garlic. I highly recommend using fresh ginger and garlic here since this recipe is so minimally spiced and hence using fresh ingredients will make a remarkable difference.
- Fresh tomatoes : I like to add tomatoes to this dal but feel free to skip it if you like.
- Seasonings: I’ve seasoned this spinach dal with basic Indian spices like cumin seeds, hing, turmeric, red chili or cayenne pepper, fresh green chilies, and dried red chilies. This dal is light on the spices so as not to overpower the flavor of the lentils and the spinach.
- Cooking fat: I’ve used a combination of oil and ghee to make this dal. But you can use just oil too. (Ghee is not pictured below).
- Lemon juice: The acidity of the lemon juice adds a bright flavor to the dal.
How to make dal palak – Step-by-step instructions
Stove top pressure cooker method
Step 1: Soak and pressure cook the dal
Rinse 1/2 cup of toor dal well under running water until the water runs clear, then soak it in sufficient water for about 20 to 30 minutes. ( Photos 1 to 4 )

How to cook toor dal? Transfer the drained dal to a pressure cooker. Add 1 & 1/2 cups of water, 1/2 teaspoon salt, 1 teaspoon oil, and 1/4 teaspoon turmeric. (Adding oil prevents frothing and spilling from the pressure cooker). Mix well. ( Photos 5 to 10 )
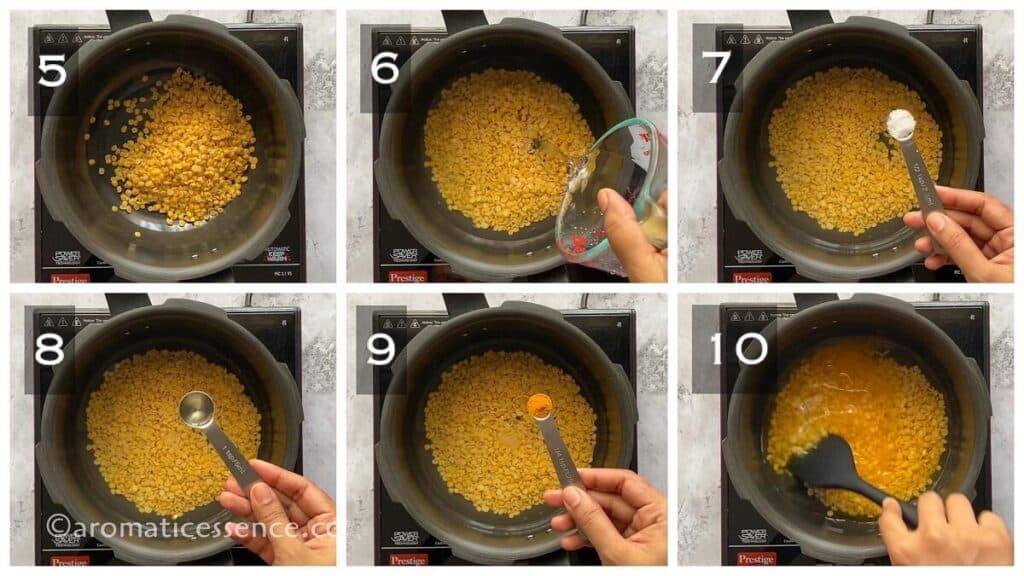
Pressure cook the dal for 3 whistles on high heat. Then lower the heat and simmer for another 5 minutes. Switch off the heat and set the cooker aside. ( Photos 11 and 12 )
Once the cooker depressurizes, open the lid and mash the dal with a wired whisk or spoon for a smooth consistency. You may leave it as it is if you prefer it that way. ( Photos 13 and 14 )

Step 2: First tempering
Heat 2 tablespoons oil in a heavy-bottomed pot, and add 1 teaspoon of cumin seeds. Once it crackles add a pinch of hing, 1 tablespoon minced garlic, 1/2 tablespoon minced ginger, 2 to 3 slit green chilies, and 1 to 2 dried red chilies. ( Photos 15 to 20 )
Stir-fry, until fragrant. ( Photo 21 )

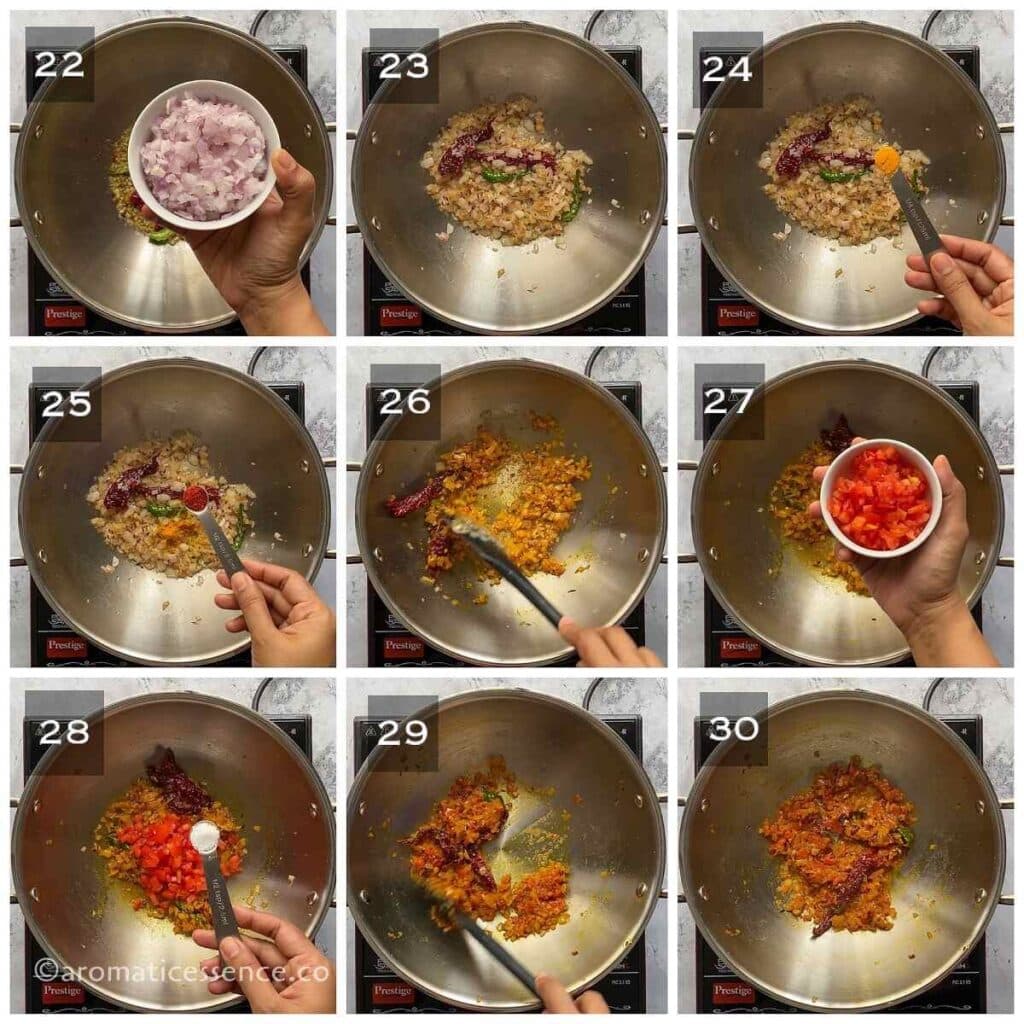
Add 1 cup finely chopped onions, and sauté until it turns a light golden brown. ( Photos 22 and 23)
Add 1/4 teaspoon turmeric and 1/2 teaspoon red chili powder or cayenne pepper, and sauté for another 30 seconds. ( Photos 24 to 26 )
Next, add finely chopped tomatoes (about 1 medium tomato) along with 1/2 teaspoon salt and sauté until it turns mushy and you see oil oozing from the sides. ( Photos 27 to 30 )
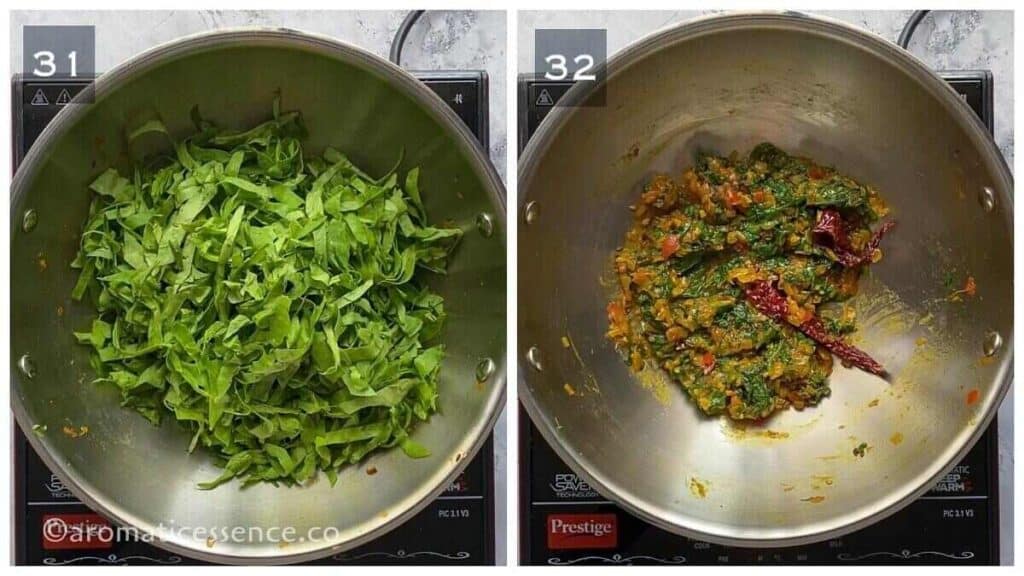
Add 3 cups of chopped spinach, and stir-fry until it wilts, about 1 to 2 minutes. ( Photos 31 and 32 )
Step 3: Add the cooked dal
Now, add the cooked dal, and give everything a good mix. ( Photos 33 and 34 )
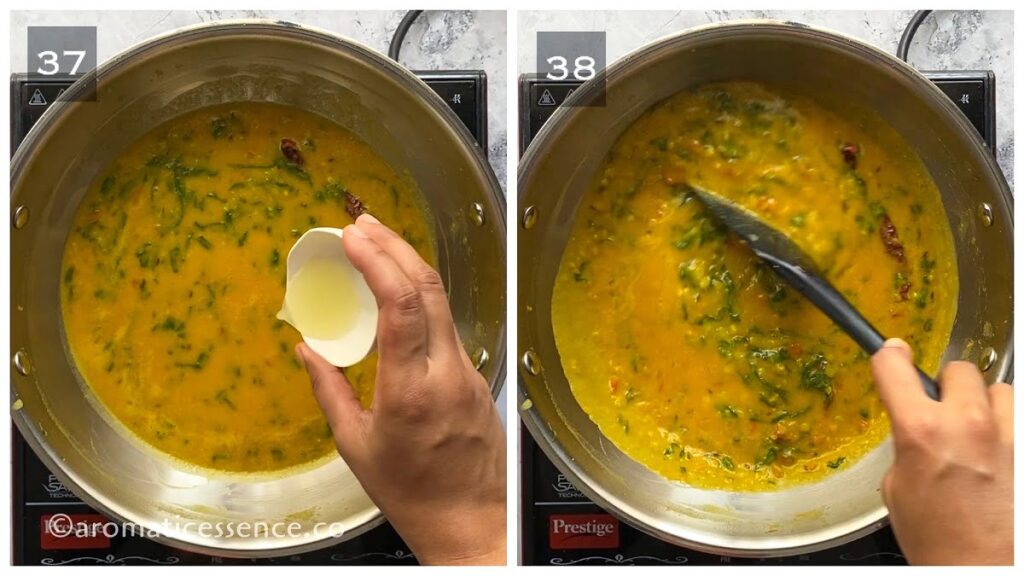
Add about 1/2 to 3/4 cup of water (I rinsed the cooker with the water and added to the kadai) or as per your desired consistency, bring to a boil. Check for seasonings and adjust accordingly. Simmer for another 5 minutes. ( Photos 35 and 36 )

Drizzle some lemon juice and mix well. ( Photos 37 and 38 )
Step 4: Second tempering (optional but recommended)
Prepare the second tempering by heating 1 tablespoon ghee in a small pan, add 1/2 teaspoon cumin seeds, and when it crackles, add 1 dried chili. ( Photos 39 to 41 )
Fry for a few seconds until the chili changes color. ( Photo 42 )
Switch off the heat, and add 1/4 teaspoon Kashmiri chili powder. Mix well and pour it over the dal immediately. Mix it well with the dal, and serve hot with rice or any other flatbread. ( Photos 43 and 44 )

Instant Pot Method
Follow the same process above for rinsing and soaking the yellow lentils. If you skip soaking, refer to the pressure cooking time mentioned below.
Step 1: Saute aromatics, spices, and tomatoes
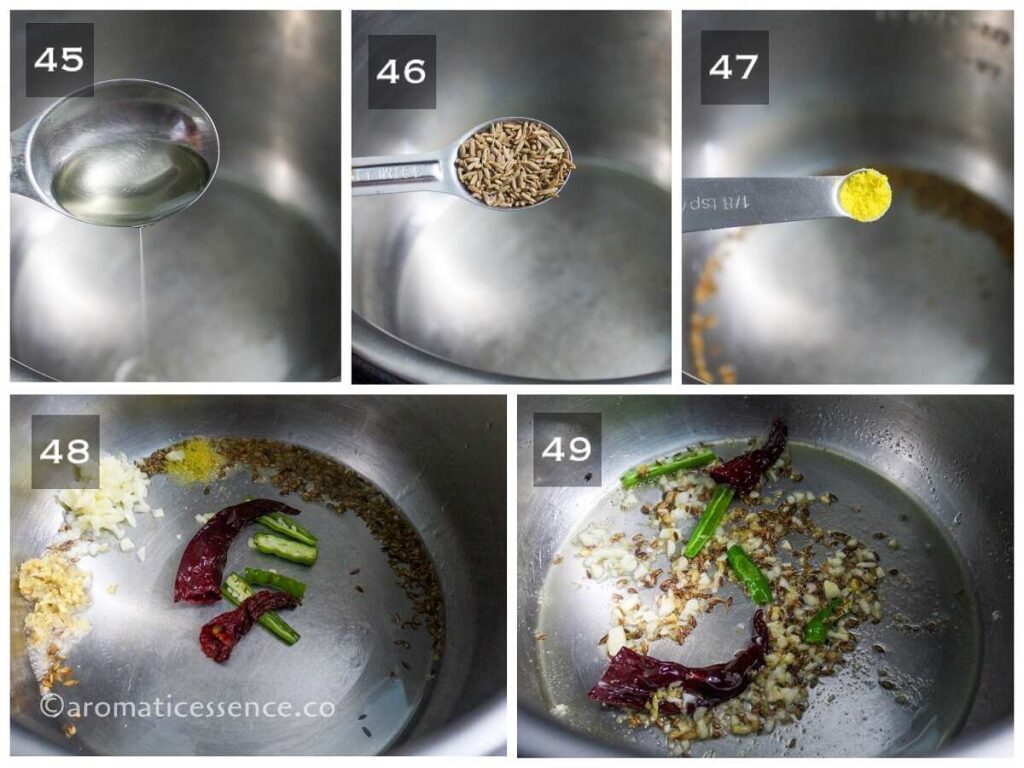
Press the ‘SAUTE’ button, and set it to ‘NORMAL’. Once it displays, ‘HOT’, add 2 tablespoons of oil. Let the oil heat up a bit, then add cumin seeds, add 1 teaspoon of cumin seeds. ( Photos 45 and 46 )
Once it crackles, add a pinch of hing, 1/2 tablespoon minced ginger, 1 tablespoon minced garlic, 2 to 3 slit green chilies, and 1 to 2 dried red chilies. ( Photos 47 and 48 )
Cook, stirring, until fragrant. ( Photo 49 )
Add 1 cup chopped onions, and saute until it turns a light golden brown. ( Photos 50 and 51 )
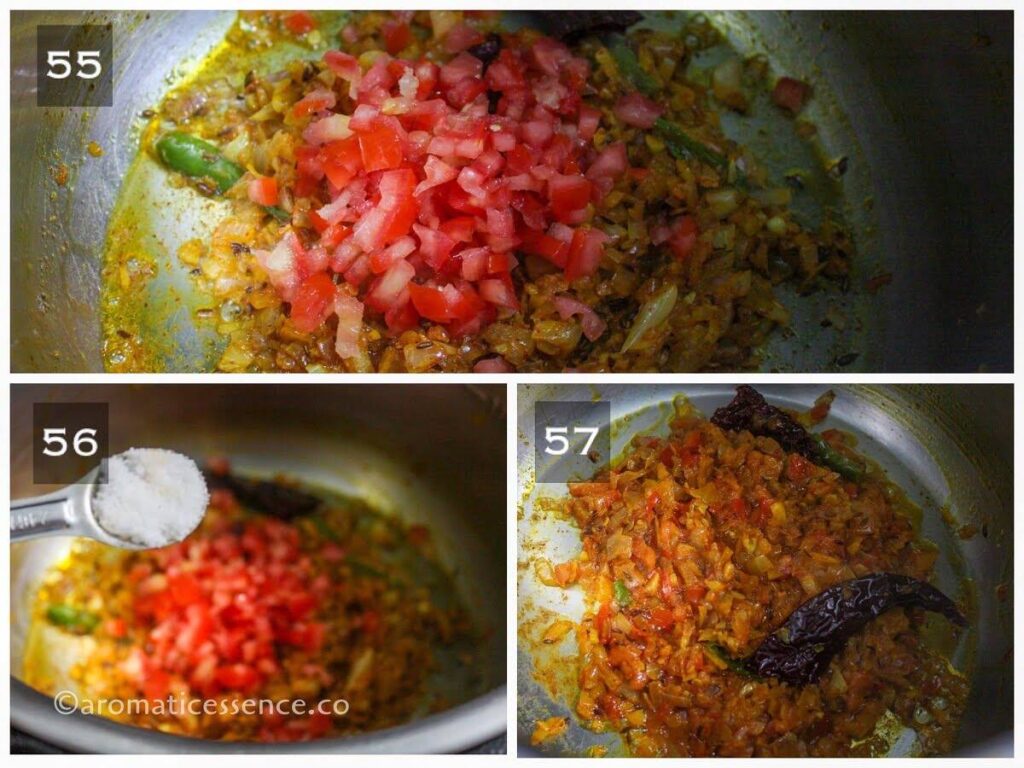
Add 1/2 teaspoon of turmeric and 1/2 teaspoon of red chili powder or cayenne pepper, and sauté for another 30 seconds. ( Photos 52 to 54 )

Add 1/2 cup chopped tomatoes and 1 teaspoon salt, and sauté until it turns mushy. ( Photos 55 to 57 )
Step 2: Add dal, water, and pressure cook
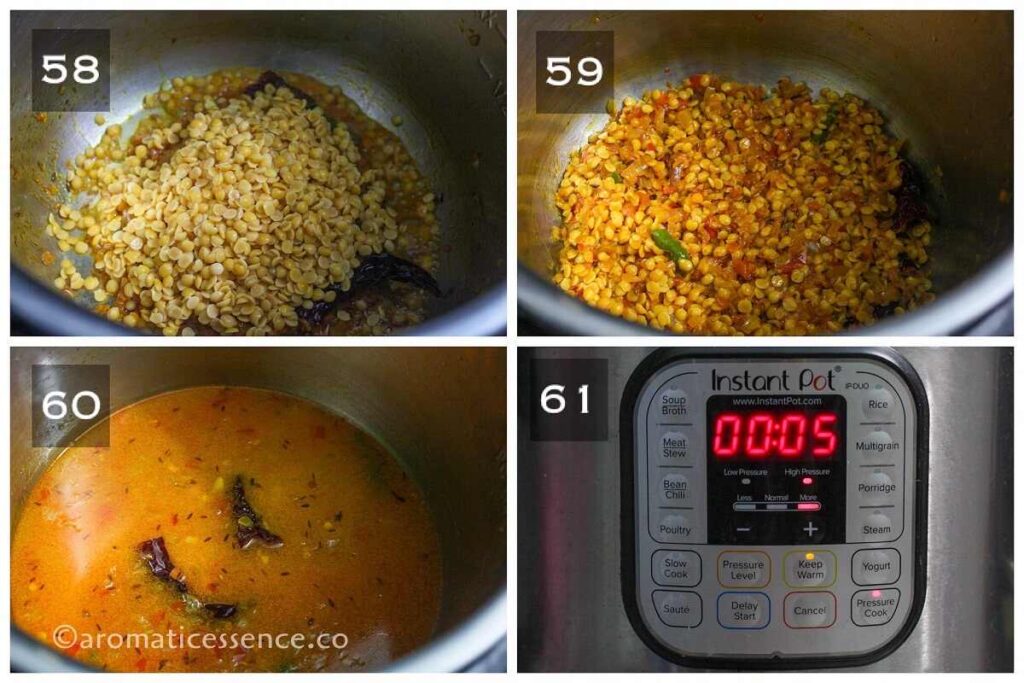
Add the drained yellow lentils, and mix well with the onion-tomato masala. Add 1 & 1/2 cups of water and mix well. ( Photos 58 to 60 )
Press ‘CANCEL’ to switch off the “SAUTE’ mode. Close the lid of the Instant Pot. Set the valve to ‘SEALING’.
Pressure cook on ‘HIGH’ for 5 minutes. It will take some time for the pressure to build up (about 10 minutes), after which the timer will begin. ( Photo 61)
For unsoaked toor dal, pressure cook on ‘HIGH’ for 8 to 10 minutes.
Step 3: Natural pressure release followed by adding the rest of the ingredients
Once the cooking cycle is complete, let the pot depressurize naturally. It took me about 14 minutes. You could let it depressurize for at least 10 minutes. ( Photo 62 )
Once the silver pin drops, turn the knob to ‘VENTING’ and open the lid away from you.
Whisk the dal using a wired whisk or a spatula until it is smooth. ( Photos 63 and 64 )
Turn on the ‘SAUTE’ mode, add about 1/2 cup of water or as per desired consistency, mix well and cook for another 2 to 3 minutes, stirring occasionally. ( Photos 65 and 66 )
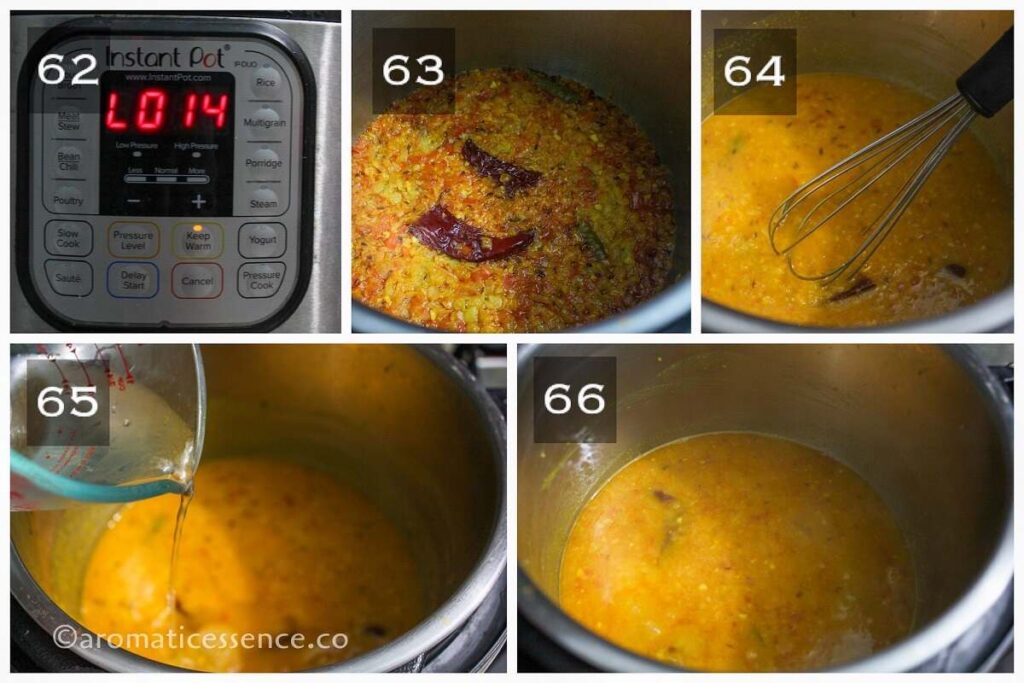
Add 3 cups chopped spinach and cook until the leaves wilt. Check for seasonings and adjust accordingly. ( Photos 67 and 68 )
Switch off the IP. Add a dash of lemon juice and mix well. ( Photos 69 and 70 )

Prepare the second tempering as shown above and pour it over the dal if desired.
Serving suggestions
This comforting and hearty spinach dal is best paired with plain steamed rice, brown rice, or jeera rice. It pairs well with quinoa too.
You can also serve it with a flatbread like roti, paratha, phulka, or chapati.
Serve it as a part of thali along with some sabzi like aloo methi , aloo bhindi, aloo gobhi, etc., rice, flatbread, yogurt or raita, pickle, and papad!
You may also enjoy it as a lentil soup or stew for a light meal.

Storage instructions
- Refrigerate: Store leftover spinach in an airtight container in the fridge for up to 2 to 3 days.
- Freeze: You may also freeze spinach dal in freezer-safe bags or containers for up to 3 months.
- Reheat: Thaw in the refrigerator overnight, and reheat in the microwave or over the stovetop. Add a splash of water since dal thickens considerably as it sits.
Tips to make the best dal palak
- Lentils: Make sure your lentils are fresh. Older lentils take longer to cook. If they are not cooked within the time specified in the recipe, add some more water and pressure cook until cooked through.
- Spinach: Avoid using the thick, fibrous, and stringy stems of spinach. They can be difficult to chew. Do trim them off before using them in the recipe.
- Quantity of spinach: You do not need to stick to 125 grams of chopped spinach for this recipe. You can add as much as you want. Though, I find this ratio of dal to spinach works well.
- Heat: This recipe is a bit spicy because of the use of spicy green chilies and red chili powder. Adjust the spice levels by using mild, light green chilies. You may also reduce or skip the red chili powder.
- Additional spices: I don’t like to add a ton of spices to this dal because they can overpower the overall flavor. However, you can add some garam masala if you like. You may also add other spices like coriander powder, cumin powder, kasuri methi, etc.
- Consistency: This dal is semi-thick, which thickens even more as it sits. You can always adjust the consistency to your liking.
Variations of this recipe
You can add interesting variations to this spinach dal recipe.
- Dry version (sabzi): If you want to eat spinach dal as a sabzi (a semi-dry veggie preparation), then skip adding water. Add a little if needed to adjust the consistency. Drizzle lemon juice, mix, and serve it as is.
- South Indian version: The dal is also known as Palakura pappu in Andhra Pradesh and paruppu keerai masiyal in Tamil Nadu. Dal is known as pappu and spinach is known as palakura in the Telugu language. You can follow the same recipe and add a tempering made of 1 tablespoon ghee, 1/2 teaspoon each of mustard seeds, urad dal, 1/8 teaspoon asafoetida, 3 to 4 sliced garlic cloves, 1-2 dry red chilies, and a sprig of curry leaves.
- Prefer a garlicky dal? Add 2-3 thinly sliced garlic cloves in the second tempering.
- Pumpkin: A cup or two of diced pumpkin cubes can be added to make pumpkin and spinach dhal. Cook the pumpkin along with the dal in the pressure cooker.
- Palak chana dal: Chana dal needs to be soaked for 3 to 4 hours. Pressure cook for 3 to 4 whistles on medium heat.
- Other lentils: You can also use other lentils like split moong dal which are petite yellow lentils to make palak moong dal or red lentils (split masoor dal) to make palak masoor dal recipe, etc. They all work great. You can also mix and match a combination of lentils. There’s no hard and fast rule here.
- Other greens: You can also swap out the spinach with other greens like fenugreek, kale, collard greens, moringa leaves, turnip greens, beetroot greens, etc.

Can I make this dal without a pressure cooker?
If you do not have a pressure cooker or Instant Pot, cook the lentils in a regular pot with sufficient water, at least 2 inches above the lentils.
Bring to a boil, then reduce the heat to medium-low and cook, uncovered, until the lentils are soft and mushy, stirring occasionally in between.
You may need to add more water if it gets too thick. This will take about 20 to 30 minutes.
I strongly suggest soaking the lentils if you plan on cooking them in a pot to cut back on the cooking time.
Is this palak ki dal gluten-free?
Since hing (asafoetida) is used here, it is not a gluten-free recipe. While in its pure form asafoetida is naturally gluten-free, but most commercially available form is compounded hing often mixed with flour or rice flour. Check the label of the container to make sure you are using pure, gluten-free asafoetida.
Can I make a vegan version?
Yes, of course, you can! This recipe can be easily adapted to suit a vegan diet. Simply swap the ghee with your preferred plant-based oil.
Can I cook the rice along with the dal in the Instant Pot using the Pot-in-pot (PIP) method?
Yes, you can! Since the dal and white rice have similar cooking times, you can use this time-saving method.
To do that, simply place a tall trivet over the dal. Add 1 cup rinsed rice, 1 cup water (1 & 1/4 cups for softer texture), a pinch of salt or to taste, and 1 teaspoon oil or ghee to a stainless steel container. Place the container over the trivet, no need to cover it. Follow the rest of the pressure cooking instructions as mentioned.
Can I use frozen spinach instead of fresh?
Yes, you can! Defrost the spinach, squeeze out excess water, and then use it in the recipe.
You may also enjoy these dal recipes
Toor dal recipe (Stovetop + Instant Pot)
Instant pot brown lentil curry
Editor’s note: This recipe was first published on October 10, 2018. It has been updated and republished on July 29, 2022, with new images, detailed stepwise pictorials, video, and additional information. The recipe is the same as the one originally published, except for the use of ghee instead of oil in the second tempering.
Dal Palak Recipe | Spinach Dal (Stovetop & Instant Pot)
Ingredients1x2x3x
- 1/2 cup lentils of choice, I’ve used toor dal
- 1 teaspoon salt, or to taste, divided
- 1/2 teaspoon turmeric powder, divided
- 2 tablespoon + 1 teaspoon oil
- 1 teaspoon cumin seeds
- Pinch of hing (asafoetida)
- 1 tablespoon minced garlic
- 1/2 tablespoon minced ginger
- 2 to 3 green chillies, slit lengthwise
- 2 to 3 dried red chillies, broken into half
- 1 cup finely chopped onion
- 1/2 teaspoon red chilli powder
- 1 medium tomato, finely chopped, about 1/2 cup
- 3 cups loosely packed chopped spinach, 125 grams
- Dash of lemon juice
For the second tempering (optional)
- 1 tablespoon oil/ghee
- 1/2 teaspoon cumin seeds
- 1 dried red chili
- 1/4 teaspoon Kashmiri red chilli powder
Instructions
Stove top pressure cooker method
- Rinse toor dal well under running water until the water runs clear, then soak it in sufficient water for about 30 minutes.
- Transfer the drained dal to a pressure cooker. Add 1 & 1/2 cups of water, 1/2 teaspoon salt, 1 teaspoon oil, and 1/4 teaspoon turmeric. (Adding oil prevents frothing and spilling from the pressure cooker). Mix well.
- Pressure cook the dal for 3 whistles on high heat. Then lower the heat and simmer for another 5 minutes. Switch off the heat and set the cooker aside.
- Once the cooker depressurizes, open the lid and mash the dal with a wired whisk or spoon for a smooth consistency. You may leave it as it is if you prefer it that way.
- Heat 2 tablespoons oil in a heavy-bottomed pot, add cumin seeds. Once it crackles, add a pinch of hing, minced garlic, minced ginger, slit green chillies, and dried red chillies.
- Stir-fry, until fragrant.
- Add finely chopped onions, sauté until it turns a light golden brown.
- Add the remaining 1/4 teaspoon turmeric and red chilli powder or cayenne pepper, sauté for another 30 seconds.
- Next, add finely chopped tomatoes along with 1/2 teaspoon salt and sauté until it turns mushy and you see oil oozing from the sides.
- Add chopped spinach, and stir-fry until it wilts, about 1 to 2 minutes.
- Now, add the cooked dal, and give everything a good mix.
- Add about 1/2 to 3/4 cup of water or as per your desired consistency, bring to a boil. Check for seasonings and adjust accordingly. Simmer for another 5 minutes.
- Drizzle some lemon juice and mix well.
- Prepare the second tempering by heating ghee in a small pan, add cumin seeds, when it crackles, add 1 dred chili.
- Fry for a few seconds until the chili changes color.
- Switch off the heat, add Kashmiri chilli powder. Mix well and pour it over the dal immediately. Mix it well with the dal, and serve hot with rice or any other flatbread.
Instant Pot Method
- Follow the same process above for rinsing and soaking the yellow lentils. If you skip soaking, refer to the pressure cooking time mentioned below.
- Press the ‘SAUTE’ button, and set it to ‘NORMAL’. Once it displays, ‘HOT’, add oil. Let the oil heat up a bit, then add cumin seeds.
- Once it crackles, add a pinch of hing, minced ginger, minced garlic, slit green chilies, and dried red chilies
- Cook, stirring, until fragrant.
- Add chopped onions, and saute until it turns a light golden brown.
- Add 1/2 teaspoon each of turmeric and red chilli powder or cayenne pepper, sauté for another 30 seconds.
- Add chopped tomatoes and 1 teaspoon salt, sauté until it turns mushy.
- Add the drained yellow lentils, and mix well with the onion-tomato masala. Add 1 & 1/2 cups of water and mix well.
- Press ‘CANCEL’ to switch off the “SAUTE’ mode. Close the lid of the Instant Pot. Set the valve to ‘SEALING’.
- Pressure cook on ‘HIGH’ for 5 minutes. It will take some time for the pressure to build up (about 10 minutes), after which the timer will begin.
- For unsoaked toor dal, pressure cook on ‘HIGH’ for 8 to 10 minutes.
- Once the cooking cycle is complete, let the pot depressurize naturally. It took me about 14 minutes. You could let it depressurize for at least 10 minutes.
- Once the silver pin drops, turn the knob to ‘VENTING’ and open the lid away from you.
- Whisk the dal using a wired whisk or a spatula until it is smooth.
- Turn on the ‘SAUTE’ mode, add about 1/2 cup of water or as per desired consistency, mix well and cook for another 2 to 3 minutes, stirring occasionally.
- Add chopped spinach and cook until the leaves wilt. Check for seasonings and adjust accordingly.
- Switch off the IP. Add a dash of lemon juice and mix well.
