Prawn pulao (shrimp pulao) is a yummy, one-pot rice dish featuring tender prawns and fragrant basmati rice, flavored with aromatic herbs and spices.

Let me start by saying I just love seafood. Prawns have always been on top of my list, second only to crabs. I love the mildly sweet and meaty texture of the prawns. Secondly, they can be cooked in a jiffy which is why I always have some prawns stashed in my freezer for a quick meal.
This one-pot prawn pulav recipe is so easy to make and tastes absolutely delicious. Have it with some kachumber or salad for a simple yet hearty meal.
I usually resort to making pulao or biryani on Sundays, especially biryani, since it does involve some amount of prep work. But IMHO pulao makes for a great weekday meal when you are short on time! Besides, who doesn’t love one-pot meals?
Prawns are known as jhinga in Hindi, so it is also known as jhinga pulao. There are quite a number of ways of preparing prawn pulao.
Mom usually prepares it the Goan way which is quite mild. It relies on some whole spices, turmeric, bouillon, and coconut milk for flavor. I will be sure to share that with you some other time.
Today, I’m sharing a slightly different version of prawn pulao, kind of a masaledar version. The flavor leans more towards biryani since it is packed with spices and is uber delicious. The only difference is that it is not layered, but rather cooked in one pot!

- Why you will love this recipe?
- Ingredients needed
- How to make prawn pulao recipe –
- Serving suggestions
- Storage instructions
- Recipe tips
- Variations
- Frequently asked questions
- You may also enjoy these rice recipes
- Prawn Pulao | Shrimp Pulao
Why you will love this recipe?
This prawn pilaf;
☑ Is a flavorful one-pot dish
☑ Can be customized to suit your palate
☑ Is great to be served at parties, potlucks, or house gatherings
☑ Can be easily scaled
☑ Is gluten-free
Ingredients needed
Rice: I’ve used aged basmati rice. You may use long-grained or short-grained rice of your choice. But please be sure to use the correct ratio of water for the kind of rice you opt for.
Prawns: I’ve used medium-sized prawns here. You could use large, jumbo, colossal-size prawns, etc as well. You could also use sea, river, or farmed prawns. Do not opt for very small prawns as they will kind of get lost amongst the rice grains.
Aromatics: Onions, fresh ginger, and garlic. I’m not a fan of the store-bought ginger garlic paste as it pales in comparison to homemade paste. But, if that is all you have, feel free to use it.
Tomatoes: Add a subtle tangy flavor to the pulao.
Whole spices: You will need a mix of whole spices like shahi jeera, green cardamom, cloves, black peppercorns, cinnamon, star anise, mace, and bay leaves. The spices release a lovely aroma when tempered in ghee.
Powdered spices: Along with the whole spices, you will also need basic Indian spices from your masala dabba , like spicy red chili powder, cumin, coriander powder, turmeric, and garam masala, along with some salt.
Cooking fat: I’ve used ghee, but you can also use vegetable oil.
Lemon juice: A little amount of acid added to the water while cooking prevents the rice grains from sticking together and helps make them fluffier.

How to make prawn pulao recipe –
Step 1: Soak rice and marinate prawns
Rinse the rice 3 to 4 times with water until it runs clear to remove excess starch. Add 2 cups of water and soak the rice for 15 to 20 minutes. ( Photos 1 to 4 )
Marinate the prawns with ½ teaspoon salt, and ¼ teaspoon each of black pepper and turmeric. Set aside for 15 minutes. ( Photos 5 and 6 )
Prep your ingredients in the meanwhile.

Step 2: Cook onion-tomato masala and prawns
Heat 2 tablespoons of ghee in a heavy-bottomed pot on medium heat. Add ½ teaspoon shahi jeera, 2 bay leaves, 1-inch cinnamon, 1-star anise, 4 green cardamom, 2 cloves, and 3 to 4 black peppercorns, and saute for about 30 seconds. ( Photo 7 )
Add 1 cup thinly sliced onion, and saute until it turns golden brown. ( Photos 8 and 9 )
Next, add 1 tablespoon of coarsely crushed ginger-garlic paste and 2 to 3 green chilies, and saute until fragrant. ( Photos 10 to 12 )

Add 1 teaspoon of coriander powder, ½ teaspoon of cumin powder, ¼ teaspoon of red chili powder, ½ teaspoon of garam masala, and ½ teaspoon of turmeric. ( Photos 13 to 17 )
Saute for about 30 seconds. Add a few splashes of water if needed to prevent the spices from sticking to the bottom of the pot. ( Photo 18 )

Add ¾ cup chopped tomatoes and salt to taste. Mix well, and cook until the tomatoes turn mushy and fat separates from the sides. You can add a few tablespoons of water if needed to cook the tomatoes. ( Photos 19 and 20 )
Add the marinated prawns, and cook on medium-high heat just until it turns opaque (about 1 minute). ( Photos 21 and 22 )
Add 1 to 2 tablespoons of coriander leaves, and mix. ( Photos 23 and 24 )

Step 3: Add rice and water, and cook the prawn pulao
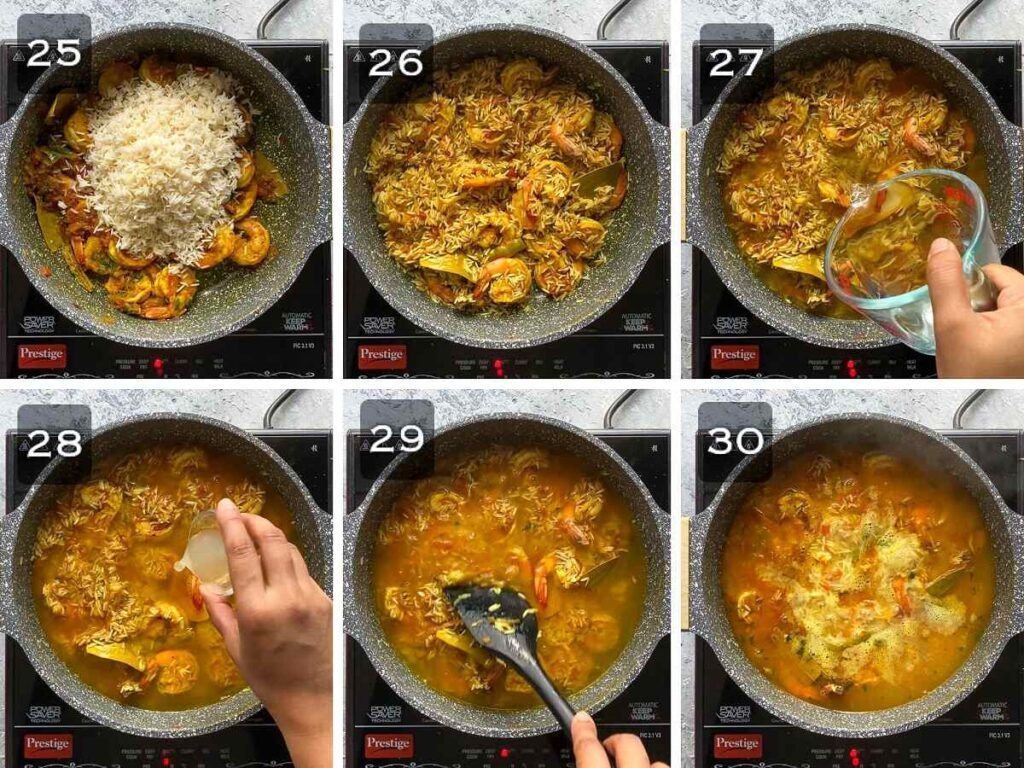
Add the drained basmati rice, and mix it well, so that the grains get coated evenly with the masala. ( Photos 25 and 26 )
Add 1¾ cups of water, and ½ tablespoon of lemon juice, and bring to a boil. ( Photos 27 and 30 )
Cover and simmer on low heat until all the water is absorbed and the rice is fully cooked (about 15 minutes). ( Photo 31 )
Switch off the heat, and leave it undisturbed for another 15 minutes.( Photo 32 )
Fluff the rice gently, garnish with more coriander leaves and serve hot! ( Photos 33 and 34 )

Serving suggestions
This prawn pulao is a yummy standalone dish. It doesn’t need many sides.
A raita or salad is more than enough to serve as an accompaniment.
Sometimes, I serve it along with boiled eggs.
You can also serve it along with some papad and pickle.
Storage instructions
Leftovers: Allow the pulao to cool down completely. Store leftovers within 2 hours of cooking in an airtight container in the fridge for up to 2 days.
Freeze: Portion out individual servings in freezer-safe airtight containers or Ziptop bags and freeze for up to 1 month. Thaw overnight in the fridge.
Reheat: Transfer it in a skillet or pot, add about 2 to 3 tablespoons of water. Reheat on medium-low heat for about 5 to 10 minutes or until heated through. Stir frequently to prevent the rice grains from sticking to the bottom of the skillet.
Recipe tips
Use stock instead of water: You can use seafood stock or just prawn stock instead of plain water to amp up the flavor of this pulao. Feel free to add one small chicken or vegetable bouillon cube (Maggi stock cube) or 1 teaspoon of better than bouillon lobster base. Please skip or reduce the salt in the recipe accordingly.
Rice-to-water ratio: Most pulao recipes call for a 1:2 ratio of rice to water. But since the rice is soaked for about 30 minutes here, I highly suggest cutting back on the water for perfectly cooked rice grains that are fluffy and distinct. Follow the quantities mentioned in the recipe.
Prawns: You can use either fresh or frozen prawns. If using frozen, thaw and then use. If cleaning fresh prawns yourself, be sure to devein them. I like to leave the tails on as it gives them a nice appearance. Feel free to remove them if you like.
Do not overcook the prawns: You need to saute the prawns just until they turn opaque. Keep in mind that they will further cook with the rice for another 10 to 15 minutes. Cooking it too much initially will just make them hard and rubbery.
Spices: Feel free to play around with the amount of spices. If you prefer a brownish-colored pulao, skip the turmeric. You can also add pulao masala or biryani masala instead of garam masala.

Variations
Shrimp pulao: Substitute the prawns with shrimp if you like.
Add vegetables: You can add some diced carrots, potatoes, green beans, bell peppers, cauliflower, or green peas to this pulao.
Green prawn pulao: Skip adding ginger garlic paste after sauteing onion if you want to make this version. Instead make a paste of about 1 cup of coriander leaves, green chilies, 1-inch ginger, and 10 to 12 garlic cloves. You can also add about 1/4 to 1/2 cups of freshly grated coconut if you like. Add this paste after sauteeing the tomatoes and cook for a few minutes. Then add prawns and follow the rest of the recipe.
Mint leaves: You can also add a few mint leaves along with coriander leaves.
Coconut milk: Swap 3/4 cup of water with light coconut milk.
Spicy: This recipe is not very spicy. If you prefer spicy pulao, add the dark green variety of chilies or use serrano peppers, and add more red chili powder/cayenne pepper.
Make it with cooked rice: Follow the recipe as such, and add 3 cups of cold cooked rice (a day old preferably) instead of the drained raw rice. Toss gently until the rice is well combined with the masala.
Quinoa: Swap the rice with quinoa for a twist.
Saffron: For a royal touch, add about 2 tablespoons of saffron water (a pinch of saffron soaked in 2 tablespoons of hot water for 10 minutes).
Birista garnish: For a festive touch, sprinkle some crispy fried onions while serving.
Can I use brown basmati rice?
I don’t recommend using brown rice here. Brown rice takes a long time to cook, and the prawns will definitely overcook and turn rubbery!
If you must use brown rice, saute the prawns separately and add them to the pulao towards the end of cooking (after most of the liquid has been absorbed by the rice). Add the sauteed prawns, cover, and let it stand undisturbed for 10 minutes.
Can I make prawn pulao in the pressure cooker?
I personally do not prefer pressure cooking prawns since they do tend to overcook. You may saute the prawns in the pressure cooker first and set them aside on a plate.
Follow the same recipe as the stovetop method, but use 1.5 cups of liquid for 1 cup of basmati rice. Pressure cook the pulao for 2 whistles over medium heat, switch off the heat, and let it depressurize.
Then open the lid, add the sauteed prawns in one layer, close the lid and leave undisturbed for 10 minutes (gas should be switched off). Then fluff the rice gently.
How to make it in the Instant Pot
Follow the same process as the stovetop pressure cooker. Use 1 cup water (firm) to 1.25 cups water (softer) for 1 cup of rice, depending on your preferred rice consistency. Pressure cook on ‘HIGH’ for 5 minutes, followed by ‘NPR’ for 10 minutes.

You may also enjoy these rice recipes
Vegetable pulao
Mushroom pulao
Palak rice
Pudina rice
Tomato rice
Bagara rice
I would love to hear from you! Please be sure to share your feedback and/or give this recipe a rating in the comment below. Your reviews help others know the recipe better too.
You can also FOLLOW me on Facebook , Pinterest, Instagram & Twitter

Prawn Pulao | Shrimp Pulao
Ingredients1x2x3x
For the prawn marination
- 250 grams prawns, cleaned and deveined, about 20 medium-sized prawns
- 1/2 teaspoon salt
- ¼ teaspoon black pepper
- ¼ teaspoon turmeric
For the pulao
- 1 cup basmati rice 210 grams
- 2 tablespoons ghee
- ½ teaspoon shahi jeera
- 2 bay leaves,
- 1 inch cinnamon
- 1 star anise
- 4 green cardamom
- 2 cloves
- 3 to 4 black peppercorns
- 1 cup thinly sliced onion, 110 grams
- 1 tablespoon ginger garlic paste
- 2 green chilies slit lengthwise
- 1 teaspoon coriander powder
- ½ teaspoon cumin powder
- ¼ teaspoon red chili powder, you may add more for more heat
- ½ teaspoon garam masala
- ½ teaspoon turmeric
- 2 medium tomatoes, finely chopped, about ¾ cup, 120 grams
- 1 teaspoon table salt, or to taste
- 2 to 3 tablespoons chopped coriander leaves, divided
- ½ tablespoon lemon juice
Instructions
Soak rice and marinate prawns
- Rinse the rice 3 to 4 times with water until it runs clear to remove excess starch. Add 2 cups of water and soak the rice for 15 to 20 minutes.
- Marinate the prawns with salt, black pepper and turmeric. Set aside for 15 minutes.
- Prep your ingredients in the meanwhile.
Cook onion-tomato masala and prawns
- Heat ghee in a heavy-bottomed pot on medium heat.
- Add shahi jeera, bay leaves, cinnamon, star anise, green cardamom, cloves, and black peppercorns, and saute for about 30 seconds.
- Add sliced onion, and saute until it turns golden brown.
- Next, add coarsely crushed ginger-garlic paste and green chilies, and saute until fragrant.
- Add coriander powder, cumin powder, red chili powder, garam masala, and turmeric.
- Saute for about 30 seconds. Add a few splashes of water if needed to prevent the spices from sticking to the bottom of the pot.
- Add chopped tomatoes and salt to taste. Mix well, and cook until the tomatoes turn mushy and fat separates from the sides. You can add a few tablespoons of water if needed to cook the tomatoes.
- Add the marinated prawns, and cook on medium-high heat just until it turns opaque, about 1 minute.
- Add half of the chopped coriander leaves, and mix.
Add rice and water, and cook the prawn pulao
- Add the drained basmati rice, and mix it well, so that the grains get coated evenly with the masala.
- Add 1¾ cups of water, and lemon juice, and bring to a boil.
- Cover and simmer on low heat until all the water is absorbed and the rice is fully cooked, about 15 minutes.
- Switch off the heat, and leave it undisturbed for another 15 minutes.
- Fluff the rice gently, garnish with more coriander leaves and serve hot!
Video

Prawn Pulao | Shrimp Pulao
Ingredients
For the prawn marination
- 250 grams prawns, cleaned and deveined, about 20 medium-sized prawns
- 1/2 teaspoon salt
- ¼ teaspoon black pepper
- ¼ teaspoon turmeric
For the pulao
- 1 cup basmati rice 210 grams
- 2 tablespoons ghee
- ½ teaspoon shahi jeera
- 2 bay leaves,
- 1 inch cinnamon
- 1 star anise
- 4 green cardamom
- 2 cloves
- 3 to 4 black peppercorns
- 1 cup thinly sliced onion, 110 grams
- 1 tablespoon ginger garlic paste
- 2 green chilies slit lengthwise
- 1 teaspoon coriander powder
- ½ teaspoon cumin powder
- ¼ teaspoon red chili powder, you may add more for more heat
- ½ teaspoon garam masala
- ½ teaspoon turmeric
- 2 medium tomatoes, finely chopped, about ¾ cup, 120 grams
- 1 teaspoon table salt, or to taste
- 2 to 3 tablespoons chopped coriander leaves, divided
- ½ tablespoon lemon juice
Instructions
Soak rice and marinate prawns
- Rinse the rice 3 to 4 times with water until it runs clear to remove excess starch. Add 2 cups of water and soak the rice for 15 to 20 minutes.
- Marinate the prawns with salt, black pepper and turmeric. Set aside for 15 minutes.
- Prep your ingredients in the meanwhile.
Cook onion-tomato masala and prawns
- Heat ghee in a heavy-bottomed pot on medium heat.
- Add shahi jeera, bay leaves, cinnamon, star anise, green cardamom, cloves, and black peppercorns, and saute for about 30 seconds.
- Add sliced onion, and saute until it turns golden brown.
- Next, add coarsely crushed ginger-garlic paste and green chilies, and saute until fragrant.
- Add coriander powder, cumin powder, red chili powder, garam masala, and turmeric.
- Saute for about 30 seconds. Add a few splashes of water if needed to prevent the spices from sticking to the bottom of the pot.
- Add chopped tomatoes and salt to taste. Mix well, and cook until the tomatoes turn mushy and fat separates from the sides. You can add a few tablespoons of water if needed to cook the tomatoes.
- Add the marinated prawns, and cook on medium-high heat just until it turns opaque, about 1 minute.
- Add half of the chopped coriander leaves, and mix.
Add rice and water, and cook the prawn pulao
- Add the drained basmati rice, and mix it well, so that the grains get coated evenly with the masala.
- Add 1¾ cups of water, and lemon juice, and bring to a boil.
- Cover and simmer on low heat until all the water is absorbed and the rice is fully cooked, about 15 minutes.
- Switch off the heat, and leave it undisturbed for another 15 minutes.
- Fluff the rice gently, garnish with more coriander leaves and serve hot!
Video
This fresh strawberry mousse is light, fluffy, delicious, and bursting with strawberry flavor! Made with just 4 ingredients, this mousse is the perfect dessert to be served for any occasion! Eggless and gelatin-free!

If you are looking for an easy, eggless, no-bake dessert for Valentine’s or simply to welcome Spring, then you will love this refreshing strawberry mousse recipe. It is airy and creamy with the perfect balance of fruity strawberry flavor that is not overly sweet and neither is it too tart!
Each spoonful of this luscious strawberry mousse is like savoring a fluffy cloud of creamy strawberry goodness!
Strawberries are in season for a very short time in India, from late November to early March. So I’m making the best of these seasonal strawberries.
This eggless strawberry mousse is a big hit with my family! It was polished off as soon as I was done taking the pictures!
Now that the market is flooded with strawberries, I really hope you will make some and enjoy it as much as my family does!

- Why you will love this recipe?
- Ingredients required
- How to make eggless strawberry mousse – Step-by-step process
- Storage instructions
- Recipe tips
- Variations
- Frequently asked questions
- You may also enjoy these strawberry recipes
- Strawberry Mousse (Without Gelatin)
Why you will love this recipe?
This creamy strawberry mousse;
☑ Is an easy, 4-ingredient, beginner-friendly recipe
☑ Is one of the simplest seasonal strawberry-based desserts
☑ Looks elegant
☑ Is bursting with strawberry flavor
☑ Is made without dairy, gelatin, agar-agar, or eggs
☑ Can be made ahead making it perfect for entertaining
☑ Makes for a great date night dessert
Ingredients required
To make this mousse, you will need the following ingredients,
Strawberries: Use fresh, sweet, plump, and ripe strawberries for the best-tasting mousse.
Whipping cream: I’ve used non-dairy whipping cream, which forms the base of the mousse! Make sure it’s cold before you start whipping it.
Sugar: I’ve used castor sugar, regular granulated sugar will also work fine. The quantity of sugar can be adjusted depending on the tartness of the strawberries.
Lemon juice : The acidity of the lemon juice balances the sweetness and enhances the flavor of the strawberries giving the sauce a depth of flavor.
Garnishes: I’ve garnished this mousse with whipping cream and strawberry halves. You can also use grated chocolate, edible flowers, mint leaves, etc.

How to make eggless strawberry mousse – Step-by-step process
Step 1: Prepare the strawberry reduction sauce
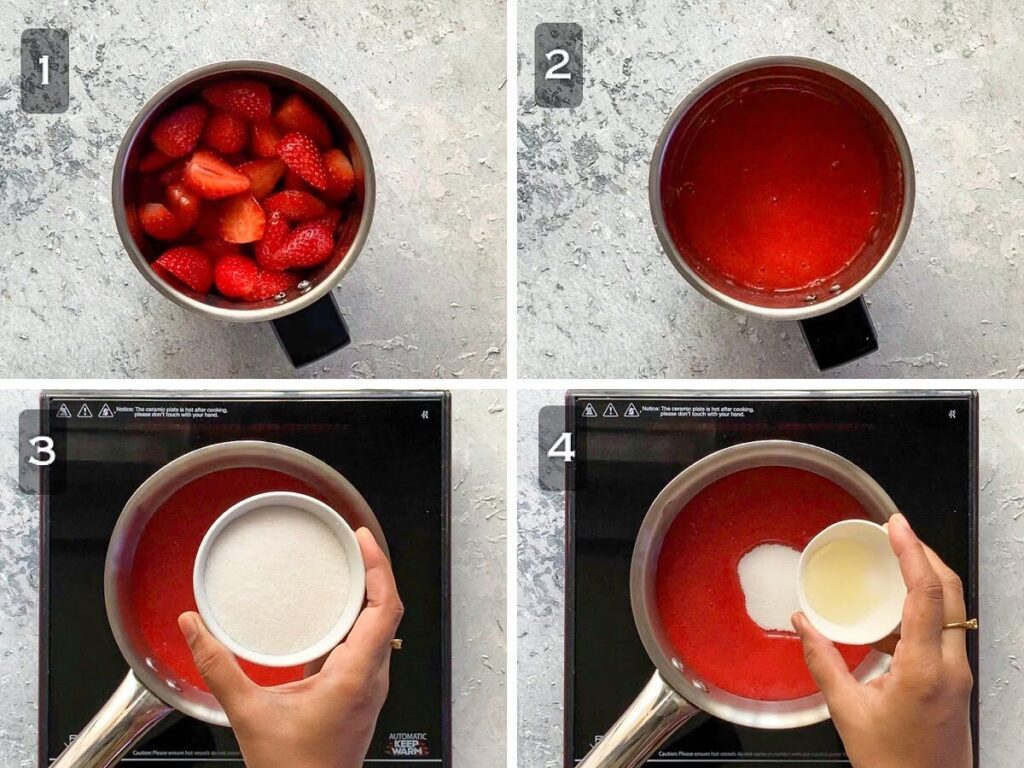
Add 450 grams of roughly chopped strawberries into a blender. Blend to a smooth puree. You should end up with approx 2 cups of strawberry puree. (Photos 1 and 2)
Pro tip: You may strain the puree for a smoother mousse. I left it as such since I don’t mind it.
Transfer the puree to a saucepan, and add 1/3 cup of castor sugar and 2 teaspoons of lemon juice. (Photos 3 and 4)
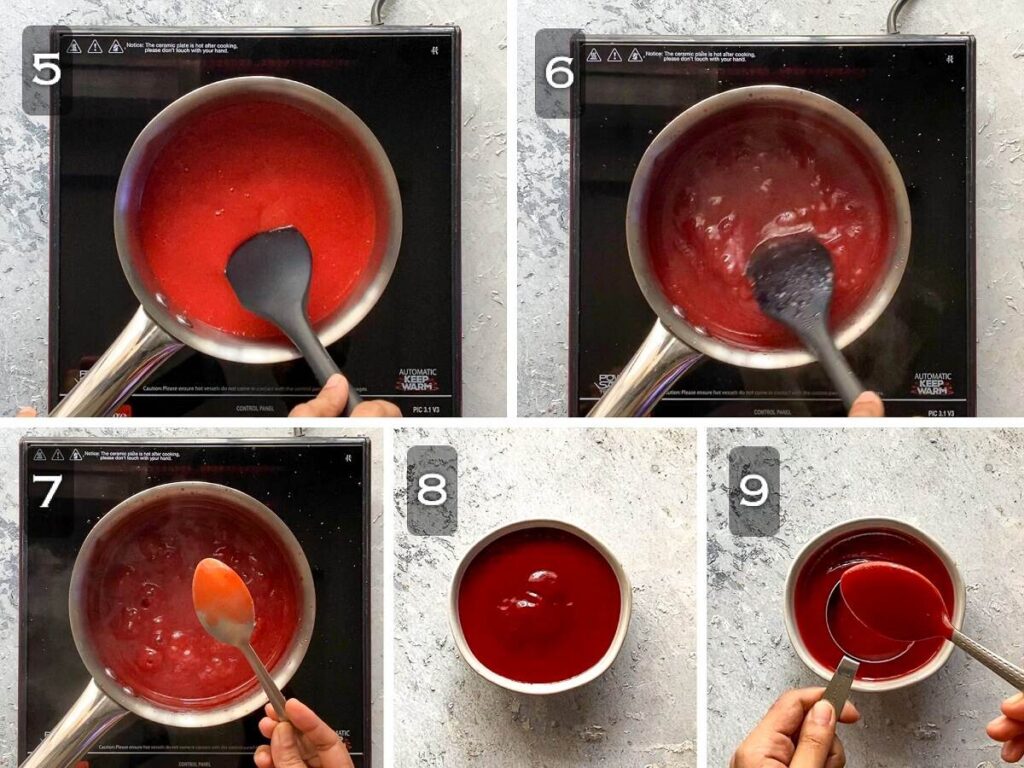
Mix well and bring to a boil over medium heat, stirring occasionally.
Reduce the heat to medium-low, and continue cooking, stirring often, until it thickens and coats the back of a spoon. The sauce should reduce to 1 cup (250 grams). (Photos 5 to 7)
It takes approximately 8 to 10 minutes. You may skim off any foam that rises to the surface.
Transfer to a bowl and reserve 1/4 cup of the sauce and set aside to cool completely. (Photos 8 and 9)
Refrigerate the sauce for another 1-2 hours. It will thicken further on cooling.
Step 2: Whip the heavy cream
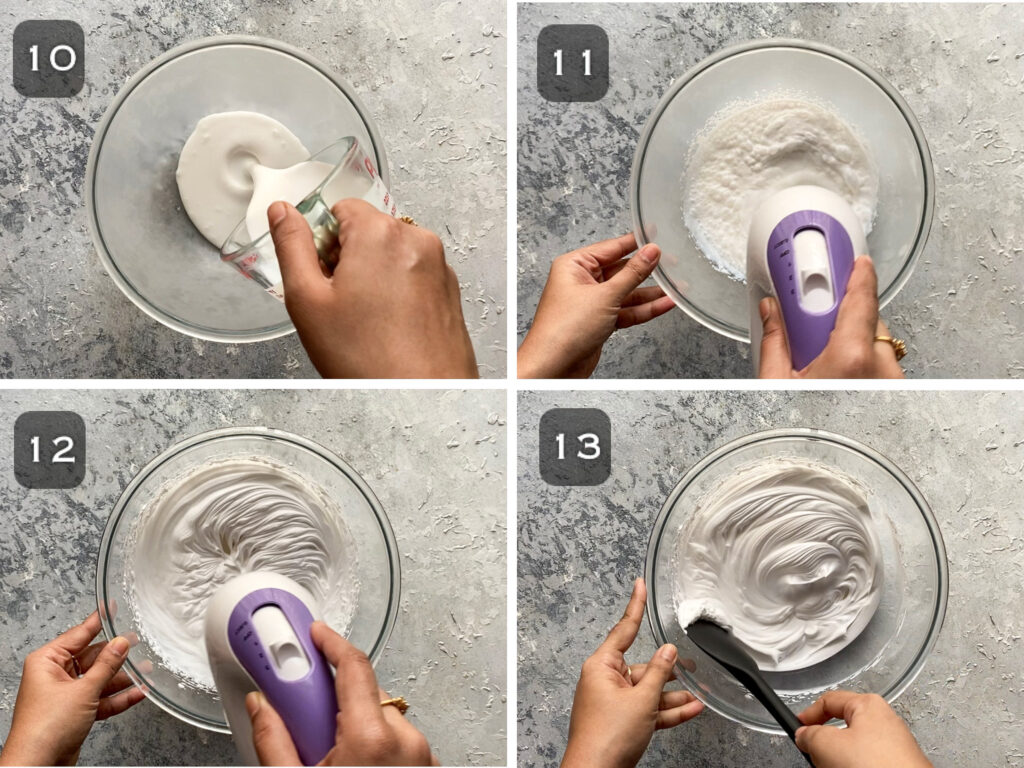
Add chilled whipping cream into a chilled mixing bowl. (Photo 10)
Whip on medium-high speed until it reaches the stiff peak consistency. (Photos 11 to 13)
The cream stays put and doesn’t move when you invert the bowl.
Note: Non-dairy whipping cream is already sweet, hence I’ve skipped adding extra sugar.
Step 3: Fold the strawberry reduction into the cream
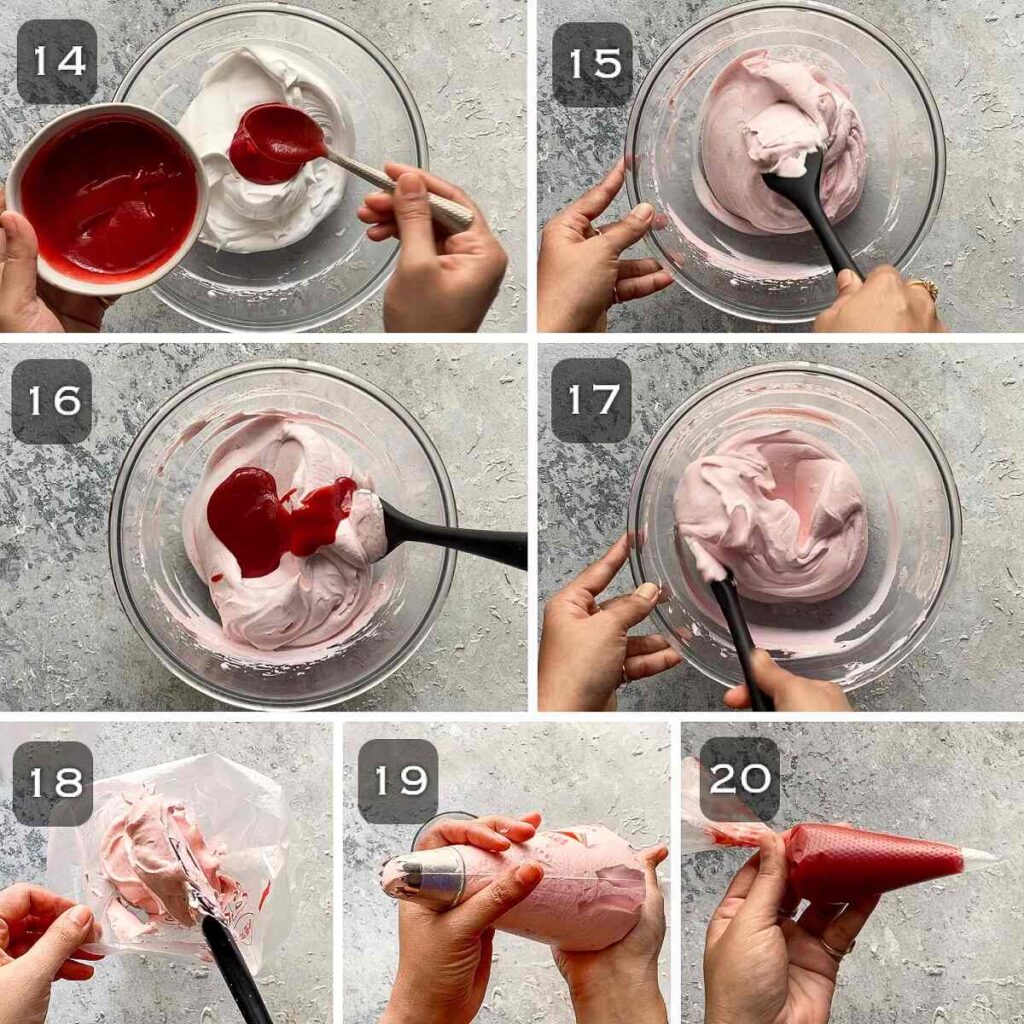
Add the cooled strawberry sauce to the whipped cream in two batches, and fold it gently. (Photos 14 to 17)
Transfer the mousse to a piping bag fitted with a large, closed star nozzle or any other nozzle of your choice. You may skip the nozzle, and simply snip off the tip. (Photos 18 and 19)
Also, transfer the reserved strawberry reduction to a piping bag and snip off the tip just before you are ready to pipe. (Photo 20 )
Step 4: Pipe the mousse into serving glasses
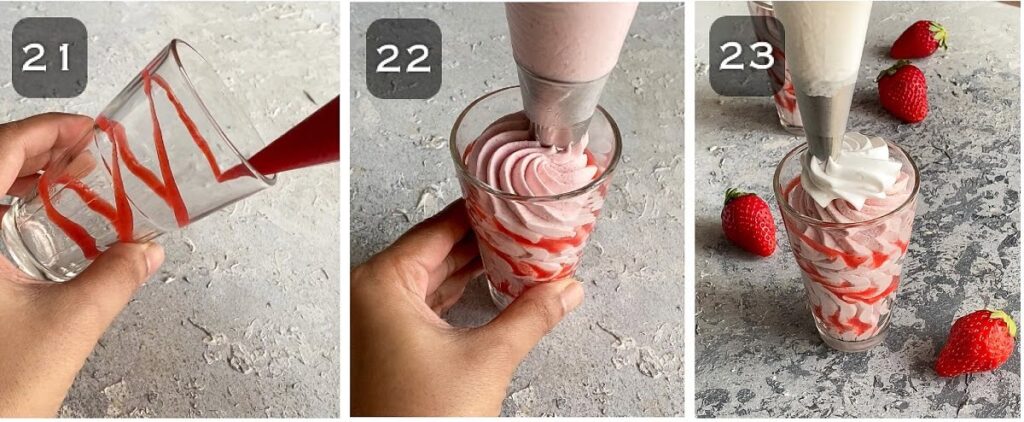
Drizzle strawberry reduction along the insides of the glass. (Photo 21)
Pipe the mousse into desired serving bowls/cups or jars. (Photo 22)
Cover with cling wrap or lids if using jars, and refrigerate for about 3 to 4 hours or overnight for best results.
When you are ready to serve, top with more whipped cream, and strawberry halves! Enjoy! (Photo 23)
Storageinstructions
Freeze: You may freeze the mousse in freezer-safe jars (like Ball Mason jars) for up to 2 months. This makes for a delicious frozen strawberry mousse. You could also thaw it overnight in the refrigerator but be sure to consume it within a day.
Recipe tips
Strawberry reduction sauce is a must: Do not be tempted to use the fresh strawberry puree as such. You have to cook it down to a thick sauce! Cooking down the mixture removes the moisture in the puree allowing for a thick, luscious sauce with concentrated strawberry flavor! The resultant mousse is also fluffy, and creamy, and holds its shape without any stabilizers.
Refrigerate the strawberry reduction before folding it with whipped cream: This helps the mousse set well and hold its shape.
Chill the bowl and beaters: Chilling the bowl and beaters/whisk in the fridge or freezer for at least 20 to 30 minutes will ensure that the cream whips up faster.
Variations
Mixed berries: Instead of strawberries, you can use a mix of other berries like blueberries, raspberries, blackberries, mulberries, etc. Blend the berries to a smooth puree and prepare the reduction sauce as mentioned above. Do strain the puree if using other berries to get rid of the seeds.
Jam or strawberry crush: If you want to make this a no-cook recipe, you can use a good quality strawberry jam or strawberry crush. Since store-bought jams are quite sweet, start with 1/4 cup of jam or crush and add more as needed until you are satisfied with the sweetness and strawberry flavor.
Layered dessert: You can make alternate layers of biscuits crumbs or cake pieces, mousse, and strawberry compote or reduction sauce in dessert cups or glasses. That way you can stretch this recipe to yield more servings.
Nuts: You can top it with slivered almonds or pistachios to add some crunch.
Vanilla/strawberry extract: You can flavor the whipped cream with vanilla or strawberry extract for more strawberry flavor.

Can I make this recipe with heavy cream?
Yes, you can! Make sure that it has a minimum of 36% milk fat. Do not overbeat the cream, or you will end up with butter. You will also need to add at least 2 tablespoons of sifted icing sugar to sweeten the cream.
I tried this recipe with Amul cream containing 30% fat and I couldn’t pipe the mousse. I just spooned it into serving glasses. It failed to set well on refrigeration and had a sort of runny consistency. It did have a better texture when frozen though.
Heavy cream with 36% milk fat or anything above that should work much better.
Can I make this mousse with frozen strawberries?
Yes, absolutely! Frozen strawberries are usually packaged at the peak of ripeness and hence they are great to be used in this recipe. So it’s a great dessert to make all year round 😀
Thaw the strawberries, blend to a smooth puree, and follow the recipe for the sauce as you would with fresh strawberries.
Can I use this as icing for cakes/cupcakes?
Yes, this strawberry mousse made with non-dairy whipping cream is pretty stable to be used as a filling or to pipe swirls.
If you prefer to use dairy heavy cream instead, I’d suggest stabilizing it with gelatin or agar agar if you intend to use it as a frosting.

You may also enjoy these strawberry recipes
Strawberry fool
Strawberry lassi
Strawberry topping
Strawberry cream
I would love to hear from you! Please be sure to share your feedback and/or give this recipe a rating in the comment below. Your reviews help others know the recipe better too.
You can also FOLLOW me on Facebook , Pinterest, Instagram & Twitter

Strawberry Mousse (Without Gelatin)
Ingredients1x2x3x
- 450 grams strawberries, rinsed, drained, hulled, and roughly chopped
- 75 grams castor or granulated sugar, 1/3 cup
- 2 teaspoons lemon juice
- 250 ml whipping cream, I’ve used non-dairy
To garnish
- Sweetened whipped cream, optional, as needed
- Fresh strawberry halves or slices
Instructions
Prepare the strawberry reduction sauce
- Add roughly chopped strawberries into a blender. Blend to a smooth puree. You should end up with approx 2 cups of strawberry puree.
- Pro tip: You may strain the puree for a smoother mousse. I left it as such since I don’t mind it.
- Transfer the puree to a saucepan, add sugar and lemon juice.
- Mix well and bring to a boil over medium heat, stirring occasionally.
- Reduce the heat to medium-low, and continue cooking, stirring often, until it thickens and coats the back of a spoon. The sauce should reduce to 1 cup (250 grams).
- It takes approximately 8 to 10 minutes. You may skim off any foam that rises to the surface.
- Transfer to a bowl and reserve 1/4 cup of the sauce and set aside to cool completely.
- Refrigerate the sauce for another 1-2 hours. It will thicken further on cooling.
Whip the heavy cream
- Add chilled whipping cream into a chilled mixing bowl.
- Whip on medium-high speed until it reaches the stiff peak consistency.
- The cream stays put and doesn’t move when you invert the bowl.
Fold the strawberry reduction into the cream
- Add the cooled strawberry sauce to the whipped cream in two batches, and fold it gently.
- Transfer the mousse to a piping bag fitted with a large, closed star nozzle or any other nozzle of your choice. You may skip the nozzle, and simply snip off the tip.
- Also, transfer the reserved strawberry reduction to a piping bag and snip off the tip just before you are ready to pipe.
Pipe the mousse into serving glasses
- Drizzle strawberry reduction along the insides of the glass.
- Pipe the mousse into desired serving bowls/cups or jars.
- Cover with cling wrap or lids if using jars, and refrigerate for about 3 to 4 hours or overnight for best results.
- When you are ready to serve, top with more whipped cream, and strawberry halves! Enjoy!
