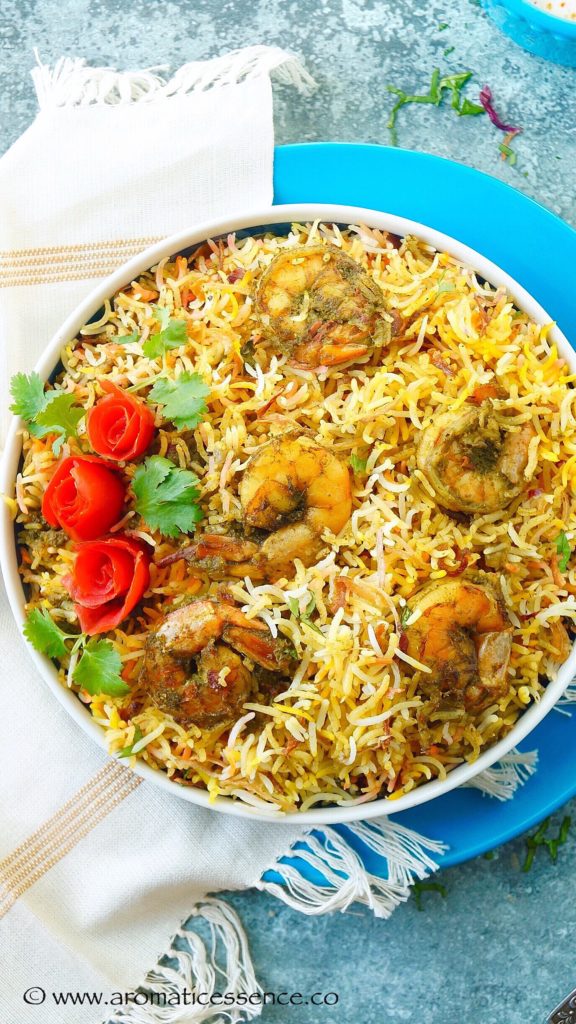
This Prawn Biryani | Shrimp biryani is a delectable rice dish, prepared with an uber delicious green masala consisting of cilantro/coriander leaves and warm spices. It is hearty, wholesome, aromatic and just what you need for a satisfying seafood meal!

I love all kinds of biryani! A delectable rice and meat/veg preparation seasoned with aromatic spices and condiments infused with fragrant saffron and brown caramelized onions! As daunting as it looks, it’s not really very difficult to prepare a good biryani at home. You may need a few trials, to get all the proportions right.

Today I’m sharing my Mom’s recipe for green masala prawn biryani recipe| hariyali jhinga biryani . She learnt to make this shrimp biryani years ago from one of her neighbors way before she even got married. Everyone who has eaten this prawn biryani has always requested for the recipe, prepared it and raved about it.
This is a fairly simple shrimp biryani recipe , and yet it took me time to get it right, mostly my masala gravy would be too little for the rice and then it would turn out a bit dry. So when mom was here with us, I learnt exactly how it’s to be done. I’m sharing exact measures for the proportions I follow now to make this perfect prawn biryani, so you don’t have to go through all the trials and errors.
- WHAT’S IN THIS HARIYALI (GREEN) MASALA FOR PRAWN BIRYANI?
- YOU MAY ALSO LIKE
- STEP BY STEP INSTRUCTIONS TO MAKE PRAWN BIRYANI | SHRIMP BIRYANI | HARIYALI JHINGA BIRYANI
- HOW TO MAKE PRAWN BIRYANI | SHRIMP BIRYANI?
- Prawn Biryani Recipe | Hariyali Jhinga Biryani | How To Make Prawn Biryani
WHAT’S IN THIS HARIYALI (GREEN) MASALA FOR PRAWN BIRYANI?
I love coriander or cilantro leaves as they are known here in the USA, and for me, none of my dishes are complete without a little sprinkle of cilantro over it. Cilantro leaves which are the most important ingredient in the masala are what imparts the lovely, fresh fragrance to this biryani. Of course, there are other spices like peppercorns, cinnamon, cloves, cumin-coriander seeds, ginger, garlic, and green chillies, along with some turmeric!
You really need to make sure you get fresh cilantro for this masala, for best results. Once this masala hits the pan, your whole kitchen is suddenly filled with a tantalizing and inebriating aroma, sure to make you drool.
You can easily replace the shrimps with chicken too. For the chicken, simply marinate with yogurt, and lightly fry the pieces till 80 % cooked then add to the masala in step 6. You can also use paneer/tofu/mushrooms/mixed veggies for a vegetarian version. The list is endless!
For now, let’s have a look to prepare this easy prawn biryani recipe .

Cauliflower dum biryani
STEP BY STEP INSTRUCTIONS TO MAKE PRAWN BIRYANI | SHRIMP BIRYANI | HARIYALI JHINGA BIRYANI
1.Clean, de-vein the shrimp. Wash well, pat dry and apply about 1 teaspoon of salt. Mix well and let it marinate for 10 minutes.

2.Heat water in a pot, add lemon juice,once it comes to a boil, add salt and the washed and drained rice. Cook the rice till it is about 70% cooked. It should break easily when you press between your fingers and still retain its shape. If it mashes easily, it’s overcooked and that will not result in a good biriyani. So keep a close check. Drain in a colander and let it cool. You will notice the grains have separated nicely from each other.

3.Gather all the ingredients mentioned under To be ground to a smooth paste, grind using little water at a time for easy and even grinding. It’s better to pulse only the cilantro first, then add all the remaining ingredients. Doing it this way will ensure you have a smooth ground paste. I used about 1/4 cup water. This will yield about 3/4th cup ground paste.

4.Heat ghee/oil in a heavy and deep bottomed pot. Add the onions and tomatoes, sauté on medium heat until the onions are translucent and tomatoes turn mushy.

5.Add the ground masala paste, sauté until it leaves oil from the sides.


6.Rinse the grinder with 1/2 cup of water, extract the remaining masala, and add to the pot, add another 1/2 cup of water. Bring this to a boil.

7.Add the washed shrimps, mix well in the masala.

8.Let them cook for another 5 minutes. Once the oil floats on top of the gravy, it’s ready. Check for seasoning and adjust if required.

9.Take it off the heat. Add the par-cooked rice over the masala.


10.Add ghee over the rice, sprinkle chopped cilantro leaves, saffron infused milk, orange/red color& birista all over the rice layer.
11.Cover with an aluminum foil, and then with the lid. Switch on the heat to medium-high, place the pot directly over heat, let it cook for about 5 minutes. Then transfer the pot to an iron tawa/skillet, let it cook on medium-low heat for another 15 minutes. Switch off the heat and let it stand for another 15 minutes. If you are not using a heavy lid to cover the pot, remember to place some weight on it, to prevent the steam from escaping. Or seal the edges of the pot with some wheat dough, as it is done traditionally. Serve hot with onion-tomato raita or any other raita of your choice.

NOTES
- 2 cups of rice yields about 5 cup of cooked rice, which is just right for this biryani masala.
- You can add whole spices whilst boiling the rice too, discard and use the rice.
- For a spicy prawn biryani, increase the green chillies in the spice paste.
HOW TO MAKE PRAWN BIRYANI | SHRIMP BIRYANI?

Prawn Biryani Recipe | Hariyali Jhinga Biryani | How To Make Prawn Biryani
Ingredients1x2x3x
Measuring cup used, 1 Cup = 250 ml, 1 tsp = 5 ml
- 1 lb /approx 500 grams of shrimps/prawns
To be ground to a smooth paste
- 1 bunch of cilantro/coriander leaves along with tender stems, about 100 grams
- 1.5 tbsp coriander seeds
- 1/2 tsp cumin seeds
- 8-10 peppercorns
- 6-7 cloves
- 1 inch cinnamon
- 1 inch ginger
- 4-5 garlic cloves
- 1-3 green chillies, add as per desired spice
- 1/4 tsp turmeric powder
Other ingredients
- 2 cups Basmati rice, washed and soaked for 30 minutes* ( Please refer notes)
- Juice of half a lime
- 1 large onion, cut into rounds, about 100 grams
- 1 tomato, cut into rounds, about 125 grams
- Salt to taste
- 4 tbsp ghee/oil + 2 tbsp for layering
- Handful of chopped cilantro and mint leaves
- 8-10 strands of saffron added to 1 tablespoon of hot milk
- small pinch of orange/red food color dissolved in 1 tablespoon of water
- 1/4 cup birista brown fried onions
Instructions
- Clean, devein the shrimp. Wash well, pat dry and apply about 1 teaspoon of salt. Mix well and let it marinate for 10 minutes.
- Heat water in a pot, add lemon juice, once it comes to a boil, add salt and the washed and drained rice. Cook the rice till it is about 70% cooked. It should break easily when you press between your fingers and still retain it’s shape. If it mashes easily, it’s overcooked and that will not result in a good biryani. So keep a close check. Drain in a colander and let it cool. You will notice the grains have separated nicely from each other.
- Gather all the ingredients mentioned under To be ground to a smooth paste, grind using little water at a time for easy and even grinding. It’s better to pulse only the cilantro first, then add all the remaining ingredients. Doing it this way will ensure you have a smooth ground paste. I used about 1/4 cup water. This will yield about 3/4th cup ground paste.
- Heat ghee/oil in a heavy and deep bottomed pot. Add the onions and tomatoes, sauté on medium heat until the onions are translucent and tomatoes turn mushy.
- Add the ground masala paste, sauté until it leaves fat from the sides.
- Rinse the grinder with 1/2 cup of water, extract the remaining masala, and add to the pot, add another 1/2 cup of water. Bring this to a boil.
- Add the washed shrimps, mix well in the masala.
- Let them cook for another 5 minutes. Once the oil floats on top of the gravy, it’s ready. Check for seasoning and adjust if required.
- Take it off the heat. Add the par cooked rice over the masala.
- Add ghee over the rice, sprinkle chopped cilantro leaves, saffron infused milk, orange/red color & birista all over the rice layer.
- Cover with an aluminum foil, and then with the lid. Switch on the heat to medium-high, place the pot directly over heat, let it cook for about 5 minutes. Then transfer the pot to an iron tawa/skillet, let it cook on medium-low heat for another 15 minutes. Switch off the heat and let it stand for another 15 minutes. If you are not using a heavy lid to cover the pot, remember to place some weight on it, to prevent the steam from escaping. Or seal the edges of the pot with some wheat dough, as it is done traditionally. Serve hot with onion-tomato raita or any other raita of your choice.
Notes
- 2 cups of rice yields about 5 cup of cooked rice, which is just right for this biryani masala.
- You can add whole spices whilst boiling the rice too, discard and use the rice.
- For a spicy prawn biryani, increase the green chillies in the spice paste.

I would love to hear from you! Please feel free to share your feedback with photos and suggestions to me at aromaticessence77@gmail.com
You can also follow me on :
Regards,
Freda

Prawn Biryani Recipe | Hariyali Jhinga Biryani | How To Make Prawn Biryani
Ingredients
Measuring cup used, 1 Cup = 250 ml, 1 tsp = 5 ml
- 1 lb /approx 500 grams of shrimps/prawns
To be ground to a smooth paste
- 1 bunch of cilantro/coriander leaves along with tender stems, about 100 grams
- 1.5 tbsp coriander seeds
- 1/2 tsp cumin seeds
- 8-10 peppercorns
- 6-7 cloves
- 1 inch cinnamon
- 1 inch ginger
- 4-5 garlic cloves
- 1-3 green chillies, add as per desired spice
- 1/4 tsp turmeric powder
Other ingredients
- 2 cups Basmati rice, washed and soaked for 30 minutes* ( Please refer notes)
- Juice of half a lime
- 1 large onion, cut into rounds, about 100 grams
- 1 tomato, cut into rounds, about 125 grams
- Salt to taste
- 4 tbsp ghee/oil + 2 tbsp for layering
- Handful of chopped cilantro and mint leaves
- 8-10 strands of saffron added to 1 tablespoon of hot milk
- small pinch of orange/red food color dissolved in 1 tablespoon of water
- 1/4 cup birista brown fried onions
Instructions
- Clean, devein the shrimp. Wash well, pat dry and apply about 1 teaspoon of salt. Mix well and let it marinate for 10 minutes.
- Heat water in a pot, add lemon juice, once it comes to a boil, add salt and the washed and drained rice. Cook the rice till it is about 70% cooked. It should break easily when you press between your fingers and still retain it’s shape. If it mashes easily, it’s overcooked and that will not result in a good biryani. So keep a close check. Drain in a colander and let it cool. You will notice the grains have separated nicely from each other.
- Gather all the ingredients mentioned under To be ground to a smooth paste, grind using little water at a time for easy and even grinding. It’s better to pulse only the cilantro first, then add all the remaining ingredients. Doing it this way will ensure you have a smooth ground paste. I used about 1/4 cup water. This will yield about 3/4th cup ground paste.
- Heat ghee/oil in a heavy and deep bottomed pot. Add the onions and tomatoes, sauté on medium heat until the onions are translucent and tomatoes turn mushy.
- Add the ground masala paste, sauté until it leaves fat from the sides.
- Rinse the grinder with 1/2 cup of water, extract the remaining masala, and add to the pot, add another 1/2 cup of water. Bring this to a boil.
- Add the washed shrimps, mix well in the masala.
- Let them cook for another 5 minutes. Once the oil floats on top of the gravy, it’s ready. Check for seasoning and adjust if required.
- Take it off the heat. Add the par cooked rice over the masala.
- Add ghee over the rice, sprinkle chopped cilantro leaves, saffron infused milk, orange/red color & birista all over the rice layer.
- Cover with an aluminum foil, and then with the lid. Switch on the heat to medium-high, place the pot directly over heat, let it cook for about 5 minutes. Then transfer the pot to an iron tawa/skillet, let it cook on medium-low heat for another 15 minutes. Switch off the heat and let it stand for another 15 minutes. If you are not using a heavy lid to cover the pot, remember to place some weight on it, to prevent the steam from escaping. Or seal the edges of the pot with some wheat dough, as it is done traditionally. Serve hot with onion-tomato raita or any other raita of your choice.
Notes
- 2 cups of rice yields about 5 cup of cooked rice, which is just right for this biryani masala.
- You can add whole spices whilst boiling the rice too, discard and use the rice.
- For a spicy prawn biryani, increase the green chillies in the spice paste.
Step-by-step recipe with pictures to make Neureos | Nevri | Karanji (Flaky pastry stuffed with sweet coconut filling).

Goan Neureos are deep-fried, flaky pastry stuffed with coconut & dried fruit filling. They are also known as Karanji in Maharashtra, sweet Somas in Tamil Nadu, Gujiya or Ghughra in North India. Somas usually also include gram dal, and Gujiyas have mava (milk solids) in the stuffing.
Other than tiny variations from region to region in India, they are almost the same. These are made for festivals like Holi, Ganesh Chaturthi, Diwali & Christmas. The crescent shape is redolent of an empanada. You can pretty much say these are an Indian version of empanadas.

December is officially here! Just a few days more and we will bid adieu to 2017. December also happens to be my favorite month, and I’m sure is with most of you too. Apart from the aura that surrounds the month of December who else is a fan of all the sweets & food?
Indian Christmas sweets are totally different from the one I see here in the US. Here its more of cookies, cakes etc, but back home we have a number of sweets that are dainty, time-consuming and some that actually require the combined efforts of a small community. Not kidding!
Like these Neureos | Nevri | Karanji! These are actually a multi-person task. As you really can’t make endless containers of these goodies all by yourself. Of course, if you are adventurous enough, you could take up the challenge !!
I have vivid memories of watching these made. One person would be assigned to make the pastry dough, one made the filling, one did the job of rolling out the dough, one did the stuffing, and shaping and one did all the frying. A team effort !!

I’m so glad that one of the most important sweets of Goan Kuswar (Goan Christmas sweet platter) finally made it to the blog! I actually made these earlier this year, during my Mum in law’s stay.
I wanted to learn it first hand rather than instructions over the phone. Neureos/karanji was my least liked Christmas sweet. We never made it at home, rather always got some made to order. As I said, these require a heck of a time, and my parents had a tough work schedule.
But once I happened to taste these at my In-law’s place, and I was hooked. I didn’t find it surprising when my DH said that they there were a big fan of these treats and that it would hardly last the Holiday season.
In fact, my Mum in law always made extra to make sure everyone at home had more than enough to their heart’s content. These Neureos are truly addictive and hard to resist. The filling taste so amazing, that you may end up eating spoonfuls of the filling itself before you even begin the process of stuffing the pastry.

Other sweets that often make an appearance in Goan Kuswar are Rich Christmas fruit cake , kulkul, shankarpali , kormolas , jujubes, bebinca , dodol, marzipan , guava cheese , milk cream etc to name a few!
If this is your maiden attempt at making these, I hope this post will help you 🙂 Sharing with you all the tips & tricks to get these babies right!

- YOU MAY ALSO ENJOY THESE TRADITIONAL GOAN CHRISTMAS SWEET RECIPES
- How to make Neureos/Nevri – Step by step process
- Neureos | Karanji Recipe | How To Make Karanji
YOU MAY ALSO ENJOY THESE TRADITIONAL GOAN CHRISTMAS SWEET RECIPES
- Rich Christmas fruit cake
- Guava cheese
- Goan Baath cake
- No cook & egg-free marzipan
- Any much more here .
How to make Neureos/Nevri – Step by step process
For the stuffing
1.Heat a heavy bottomed skillet / non-stick skillet over medium heat, dry roast semolina until crisp and fragrant. Set aside.

2.In the same skillet, add ghee, once hot enough, add charoli, sauté for 30 seconds or until it turns slightly darker.
3.Next, add poppy seeds, sauté another minute.

4.Add the desiccated coconut, roast until it turns golden brown.

5.Add the roasted semolina, mix everything well, transfer to another bowl and let the mixture cool completely.

6.Once the mixture has cooled, add powdered sugar, raisins and cardamom powder, mix well. The stuffing for the karanji is ready.

For the pastry shell
1.Combine flour, ghee, and salt in a mixing bowl. Mix the ghee with the flour.

2.Add water little at a time, knead to form a smooth and firm dough. The dough should not be too soft nor too hard. Cover with a damp napkin and set aside for an hour.

Making the neureos
1.Transfer the dough to the work surface, divide it into equal portions (about walnut-sized portions, around 15).
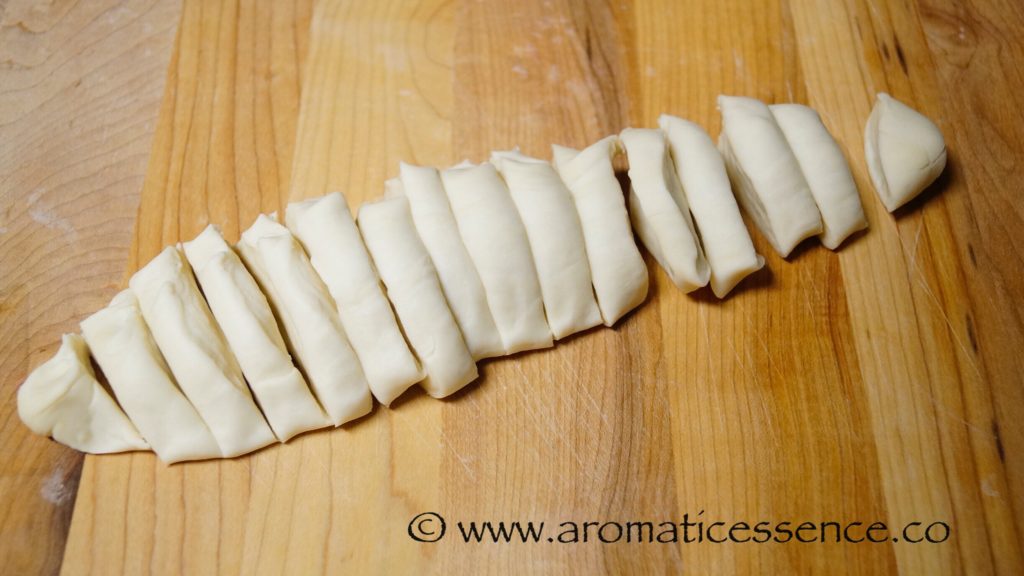
2.Take one portion, dust it in flour, roll it out very thin, to a diameter of about 4 inches. Dust flour, as needed whilst rolling. Roll out the rest in the same manner.

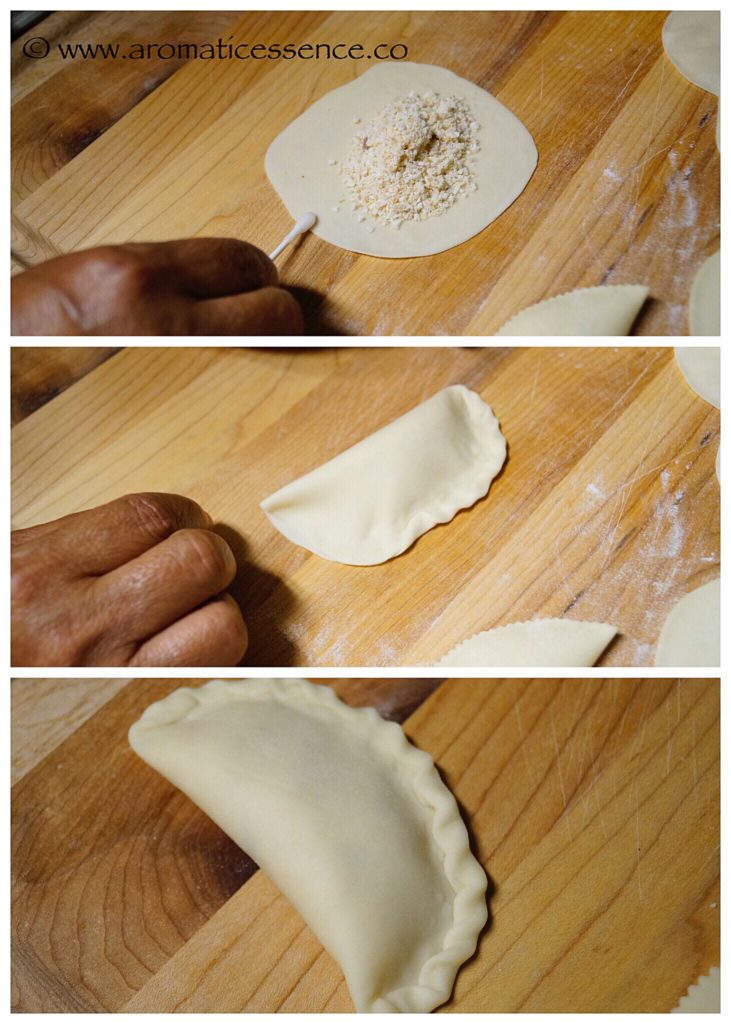
3.Transfer the rolled dough to the mold, fill a tablespoon of the filling (do not overstuff), apply water all around the edge, close the mold tightly, open it, trim the edges and unmold the neureo. Cover the neureos with a clean, damp kitchen napkin while you prepare the remaining in the same way.
Collect all the scraps, form a dough, divide and roll out more dough to make more neureos (we got 6 extra from the scraps). Dust off excess flour before stuffing them.

4.If you do not have a mold, you can do it the traditional way. Place a tablespoon of the stuffing in the center of the rolled dough, apply water all around the edges, bring one edge, and join the other to form a half-moon shape. Seal with a fork or keep pinching to form a pleated pattern.
5.Heat oil in a kadai, deep fry the prepared neureos on medium heat, in batches, flipping in between, until golden. They will continue to cook once you remove them out, so don’t overcook them. Keep the rest of the prepared neureos covered with a damp kitchen napkin, to prevent the dough from drying out.

6.Transfer to a tray lined with an absorbent kitchen napkin to drain off excess oil.

7.Once cool completely they crisp up. Store in an airtight container for up to 2 weeks.

NOTE
1.This recipe can easily be multiplied for more yield.
You can also follow me on Facebook , Pinterest, Instagram & Twitter

Neureos | Karanji Recipe | How To Make Karanji
Ingredients1x2x3x
Measuring cup used, 1 cup = 250 ml, 1 tsp = 5 ml
For the stuffing
- 1/4 cup fine semolina/rava/sooji
- 1 cup desiccated coconut approx 90 grams
- 1 tbsp charoli, If you can’t find it, substitute with any other nut of choice
- 2 tsp poppy seeds (khus khus)
- 1 tbsp raisins
- Pinch of of cardamom powder
- 6 tbsp powdered sugar, adjust as per desired sweetness
- 1/2 tbsp ghee
For the pastry shell
- 1 cup all purpose flour (maida) 143 grams
- 1/2 tbsp ghee
- Salt, to taste
- Water, as required to knead the dough
Other ingredients
- Oil, as required to deep fry
Instructions
For the stuffing
- Heat a heavy bottomed skillet / non-stick skillet over medium heat, dry roast semolina until crisp and fragrant. Set aside.
- In the same skillet, add ghee, once hot enough, add charoli, sauté for 30 seconds or until it turns slightly darker.
- Next, add poppy seeds, sauté another minute.
- Add the desiccated coconut, roast until it turns golden brown.
- Add the roasted semolina, mix everything well, transfer to another bowl and let the mixture cool completely.
- Once the mixture has cooled, add powdered sugar, raisins and cardamom powder, mix well. The stuffing for the karanji is ready.
For the pastry shell
- Combine flour, ghee, and salt in a mixing bowl. Mix the ghee with the flour.
- Add water little at a time, knead to form a smooth and firm dough. The dough should not be too soft nor too hard. Cover with a damp napkin and set aside for an hour.
To make the Neureos | Karanji
- Transfer the dough to the work surface, divide it into equal portions (about walnut sized portions, around 15). Roll out the rest in the same manner.
- Take one portion, dust it in flour, roll it out very thin, to a diameter of about 4 inches. Dust flour, as needed whilst rolling.
- Transfer the rolled dough to the mold, fill a tablespoon of the filling (do not overstuff), apply water all around the edge, close the mold tightly, open it, trim the edges and unmold the neureo. Cover the neureos with a clean, damp kitchen napkin while you prepare the remaining in the same way. Collect all the scraps, form a dough, divide and roll out more dough to make more neureos (we got 6 extra from the scraps). Dust off excess flour before stuffing them.
- If you do not have a mold, you can do it the traditional way. Place a tablespoon of the stuffing in the center of the rolled dough, apply water all around the edges, bring one edge and join the other to form a half moon shape. Seal with a fork or keep pinching to form the pleated pattern.
- Heat oil in a kadai, deep fry the prepared neureos on medium heat, in batches, flipping in between, until golden. They will continue to cook once you remove them out, so don’t overcook them. Keep the rest of the prepared neureos covered with a damp kitchen napkin, to prevent the dough from drying out.
- Transfer to a tray lined with absorbent kitchen napkin to drain off excess oil.
- Once cool completely they crisp up. Store in an airtight container for up to 2 weeks.
Notes

