Pani Puri recipe with step-by-step pictures. Learn how to make this mouth-watering, Indian street food at home from scratch!

Pani Puri is a popular Indian street food known by various names all over the country. In Mumbai, it is known as pani puri, as golgappa or gol gappay in Delhi, and puchka in Kolkatta and pani ke batashe in Uttar Pradesh, gupchup in Bihar, Odisha, Jharkhand, Telangana. Different names for the same yummy thing!
- So what is pani puri?
- Ingredients needed
- A few tips…
- You may also enjoy the yummy ‘chaat’ snacks
- How to make Indian pani puri – Step by step instructions
- Pani Puri Recipe | How To Make Pani Puri
So what is pani puri?
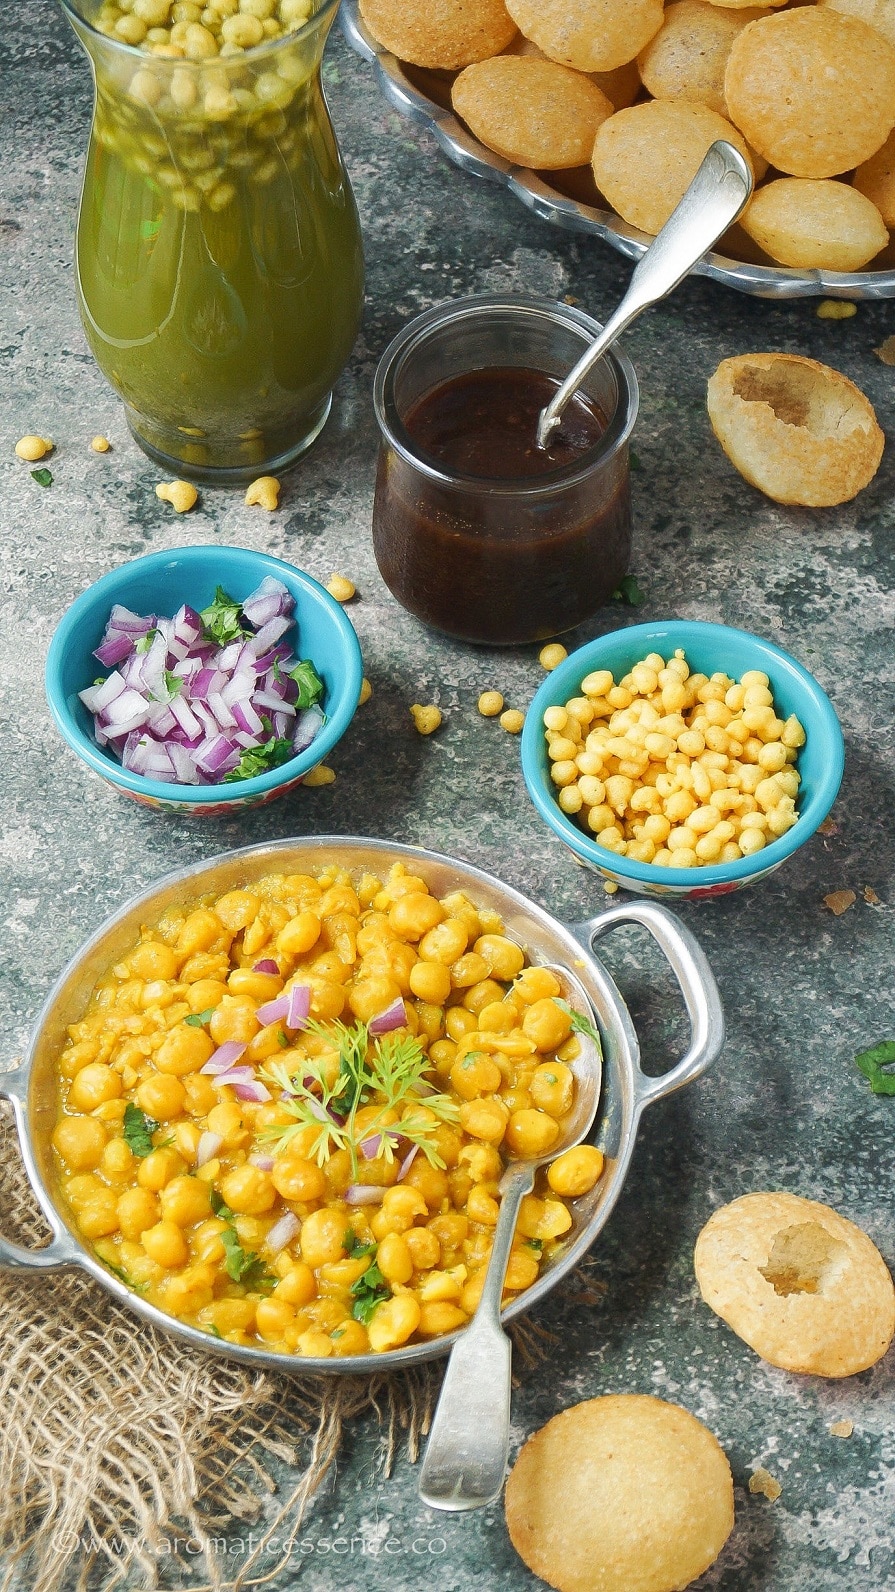
Pani means water in Hindi and puri is a hollow, deep-fried, crispy sphere. The puris are cracked very gently with the thumb to create a cavity that is stuffed with some sort of filling, dipped in sweet chutney and finally dunked in spicy and tangy water. That is pani puri for you!
The filling can either be made with
- Ragda (curried white peas)
- Boiled and mashed potatoes mixed with black chickpeas or moong sprouts spiced with seasonings
- Plain or spiced moong sprouts stuffing.
- Boondi
A single serving of this yummy Indian street food comprises of 6 pani puris. The gamut of textures to flavors in this chaat snack is a real explosion (literally!) in your mouth. From the crunch of the crisp puris to the warm ragda filling and then the tangy, sweet and spicy flavors of the chutneys, it is seriously addictive for a reason!
I’m literally salivating as I write this post since that is what the very mention of these two words would evoke in most Indians. Whether you are a child or an adult, I doubt you can ever get tired of eating that stuff! It’s so delicious!
However, with most things prepared on the roadside, hygiene is a really big question! Since this is mostly prepared by hands, from the cracking of the puris to dunking them in water, to the source of the water itself, one really wonders how hygienic it is! Well, of course, if you have a really strong immune system, lucky you 😀
Quite frankly, before moving to the US, I never made pani puri at home. I’m one of those who depended on my immune system. But I really started missing out while I was there. So I took matters into my own hands and made everything at home.
I’m sure most of you are familiar with the basic things you’d need to make it at home. But if this is totally new to you, you’d definitely like to read further. So let’s get going with that!
Ingredients needed
You will need the following to make this yummy street food at home;
- Puri or poori
- Filling or stuffing (ragda/aloo masala/moong sprouts), totally your choice
- Meetha pani aka sweet chutney
- Teekha pani aka the spicy water
Let’s talk about all these elements in detail!
Puris
I’ve already done a very detailed recipe in my earlier post on this topic. You can read all about that here – golgappa puri recipe
Filling/stuffing
You have quite a lot of options when it comes to the stuffing. I personally, love using ragda for the filling, as that is what I’ve been eating all my life. It’s the stuffing of choice in Mumbai.
- For the ragda recipe: You will need to soak the dried peas overnight or at least 8 hours. The next day, pressure cook it with salt, red chilli powder, and turmeric. That’s about it. This is the pretty basic recipe, you don’t really need to add too many flavors to the ragda, coz the pani’s are super flavorful. However, if you do wish to make the ragda with onion, tomatoes, and more spices, you can refer the recipe for that here, which I’ve shared in my ragda patties post .
- Moong sprouts: You will need steamed moong sprouts if you like this as the filling. You can read my moong sprouts pulao post to learn how to sprout moong beans.
- Aloo masala stuffing: Take about 2-3 medium boiled and mashed potatoes, and add finely chopped onion, cilantro/coriander leaves, green chillies, about 1/4 cup of ragda or boiled black chickpeas, roasted cumin powder, black salt, red chili powder, about a teaspoon of lemon juice and salt, to taste. Mix everything well, and your aloo masala stuffing is ready. Add all the ingredients as per your taste, there is really no fixed recipe for this stuffing.
- Plain boondi
Golgappa pani
So there are two kinds of water as mentioned above,
Teekha pani (spicy water)
You can make the spicy pani aka green pani at home with fresh ingredients, you don’t really need any pani puri masala to make this water. In a pinch, you can use the popular Everest pani puri masala instead of the individual spices mentioned in the recipe.
To make the spicy water, first, you will need to prepare the pani puri paste. That consists of mint leaves, cilantro/coriander leaves, lots of green chillies (of course you can adjust to your heat tolerance), ginger, and few ‘ chatpata ‘ spices. If you can get hold of some raw mangoes, please use them, it adds an amazing flavor to the spicy water.
The recipe of the teekha pani was shared by one of the members, Mrs. Indira Sharma, of our FB foodie group. She’s been making it for years now. I’ve simply adapted her recipe and let me tell you it’s the best and only recipe you will ever need for making the ‘spicy pani’ which is a bomb of flavors!
Ditch the ready-made store-bought stuff, and make it at home instead. You won’t regret you did!
Meetha pani (sweet chutney)
This is nothing but the sweet chutney aka date-tamarind chutney. Add some water to dilute it to a slightly runny consistency. That’s about it.
Some people add the meetha chutney into the spicy water, but I like to serve it separately, as some people like it mild, some like it spicy, and some like it with just the sweet chutney, especially kids. So you can absolutely customize that to suit everyone’s needs!
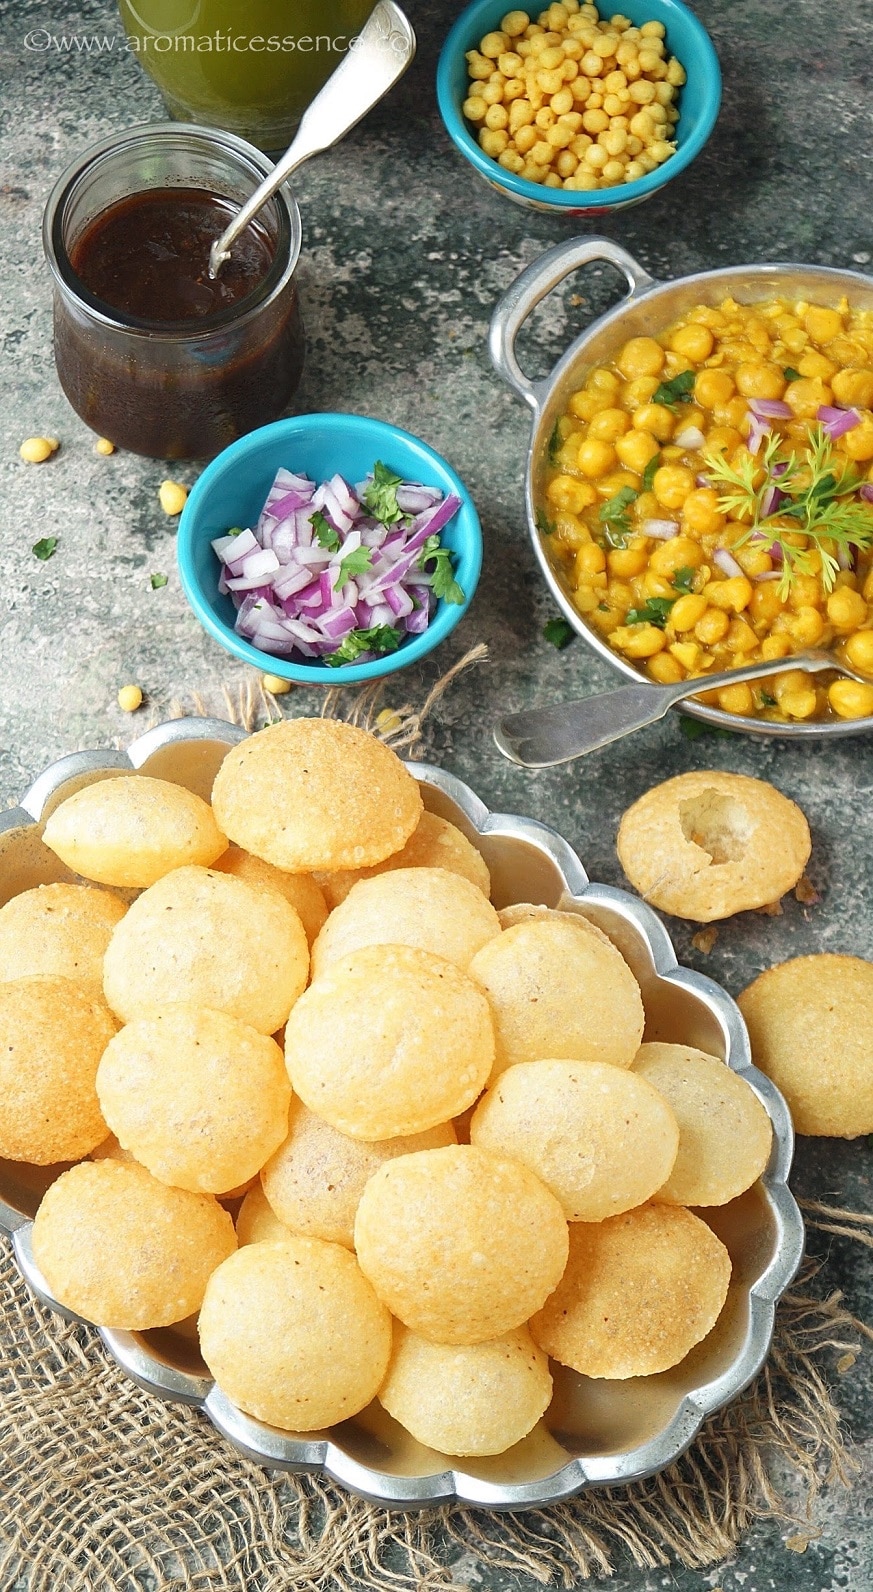
Serving this ‘chaat’
Lay out the puris, sweet chutney, spicy pani, stuffing of choice (here it is ragda) in separate containers.
Take a puri, crack it gently with your thumb, spoon in some warm ragda, followed by sweet pani, then dunk the puri in spicy pani, and slurp away!!
I’m sure even 6 of this delicious homemade pani puris won’t suffice. You can easily lose track of how many you indulge in!

A few tips…
- I’ve shared a lot of tips to make the perfect puri for this recipe, so do check those out, find the link below in the steps. A perfect, crispy, puffed puri is the heart and soul of this recipe, as it is the vessel that carries all that yumminess! In a pinch, you could choose to buy the read-made ones as well.
- Adjust the seasoning of the pani as per your preference. I really love using more mint as compared to coriander leaves for the spicy pani. You can add an equal amount of coriander and mint leaves if you like.
- Do not skip the raw mango for the spicy pani, it really adds a little extra to the flavor.
- Chill the spicy water for a few hours, it really helps the flavors to mingle and develop more as it sits.
- If you like soft boondi, you may add it to the spicy water before refrigerating. If you like it crispy, add it to the water just before serving.
- Remember to have everything ready before you serve. Then simply assemble and enjoy as many as you like to your heart’s content 🙂
You may also enjoy the yummy ‘chaat’ snacks
- Dahi puri
- Ragda patties
- Dabeli
- Veg Frankie
Now, that you have learned about the components in detail, let’s head over to the illustrations and learn how to make this popular Indian street food at home 🙂
How to make Indian pani puri – Step by step instructions
Hpw to make puri?
For the detailed recipe to make perfect, crispy puri’s, head over to this puri recipe .
How to make ragda?
1.Wash and soak the chickpeas overnight in sufficient water.

2.Next morning pressure-cook the soaked and drained peas with turmeric, red chilli powder, salt to taste, and 2 cups of water on medium to high heat for 6 whistles.

3.Open the cooker once it depressurizes. The peas should turn tender and slightly mushy, if not put the lid back on and cook for 2 more whistles.

How to make golgappa pani?
Teekha pani
1.Add all the ingredients in a blender. Grind to a smooth paste using little water.


2.Transfer the chutney into a sufficiently big bowl and add 1 cup of water at a time, mix and taste for seasonings. You can add as much water as you want to thin it out, but remember to check for seasonings and adjust the salt, spice, and tang as required. I add about 3 cups of water. (You may strain the chutney through a fine-mesh sieve, in that case, add all the spice powders after straining the chutney).

3.Chill the pani in the refrigerator for at least 2-3 hours. This also allows the flavors in the water to develop better. I like to serve the sweet chutney separately, but you can mix about 1/4 cup of date-Tamarind chutney to the spicy pani and mix well. Add a few tablespoons of boondi to the pani just before serving.
Meetha pani
Make a batch of my date-tamarind chutney , then dilute it with little water to your desired consistency. I keep my chutney a little thick but feel free to adjust as per your preference. Keep in mind that you will need to add more seasonings if you dilute the chutney with more water, so taste and adjust.
How to make golgappa?
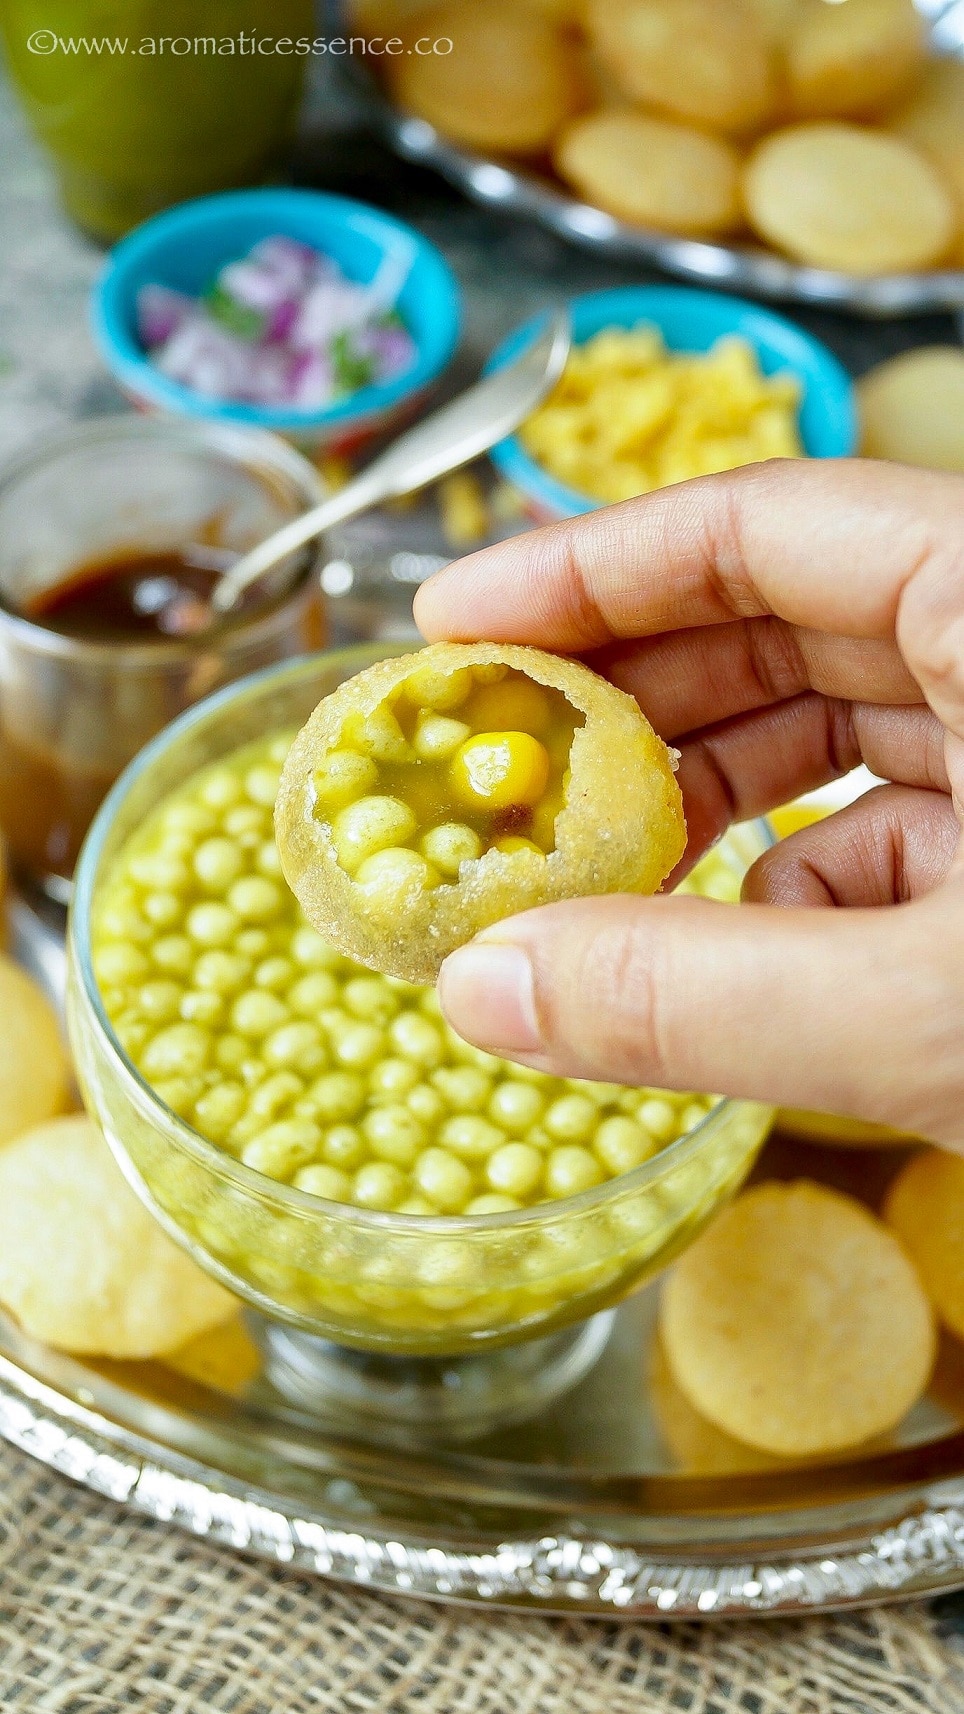
1.Crack the puri gently with the tip of your fingers.
2.Add in some ragda filling or any other filling of your choice. You can also add some chopped onions.
3.Spoon in about a teaspoon of sweet date-tamarind chutney.

4.Finally, dunk it in spicy pani. Gobble it up immediately or else it will get soggy!

You can also follow me on Facebook , Pinterest, Instagram & Twitter

Pani Puri Recipe | How To Make Pani Puri
Ingredients1x2x3x
Measuring cup used, 1 Cup = 250 ml, 1 tsp = 5 ml
- About 30 Puris, store-bought or homemade
For the ragda filling
- 1/2 cup white peas
- 1/8 tsp turmeric powder
- 1/4 tsp red chilli powder
- salt, to taste
For the teekha paani
- 1 cup loosely packed mint leaves, about 15 grams
- 1/2 cup loosely packed cilantro/coriander leaves, about 10 grams
- Juice of 1/2 lemon, about 1 tbsp
- 30 grams of raw mango, about half a raw mango, cut into pieces
- 4 green chillies, adjust as per desired heat
- 2 teaspoons roasted cumin seeds
- 1 inch piece of ginger
- 1 teaspoon black salt
- 1 teaspoon chaat masala
- 10 peppercorns
- salt, to taste, add accordingly as you are also adding black salt
- 1/2 teaspoon hing (asafoetida)
For the meetha pani
- Sweet date & tamarind chutney, us as such or dilute it with water to thin it down
Other ingredients
- boondi, as required
Instructions
HOW TO MAKE PURI?
- For the detailed recipe to make perfect, crispy puri’s, head over to this puri recipe .
HOW TO MAKE RAGDA?
- Wash and soak the chickpeas overnight in sufficient water.
- Next morning, pressure-cook the soaked and drained peas with turmeric, red chilli powder, salt to taste, and 2 cups of water on medium to high heat for 6 whistles.
- Open the cooker once it depressurizes. The peas should turn tender and slightly mushy, if not put the lid back on and cook for 2 more whistles.
TEEKHA PANI
- Add all the ingredients in a blender. Grind to a smooth paste using little water.
- Transfer the chutney into a sufficiently big bowl and add 1 cup of water at a time, mix and taste for seasonings. You can add as much water as you want to thin it out, but remember to check for seasonings and adjust the salt, spice, and tang as required. I add about 3 cups of water. (You may strain the chutney through a fine-mesh sieve, in that case, add all the spice powders after straining the chutney).
- Chill the pani in the refrigerator for at least 2-3 hours. This also allows the flavors in the water to develop better. I like to serve the sweet chutney separately, but you can mix about 1/4 cup of date-tamarind chutney to the spicy pani and mix well. Add a few tablespoons of boondi to the pani just before serving.
MEETHA PANI
- Make a batch of my date-tamarind chutney , then dilute it with little water to your desired consistency. I keep my chutney a little thick but feel free to adjust as per your preference. Keep in mind that you will need to add more seasonings if you dilute the chutney with more water, so taste and adjust.
HOW TO MAKE GOLGAPPA?
- Crack the puri gently with the tip of your fingers.
- Add in some ragda filling or any other filling of your choice. You can also add some chopped onions.
- Spoon in about a teaspoon of sweet date-tamarind chutney.
- Finally, dunk it in spicy pani. Gobble it up immediately or else it will get soggy!
Notes
- The prep time in the recipe is taken as 20 minutes considering you have the puris and the sweet chutney already prepared. If you need to make everything, the prep and cook time will increase. Please refer to the individual post on puri and sweet chutney for reference on timings.
- Measuring cup used, 1 cup = 250 ml, 1 teaspoon = 5 ml


Pani Puri Recipe | How To Make Pani Puri
Ingredients
Measuring cup used, 1 Cup = 250 ml, 1 tsp = 5 ml
- About 30 Puris, store-bought or homemade
For the ragda filling
- 1/2 cup white peas
- 1/8 tsp turmeric powder
- 1/4 tsp red chilli powder
- salt, to taste
For the teekha paani
- 1 cup loosely packed mint leaves, about 15 grams
- 1/2 cup loosely packed cilantro/coriander leaves, about 10 grams
- Juice of 1/2 lemon, about 1 tbsp
- 30 grams of raw mango, about half a raw mango, cut into pieces
- 4 green chillies, adjust as per desired heat
- 2 teaspoons roasted cumin seeds
- 1 inch piece of ginger
- 1 teaspoon black salt
- 1 teaspoon chaat masala
- 10 peppercorns
- salt, to taste, add accordingly as you are also adding black salt
- 1/2 teaspoon hing (asafoetida)
For the meetha pani
- Sweet date & tamarind chutney, us as such or dilute it with water to thin it down
Other ingredients
- boondi, as required
Instructions
HOW TO MAKE PURI?
- For the detailed recipe to make perfect, crispy puri’s, head over to this puri recipe .
HOW TO MAKE RAGDA?
- Wash and soak the chickpeas overnight in sufficient water.
- Next morning, pressure-cook the soaked and drained peas with turmeric, red chilli powder, salt to taste, and 2 cups of water on medium to high heat for 6 whistles.
- Open the cooker once it depressurizes. The peas should turn tender and slightly mushy, if not put the lid back on and cook for 2 more whistles.
TEEKHA PANI
- Add all the ingredients in a blender. Grind to a smooth paste using little water.
- Transfer the chutney into a sufficiently big bowl and add 1 cup of water at a time, mix and taste for seasonings. You can add as much water as you want to thin it out, but remember to check for seasonings and adjust the salt, spice, and tang as required. I add about 3 cups of water. (You may strain the chutney through a fine-mesh sieve, in that case, add all the spice powders after straining the chutney).
- Chill the pani in the refrigerator for at least 2-3 hours. This also allows the flavors in the water to develop better. I like to serve the sweet chutney separately, but you can mix about 1/4 cup of date-tamarind chutney to the spicy pani and mix well. Add a few tablespoons of boondi to the pani just before serving.
MEETHA PANI
- Make a batch of my date-tamarind chutney , then dilute it with little water to your desired consistency. I keep my chutney a little thick but feel free to adjust as per your preference. Keep in mind that you will need to add more seasonings if you dilute the chutney with more water, so taste and adjust.
HOW TO MAKE GOLGAPPA?
- Crack the puri gently with the tip of your fingers.
- Add in some ragda filling or any other filling of your choice. You can also add some chopped onions.
- Spoon in about a teaspoon of sweet date-tamarind chutney.
- Finally, dunk it in spicy pani. Gobble it up immediately or else it will get soggy!
Notes
- The prep time in the recipe is taken as 20 minutes considering you have the puris and the sweet chutney already prepared. If you need to make everything, the prep and cook time will increase. Please refer to the individual post on puri and sweet chutney for reference on timings.
- Measuring cup used, 1 cup = 250 ml, 1 teaspoon = 5 ml
Welcome spring with this amazing Lemon Ricotta Cake! A simple, elegant, and delicious cake that is moist, lemony, and light, yet rich and decadent. Serve a slice of this cake with a dollop of whipped cream and fresh berries/berry compote, a truly delicious treat!

I’d like to dedicate this recipe to all you lovely readers, especially those who keep coming back and hanging around my little space often. I can’t thank you enough! I hope you will continue to visit the site, try more recipes and share your feedback with me <3
- An Italian-inspired cake apt for any occasion
- Some pointers for this lemon ricotta cake
- What does this cake taste like?
- You will love this cake because
- You may also enjoy these simple cake recipe
- How to make lemon ricotta cake – Step by step instructions
- Lemon Ricotta Cake Recipe
An Italian-inspired cake apt for any occasion
This cake is an adaption of my lemon blueberry cake with the inclusion of ricotta cheese. Ricotta is indeed the star ingredient in this cake and pairs exceptionally well with lemon. The two make a heavenly combination!
So this cake is absolutely tasty, it has a subtle lemon flavor, with the right amount of sweetness, it is a dense cake, but moist and decadent, and yet so light! Perfect summer treat!
I’ve yet to taste an authentic Italian ricotta cake. It is not something that you can stumble upon in a regular bakery outside Italy. Even in the country, I’m sure there are lots of regional variations. The authentic version is made with semolina or almond flour, and I’ve not incorporated either of those in this recipe.
I’m sharing my version of this lovely Italian lemon ricotta cake that always turns out beautifully. I thought it needed to be shared with you guys so that you could try and enjoy it as much as we do.
And what better occasion than this! Since it’s been 5 years of my blogging journey, it is only fair to share a sweet treat 🙂
I love chocolate-based desserts, it is right there on top of my list of favorites. But I lean towards lemon-based desserts during this season. A simple lemon loaf, lemon bars, lemon tart, lemon crinkle cookies are a few of my favorites citrus desserts!
What’s not to love after all! The bright, tart-sweet flavor of this citrus fruit adds a zing to anything and everything it is used in, be it sweet or savory!
I’ve shared a few recipes like these delicious eggless orange cupcakes and this lemon blueberry bread earlier, do check those out too!

Some pointers for this lemon ricotta cake
- Cake pan: I used a regular 8-inch round cake pan. Remember to grease the bottom and sides very well. I also like to line the bottom of the pan with parchment paper so that nothing sticks to the bottom of the pan. You may also use an 8-inch springform pan or a pan with a removable bottom to release the cake easily.
- Room temperature ingredients: It is ideal and the best practice to use room temperature ingredients when it comes to baking. Using room temperature ingredients ensures that the ingredients mix well without overworking the batter. Overmixing the batter always results in a tough cake. Remember to keep your ingredients out at least 30 minutes to an hour before you plan to bake the cake.
- Avoid overmixing: Do not overmix the batter once you add the dry ingredients to the creamed mixture. I always mention this because we do have a tendency to overmix until we see no more lumps. A few tiny lumps are fine in the batter. Mix until you see no more flour pockets and you should be good to go. This will ensure the cake has a nice and light crumb.
- Sweetness: This cake is not very sweet, the quantity of sugar in this recipe balances out the tartness of the lemon. You can reduce it to 3/4 cup if you prefer a less sweet cake.
- Fresh lemon juice: Please try and use fresh lemons. Besides the juice, you will also need the zest for that lemony flavor. And remember to zest the lemon first, before squeezing out the juice. I’ve used 2 tablespoons of lemon zest in this recipe, you could also add more for more lemon flavor or in addition to the lemon juice and zest, you can also add 1 teaspoon of lemon extract.
- Ricotta cheese: I used store-bought, whole milk ricotta cheese in a tub (BelGioioso con latte brand) and I did not drain it. If you use wetter ricotta, you may need to drain it. You can also use part-skim ricotta cheese, though I highly suggest sticking to whole milk ricotta for best results.
- Frosting: We really enjoy a slice of this cake served with lightly sweetened whipped cream and a berry compote. You can make this cake fancy by dividing it in two-layers and icing it with a simple buttercream or a lemon buttercream frosting for a heightened lemon flavor. Or simply drizzle the cake with lemon glaze.
- Loaf cake: You can transfer the batter to a 9×5-inch loaf pan for a lemon ricotta loaf cake, keep an eye on the baking time, it should take about 55-60 minutes. If you find the top browning too quickly, cover the loaf pan loosely with an aluminum foil after 45 minutes and continue baking until done.
- Cupcakes: You can make cupcakes with this batter instead of baking an entire cake. Bake for 18-20 minutes or until a toothpick inserted in the center of the cupcake comes out clean.
- Make-ahead: You can make this cake a day in advance and store it in an airtight container at room temperature for up to 2 days max. I do not recommend keeping it out for longer than that. If you still have leftovers after 2 days, refrigerate the cake in an airtight container. Bring it to room temperature before serving.
- Freezing ricotta cake: Once the cake has cooled down completely, wrap it with a cling film, and aluminum foil. Transfer to an airtight container, label, and freeze up to 2 months. Let it thaw overnight in the refrigerator. Bring to room temperature before serving.

What does this cake taste like?
The texture and flavor of this lemon ricotta cake is reminiscent of the popular Indian mawa cake , found in Iranian bakeries. Mawa Cake is a cardamom flavored, dense and moist cake infused with milk solids. Except here we have that lemony flavor from the lemon zest and juice in the recipe.
The lemon adds a refreshing element and the creamy ricotta cheese lends moisture to this cake. This cake is simply amazing and absolutely perfect to welcome spring or great to be served at Easter brunch or end a fabulous meal on a lovely note with this light dessert.
You will love this cake because
- It is simple and luscious, with the perfect balance of sweet-tart, that is great for any occasion.
- It is a lovely citrus dessert, that can be enjoyed plain with a cup of tea or coffee or can be enjoyed as a dessert topped with some whipped cream or mascarpone or creme fraiche and berries.

You may also enjoy these simple cake recipe
- Eggless date and walnut loaf cake
- Eggless mango loaf cake
- Marble loaf cake
- Eggless rava (semolina) cake
How to make lemon ricotta cake – Step by step instructions
Step 1: Preheat the oven and prepare the pan
Preheat the oven to 350° F/180° C, position a rack in the middle of the oven. Prepare an 8-inch round cake pan, by greasing it with oil spray or butter and lining the bottom of the pan with parchment paper. Trace the shape of the pan by placing it over the parchment paper, then trim and place the reverse side of the paper on to the bottom of the pan.

Step 2: Whisk dry ingredients
In a medium mixing bowl, sift 1.5 cups flour, 1.5 teaspoon baking powder, and 1/4 teaspoon baking soda. Add 1/2 teaspoon salt, whisk the dry ingredients until well combined. Set aside.

Step 3: Cream butter and sugar
In the bowl of your stand mixer fitted with the paddle attachment, beat 1/2 cup unsalted butter and 1 cup sugar on medium-high speed until light and creamy, scraping down in between, about 2-3 minutes. Or you can use an electric hand mixer/beater.

Step 4: Add ricotta cheese
Add 1 cup of whole milk ricotta cheese, continue beating on medium speed until fluffy.

Step 5: Add eggs
Add in the eggs one at a time, continue beating on medium-high speed. Scrape the sides of the bowl in between. The batter will look curdled at this point, and that is okay.

Step 6: Almond extract, lemon zest, and juice
Add 1/4 to 1/2 teaspoon almond extract (or 1.5 teaspoons of vanilla extract), 2 tablespoons of lemon zest, and 3 tablespoons of lemon juice. Beat on medium speed for another 30 seconds.

Step 7: Add dry ingredients
Add the dry ingredients and mix on the lowest possible speed until there are no more flour pockets. (DO NOT OVERMIX).

Step 8: Bake
Transfer the batter to the prepared pan. Gently tap it on the counter 2-3 times to remove the air bubbles. Sprinkle about 1 to 2 tablespoons of slivered almonds all over the top (optional). Bake on the middle rack for 35-40 minutes or until the toothpick inserted in the center of the cake comes out clean.

Step 9: Cool the cake on a wire rack
Transfer the cake to a cooling rack. Let it cool down in the pan for 15 minutes, then remove from the pan and cool on the rack completely. Invert the cake gently and peel off the parchment paper. Flip it back, slice the cake, and serve! I used some leftover berry compote that I had remaining from my granola yogurt parfait .


You can also follow me on Facebook , Pinterest, Instagram & Twitter

Lemon Ricotta Cake Recipe
Ingredients1x2x3x
- 1.5 cups of all-purpose flour, spooned and leveled 214 grams
- 1.5 teaspoons of baking powder
- 1/4 teaspoon baking soda
- 1/2 teaspoon salt
- 1/2 cup unsalted butter, 113 grams
- 1 cup granulated sugar, 210 grams
- 1 cup whole milk ricotta cheese, 245 grams
- 2 large eggs, approx 114 grams
- 1/4 to 1/2 teaspoon almond extract
- 3 tablespoons freshly squeezed lemon juice, 45 grams
- 2 tablespoons lemon zest
- 2 tablespoons of slivered almonds
Instructions
- Preheat the oven to 350° F/180° C, position a rack in the middle of the oven. Prepare an 8-inch round cake pan, by greasing it with oil spray or butter and lining the bottom of the pan with parchment paper.
- In a medium mixing bowl, sift flour, baking powder, and baking soda. Add salt, whisk the dry ingredients until well combined. Set aside.
- In the bowl of your stand mixer fitted with the paddle attachment, beat unsalted butter and sugar on medium-high speed until light and creamy, scraping down in between, about 2-3 minutes. Or you can use an electric hand mixer/beater.
- Add ricotta cheese, continue beating on medium speed until fluffy.
- Add in the eggs one at a time, continue beating on medium-high speed. Scrape the sides of the bowl in between. The batter will look curdled at this point, and that is okay.
- Add almond extract, lemon zest, and lemon juice. Beat on medium speed for another 30 seconds.
- Add the dry ingredients and mix on the lowest possible speed until there are no more flour pockets. (DO NOT OVERMIX).
- Transfer the batter to the prepared pan. Gently tap it on the counter 2-3 times to remove the air bubbles. Sprinkle some slivered almonds all over the top (optional). Bake on the middle rack for 35-40 minutes or until the toothpick inserted in the center of the cake comes out clean.
- Transfer the cake to a cooling rack. Let it cool down in the pan for 15 10 minutes, then remove from the pan and cool on the rack completely.
- Invert the cake gently and peel off the parchment paper. Flip it back, slice the cake, and serve!
Notes
Nutrition

