Easy paneer puff with a crisp, flaky, and golden crust stuffed with a delicious paneer filling. These paneer puffs come together quickly using store-bought puff pastry!

- What is paneer puff?
- Why you will love this recipe?
- Ingredients needed
- How to make paneer puff at home – Step-by-step process
- Serving suggestions
- Storage instructions
- Recipe Tips
- Variations
- Paneer Puff (Oven & Air Fryer)
What is paneer puff?
Paneer puffs are delicious Indian savory turnovers made with puff pastry dough wrapped around a delicious paneer stuffing.
Puff patties are really popular in Indian bakeries. You will find a variety of them from veg, egg to meat puffs!
We love to indulge in these paneer puff turnovers on the weekends, usually on Sundays! A cup of coffee along with some warm puff, and that’s breakfast sorted!
Today, I’m sharing these vegetarian paneer puffs because they are equally delicious as the ones made with eggs and meat. Besides, anything with paneer just ought to be! Right?
Nothing beats homemade puff pastry, but it can be quite time-consuming with all that rolling, folding, and refrigeration time.
I hope to try my hands at making puff pastry from scratch someday from my Mom’s old recipe book. I will definitely share a post on it when I do!

Why you will love this recipe?
This paneer puff;
☑ Is a cinch to make with readymade puff pasty sheets or squares
☑ Is the perfect finger food to serve for parties, potlucks, etc
☑ Can be made ahead by filling the pastry sheets and refrigerating for up to 2 days
☑ Is a perfect accompaniment to your evening tea and some chitter chatter :p
☑ Is very adaptable
Ingredients needed
For the paneer filling, you will need;
Paneer: I’ve diced the paneer (Indian cottage cheese) into small cubes coz that is how we prefer it in these puffs.
Aromatics: Onions, freshly minced ginger, and garlic. You could use readymade ginger garlic paste too.
Seasoning: I’ve seasoned this filling with basic spices like cumin seeds, Kashmiri chili powder, coriander powder, turmeric, garam masala, salt, and pepper. You could add other spices like chaat masala, kasuri methi, etc!
Tomatoes and ketchup : I’ve used one medium-sized tomato. You can skip the tomato if you like. I’ve added ketchup just to add a little tang and sweetness, which is not that noticeable. You may skip it or add more if you like. Hot and sweet ketchup also works great here.
Herbs: Some finely chopped coriander leaves.
Cooking fat: I’ve used sunflower oil. Feel free to use your preferred cooking oil.
Puff pastry squares or sheets: You will need about 12 puff pastry squares or two sheets. Feel free to use homemade!
Other ingredients: You will also need some cream to brush the tops of the pastry and some sesame seeds which are optional. I’ve used a mix of white and black sesame seeds. You could also use kalonji (nigella seeds)! Both cream and sesame seeds are not pictured below.

How to make paneer puff at home – Step-by-step process
Step 1: Paneer filling
Thaw the frozen puff pastry squares or sheets in the refrigerator. I prefer to thaw it overnight if I’m making these puffs for breakfast.
Heat oil in a skillet over medium heat.
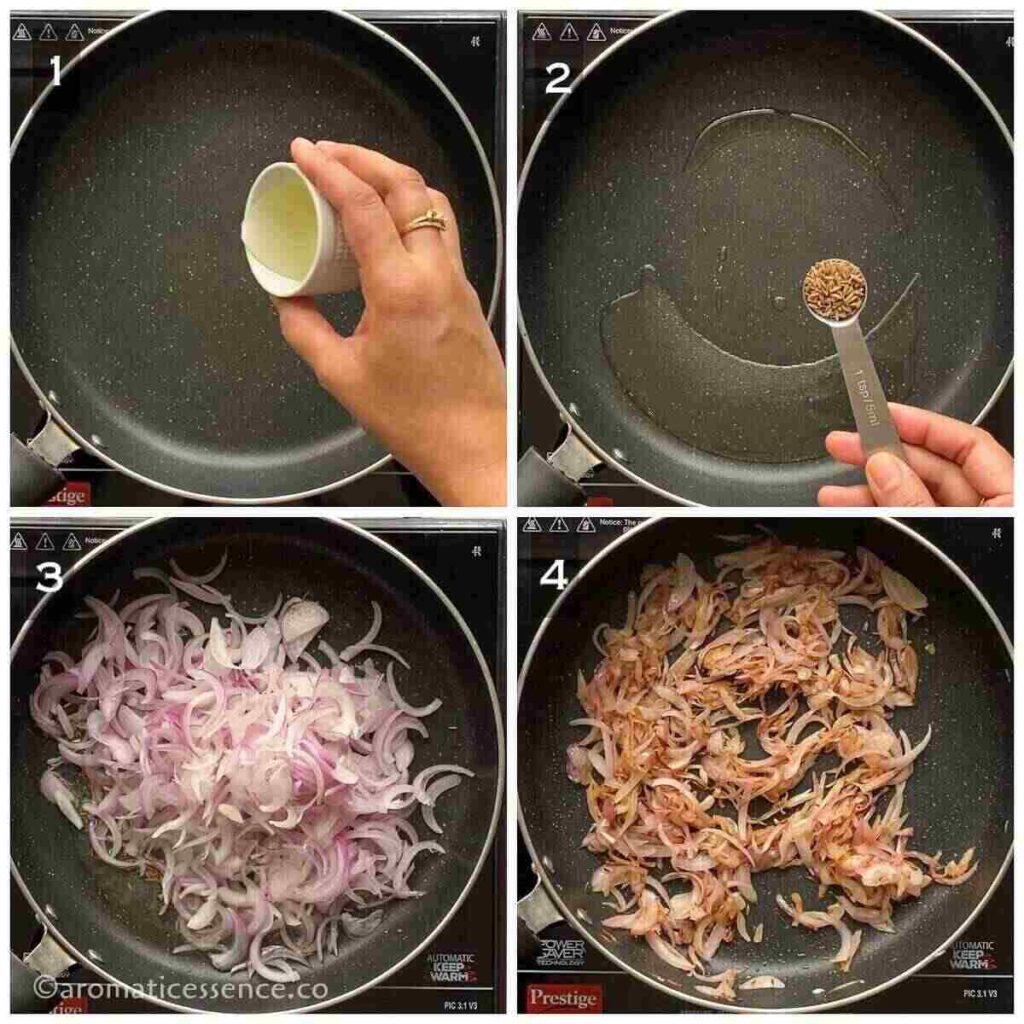
Heat 2 tablespoons oil in a heavy-bottomed skillet on medium heat. Add 1 teaspoon of cumin seeds and allow them to crackle. ( Photos 1 and 2 )
Next, add 2 cups of sliced onions, and saute on medium to medium-low heat until golden brown. ( Photos 3 and 4 )
Add 1 tablespoon of coarsely crushed ginger-garlic, and stir-fry until fragrant. ( Photos 5 and 6 )

Add diced tomatoes (1 medium tomato) along with ¾ teaspoon of table salt, mix, cover, and cook on medium-low heat for 1 to 2 minutes. ( Photos 7 to 10 )
Remove the lid, and saute until tomatoes are mushy. ( Photo 11 )

Next, add 1 teaspoon Kashmiri chili, 1 teaspoon coriander, ½ teaspoon black pepper, ¼ teaspoon turmeric, and ½ teaspoon garam masala powders, mix well and saute for another 30 seconds. ( Photos 12 to 17 )

Add 1 tablespoon of tomato ketchup and mix well. ( Photos 18 and 19 )
Add ⅓ cup of water and mix well. ( Photos 20 and 2 1)

When the mixture starts to bubble, add 200 grams of cubed paneer, mix gently, and cook for another 2 minutes on medium-low heat. ( Photos 22 and 2 3)
Switch off the heat and add 2 teaspoons of lemon juice, and ¼ cup of finely chopped coriander leaves. ( Photos 24 to 26)
Mix gently and set aside to cool down completely. This makes about 2¼ cups of paneer filling.

Step 2: Assemble the puffs
Position a rack in the middle of the oven and preheat the oven to 220° C (430° F) for about 10 minutes. Line a baking tray with parchment paper.
Place about 2 tablespoons of the filling in the center of the puff pastry square. Do not overfill. ( Photo 27)
Fold the pastry to form a triangle and press down the edges using your fingers. Seal the edges with a fork as shown in the pics below. ( Photo 28 and 29)
Place it on the prepared baking tray. Repeat the same procedure with the rest of the filling and puff pastry squares. Make sure to space the pastries at least 1-inch apart since they will expand as they bake. ( Photo 30)

Step 3: Bake
Brush the tops with cream or milk using a pastry brush and sprinkle some sesame seeds. ( Photo 31 and 32)
In the oven
Bake at 220° C (430° F) for 20 minutes or until golden brown. ( Photo 33 and 34)

In the air fryer
Place 3 assembled puff pastries in the air fryer basket and air fry at 180° C/350° F for 9 to 10 minutes. ( Photo 35 and 36)
Transfer the puffs to a serving platter, and serve warm!

Serving suggestions
Serve warm paneer puff patties with some ketchup or sweet chili sauce or green chutney.
These are really good with a hot cup of tea or coffee!
Storage instructions
These puffs are best enjoyed the day they are baked. They will lose their crispiness if left to sit for too long.
Leftovers: Refrigerate in an airtight container for up to 2 days.
Freeze: You can also freeze assembled and unbaked paneer puffs for up to 3 months. Just pop it in the oven when you feel like having some, or when you have to entertain unexpected guests!
Skip the cream wash and sprinkling of the seeds. Follow these steps to freeze;
- Place the assembled puffs on a baking tray lined with parchment paper.
- Freeze until hard, about 2 hours.
- Wrap each frozen puff in cling film and place them in a freezer-safe bag. Label the bag with the contents and date.
- When you are ready to serve, brush them with the cream and sprinkle some sesame seeds, bake them straight from frozen. Add about 5 to 6 minutes more to the cooking time, keep an eye out!
Reheat: Reheat puff from the fridge in the oven at 180° C (350° F) for 8 to 10 minutes or until heated through. You could also reheat them in the air fryer at 180° C/350° F for 2 to 3 minutes. Avoid reheating in the microwave as it will make the puff soggy.

Recipe Tips
Avoid caramelizing onions on high heat: Caramelized onions form the base of this filling. Make sure to cook on medium to medium-low heat. Cooking on high heat will lend a bitter taste and ruin the flavor of the filling.
Make sure the puff pastry is cold: If puff pastry dough becomes too soft after assembling them, chill in the fridge for 15 to 20 minutes so that they firm up a bit. This allows the fat to re-solidify in the dough. Puff pastry dough should be cold when it hits the oven in order to rise and get crispy, flaky puffs!
Avoid opening the oven door: Do not open the oven door for the first 15 minutes. Opening the oven door prematurely will cause the steam to escape which is important for the rise of the puffs. It will cause the puffs to deflate and you will end up with a flat pastry.
Baking temperature: Puff pastry needs to be baked at a high temperature to create sufficient steam for the dough to rise. However, with the air fryer, avoid using high heat because it can cause the puffs to burn or brown quickly while the insides remain uncooked. The temperature specified in the instructions works perfectly. You can always check what works for you by testing a single puff rather than ruining the entire batch.
Use the air fryer for a few puffs: If you just need to make 2 to 3 puffs, I suggest using the air fryer. That way, you can avoid preheating the oven and your kitchen!
Cream/milk wash: Brushing the puffs with cream gives them a nice shine and an even color as compared to just using milk. So, I suggest you use cream! You can also use oil, melted butter, or melted ghee. If you consume eggs, then brush these puffs with egg wash.
Don’t have puff pastry? Then use this paneer filling to make sandwiches, bread rolls, paratha, wraps, pizza pockets, as a topping for pizza, or quesadillas! All these are great options for your kid’s lunch box.
Variations
Paneer bhurji filling: You could use scrambled paneer instead of small paneer cubes.
Add vegetables: You can add some vegetables like finely chopped carrots, green peas, bell peppers, corn, mushrooms, or leafy greens like palak, etc to this paneer filling.
Cheese: You add some grated cheese over the filling.
Tofu: Vegans can swap the paneer with tofu and vegan puff pastry sheets.

Have you made this recipe?
I would love to hear from you! Please be sure to share your feedback and/or give this recipe a rating in the comment below. Your reviews help others know the recipe better too.
You can also FOLLOW me on Facebook , Pinterest, Instagram & Twitter

Paneer Puff (Oven & Air Fryer)
Ingredients1x2x3x
- 12 (5 inch) puff pastry squares or 2 sheets of puff pastry, 660 grams
For the paneer filling
- 2 tablespoons oil
- 1 teaspoon cumin seeds
- 2 cup sliced onions, 200 grams
- 1 tablespoon coarsely crushed ginger garlic, 15 grams
- 1 teaspoon Kashmiri chili powder
- 1 teaspoon of coriander powder
- ½ teaspoon black pepper
- ¼ teaspoon turmeric powder
- ½ teaspoon garam masala
- 1 large tomato finely chopped, about 85 grams
- ¾ teaspoon salt or to taste
- 1 tablespoon ketchup optional
- ⅓ cup water
- 200 grams diced paneer cubes approx 1¾ cups
- 2 teaspoons of lemon juice
- ¼ cup finely chopped coriander leaves
Other ingredients
- 1 tablespoon cream
- 1 teaspoon sesame seeds, I used a mix of white and black sesame seeds
Instructions
Paneer filling
- Heat oil in a skillet on medium heat.
- Thaw the puff pastry squares or sheets in the refrigerator.
- Heat oil in a heavy-bottomed skillet over medium heat. Add cumin seeds and allow them to crackle.
- Next, add sliced onions, and saute on medium to medium-low heat until golden brown.
- Add coarsely crushed ginger-garlic, and stir-fry until fragrant.
- Add diced tomatoes along with salt, mix, cover, and cook on medium-low heat for 1 to 2 minutes.
- Remove the lid, and saute until tomatoes turn mushy.
- Next, add Kashmiri chili, coriander, black pepper, turmeric, and garam masala powders, mix well and saute for another 30 seconds.
- Add tomato ketchup and mix well.
- Add water and mix well.
- When the mixture starts to bubble, add cubed paneer, mix gently, and cook for another 2 minutes on medium-low heat.
- Switch off the heat and add lemon juice, and finely chopped coriander leaves. Mix gently and set aside to cool down completely. This makes about 2¼ cups of paneer filling.
Assemble the puffs
- Position a rack in the middle of the oven and preheat the oven to 220° C (430° F) for about 10 minutes. Line a baking tray with parchment paper.
- Place about 2 tablespoons of the filling in the center of the puff pastry square. Do not overfill.
- Fold the pastry to form a triangle and press down the edges using your fingers. Seal the edges with a fork.
- Place it on the prepared baking tray. Repeat the same procedure with the rest of the filling and puff pastry squares. Make sure to space the pastries at least 1-inch apart since they will expand as they bake.
- Note: If the pastry gets too warm,soft, and sticky, refrigerate it for 20-30 minutes to firm up.
Bake
- Brush the tops with cream or milk using a pastry brush and sprinkle some sesame seeds.
In the oven
- Bake at 220° C (430° F) for 20 minutes or until golden brown.
In the air fryer
- Place 3 assembled puff pastries in the air fryer basket and air fry at 180° C (350° F) for 9 to 10 minutes.
- Transfer the puffs to a serving platter, and serve warm!
Video
Notes
Nutrition

Paneer Puff (Oven & Air Fryer)
Ingredients
- 12 (5 inch) puff pastry squares or 2 sheets of puff pastry, 660 grams
For the paneer filling
- 2 tablespoons oil
- 1 teaspoon cumin seeds
- 2 cup sliced onions, 200 grams
- 1 tablespoon coarsely crushed ginger garlic, 15 grams
- 1 teaspoon Kashmiri chili powder
- 1 teaspoon of coriander powder
- ½ teaspoon black pepper
- ¼ teaspoon turmeric powder
- ½ teaspoon garam masala
- 1 large tomato finely chopped, about 85 grams
- ¾ teaspoon salt or to taste
- 1 tablespoon ketchup optional
- ⅓ cup water
- 200 grams diced paneer cubes approx 1¾ cups
- 2 teaspoons of lemon juice
- ¼ cup finely chopped coriander leaves
Other ingredients
- 1 tablespoon cream
- 1 teaspoon sesame seeds, I used a mix of white and black sesame seeds
Instructions
Paneer filling
- Heat oil in a skillet on medium heat.
- Thaw the puff pastry squares or sheets in the refrigerator.
- Heat oil in a heavy-bottomed skillet over medium heat. Add cumin seeds and allow them to crackle.
- Next, add sliced onions, and saute on medium to medium-low heat until golden brown.
- Add coarsely crushed ginger-garlic, and stir-fry until fragrant.
- Add diced tomatoes along with salt, mix, cover, and cook on medium-low heat for 1 to 2 minutes.
- Remove the lid, and saute until tomatoes turn mushy.
- Next, add Kashmiri chili, coriander, black pepper, turmeric, and garam masala powders, mix well and saute for another 30 seconds.
- Add tomato ketchup and mix well.
- Add water and mix well.
- When the mixture starts to bubble, add cubed paneer, mix gently, and cook for another 2 minutes on medium-low heat.
- Switch off the heat and add lemon juice, and finely chopped coriander leaves. Mix gently and set aside to cool down completely. This makes about 2¼ cups of paneer filling.
Assemble the puffs
- Position a rack in the middle of the oven and preheat the oven to 220° C (430° F) for about 10 minutes. Line a baking tray with parchment paper.
- Place about 2 tablespoons of the filling in the center of the puff pastry square. Do not overfill.
- Fold the pastry to form a triangle and press down the edges using your fingers. Seal the edges with a fork.
- Place it on the prepared baking tray. Repeat the same procedure with the rest of the filling and puff pastry squares. Make sure to space the pastries at least 1-inch apart since they will expand as they bake.
- Note: If the pastry gets too warm,soft, and sticky, refrigerate it for 20-30 minutes to firm up.
Bake
- Brush the tops with cream or milk using a pastry brush and sprinkle some sesame seeds.
In the oven
- Bake at 220° C (430° F) for 20 minutes or until golden brown.
In the air fryer
- Place 3 assembled puff pastries in the air fryer basket and air fry at 180° C (350° F) for 9 to 10 minutes.
- Transfer the puffs to a serving platter, and serve warm!
Video
Notes
Nutrition
This coconut burfi is a delicious Indian dessert made with fresh or desiccated coconut, milk, sweetened condensed milk, and flavored with cardamom. It is coconutty, soft, moist, creamy, and really easy to make!
I’ve shared two methods in this post to make coconut barfi, one with condensed milk and the other without condensed milk!

The Indian festive season is right around the corner starting off with the beautiful festival that celebrates the special bond between brothers and sisters, Rakshabandhan!
I’d like to share a really simple Indian sweet to celebrate Raksha Bandhan! This coconut burfi recipe is an easy and delicious treat that comes together pretty quickly.
Not only Raksha Bandhan but it can be made and shared with friends and family for other festivals like Holi, Janmashthami, Ganesh Chaturthi, Diwali, Navratri, etc.
If you are anything like me then why wait for a festive or special occasion? Just make some if you are craving a coconut-based dessert!

- What is coconut burfi?
- Why you will love this recipe?
- Ingredients needed
- How to make coconut burfi recipe – Step-by-step process
- Storage instructions
- Recipe tips to make the best nariyal burfi
- Variations
- Frequently asked questions (FAQs)
- You may also enjoy these delicious Indian festive sweets
- Coconut Burfi | Nariyal Barfi
What is coconut burfi?
It is an Indian version of fudge, traditionally made with freshly grated coconut, water or milk, and sugar. It is usually flavored with green cardamom.
Coconut is known as nariyal in Hindi language, thengai in Tamil language, khobra in Marathi, and tenginakayi in Kannada. Hence it is also known by other names like nariyal barfi in North India, khobra barfi or naralachi vadi in Maharashtra, kopra pak in Gujarat, thengai burfi, or tenginakayi burfi in South India.
There are many ways of making this nariyal barfi;
- With water and sugar (using the one thread consistency of sugar syrup method), which is the more traditional approach in South India
- With jaggery
- With mawa
- Fresh or desiccated coconut with condensed milk
- With milk and sugar
The results vary with each of the above methods and I hope to share them all gradually. But today I’m sharing the last two methods.
Love coconut? Then you may also enjoy these eggless coconut cookies and 2-ingredient coconut macaroons !

Why you will love this recipe?
This coconut barfi;
☑ Is an easy, foolproof, and fuss-free burfi recipe that is perfect for beginners
☑ Looks pretty with the white and pink layers
☑ Yields consistent results every single time
☑ Is made with a few basic ingredients
☑ Does not need any mawa nor do you have to worry about sugar syrup consistency
☑ Is apt for the festive season and perfect for sharing
Ingredients needed
I’m sharing two methods to make this burfi. Let’s have a look at the ingredients;
Common ingredients used in both methods
Ghee: Just a little bit of ghee is added to roast the coconut. It brings out the nutty flavor, but you can skip it if you wish to.
Coconut: I’ve used desiccated coconut for this recipe.
Milk: Use whole/full-fat milk for best results. Milk helps add moisture so that the resultant burfi is not dry and crumbly.
Other ingredients: A fat pinch of cardamom powder is used to flavor the burfi. I’ve also used silver vark , slivered pistachios and dried rose petals to garnish the burfi!
For method 1 with condensed milk
Condensed milk: Besides the common ingredients mentioned above, you will need condensed milk to add sweetness and richness to this coconut barfi.
Rose essence and pink food color: Since I’ve made two layers using this method, I’ve used some rose essence to flavor the pink-colored layer.
For method 2 without condensed milk
Sugar: I’ve used regular granulated sugar. The quantity of sugar can be adjusted to suit your desired sweetness.
Cream: I’ve used 30 % cream. Heavy cream with 35% fat content would also work well. You can also use fresh malai (the layer of cream that forms on the surface when you boil full-fat milk).
Milk powder: This adds a little richness to the coconut burfi.

How to make coconut burfi recipe – Step-by-step process
Grease a tray with oil or ghee and line with parchment paper leaving an overhang.
Method 1: With condensed milk
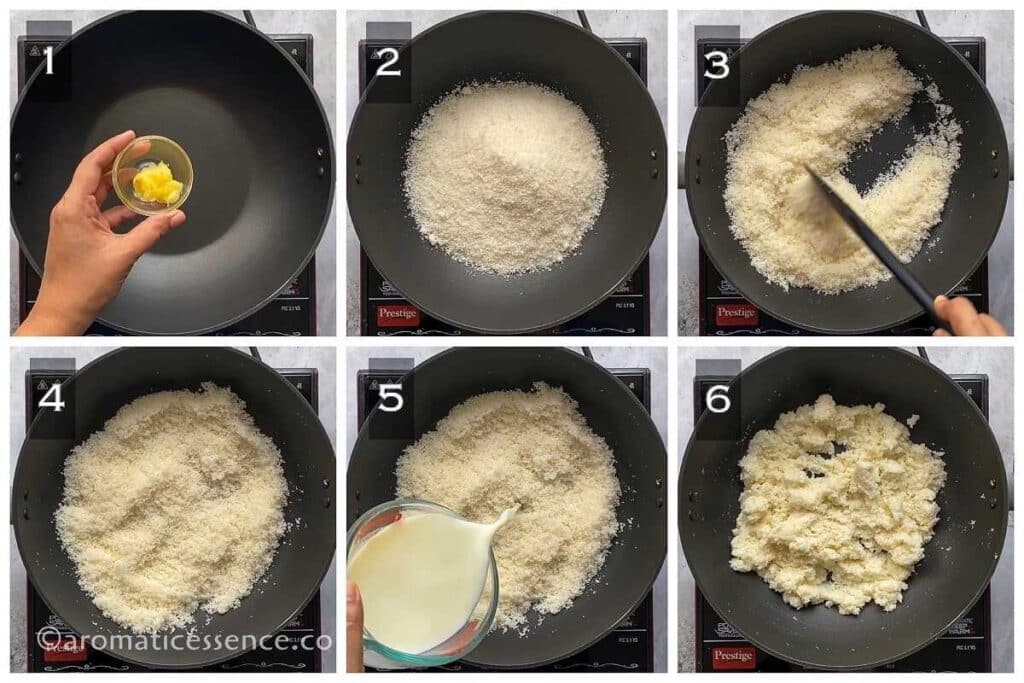
Heat 1/2 tablespoon ghee in a heavy-bottomed kadai on low heat. ( Photo 1 )
Add 175 grams (2 cups) of desiccated coconut. ( Photo 2 )
Roast over low heat for 2-3 minutes or until it gives out a nutty aroma. ( Photos 3 and 4 )
Add 1 cup of milk and cook, stirring continuously until the milk is absorbed by the coconut. ( Photos 5 and 6 )
Add 3/4 cup of condensed milk. ( Photo 7 )
Mix well and check for sweetness. If you prefer a sweeter burfi add 1/4 cup more of condensed milk.
Mix and cook, stirring continuously until the mixture comes together, forms a dough-like consistency, and starts leaving the sides of the kadai. ( Photos 8 to 10 )

Add 1/2 teaspoon cardamom powder, and give it a good mix. ( Photos 11 and 12 )
Switch off the heat, divide the mixture into two halves and transfer one half of the mixture to the prepared tray. ( Photos 13 and 14 )
Press it down with the help of a spatula and pack it firmly. ( Photos 15 and 16 )

To the remaining coconut mixture, add 1/4 teaspoon rose essence and 2 to 3 drops of pink food color. ( Photos 17 and 18 )
Mix well and transfer the pink layer over the white layer. ( Photos 19 and 20 )

Spread it evenly and press it down with the help of a spatula to pack it firmly. ( Photos 21 and 22 )
Decorate with siver vark and sprinkle slivered pistachios and edible dried rose petals. Press it gently using a spatula. ( Photos 23 and 24 )
Set the coconut barfi at room temperature for 3 to 4 hours or in the fridge for 1 hour.

Cut the set coconut burfi into desired-sized pieces. ( Photos 25 and 26 )

Method 2: Without condensed milk
Heat 1/2 tablespoon ghee in a heavy-bottomed kadai on low heat. ( Photo 27 )
Add 175 grams (2 cups) of desiccated coconut. ( Photo 2 8)
Roast over low heat for 2-3 minutes or until it gives out a nutty aroma. ( Photos 29 and 30 )

Add 250 ml (1 cup) milk and 60 grams (1/4 cup) cream. ( Photos 31 and 32 )
Cook, stirring continuously until the milk is absorbed by the coconut. ( Photos 33 and 34 )

Add 160 grams (2/3 cup) of sugar. ( Photo 35 )
Mix well, the sugar will melt and release moisture. Cook, stirring continuously until the most of the moisture evaporates. ( Photo 36 )
Add 1/2 cup milk powder, mix and cook until the mixture comes together, forms a dough-like consistency, and starts leaving the sides of the kadai. ( Photos 37 and 38 )
Add 1/2 teaspoon cardamom powder, and give it a good mix. ( Photos 39 and 40 )

To check if the mixture is done, take a small portion of the mixture and check if you can form a ball. If you can, then it’s ready. If not, cook for a few more minutes. ( Photo 41 )
Switch off the heat, and transfer the mixture to the prepared tray. ( Photo 42 )
Press it down with the help of a spatula. Make sure you pack it firmly. ( Photo 43 )
Sprinkle slivered pistachios and edible dried rose petals. Press it gently using a spatula. ( Photo 44 )
Set the coconut barfi for 3 to 4 hours or overnight in the fridge.

Cut the set coconut burfi into desired-sized pieces. ( Photos 45 and 46 )

Note: For a detailed video tutorial of this method, you can check out my coconut ladoo post. I’ve used the same recipe to make coconut barfi. The only difference is that I’ve increased the quantity of milk powder for the burfi.
Storage instructions
Fridge: Since dairy is used in this recipe, it is best to store the burfi in the fridge in an airtight container to extend its shelf life. It will last for about 10 days.
Coconut burfi served straight from the fridge will be firm due to the fat content, but it is still soft and melt-in-the-mouth. It will not turn as hard as the one made with just sugar syrup.
You may enjoy it straight from the fridge or remove the required number of pieces on a plate and let it sit for about 10 minutes at room temperature before serving.
Freeze: You may also freeze the burfi for up to 3 months. To do that, place the burfi squares on a baking tray lined with parchment paper and freeze until hard, about 2 hours. Then transfer it to a freezer-safe container or freezer-safe bag, label it with contents and date.
Thaw: Defrost frozen coconut burfi overnight in the fridge. Avoid refreezing it again! It is best to freeze it in portion sizes if you have a lot of leftovers.

Recipe tips to make the best nariyal burfi
Sweetness: I used 1 cup of condensed milk for 2 cups of desiccated coconut and it was good for us. You can decrease it to 3/4 cup if you like. But then the coconut flavor is predominant. It is better to add less first, taste, and then adjust if you prefer it sweeter.
Coconut: You can also use frozen coconut for this recipe. Thaw and use in place of desiccated coconut. Roast it a few minutes more because of the extra moisture content.
Cook on medium to medium-low heat: Avoid cooking the coconut mixture on high heat, as the mixture may burn and render an unpleasant taste to the burfi. The bottom part of the mixture may also brown if you leave it unattended. If you do use high heat, stir the mixture continuously.
Quantity: I’ve used a 5-inch square pan to set the burfi. I got around 9, 1-inch thick pieces. You could easily get around 18 pieces if you use a bigger tray.
Variations
This simple coconut burfi is so versatile, that you can adapt it to your liking! The sky is the limit here! So feel free to play around and experiment! Here are a few ideas to get you started!
Variations in layers: Here are some flavor-color combinations you can consider;
- Green layer: Add a few drops of paan or pistachio essence and green food color.
- Yellow layer: Add a few drops of yellow color and 2 to 3 tablespoons of saffron-infused milk to the remaining half of the coconut mixture. Mix well and cook this mixture for a few seconds more.
Chocolate flavored: You can add about 2 tablespoons of unsweetened cocoa powder to the remaining half of the coconut mixture and layer it over the white layer.
Chocolate drizzle: You can make plain coconut barfi and drizzle some melted chocolate randomly over it. Garnish with pistachios and dried rose petals to make it look festive!
Homemade bounty or mounds candy: Cut the burfi into bars instead of squares, dip the bars in melted chocolate, and roll it to coat them on all sides. Remove with a fork and allow the excess chocolate to drip. Place it on a tray lined with parchment paper to harden. Once it has set, drizzle some more melted chocolate over it!
Vegan: Swap the dairy with coconut milk and coconut cream instead.

Is there any difference in nariyal barfi made between the two methods?
Yes, there is a difference in the texture to quite an extent. Here are some noticeable differences;
- Barfi made with just milk and sugar tends to be whiter than the one made with condensed milk.
- The burfi made with condensed milk is a bit firm yet soft. While the one made with just milk and sugar is incredibly soft, moist, and creamy!
Depending on what you like, feel free to use either of the methods.
Can I skip the cream in the 2nd method?
Yes, you can! You do not need to add additional milk. Simply skip it! But I suggest you add at least half of the quantity if not full. The cream adds the required richness and creaminess to this burfi since there is no mawa, condensed milk, or milk powder.
Why is my burfi not setting?
This could happen if you take it off the heat earlier. It simply means that you need to cook off the extra moisture that is still present. Transfer the mixture back to the kadai, cook until the coconut mixture comes together, and leaves the sides of the kadai or pan easily.
Please refer to the video to get an exact idea of the consistency.
Why is my burfi crumbly?
Your burfi could turn crumbly if it is dry and has no moisture. To troubleshoot it, transfer the mixture back to the kadai, add some milk, and cook for a few minutes until it comes together. Then set it in the tray or make ladoos.
Can I use fresh coconut instead of desiccated coconut?
Yes, you can! You will need to roast it a little longer as it has more moisture. Roast it on low heat so that the color does not change. If using the second method, reduce the milk to 1/2 cup.
You may also enjoy these delicious Indian festive sweets
Rasmalai
Kalakand
Gulab Jamun
No cook kaju katli
Badam pista burfi
No-cook rabri
Have you made this recipe?
I would love to hear from you! Please be sure to share your feedback and/or give this recipe a rating in the comment below. Your reviews help others know the recipe better too.
You can also FOLLOW me on Facebook , Pinterest, Instagram & Twitter

Coconut Burfi | Nariyal Barfi
Ingredients1x2x3x
Method 1: With condensed milk
- 1/2 tablespoon ghee, 10 grams
- 2 cups desiccated coconut, 175 grams
- 1 cups full-fat milk, 250 ml
- 3/4 to 1 cup condensed milk, 230 to 300 grams
- 1/2 teaspoon cardamom powder
- 1/4 teaspoon rose essence
- Pink food color
Method 2: Without condensed milk
- 1/2 tablespoon ghee, 10 grams
- 2 cups desiccated coconut, 175 grams
- 1 cups full-fat milk, 250 ml
- 1/4 cup heavy cream, 60 grams
- 2/3 to 3/4 cup sugar, you can increase for more sweetness
- 1/2 cup milk powder, 70 grams
- 1/2 teaspoon cardamom powder
To garnish
- 1/2 tablespoon slivered pistachios
- 1/2 tablespoon dried rose petals
- 1 sheet of silver vark, optional
Instructions
- Grease a tray with oil or ghee and line with parchment paper leaving an overhang.
Method 1: With condensed milk
- Heat ghee in a heavy-bottomed kadai on low heat.
- Add desiccated coconut. Roast over low heat for 2-3 minutes or until it gives out a nutty aroma.
- Add milk and cook, stirring continuously until the milk is absorbed by the coconut.
- Add 3/4 cup of condensed milk. Mix well and check for sweetness. If you prefer a sweeter burfi add 1/4 cup more of condensed milk.
- Mix and cook, stirring continuously until the mixture comes together, forms a dough-like consistency, and starts leaving the sides of the kadai.
- Add cardamom powder, and give it a good mix.
- Switch off the heat, divide the mixture into two halves and transfer one half of the mixture to the prepared tray.
- Press it down with the help of a spatula and pack it firmly.
- To the remaining coconut mixture, add rose essence and 2 to 3 drops of pink food color. Mix well and transfer the pink layer over the white layer.
- Spread it evenly and press it down with the help of a spatula to pack it firmly.
- Decorate with siver varak and sprinkle slivered pistachios and edible dried rose petals. Press it gently using a spatula.
- Set the coconut barfi at room temperature for 3 to 4 hours or in the fridge for 1 hour.
- Cut the set coconut burfi into desired-sized pieces.
Method 2: Without condensed milk
- Heat ghee in a heavy-bottomed kadai on low heat.
- Add desiccated coconut. Roast over low heat for 2-3 minutes or until it gives out a nutty aroma.
- Add milk and cream. Cook, stirring continuously until the milk is absorbed by the coconut.
- Add sugar and mix well, the sugar will melt and release moisture.
- Cook, stirring continuously until the most of the moisture evaporates.
- Add milk powder, mix and cook until the mixture comes together, forms a dough-like consistency, and starts leaving the sides of the kadai.
- Add cardamom powder, and give it a good mix.
- To check if the mixture is done, take a small portion of the mixture and check if you can form a ball. If you can, then it’s ready. If not, cook for a few more minutes.
- Switch off the heat, and transfer the mixture to the prepared tray.
- Press it down with the help of a spatula. Make sure you pack it firmly.
- Sprinkle slivered pistachios and edible dried rose petals. Press it gently using a spatula.
- Set the coconut barfi for 3 to 4 hours or overnight in the fridge.
- Cut the set coconut burfi into desired-sized pieces.
