These Oven Baked Buffalo Wings are super crispy and fall-off-the-bone tender. After trying this technique of cooking chicken wings in the oven, you will never go back to the traditional method of deep frying them ever again! Serve with blue cheese dip and celery sticks.

I have always enjoyed chicken wings in the form of lollipops , a popular Indian-Chinese appetizer. The wings are frenched, the meat is pushed down to one end of the bone to make it appear like a lollipop. These lollipops are coated in a seasoned cornstarch batter, deep-fried, and served with a spicy schezwan sauce .
I was introduced to these buffalo chicken wings after moving to the US. And I really loved those crispy wings smothered with spicy, tangy and buttery buffalo sauce. What’s not to love about crispy, fried food? 😀
- Why is it called a buffalo wing?
- The best way to make crispy chicken wings at home- Bake them!
- Ingredients needed to make baked hot wings?
- Tips to make the best crispy hot wings in the oven
- How to make oven baked buffalo wings at home – Step by step instructions
- Why you will love this homemade oven baked hot wings
- Oven Baked Buffalo Wings
Why is it called a buffalo wing?
The name has nothing to do with a buffalo! The dish gets its name from the place it originated, at the Anchor Bar in Buffalo, New York, by Teressa Bellissimo, who owned the bar with husband Frank in 1964. (Source- Wikipedia )
Chicken wings are the go-to food for those long-awaited game days or game nights, or any party for that matter. As my husband says ‘A bowl of spicy wings and a frosty beer, makes my game night dear’ 😀
The best way to make crispy chicken wings at home- Bake them!
While I enjoy my fair share of fried food when we dine out, I really really hate deep-frying anything at home, unless I have to as a last resort. I hate all that mess, grease, excess oil (by the way, never ever discard it down the drain), the smell lingering in the kitchen, and don’t even get me started on the calories.
Let’s be realistic, you really can’t bake everything that calls for deep-frying. Sometimes, there is absolutely no substitute. But these no-fry buffalo wings are a delicious exception to that rule.
The first time I tried this new technique of baking hot wings in the oven, it really blew my mind. The recipe calls for the use of baking powder and trust me it is the magic ingredient that makes all the difference. They were that good and crispy and the best part was no extra calories.
The only time-consuming part of this recipe, though not laborious per se, is separating the wings into the flats, also known as wingettes and drumettes. Other than that, there is hardly anything else to do. To make this recipe practically effortless, simply buy the party style wings from your local vendor.
Because this recipe for homemade baked buffalo wings is so darn easy, you can;
A. Indulge in one of your favorite restaurant foods more often in the comfort of your home.
B. Enjoy it guilt-free 🙂
These are seriously the best crispy oven baked chicken wings I’ve ever made! With this method, making buffalo wings at home is easier than you think and I promise you won’t miss the deep-fried ones at all!
You can enjoy these crispy, oven-baked buffalo wings with other wing sauces like BBQ, Asian, honey garlic, etc to name a few! Just follow the same technique of baking the wings and switch it up as you desire.

Ingredients needed to make baked hot wings?
There are 2 components in this recipe;
- The baked wings
- Buffalo sauce
Baked wings:
- Whole wings or party style wings
- Baking powder: The secret ingredient in this recipe that makes these wings extra crispy.
- Salt and pepper
These oven baked buffalo wings do not need flour or cornstarch, which also makes them gluten-free! Just make sure the baking powder you use is free from gluten. You can also season the wings with garlic powder, smoked paprika, etc.
For the buffalo sauce:
It is so easy to make your own buffalo sauce at home, as you can customize it to suit your taste. You just need;
- Cayenne pepper sauce such as Frank’s Red Hot
- Melted unsalted butter
Mix these two ingredients in a bowl, add the baked wings and toss to coat! Easy-peasy! Although, if you are in the mood to cheat a little, you can use Frank’s buffalo wing sauce or any other bottled buffalo sauce will work just as well 🙂
You can also add an optional ingredient i.e honey or brown sugar , or stevia or monk fruit or other such sweeteners for a keto version. Though honey is not traditionally used in the classic buffalo sauce recipe, I like the touch of sweetness it adds.
Tips to make the best crispy hot wings in the oven
Before we head on to the recipe, I’d like to share some important tips to make some delicious, extra crispy buffalo wings!
Make sure the wings are absolutely dry
Use paper towels to pat dry the wings, squeezing out excess moisture. This will ensure they are completely dry and the skin turns ultra-crispy on baking instead of steaming.
Aluminum-free baking powder
The baking powder helps draw out excess moisture to the surface and dries out the skin so that they turn super crispy on baking while the inside still remains moist and juicy.
Try and use aluminum-free baking powder to avoid that metallic after-taste.
Use an oven-safe rack
It is essential to line the baking sheet with a rack for 2 simple reasons;
- To catch the drippings
- For even heat flow
The rack elevates the wings so that they don’t sit on the grease that drips below. This allows the wings to turn crispy on all sides. I also line my tray with aluminum foil, makes clean up a breeze 🙂
Use a hot sauce of your choice
For that true classic flavor, I love to use Franks’s red hot sauce. I like the fact that the sauce is not too spicy, but has just the right amount of kick and tang. Feel free to use any hot sauce like Tabasco, Cholula, Sriracha, etc of your choice.
I’d also like to share another handy tip. Before dredging the baked wings, do a taste-test of the prepared sauce to see if it is to your liking.
A 1:1 ratio of hot sauce and butter works well for us. If you want more heat, increase the ratio of hot sauce. If it is too spicy, add more butter and/or honey or brown sugar.
Bake the wings first, then coat with the sauce
For best results, bake the wings without the sauce. The wings will not crisp up if you douse them in sauce, besides the sauce might also get burnt.

How to make oven baked buffalo wings at home – Step by step instructions
Step 1:Prepare the baking sheet and the chicken wings
Adjust oven rack in the upper-middle position. Preheat the oven to 400°F. Line a rimmed baking sheet with aluminum foil, place an oven-safe, nonstick rack on top. Grease the rack with cooking spray or oil.
In a large bowl, add 2 pounds of chicken wings. Pat dry with kitchen paper napkins, squeeze out as much moisture as possible. Add 2 teaspoons of baking powder, 1/2 teaspoon of kosher salt, and 1/2 teaspoon of freshly cracked pepper and toss to coat the wings evenly.

Step 2: Bake
Place the wings in a single layer. Bake for 30 minutes, flip and cook the other side for another 20-25 minutes or until the chicken wings cook through and the skin turns golden brown and crispy.

Step 3: Make buffalo sauce and toss the wings with it
While the wings are baking, you can prep up the buffalo sauce. In a large bowl, add 1/4 cup each of melted butter and hot sauce, 2 teaspoons of honey or brown sugar. Mix until well combined and set aside.
Add baked wings and toss to coat. If you do not like coating the wings with the sauce, you can serve them separately with the buffalo sauce on the side.
I served these wings with my homemade blue cheese dip and celery sticks, but you could also serve it with Ranch if that’s what you prefer.

Notes
- If you have time to spare, you can place the baking sheet with the wings in the refrigerator, uncovered, for 8 hours to overnight. This will dry out the skin completely. But it works just as well without the extra step.
- If using frozen wings, thaw and then proceed with the recipe. It is important to pat dry the wings thoroughly.
- You can easily double or triple this recipe as per your needs.
- We prefer our baked wings pretty saucy. Add as much of the prepared buffalo sauce you’d like, or return the glazed wings onto the rack again and broil on low for 2-3 minutes or until the sauce has caramelized. Keep an eye while broiling.
- You can also air-fry the wings at 400°F for 25 minutes, tossing them every 5 to 7 minutes, or until the chicken wings cook through and the skin turns crispy.
- Leftovers: These oven baked buffalo wings are best eaten as soon as they are tossed in the sauce. They will remain crisp for some time after pouring the sauce, but eventually, they will begin to lose their crispiness. If you have leftovers, store it in an airtight container, and refrigerate for up to 3 to 4 days.
- To freeze: Place the wings in a freezer-safe bag, squeeze out excess air, seal the bag, label, lay the bag flat so each that the wings are not sticking to each other, and freeze up to 1 month. Alternatively, you can also freeze the wings on a baking sheet for 1-2 hours, then place them in containers or freezer-safe bags. Thaw in the refrigerator overnight.
- To reheat: Once thawed, place the wings on a rack over the rimmed baking sheet and reheat in a preheated oven at 350° F for 15-20 minutes or until heated through. You can also reheat wings in the air fryer at 400°F for 6-8 minutes or until heated through. Do keep in mind that the wings will not turn crispy like before because they are coated with the sauce.
- Make-ahead: Bake the wings as directed in the instructions above. Once it cools down, transfer them to an airtight container and refrigerate until ready to eat. Reheat in the oven at 400°F on a rack over a rimmed baking sheet for 10-15 minutes to crisp them up again.
Why you will love this homemade oven baked hot wings
- The skin is crispy and the meat is so flavorful, tender and juicy, everything you’d want from a chicken wing!
- Easy cleanup, no stress of having to deal the mess, leftover oil, and the fried smell lingering in the kitchen for days
- So convenient and much more economical to whip up a batch at home.
- Fewer calories = less guilt 😀

You can also follow me on Facebook , Pinterest, Instagram & Twitter

Oven Baked Buffalo Wings
Ingredients1x2x3x
- 2 lb chicken wings, separated into flats and drumettes, reserve the tips for homemade stock
- 2 teaspoons aluminum-free baking powder, do not substitute with baking soda
- 1/2 teaspoon kosher salt
- 1/4 to 1/2 teaspoon freshly cracked black pepper
For the buffalo wing sauce
- 1/4 cup melted unsalted butter
- 1/4 cup Frank’s red hot sauce, or any other hot sauce of choice
- 2 teaspoons honey or brown sugar, optional
To serve
- Homemade blue cheese dip or store-bought
- Celery sticks
Instructions
- Adjust oven rack in the upper-middle position. Preheat the oven to 400°F. Line a rimmed baking sheet with aluminum foil, place an oven-safe, nonstick rack on top. Grease the rack with cooking spray or oil.
- In a large bowl, add chicken. Pat dry with kitchen paper napkins, squeeze out as much moisture as possible. Add baking powder, salt, and pepper, whisk to combine well. Add the wings and toss to coat evenly.
- Place the wings in a single layer. Bake for 30 minutes, flip and cook the other side for another 20-25 minutes or until the chicken wings cook through and the skin turns golden brown and crispy.
- While the wings are baking, you can prep up the buffalo sauce. In a large bowl, add melted butter, Hot sauce, and honey or brown sugar. Mix until well combined and set aside.
- Add the baked wings and toss to coat.
- Serve with blue cheese dip and celery sticks.
Notes
- If you have time to spare, you can place the baking sheet with the wings in the refrigerator, uncovered, for 8 hours to overnight. This will dry out the skin completely. But it works just as well without the extra step.
- If using frozen wings, thaw and then proceed with the recipe. It is important to pat dry the wings thoroughly.
- You can easily double or triple this recipe as per your needs.
- We prefer our baked wings pretty saucy. Add as much of the prepared buffalo sauce you’d like, or return the glazed wings onto the rack again and broil on low for 2-3 minutes or until the sauce has caramelized. Keep an eye while broiling.
- You can also air-fry the wings at 400°F for 25 minutes, tossing them every 5 to 7 minutes, or until the chicken wings cook through and the skin turns crispy.
- Leftovers: These oven baked buffalo wings are best eaten as soon as they are tossed in the sauce. They will remain crisp for some time after pouring the sauce, but eventually, they will begin to lose their crispiness. If you have leftovers, store it in an airtight container, and refrigerate for up to 3 to 4 days.
- To freeze: Place the wings in a freezer-safe bag, squeeze out excess air, seal the bag, label, lay the bag flat so each that the wings are not sticking to each other, and freeze up to 1 month. Alternatively, you can also freeze the wings on a baking sheet for 1-2 hours, then place them in containers or freezer-safe bags. Thaw in the refrigerator overnight.
- To reheat: Once thawed, place the wings on a rack over the rimmed baking sheet and reheat in a preheated oven at 350° F for 15-20 minutes or until heated through. You can also reheat wings in the air fryer at 400°F for 6-8 minutes or until heated through. Do keep in mind that the wings will not turn crispy like before because they are coated with the sauce.
- Make-ahead: Bake the wings as directed in the instructions above. Once it cools down, transfer them to an airtight container and refrigerate until ready to eat. Reheat in the oven at 400°F on a rack over a rimmed baking sheet for 10-15 minutes to crisp them up again.
- Inspired by Serious Eats

Oven Baked Buffalo Wings
Ingredients
- 2 lb chicken wings, separated into flats and drumettes, reserve the tips for homemade stock
- 2 teaspoons aluminum-free baking powder, do not substitute with baking soda
- 1/2 teaspoon kosher salt
- 1/4 to 1/2 teaspoon freshly cracked black pepper
For the buffalo wing sauce
- 1/4 cup melted unsalted butter
- 1/4 cup Frank’s red hot sauce, or any other hot sauce of choice
- 2 teaspoons honey or brown sugar, optional
To serve
- Homemade blue cheese dip or store-bought
- Celery sticks
Instructions
- Adjust oven rack in the upper-middle position. Preheat the oven to 400°F. Line a rimmed baking sheet with aluminum foil, place an oven-safe, nonstick rack on top. Grease the rack with cooking spray or oil.
- In a large bowl, add chicken. Pat dry with kitchen paper napkins, squeeze out as much moisture as possible. Add baking powder, salt, and pepper, whisk to combine well. Add the wings and toss to coat evenly.
- Place the wings in a single layer. Bake for 30 minutes, flip and cook the other side for another 20-25 minutes or until the chicken wings cook through and the skin turns golden brown and crispy.
- While the wings are baking, you can prep up the buffalo sauce. In a large bowl, add melted butter, Hot sauce, and honey or brown sugar. Mix until well combined and set aside.
- Add the baked wings and toss to coat.
- Serve with blue cheese dip and celery sticks.
Notes
- If you have time to spare, you can place the baking sheet with the wings in the refrigerator, uncovered, for 8 hours to overnight. This will dry out the skin completely. But it works just as well without the extra step.
- If using frozen wings, thaw and then proceed with the recipe. It is important to pat dry the wings thoroughly.
- You can easily double or triple this recipe as per your needs.
- We prefer our baked wings pretty saucy. Add as much of the prepared buffalo sauce you’d like, or return the glazed wings onto the rack again and broil on low for 2-3 minutes or until the sauce has caramelized. Keep an eye while broiling.
- You can also air-fry the wings at 400°F for 25 minutes, tossing them every 5 to 7 minutes, or until the chicken wings cook through and the skin turns crispy.
- Leftovers: These oven baked buffalo wings are best eaten as soon as they are tossed in the sauce. They will remain crisp for some time after pouring the sauce, but eventually, they will begin to lose their crispiness. If you have leftovers, store it in an airtight container, and refrigerate for up to 3 to 4 days.
- To freeze: Place the wings in a freezer-safe bag, squeeze out excess air, seal the bag, label, lay the bag flat so each that the wings are not sticking to each other, and freeze up to 1 month. Alternatively, you can also freeze the wings on a baking sheet for 1-2 hours, then place them in containers or freezer-safe bags. Thaw in the refrigerator overnight.
- To reheat: Once thawed, place the wings on a rack over the rimmed baking sheet and reheat in a preheated oven at 350° F for 15-20 minutes or until heated through. You can also reheat wings in the air fryer at 400°F for 6-8 minutes or until heated through. Do keep in mind that the wings will not turn crispy like before because they are coated with the sauce.
- Make-ahead: Bake the wings as directed in the instructions above. Once it cools down, transfer them to an airtight container and refrigerate until ready to eat. Reheat in the oven at 400°F on a rack over a rimmed baking sheet for 10-15 minutes to crisp them up again.
- Inspired by Serious Eats
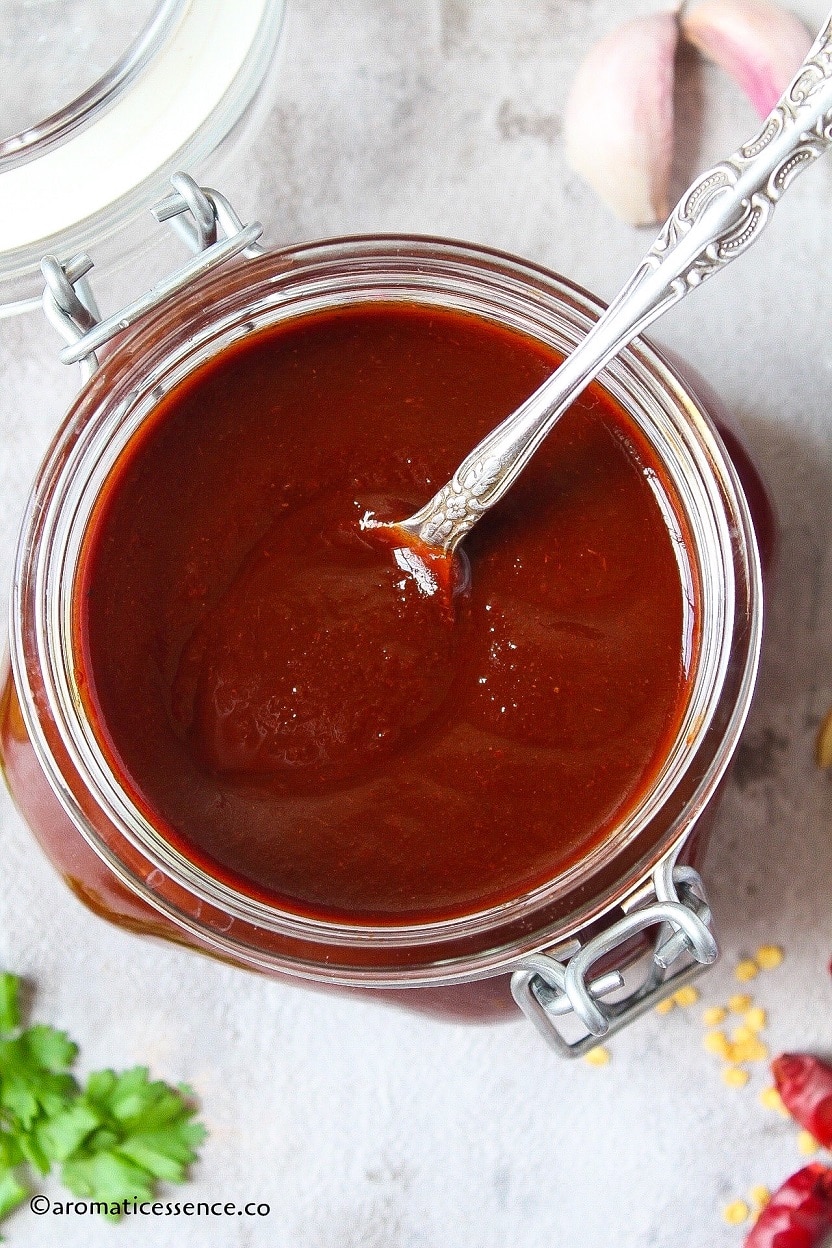
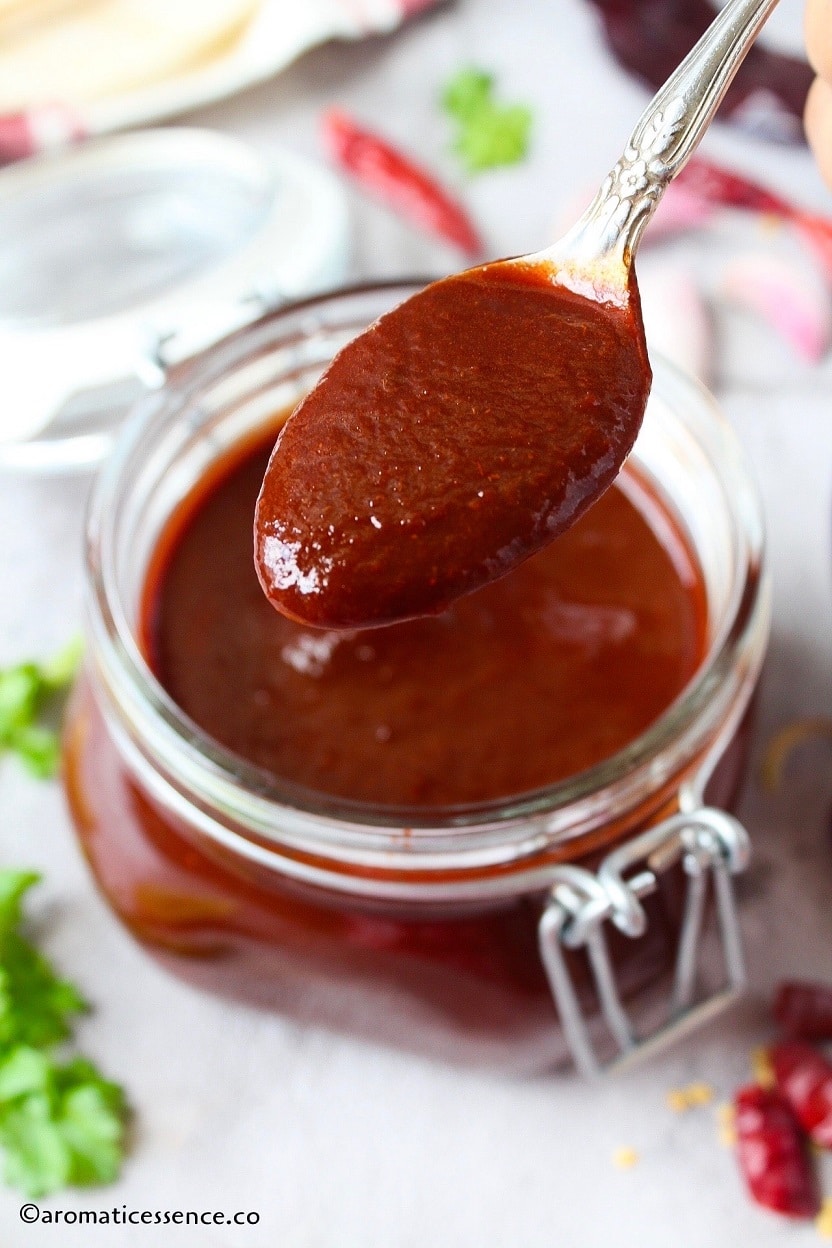
This Red Enchilada Sauce (Salsa Roja) is made from scratch using dried chile pods like guajillo, ancho, and chile de Arbol along with traditional Mexican spices. It has a gorgeous deep red color and is packed with a ton of robust, deep, and complex, chile flavors. This sauce is versatile and can be used in many Mexican dishes.

I love making condiments, dips, chutneys, salad dressings, and sauces of all kinds at home. While some recipes hardly require any effort, some are definitely time-consuming, but I believe in the mantra ‘homemade is truly the best’! It always tastes so fresh and flavorful. And this red chile enchilada sauce right here my friends, is just that!
I’ve enjoyed some really authentic Mexican food on my trip to Mexico a couple of years ago. I won’t say I was surprised to learn of the differences in Mexican food served in the US, as most cuisines are Americanized in the States, be it Indian, Mediterranean, Middle Eastern, or Thai. You’d actually be lucky to find something authentic. More often than not you may not even like it, because your palate loves a different version altogether.
You will come across a lot of recipes that use tomato sauce, chili powder, and flour to make enchilada sauce. While that is great for a quick-fix, I’d not call it an authentic version. I do make that version when I’m pressed for time, I still think it is better than the canned sauce. But, the real deal, classic Mexican enchilada sauce is made with dried chiles, and never chili powder.
Today, I’d love to share my take on this sauce inspired by the authentic basic red enchilada sauce. This wonderful sauce is not only great for enchiladas, but also great for your stews, soups, chilaquiles, huevos rancheros, tamales, and chili con carne, you name it! Pozole is a popular Mexican stew that uses this sauce as the base and it is so delicious! I also love using this sauce to make stacked enchiladas topped with a fried egg! Yum yum!!

- Ingredients and possible substitutions
- Some handy tips to make red enchilada sauce
- How to make red enchilada sauce with dried chiles – Step by step instructions
- Storage and freezing instructions
- Variations of this classic enchilada sauce recipe
- Red Enchilada Sauce | How To Make Enchilada Sauce
Ingredients and possible substitutions
The authentic recipe usually calls for dried chiles, garlic, and seasoning. But again, it may differ regionally, and some also include onion. Let me walk you through the ingredients needed for this recipe;
- Dried chile peppers
I’ve used a combination of;
- Guajillo chiles: Rich, bright, slightly smoky, earthy flavor, with mild to medium heat with a heat index ranging between 2500 to 5000 Scoville Heat Units. This chile variety has deep red, smooth, and shiny skin.
- Ancho chiles: Earthy, sweet, smoky, fruity flavor and are quite mild with a heat index ranging between 1000 to 1500 Scoville Heat Units. They are basically dried poblano peppers. It has a reddish-brown to nearly black, wrinkled skin, that somewhat looks like a big raisin.
- Chile de Arbol: These are quite hot, their heat index ranges between 15,000 to 30,000 Scoville Heat Units. I’ve used about 4 of these, to add a touch of heat to the sauce since the other two are relatively mild.
I love the combination of these three chiles, the resultant enchilada sauce has a lovely, earthy, well-rounded, savory, complex flavor. You can taste the smoky, rich flavor of the anchos and the mild heat from the other two chiles.
Unlike most enchilada sauces that are commercially available in the US, this sauce truly celebrates the flavor of the chiles.
Substitution: There is absolutely no substitute for the peppers in this recipe. It is, in fact, the heart and soul of this sauce. Using chili powder will not work in this recipe, because the dried chile paste offers so much body to the sauce without the need of a thickener.
What you can, however, do is, is experiment with other dried peppers which may be easily accessible to you. But keep in mind that the flavor profile will change depending on what pepper you use.
You can substitute guajillo with New Mexico chiles, anchos with pasilla or mulato chiles and chile de Arbol with cascabel chiles or skip it and add some cayenne pepper instead. Feel free to play around with the ratio of the chile peppers.
Interested in knowing more about the various kinds of Mexican chiles? Then you may enjoy this article .

- Aromatics
I’ve used half of a white onion, but any will work. You can also choose to skip it entirely.
- Seasoning
I’ve used ground cumin, Mexican dried oregano, and salt to season this sauce.

Some handy tips to make red enchilada sauce
Make sure the dried peppers are good to be used in the recipe: Dried chiles do go bad after some time if they were not dried properly in the first place. You will know if you see some white powdery mold on the insides, you need to discard them.
Here is a handy tip that I learned from my Mom to prolong the shelf life of the chiles. She lays the dried chiles in a single layer over a cloth in a warm and dry place. The chiles are dried in the sun for a couple of hours. This will get rid of moisture, if any, and extend the shelf life of the chiles.
Wear gloves while handling peppers: My second tip is to wear gloves while handling chiles to avoid the chili burn. If you don’t use gloves, remember to wash your hands really well after you are done handling the chiles and before you touch your face, especially eyes.
Avoid toasting the chiles for too long: Toasting enhances and brings out that chili flavor adding more depth to the sauce. However, keep in mind, that over toasting the chiles might cause them to burn, and that will lend a bitter flavor to the sauce.
Do a taste-test of the chile stock: I suggest tasting the soaking liquid first to determine the bitterness. If it is too bitter, discard it and use fresh water or stock to blend the ingredients. The real flavor comes from the chiles itself, but it is better to discard the liquid if it is too bitter.
Do not skip the step of straining the sauce: Straining does more than making the sauce smooth. It also gets rid of the unblended tough chile skin and reduces some of the bitter flavors. If you taste the sauce before and after straining, you will be able to tell the difference.
You can see all the chile peels that are left behind in the mesh-strainer in the pics and video, you do not want that in your sauce!
You must fry the sauce: This step deepens the flavor of the sauce adding a rich, complex flavor to it. Do not skip it!
Sauce too bitter? Add sugar or an acid like vinegar or lime juice to cut through the bitterness and balance the flavor. You can use honey, agave, or maple syrup, to balance out the bitter flavor. Start with as little as 1 teaspoon, taste, and adjust.
Try adding a small piece of dark or semi-sweet chocolate to add more depth to the sauce.
You may need to adjust each batch of sauce: You have to understand that the heat levels and the flavor of the chiles, dried or fresh, can vary depending on many factors such as the region, the climate, the soil, the age of pepper to name a few. It is possible that no two batches of this sauce will taste the same.
Capsaicin is the chemical compound that provides heat to the chiles. It is mostly concentrated in the membrane and not the seeds. Some of it may get transferred to the seeds since they are in close contact with it, but the seeds themselves do not contain capsaicin. The heat levels can also vary depending on the thickness of the membrane.
Make sure you remove the membrane to reduce the heat in the sauce. Also, try and discard as much of the seeds, because they can lend a bitter taste too.
Best when made in advance: This enchilada sauce isn’t going to be great as soon as it is prepared. It needs time for the flavors to marry and meld together. So plan a few hours ahead, and let it sit for a while to enjoy some kickass enchiladas! This also freezes well, great to have on hand for a quick dinner.
And though not a tip for the actual sauce itself, keep in mind that things will get messy while making this sauce. You can see the splatters on my backdrop while frying the sauce in the video! So definitely avoid wearing something nice, your clothes might get stained, and it is not easy to get rid of it.
How to make red enchilada sauce with dried chiles – Step by step instructions
(Printable recipe card at the bottom of the post)
Step 1: Toast the peppers
Wipe dried chiles with a damp paper towel to remove dust and dirt.
Heat a heavy-bottomed or cast-iron skillet over medium heat, let it heat up for a few minutes. Place the dried chile peppers(12 guajillos, 7 anchos, and 4 arbol chiles) toast for 15-20 seconds on each side, pressing with a spatula. Transfer to a bowl and set aside to cool down. Do this in batches if required.
Or place the chiles on a baking sheet in a single layer and toast it in a preheated oven 350°F for 3-5 minutes.
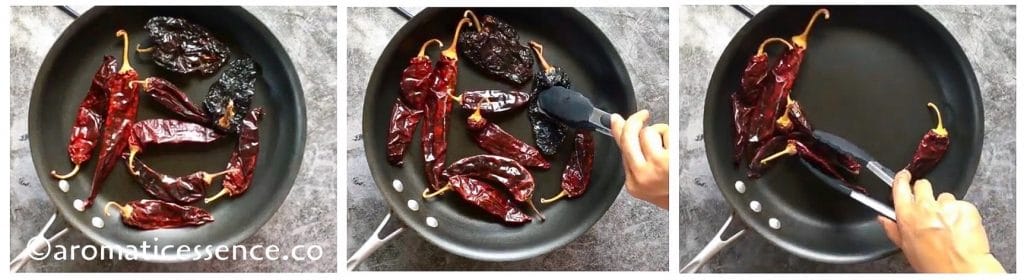
Remove and discard the stems, shake out the seeds. Cut open the pepper with a pair of kitchen scissors and remove the membrane.

Step 2: Rehydrate the chile peppers
Transfer the chiles to a big heatproof bowl. Add 1.5 quarts of boiling water. Cover and let it sit for 30 minutes or until they soften and turn plump.

Step 3:Blend and strain
Transfer the chiles with the help of a slotted spoon or tongs into a blender, add 1/2 a white onion and 5 cloves of garlic. Taste the soaking liquid, if it is bitter, do not use, add fresh water/stock. If it is not all that bitter, then add about 2.5 to 3 cups of soaking liquid and grind until smooth.

Place a fine-mesh strainer over a big bowl. Add the sauce in batches, extract out as much of the pulp by pushing it down with the back of a spoon or spatula. Use a clean spoon to scrape the pulp on the bottom of the strainer.

Step 4: Cook the enchilada sauce
Heat 2 tablespoons oil in a heavy-bottomed skillet, add the strained sauce (about 4.25 cups). Fry the sauce for 1-2 minutes, add 1/2 teaspoon Mexican oregano, 1 teaspoon cumin, and 1 teaspoon Kosher salt.
Note: Please be careful here, and do it gently, as there will be some splattering as soon as the sauce hits the skillet.
Mix well and simmer uncovered for 15-20 minutes, stirring occasionally. Check for seasoning, adjust with more salt if needed.
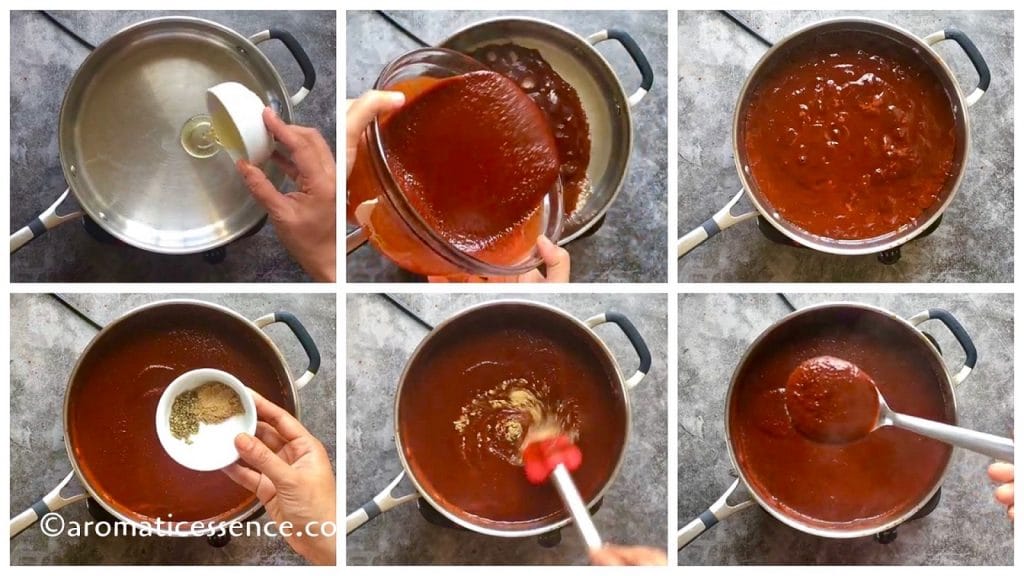
Is the sauce bitter at this point? Add 1 teaspoon of sugar or honey or a small piece of dark or semi-sweet chocolate.
Sauce still thin? Continue simmering for a few more minutes, until it thickens.
Sauce too thick? Adjust the consistency by thinning it out with few tablespoons of water at a time.
The sauce for perfect for us, I didn’t find the need to add any sweetener.
Notes:
- This recipe makes about 4 cups of sauce. If you are accustomed to the tomato-based enchilada sauce and have never tried the authentic version before, chances are you may not like this at all. So, I suggest trying half of the batch. The sauce does taste better with some onions and tomatoes in it, but I’ve made it a number of times without the tomatoes, and we love it just as much!
- The sauce tastes fabulous once it is incorporated into any dish, be it enchiladas or pozole or chili con carne. I hope you do try it sometime.
- Checkpoints to avoid bitterness:
- Avoid over toasting the chiles Discard the seeds Taste-test the soaking liquid for bitterness before using it to blend Definitely strain the sauce!

Storage and freezing instructions
Once the sauce has cooled down completely, transfer it to a glass or Mason jar, refrigerate for up to 2 weeks.
Transfer it a freezer-safe bag, squeeze out excess air, label, lay the bag flat, and freeze. Or transfer the sauce in ice cube trays and freeze until solid. Then transfer the cubes to a freezer-safe bag, label, and freeze up to 3 months.
Thaw in the refrigerator overnight. Reheat in a skillet over medium heat, stirring occasionally until heated through.
Variations of this classic enchilada sauce recipe
There is absolutely no harm in experimenting with a recipe. But sometimes, I like to stick to the classics, why fix something when it is not broken? Having said that, feel free to adapt this recipe and add your own unique touch to this sauce.
Tomatoes: Tomatoes are not traditionally used to make this red chile sauce. If you like to add tomatoes, add 2 Roma tomatoes while blending. You could also use 14.5 oz canned tomatoes, whatever you have at hand, diced, crushed, whole peeled. Or add a couple of tablespoons of tomato paste when you fry the sauce.
You can incorporate onions, tomatoes, and garlic in one of the ways in this sauce:
- Charring: You can char the onions, tomatoes, and garlic until blackened and then blend with the rehydrated chiles.
- Simmering: Or add the vegetables along with peppers in a saucepan and simmer until everything has softened.
- Sauteeing: You can also saute the onion, tomatoes, and garlic with little oil in a skillet until softened. Then blend with the chiles.
I’ve simply thrown in half a raw onion and it works just as well, as the sauce simmers, it takes the edge of the raw flavor of the aromatics. But feel free to follow any of the above methods of treating the vegetables.
Spices: You can also experiment with other spices like ground cinnamon, dried marjoram, dried thyme, ground coriander, cloves, etc. If you can’t find Mexican oregano, use the Italian oregano. The flavor will differ a little, but it isn’t really that big of a deal.
Making red enchilada sauce from scratch does involve some amount of work, but if you ask me, it is absolutely worth it. I’m sure once you make some enchiladas with this homemade sauce, you will agree that it is the best red enchilada sauce ever!
You can also follow me on Facebook , Pinterest, Instagram & Twitter

Red Enchilada Sauce | How To Make Enchilada Sauce
Ingredients1x2x3x
- 12 dried Guajillo chiles
- 7 dried Ancho chiles
- 4 to 5 dried Arbol chiles, you may add more to increase the heat
- 1.5 quarts boiling water
- 1/2 white onion
- 5 garlic cloves, peeled
- 1 teaspoon kosher salt
- 1 teaspoon ground cumin
- 1/2 teaspoon Mexican oregano
- 1 to 2 teaspoons sweetener of choice or a small piece of dark or semi-sweet chocolate, optional, if required
- 2 tablespoons vegetable oil
Instructions
- Wipe dried chiles with a damp paper towel to remove dust and dirt.
- Heat a heavy-bottomed or cast-iron skillet over medium heat, let it heat up for a few minutes. Place the dried chile peppers, toast for 15-20 seconds on each side, pressing with a spatula. Transfer to a bowl and set aside to cool down. Do this in batches if required.
- Or place the chiles on a baking sheet in a single layer and toast it in a preheated oven 350°F for 3-5 minutes.
- Remove and discard the stems, shake out the seeds. Cut open the pepper with a pair of kitchen scissors and remove the membrane.
- Transfer the chiles to a big heatproof bowl. Add boiling water. Cover and let it sit for 30 minutes or until they soften and turn plump.
- Transfer the chiles into a blender, add the onions and garlic. Taste the soaking liquid, if it is bitter, do not use, add fresh water/stock. If it is not all that bitter, then add about 2.5 to 3 cups of soaking liquid and grind until smooth.
- Place a fine-mesh strainer over a big bowl. Add the sauce in batches, extract out as much of the pulp by pushing it down with the back of a spoon or spatula. Use a clean spoon to scrape the pulp on the bottom of the strainer.
- Heat oil in a heavy-bottomed skillet, add the strained sauce. Fry the sauce for 1-2 minutes, add Mexican oregano, cumin, and salt.
- Note: Please be careful here, and do it gently, as there will be some splattering as soon as the sauce hits the skillet.
- Mix well and simmer uncovered for 15-20 minutes, stirring occasionally. Check for seasoning, adjust with more salt if needed.
- Is the sauce bitter at this point? Add 1 teaspoon of sugar or honey or a small piece of dark or semi-sweet chocolate.
- Sauce still thin? Continue simmering for a few more minutes, until it thickens.
- Sauce too thick? Adjust the consistency by thinning it out with few tablespoons of water at a time.
Video
Notes
- Avoid over toasting Discard the seeds Taste-test the soaking liquid for bitterness before using it to blend Definitely strain the sauce!
