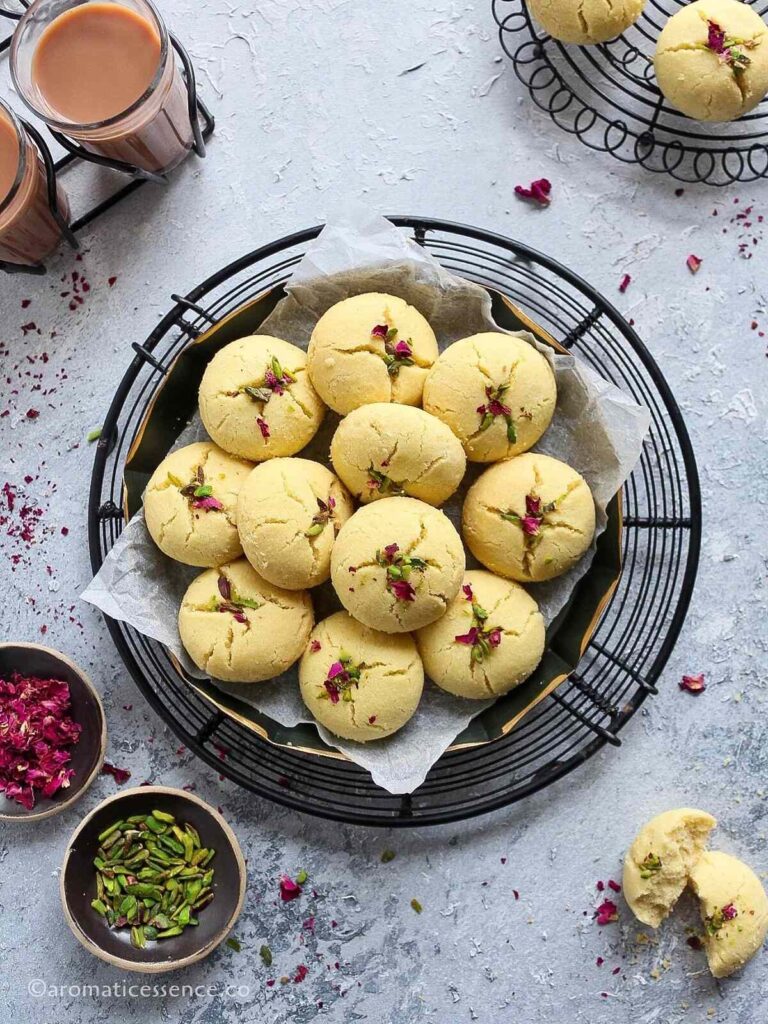
Nankhatai biscuits are an Indian version of shortbread cookies. They are crispy and crumbly, light and flaky, with a tender crumb, and absolutely moreish!
The festive season has begun with a bang in India! I’m sure you know what that means. Since Indian festivities and food are synonymous with each other, you can expect quite a lot of festive treats in the coming weeks.
The festival of lights, Diwali, is just a few weeks away, so I’m starting my series of festive treats with these classic Indian buttery cookies also known as nankhatai cookies.
I baked my first batch of nankhatai in 2015 when I was in the US. I missed having the Indian bakery-style nankhatai, so when I came across a recipe for these biscuits, I didn’t waste time making some. To my surprise, the biscuits turned out way better than the bakery ones too, they were light, crisp, crumbly and so flaky.
The sweet aroma of cardamom-flavored nankhatai’s wafting from the oven is simply irresistible! I’m quite certain that one bite of this yummy biscuit will evoke nostalgic feelings that will take you back to your childhood days. 🙂

Why should you try this recipe?
This nankhatai biscuit recipe;
☑ Is a one-bowl recipe
☑ Does not need eggs
☑ Is made with basic ingredients that you probably have sitting in your pantry right now
☑ Can be made without an oven
☑ Yields khasta (flaky, crispy, and tender) cookies that have a rich, buttery flavor and just melts-in-the-mouth
☑ Does not need any special equipment such as a stand mixer or hand mixer
☑ Is a beginner-friendly cookie recipe
☑ Can be made and shared all year round as you don’t really need an occasion to indulge in some nan khatai 😀
Ingredients needed
To make these eggless nankhatai biscuits, you will need;
- A combination of 3 flours: All-purpose flour, fine besan (gram flour), and fine semolina (rava or sooji). Gram flour imparts a prominent nutty, earthy flavor while the semolina adds a little crunch to the cookie. Some folks make it without the gram flour and semolina. If you’d like to skip it, please refer to the FAQs below.
- Sugar: You will need powdered sugar or confectioner’s sugar for these biscuits. If you have regular granulated sugar, add it to a blender and blend until you have finely powdered sugar.
- Lots of ghee (clarified butter): Yes, it is the ghee that makes nankhatai cookies flaky, which is why they are also known as ‘ khasta ‘ nankhatai.
- Salt: A pinch of salt enhances the sweetness and balances the flavors.
- Cardamom powder: To flavor the nankhatai. I’ve used readymade cardamom powder. If making your own, you can crush the seeds in a mortar and pestle or grind them along with the sugar while making powdered sugar.

How to make nankhatai cookies at home – Step-by-step instructions
Step 1: Cookie dough
Line a baking tray with parchment paper and set aside.
In a large mixing bowl, add 1/2 cup ghee. Place a fine-mesh sieve over the bowl, and sift 3/4 cup of powdered sugar. ( Photos 1 and 2 )
Cream the ghee and sugar using a whisk. ( Photos 3 and 4 )
Scrape the mixture off the sides and the bottom of the bowl occasionally using a spatula. ( Photo 5 )
Whisk until the mixture turns light, pale, and creamy. ( Photos 6 to 8 )

Place the fine-mesh sieve over the creamed mixture (make sure the sieve is not touching the mixture) and sift together 1 cup of all-purpose flour, 1/4 cup besan, 2 tablespoons rava, 1/4 teaspoon salt, and 1/2 teaspoon cardamom powder. ( Photos 9 to 15 )

Combine everything using a spatula, then use your hands to bring the dough together. Do not knead. ( Photos 16 to 18 )
If the dough looks dry, add a teaspoon of ghee and gently work the dough until it comes together.
Pinch a small portion of the dough, and roll it between your palms to form a smooth ball. Flatten it slightly and check if there are any cracks on the edges. If it appears smooth, the dough is ready and does not need more ghee. ( Photos 19 and 20 )
Wrap the dough in plastic wrap and refrigerate for 15-20 minutes. ( Photo 21 )

Step 2: Shape the dough
Pinch a lime-sized portion of the dough. Roll it between your palms to form a smooth round shape. Flatten them slightly. ( Photos 22 to 24 )
Place it on the baking tray lined with parchment paper.
Repeat with the rest of the cookie dough. Place them 1 inch apart since they will expand on baking. ( Photo 25 )
Using a knife, make a criss-cross pattern in the middle. ( Photo 26 )
You can also make an indentation in the middle of the cookie using your thumb or the back of a small measuring spoon. This helps the cookie expand during baking.
Cover loosely and refrigerate for another 15-20 minutes.
In the meantime, preheat the oven to 190°C (375 °F).

Step 3: Bake
Oven:
Bake at 190°C (375° F) for about 15 to 18 minutes or until the edges begin to turn a light golden in color. ( Photos 27 and 28 )
The baking time may vary depending on the oven and the size of the cookies. So please keep an eye out. I baked them for 16 minutes and they were perfect.
Sprinkle some slivered pistachios. ( Photo 29 )
The cookies will be soft in the middle but will firm upon cooling.
Let the cookies rest on the baking tray for 5 minutes, then transfer to a wire rack to cool completely. ( Photo 30 )

Without oven:
Shape the cookies as instructed above. Place them on a small aluminum, stainless steel, or nonstick baking pan greased and lined with parchment paper. You may use aluminum foil too. Refrigerate while the cooker preheats. ( Photo 31 )
Add 1 to 1.5 cups of salt to the bottom of a pressure cooker or kadai. Place a trivet or stand over the layer of salt. ( Photo 32 )
Make sure you remove the gasket and the whistle. Cover the cooker with the lid. Preheat on medium-high heat for 10 minutes. ( Photo 33 )
Place the plate with the cookies carefully. ( Photo 34 )
Close the lid, and let the cookies cook on medium-low heat for about 25 minutes or until done. ( Photos 35 and 36 )
Switch off the heat and transfer the plate onto a stand very carefully using tongs or silicon mitts and allow it to cool down for 5 to 10 minutes. ( Photo 37 )
The bottom of the cookie has a beautiful golden brown color. ( Photo 3 8)
Look at the texture! ( Photo 39 )

Serving suggestions
These cookies make for a delicious accompaniment to your morning coffee or evening chai.
They are also great as a snack!
Since it is like a cross between a cookie and a mithai, you can also enjoy them as a sweet treat post meals.

Storage instructions
Allow nan khatai to cool down completely. Store in an airtight container at room temperature in a cool and dry place for up to 3 weeks. Though, I really doubt they will last that long 😀
Do not leave them exposed to air for a long time or they will lose their crispiness.
Recipe Tips
Sweetness: These biscuits are not overly sweet. If you prefer cookies that aren’t too sweet, reduce the powdered sugar to 1/2 cup.
Ghee: To make the best khasta nankhatai recipe, it is recommended to use ghee as the fat.
Consistency of the ghee: Make sure that you use room temperature ghee which is in a semi-solid state with a grainy texture. It should not be melted or the cookies will be flat. If you live in a hot and humid climate and find the ghee to be a bit runny, pop it in the fridge for some time to help it solidify slightly.
Do not knead the dough: All you have to do is simply mix ingredients and get the dough together (refer to video). Kneading the dough will develop gluten which will make these cookies dense as opposed to light and flaky.
Adjust the quantity of ghee as needed: If the dough feels too crumbly and is not coming together, add a few teaspoons of ghee and mix until it comes together. Do not add milk, or it will alter the texture.
Chill the dough and shaped cookie dough balls before baking: It is also important that you chill the dough, chilling the dough helps solidify the fat (in this case, ghee), so when the cookies hit the oven, the fat melts slowly, preventing the cookies from spreading too much. If you bake them without chilling the dough, the cookies will spread out, as the dough is soft and the fat is already at room temperature.
Even-sized cookies: Use a small cookie scoop or a tablespoon for uniform-sized cookies. You can also weigh the cookie dough and divide it by the number of cookies you need to make sure that each cookie is the same size. FYI, the dough weighs about 400 grams.
Let cookies rest after baking: Nankhatais are quite delicate and fragile right after they are baked. Let them rest on the baking tray for at least 5 minutes to achieve the perfect texture. If you try to remove them earlier, they might just crumble and fall apart.
Sprinkle pistachios in the end: I prefer adding slivered pistachios in the end because they tend to turn brown after baking and don’t look very appealing. It’s a personal preference. If using other nuts like almonds or cashew nuts, you may add them before baking.

Variations
Different flavors: Skip the cardamom, and flavor these nan khatais with other ingredients like cinnamon, nutmeg, all-spice, pumpkin pie spice mix, or other flavor extracts like rose, rasmalai, rabdi, paan, etc.
Coconut flavored: Add about 1/2 cup of desiccated coconut along with the flours. Add a teaspoon of ghee at a time, if the dough isn’t coming together.
Nuts: Though I’ve added slivered pistachios just for garnishing, you can most certainly incorporate some coarsely chopped nuts like walnuts, almonds, cashew nuts, pecans, etc in the cookie dough for added texture.
Chocolate: Add 2 to 3 tablespoons of cocoa powder along with the flour. You can also add some semi-sweet or dark chocolate chips.
Thandai flavored: Add 3 to 4 tablespoons of thandai masala powder along with the flours.
Vegan: Swap the ghee with vegetable shortening (make sure it is vegan) or vegan butter.
What is the meaning of nankhatai or nan khatai?
Nankhatai biscuit, also known by other names like nan khatai, naan khatai or butter biscuit, is one of the most commonly available cookies in Indian bakeries. It is always a hit amongst kids and adults alike.
The word Nankhatai is derived from the Persian word Naan meaning bread and “Khatai” from an Afghan word meaning Biscuit. In Afghanistan and Northeast Iran, these biscuits are called Kulcha-e-Khataye. Kulcha is a type of bread similar to Naan.
There is also an interesting history of how Nankhatai originated .
Nankhatai is believed to have originated in Surat in the 16th century, the time when Dutch and Indians were the important spice traders. A Dutch couple set up a bakery in Surat to meet the needs of local Dutch residents. When the Dutch left India, they handed over the bakery to an Iranian.
The bakery biscuits were disliked by the locals. To save his business he started selling dried bread at low prices. It became so popular that he started drying the bread before selling it. With time, his experimentation with bread ultimately gave birth to Nankhatai. (Source- wiki )
Can I swap the ghee with butter?
I do not suggest replacing ghee with butter or shortening for that matter. Since butter has more moisture content than ghee, it will change the texture of the nankhatai. For that flaky and tender texture, I recommend using only pure ghee!
Can I use whole wheat flour instead of all-purpose flour?
You can make whole wheat nankhatai by replacing maida with atta (whole wheat flour) and sugar with jaggery powder to make a healthier version. But you will need to add at least 1/2 teaspoon of baking powder or the cookies will be too dense and not as light and flaky as the ones made with maida.
How do you know when nan khatai biscuits are cooked?
Nankhatais are done when cracks appear on the top of the cookies and the bottom turns golden brown. The color of these cookies will still be pale after baking and that’s how we want them to be.
Do not be tempted to overbake them, because they will continue to cook once they are out of the oven and will turn 1 to 2 shades darker.
Don’t I need to add any baking powder or soda to this recipe?
You do not need any leavening agents in this recipe. Make sure you cream the ghee and sugar really well.
Note : If you swap the all-purpose flour with wheat flour, then do add about 1/2 teaspoon of baking powder so that the cookies do not turn dense.
Can I make these biscuits without besan or rava?
Yes, you can. Add more all-purpose flour to compensate for the besan and rava.
How to bake nankhatai’s in a microwave?
Turn on the convection mode of the microwave and preheat it to 180°C for 10 minutes. Since each microwave is different, please refer to the instruction manual.
Once it is preheated, place a short stand, and the tray containing the shaped dough on the stand. Bake the cookies for about 10 to 12 minutes or until done.
How many calories are in nankhatai?
A medium-sized nankhatai cookie (approx 30 grams) contains 153 calories, 16.8 grams of carbs, 1.8 grams of protein, 8.7 grams of fat, and 6.6 grams of sugar. For the complete nutrition info, please check the recipe card.
Is nankhatai good for weight loss?
These biscuits are packed with carbs, fat, and sugar. They are certainly not diet food, so if you watch your diet, you should refrain from indulging in these cookies.

You may also enjoy these Indian biscuit recipes
- Karachi Fruit Biscuits
- Badam Pista biscuits
- Crispy coconut cookies
- Digestive biscuits
Editor’s Note: The original recipe published on June 9, 2015, was adapted from here . The recipe has been modified slightly and the post has been republished to include new images, detailed step-wise pictorials, video, and content on September 14, 2022.
Have you made this recipe?
I would love to hear from you! Please be sure to share your feedback and/or give this recipe a rating in the comment below. Your reviews help others know the recipe better too.
You can also FOLLOW me on Facebook , Pinterest, Instagram & Twitter

Nankhatai Recipe
Ingredients1x2x3x
- 1/2 cup ghee 115 grams
- 3/4 cup powdered sugar 90 grams
- 1 cup all purpose flour 143 grams
- 1/4 cup besan (gram flour) 30 grams
- 2 tablespoons fine rava (semolina) 25 grams
- 1/4 teaspoon salt
- 1/2 teaspoon cardamom powder
- 1 to 2 teaspoons slivered pistachios t
Instructions
Cookie Dough
- Line a baking tray with parchment paper and set aside.
- In a large mixing bowl, add ghee. Place a fine-mesh sieve over the bowl, and sift powdered sugar.
- Cream the ghee and sugar using a whisk.
- Scrape the mixture off the sides and the bottom of the bowl occasionally using a spatula.
- Whisk until the mixture turns light, pale, and creamy.
- Place the fine-mesh sieve over the creamed mixture (make sure the sieve is not touching the mixture) and sift together all-purpose flour, besan, rava, salt, and cardamom powder.
- Combine everything using a spatula, then use your hands to bring the dough together. Do not knead.
- If the dough looks dry, add a teaspoon of ghee and gently work the dough until it comes together.
- Pinch a small portion of the dough, and roll it between your palms to form a smooth ball. Flatten it slightly and check if there are any cracks on the edges. If it appears smooth, the dough is ready and does not need more ghee.
- Wrap the dough in plastic wrap and refrigerate for 15-20 minutes.
Shape the dough
- Pinch a lime-sized portion of the dough. Roll it between your palms to form a smooth round shape. Flatten them slightly.
- Place it on the baking tray lined with parchment paper.
- Repeat with the rest of the cookie dough. Place them 1 inch apart since they will expand on baking.
- Using a knife, make a criss-cross pattern in the middle.
- You can also make an indentation in the middle of the cookie using your thumb or the back of a small measuring spoon. This helps the cookie expand during baking.
- Cover loosely and refrigerate for another 15-20 minutes.
- In the meanwhile, preheat the oven to 190°C (375° F).
Bake (oven)
- Bake at 190°C (375° F) for about 15 to 18 minutes or until the edges begin to turn a light golden in color.
- The baking time may vary depending on the oven and the size of the cookies. So please keep an eye out. I baked them for 16 minutes and they were perfect.
- Sprinkle some slivered pistachios.
- The cookies will be soft in the middle but will firm upon cooling.
- Let the cookies rest on the baking tray for 5 minutes, then transfer to a wire rack to cool completely.
Bake (without oven)
- Shape the cookies as instructed above. Place them on a small aluminum, stainless steel, or nonstick baking pan greased and lined with parchment paper. You may use aluminum foil too. Refrigerate while the cooker preheats.
- Add 1 to 1.5 cups of salt to the bottom of a pressure cooker or kadai. Place a trivet or stand over the layer of salt.
- Make sure you remove the gasket and the whistle. Cover the cooker with the lid. Preheat on medium-high heat for 10 minutes.
- Place the plate with the cookies carefully.
- Close the lid, and let the cookies cook on medium-low heat for about 25 minutes or until done.
- Switch off the heat and transfer the plate onto a stand very carefully using tongs or silicon mitts and allow it to cool down for 5 to 10 minutes.
Video
Notes
Nutrition

Nankhatai Recipe
Ingredients
- 1/2 cup ghee 115 grams
- 3/4 cup powdered sugar 90 grams
- 1 cup all purpose flour 143 grams
- 1/4 cup besan (gram flour) 30 grams
- 2 tablespoons fine rava (semolina) 25 grams
- 1/4 teaspoon salt
- 1/2 teaspoon cardamom powder
- 1 to 2 teaspoons slivered pistachios t
Instructions
Cookie Dough
- Line a baking tray with parchment paper and set aside.
- In a large mixing bowl, add ghee. Place a fine-mesh sieve over the bowl, and sift powdered sugar.
- Cream the ghee and sugar using a whisk.
- Scrape the mixture off the sides and the bottom of the bowl occasionally using a spatula.
- Whisk until the mixture turns light, pale, and creamy.
- Place the fine-mesh sieve over the creamed mixture (make sure the sieve is not touching the mixture) and sift together all-purpose flour, besan, rava, salt, and cardamom powder.
- Combine everything using a spatula, then use your hands to bring the dough together. Do not knead.
- If the dough looks dry, add a teaspoon of ghee and gently work the dough until it comes together.
- Pinch a small portion of the dough, and roll it between your palms to form a smooth ball. Flatten it slightly and check if there are any cracks on the edges. If it appears smooth, the dough is ready and does not need more ghee.
- Wrap the dough in plastic wrap and refrigerate for 15-20 minutes.
Shape the dough
- Pinch a lime-sized portion of the dough. Roll it between your palms to form a smooth round shape. Flatten them slightly.
- Place it on the baking tray lined with parchment paper.
- Repeat with the rest of the cookie dough. Place them 1 inch apart since they will expand on baking.
- Using a knife, make a criss-cross pattern in the middle.
- You can also make an indentation in the middle of the cookie using your thumb or the back of a small measuring spoon. This helps the cookie expand during baking.
- Cover loosely and refrigerate for another 15-20 minutes.
- In the meanwhile, preheat the oven to 190°C (375° F).
Bake (oven)
- Bake at 190°C (375° F) for about 15 to 18 minutes or until the edges begin to turn a light golden in color.
- The baking time may vary depending on the oven and the size of the cookies. So please keep an eye out. I baked them for 16 minutes and they were perfect.
- Sprinkle some slivered pistachios.
- The cookies will be soft in the middle but will firm upon cooling.
- Let the cookies rest on the baking tray for 5 minutes, then transfer to a wire rack to cool completely.
Bake (without oven)
- Shape the cookies as instructed above. Place them on a small aluminum, stainless steel, or nonstick baking pan greased and lined with parchment paper. You may use aluminum foil too. Refrigerate while the cooker preheats.
- Add 1 to 1.5 cups of salt to the bottom of a pressure cooker or kadai. Place a trivet or stand over the layer of salt.
- Make sure you remove the gasket and the whistle. Cover the cooker with the lid. Preheat on medium-high heat for 10 minutes.
- Place the plate with the cookies carefully.
- Close the lid, and let the cookies cook on medium-low heat for about 25 minutes or until done.
- Switch off the heat and transfer the plate onto a stand very carefully using tongs or silicon mitts and allow it to cool down for 5 to 10 minutes.
Video
Notes
Nutrition
Sweet boondi is a classic Indian dessert! Crispy, deep-fried, gram flour pearls are soaked in cardamom-scented sugar syrup. Learn how to make the perfect sweet boondi with the help of all the tips and tricks mentioned in the post!

As Diwali is approaching, so is my list of treats to share with you’ll getting longer and I really hope I get to share them all on the blog this time around!
Today we have a really simple post on how to make sweet boondi, also known as meethi boondi or mithi boondi.
Boondi is usually made during festivals. It is also offered as prasad after the prayer rituals (pooja). Although honestly, you can also enjoy it all year round! It is one of those sweets that is loved by everyone!
Making halwai-style sweet boondi at home isn’t difficult per se, but there are certain tips and tricks that I’ve shared in this post to nail them in the first attempt. Please be sure to go through those below.
- What is boondi?
- Why should you try this recipe?
- Ingredients needed
- How to make sweet boondi at home – Step-by-step process
- Serving suggestions
- Storage instructions
- Recipe tips
- Frequently asked questions (FAQs)
- You may also enjoy these Diwali treats
- Sweet Boondi (Meethi Boondi)
What is boondi?
Boondi is derived from the Hindi word ‘boond’ which means a droplet and ‘meethi’ translates to sweet in Hindi.
Bundi, boondi, or boondiya are small, deep-fried drops made of gram flour or chickpea flour (besan).
Boondi can be made either;
- Sweet: Where the boondi is soaked in thick sugar syrup.
- Savory: Also known as khara or kara boondi where the boondi is mixed with nuts, curry leaves, chili powder, salt, etc. Sort of like an Indian version of trail mix! It can also be used to make boondi raita.
In this post, I’ve covered basic but important points to avoid;
- Flat boondi
- Boondi with tails
- Forming clumps of boondi in the hot oil

Why should you try this recipe?
This mithi boondi;
☑ Is soft, sweet, juicy, and quite addictive
☑ Has all the taste of boondi ladoo but requires less effort
☑ Is perfect to be made and shared during Diwali or any other festive or joyous occasion
☑ Needs just three basic ingredients, besan, sugar, and oil
☑ Can be made ahead
☑ Is gluten-free and vegan
Ingredients needed
For this recipe of sweet boondi, you will need;
Besan: You need fine besan to make boondi.
Sugar: I’ve used regular granulated sugar.
Water: To make the batter.
Flavoring agents: I’ve used cardamom to flavor the boondi. You can also add some crushed saffron strands, rose water, or kewra water.
Garnishes: I’ve used some slivered pistachios amd edible dried rose petals for garnishing. You can also add raisins or any nuts of your choice. You may fry the nuts and raisins in ghee and mix them with the boondi.
Oil: Is used in the batter and also for deep-frying. Oil in the batter helps make the boondi crispy. Use a neutral flavored oil like sunflower, canola, etc. You may also ghee or a combination of oil and ghee.
Other ingredients: Usually edible camphor and rock candy are also added, but I haven’t used either of these in the recipe. Feel free to add them if you like.

How to make sweet boondi at home – Step-by-step process
Step 1: Boondi batter
Sift 1 cup of besan in a big bowl. ( Photos 1 and 2 )
Add 1/2 cup water gradually, and whisk well to make a smooth, free-flowing batter. Add another 2 to 4 tablespoons of water in increments as needed. ( Photos 3 to 6 )
I added another 2 tablespoons of water, so a total of 1/2 cup + 2 tablespoons of water.
Add 1/2 tablespoon oil or ghee and a pinch of kesari food color. ( Photos 7 and 8 )
If you like to add more colors like red, green, etc, then divide the batter and add the color just before frying.
Whisk well for another minute. ( Photo 9 )
The batter should be smooth, free-flowing, and thick enough to coat the back of a spoon as shown in the pictures. ( Photos 10 and 11 )
Cover and set the batter aside for 15 minutes. ( Photo 12 )

Step 2: Deep-fry
After 15 minutes, whisk the batter for another minute. ( Photo 13 )
Heat sufficient oil in a heavy-bottomed kadai on medium-high heat.
Add a drop of the batter to the oil to check if it has reached the right temperature. ( Photo 14 )
If it sinks to the bottom the oil is not hot enough. If it rises to the surface immediately without changing color, the oil is ready. ( Photo 15 )
Hold a slotted spoon (boondi jhara or grater) about 3 to 4 inches above the oil.
Pour a ladleful of the batter over the slotted spoon. ( Photo 16 )
Drops of batter will fall into the hot oil and form a round shape. Once the boondi floats stir occasionally. ( Photos 17 and 18 )
Deep-fry for about 40 seconds or until crispy. They should not turn golden brown.
Using another slotted spoon, drain the boondi and transfer them to a plate lined with a paper towel. ( Photos 19 and 20 )
Repeat the same process with the rest of the batter. ( Photo 21 )
Wash the slotted spoon under running water and wipe with a clean napkin/paper towel each time before proceeding with the next batch.
Make sure the ladle is completely dry to avoid hot oil from splattering all over and causing any mishaps.

Step 3: Prepare the sugar syrup
Add 1 cup sugar and 1/2 cup water to a pan. Mix well and bring to boil on medium heat. ( Photos 22 to 25 )
Once it starts boiling, cook for another 2 to 3 minutes or just until the syrup is sticky to the touch (test a few drops on a spatula). We are not looking for any string consistency here. ( Photo 26 )
Switch off the heat and add 1/4 teaspoon of cardamom powder, and a pinch of orange food color. You may add about 1 teaspoon of lemon juice to avoid crystallization. ( Photos 27 to 30 )
Allow to cool down for 2-3 minutes.

Step 4: Soak boondi in sugar syrup
Add the fried boondi to the warm sugar syrup. Toss gently until the boondis are evenly coated with the syrup. ( Photo 31 )
Cover, and set aside so that the boondis absorb the sugar syrup. ( Photo 32 )
Stir occasionally after a couple of hours. Allow it to dry overnight. ( Photos 33 and 34 )
The boondis will have a light coating of sugar crystals, and they will turn soft and juicy. ( Photo 35 )
If you prefer sticky boondi, soak for about 3-4 hours in the syrup.
Garnish with slivered pistachios. Enjoy! ( Photo 36 )

Serving suggestions
Enjoy this meethi boondi warm or at room temperature all by itself as a sweet treat after meals.
You can also serve it along with some spicy sev which is a very popular combination.
You can use it to make other desserts like;
- Boondi kheer
- Boondi cheesecake jars

Storage instructions
Store sweet besan boondi in an air-tight container at room temperature for 1 week or in the fridge for up to 2 to 3 weeks.
Recipe tips
Besan: Make sure you use a fresh batch of besan for best results. Besan that has been sitting in the pantry for a while may turn rancid, and may spoil the entire batch. Do a little taste test before using it in the recipe.
Batter consistency: The batter should not be that thick or too thin. It should be thick enough to coat the back of a spoon and free-flowing that it drops into the oil without any agitation. You may test the consistency by passing the batter through the ladle before placing it over the oil.
If it is too thick it will not pass through the holes and if it is too thin, it will turn flat instead of having a round shape. Adjust the thick batter by adding little water at a time, and a thin batter by adding more besan.
Water quantity for batter: It’s hard to give you an accurate quantity of water since it may defer depending on the quality of the besan. Hence I’ve given a range of 1/2 cup and +/- 2 to 4 tablespoons of water.
Batter must drop on its own: Avoid using a spoon to spread the batter. Also, avoid tapping the ladle to force the batter through the holes. Both these actions will cause the boondi to have little tails. It doesn’t really affect the taste, but for the perfect round shape, refrain from doing either of these.
The temperature of the oil: Oil should not be too hot or too low. It should be medium hot throughout the entire process. The batter must float to the surface immediately when it hits the oil.
Fry in batches: Boondi batter cooks pretty quickly once it hits the oil, about 40-50 seconds. So it is best to fry in small batches, as it is easier to remove it quickly from the hot oil. Secondly, the more you crowd the wok, the more the boondi might clump together, and you won’t have separate boondi.
Wipe the boondi jhara before the next batch: To ensure that you continue getting round boondi after the first batch of frying, remember to clean the ladle. You can either wash and wipe it with a paper towel or simply dip it in a big bowl of water and wipe it clean before frying the next batch.
Size of the boondi: This will totally depend on the type of perforated ladle you use.
Hot sugar syrup: The syrup needs to be slightly hot/warm so that the boondi can absorb it properly. If you make the syrup first, heat it again just until it turns slightly hot.
Prefer a crispy sugar coating on the boondi? This recipe yields soft, sticky boondis with a light sugar coating. If you like the hard, crystallized sugar coating, simply cook the sugar syrup to a 1-string consistency.

Why is my boondi not round?
It is not possible that each and every boondi will be round in a batch. It is common to spot a few that won’t be perfect and that’s okay. But if the entire batch of boondi is not round, these could be the possible issues;
- Runny batter
- Oil temperature is not right. When the oil is warm the boondis turn out flat.
- You are holding the boondi jhara too high above the oil. It should only be about 3 to 4 inches above the oil.
- You did not clean and wipe the ladle after frying a batch of boondi.
Why does the boondi have tails?
This happens if the batter is too thick. Fix it by adding a few teaspoons of water before frying the next batch.
How can I fix a lumpy batter?
This could happen if you add all the water at once. Always add water slowly, and whisk well to get rid of any lumps. Once it looks smooth, you can add water as needed to achieve the right batter consistency. Also, be sure to sift the besan.
To troubleshoot a lumpy batter, simply pass the entire thing through a fine-mesh sieve.
I don’t have a boondi ladle, what else can I use?
You may use any perforated or slotted ladle with medium-sized holes. You may even use a grater.
Don’t I need to add baking soda to the batter?
You don’t really need baking soda in this recipe. Just be sure to whisk the batter really well in one direction for a couple of minutes.
I did try a batch with baking soda and I found that it absorbed almost twice the amount of oil while frying. So, I’d suggest skipping the leavening agent here, since it’s really not needed.
How many calories are in a serving of sweet boondi?
A half-cup serving contains approximately 338 calories, 49.4 grams of carbs, 4.7 grams of protein, 14.7 grams of fat, and 39.8 grams of sugar. For the complete nutritional information, please check the recipe card.
Is it healthy?
Boondi cannot be deemed as healthy, since;
- it is deep-fried
- it is loaded with sugars
Can I refrigerate the batter?
Yes, you can! Bring it to room temperature before frying. If the batter looks too thick, adjust the consistency with a couple of teaspoons of water.
You may also enjoy these Diwali treats
Rava laddoo
Coconut ladoo
Coconut burfi with condensed milk
Kaju katli (no-cook)
Badam pista barfi
Mawa barfi
Kesar peda
Karanji
Shankarpali
Poha chivda
Have you made this recipe?
I would love to hear from you! Please be sure to share your feedback and/or give this recipe a rating in the comment below. Your reviews help others know the recipe better too.
You can also FOLLOW me on Facebook , Pinterest, Instagram & Twitter

Sweet Boondi (Meethi Boondi)
Ingredients1x2x3x
Boondi batter
- 1 cup besan (gram flour or chickpead flour), 120 grams
- 1/2 cup + 2 to 4 tablespoons water
- 1/2 tablespoon oil or ghee
- A pinch of kesari (orange) or yellow food color
For the sugar syrup
- 1 cup granulated sugar, 225 grams
- 1/2 cup water, 125 ml
- Pinch of kesari (orange) or yellow food color
- 1/4 teaspoon cardamom powder
- 1 teaspoon lemon juice, optional
Other ingredients
- Oil or ghee as needed, for deep frying
- 2 tablespoons slivered pistachios optional
- 2 teaspoons edible dried rose petals, optional
Instructions
Boondi batter
- Sift besan in a big bowl.
- Add 1/2 cup water gradually, whisk well to make a smooth, free-flowing batter. Add another 2 to 4 tablespoons of water in increments as needed.
- I added another 2 tablespoons of water, so a total of 1/2 cup + 2 tablespoons of water.
- Add oil or ghee and a pinch of kesari food color. Whisk well for another minute.
- If you like to add more colors like red, green, etc, then divide the batter and add the color just before frying.
- The batter should be smooth, free-flowing, and thick enough to coat the back of a spoon as shown in the pictures.
- Cover and set the batter aside for 15 minutes.
Deep-fry
- After 15 minutes, whisk the batter for another minute.
- Heat sufficient oil in a heavy-bottomed kadai on medium-high heat.
- Add a drop of the batter to the oil to check if it has reached the right temperature.
- If it sinks to the bottom the oil is not hot enough. If it rises to the surface immediately without changing color, the oil is ready.
- Hold a slotted spoon (boondi jhara or grater) about 3 to 4 inches above the oil.
- Pour a ladleful of the batter over the slotted spoon.
- Drops of batter will fall into the hot oil and form a round shape. Once the boondi floats stir occasionally.
- Deep-fry for about 40 seconds or until crispy. They should not turn golden brown.
- Using another slotted spoon, drain the boondi and transfer them to a plate lined with a paper towel.
- Repeat the same process with the rest of the batter.
- Wash the slotted spoon under running water and wipe with a clean napkin/paper towel each time before proceeding with the next batch.
- Make sure the ladle is completely dry to avoid hot oil from splattering all over and causing any mishaps.
Prepare the sugar syrup
- Add sugar and water to a pan. Mix well and bring to boil on medium heat.
- Once it starts boiling, cook for another 2 to 3 minutes or just until the syrup is sticky to the touch (test a few drops on a spatula). We are not looking for any string consistency here.
- Switch off the heat and add cardamom powder and a pinch of orange food color. You may add about 1 teaspoon of lemon juice to avoid crystallization.
- Allow to cool down for 2-3 minutes.
Soak boondi in sugar syrup
- Add the fried boondi to the warm sugar syrup. Toss gently until the boondis are evenly coated with the syrup.
- Cover, and set aside so that the boondis absorb the sugar syrup.
- Stir occasionally after a couple of hours. Allow it to dry overnight.
- The boondis will have a light coating of sugar crystals, and they will turn soft and juicy.
- If you prefer sticky boondi, soak for about 3-4 hours in the syrup.
- Garnish with slivered pistachios. Enjoy!
