Mahalabia, also known as Muhallebi, Muhalabia, Mahalebi, Mohallabiah, or Muhallabiyeh is a traditional Middle Eastern pudding made with milk, rice flour, sugar, and flavored with rose or orange blossom water. Looking for different dessert ideas? Then you will definitely enjoy this easy pudding recipe! Let’s learn how to make mahalabia.

But before we move on with the recipe for mahalabia, I wanted to share with you guys the reason I made this dessert! I completed 4 years of blogging on the 17th of March.
So to celebrate that little milestone, I prepared this sweet treat! I didn’t have time for an elaborate dessert and yet wanted to share something quick, easy and delicious, and this mahalabia ticked off all the boxes!
Sometimes, I’m unsure if I should continue to blog and yet here I am celebrating 4 years of this blogging journey. There are ups and downs, and a thousand moments of self-doubt, but no matter what, I don’t think I can ever stop blogging after coming this far. Unless some life-changing event occurs, that is!
Thanks to my blogging journey, I’ve learned and made things that I don’t think I would have otherwise, like macarons , for instance. I will never forget the day I baked a batch of macarons successfully in my first attempt.
Or perhaps, I would have never tried making a fusion cake, such as the popular Rasmalai cake , and the many others that I made for my kid’s birthdays! And don’t even get me started on my numerous futile attempts at making soft and fluffy idlis ! I would have given up had it not been for this blog!

Let’s talk about Muhallebi or Mahalabia, Muhalabia, Mahalebi, whatever you want to call it! What’s in a name after all, right?
This fancy-sounding dessert is so easy, that you ought to head to your kitchen and make some right away! It is actually quite popular during Ramadan, but I think it is a great dessert to be enjoyed all year round!

- Ingredients needed
- How to serve mahalabia?
- You should try this recipe because
- You may also enjoy these easy eggless desserts
- How to make mahalabia (muhallebi) pudding – Step by step instructions
- Mahalabia Recipe | Muhallebi {Middle Eastern Milk Pudding}
Ingredients needed
Muhallebi or mahalabia is pretty much like a middle eastern version of the American vanilla pudding sans the eggs. The ingredients are similar for this mahalabia dessert recipe, let’s have a detailed look.
Milk
Since this is a milk-based pudding, this is an important ingredient. You can also use a mix of dairy and evaporated, half and half or heavy cream for a richer taste. But you don’t have to stick to dairy milk, you can use plant-based milk for a vegan muhallebi.
Thickener
Rice flour is traditionally used a thickener in this recipe. Rice flour has the same property as cornstarch of thickening the pudding. I use rice flour quite often to make quick dosa’s (crepes), so more often than not, I always have some in my pantry. It is not an ingredient I need to go out and get to make this pudding. But, I understand not many of you may have this ingredient, so I’ve chosen to use cornstarch in this recipe. If you have rice flour, use that instead.
Sugar
Sugar is added to sweeten the muhallebi. You can add some sweetened condensed milk instead and skip the sugar.
Flavorings
Rose water or orange blossom water, along with cardamom are traditionally used to flavor up the mahalabia. Basically, instead of vanilla, you would use these to make this delicious Middle Eastern dessert. I absolutely adore rose based dessert, I love its flavor!
Rose flavoring is a pretty common in Indian desserts as well, which is why I always have some rose extract, rose water, and rose syrup in my pantry. Rose and pistachio are one of the most exotic combinations you will try, trust me! Check out this rose and pistachio icebox cake , that turned out really well!
Speaking of rose syrup, you must check of this rose falooda recipe made with milk, rose syrup, and basil seeds. Such a cooling and refreshing beverage to beat the Summer heat!
You will find rose syrup easily in any Indian or Lebanese grocery store. If you don’t want to buy an extra ingredient that you are unsure of using in the future, use orange zest or vanilla extract or pure vanilla bean paste to flavor the pudding.
Garnishes
Traditional muhallebi is garnished with coarsely crushed nuts. I like to add some dried rose petals for a visual appeal, though they do nothing in terms of flavor. And, I like to add a thin layer of diluted rose syrup over the pudding after it has set. Rose syrup is really sweet, so diluting it down helps. Doesn’t the contrasting white and pinkish-red color look gorgeous?
How to serve mahalabia?
There are many ways you could serve it. For instance,
1.Pour the mahalabia milk pudding in glasses or bowl, and refrigerate it. After it has set, drizzle rose syrup (diluted with some water), and sprinkle pistachio powder or slivered/chopped pistachios or almonds.
2.Add ground pistachios at the bottom of the serving glass (like I did) and pour the mahalabia mixture. Drizzle diluted rose syrup and garnish with nuts.
3.Garnish with fresh fruits like strawberries, blueberries apple, mango, etc.
4.For another variation try, chocolate mahalabia: Add some melted chocolate in place of rose syrup after the pudding has set.

You should try this recipe because
- It is eggless, perfect if you don’t consume eggs
- Does not require gelatin or agar-agar
- Quick and Easy
- So delicious!
I want to take a minute here and thank all you wonderful readers for sticking around, visiting the site, trying out my recipes, and sharing your lovely feedback with me! I truly appreciate all the support!
Don’t wait for an occasion to make this easy eggless mahalabia dessert, I hope you try it soon!
You may also enjoy these easy eggless desserts
- Fruit Custard With Jelly
- Serradura (Portuguese sawdust pudding)
- Mango cream
- Mango Parfait
- Strawberry Fool
- Banana Pudding Parfait
How to make mahalabia (muhallebi) pudding – Step by step instructions
1.Remove the seeds from the cardamom pods, transfer to a mortar and pestle. Pound them to a fine powder and set aside.

2.Add milk in a heavy-bottomed pan, add cream, followed with cornstarch, and sugar. Using a wire whisk, whisk the mixture very well. Make sure the cornstarch is not settled at the bottom of the pot {You may mix the cornstarch with about 1/2 cup of milk and then add the cornstarch slurry to the milk mixture too, but it doesn’t make much of a difference if you use a wire whisk to mix up everything}. Then, switch on the flame to medium heat.

3.Cook the mahalabia pudding mix on medium heat, while continuously whisking the milk mixture until it begins to thicken, like a custard. This will take around 8-10 minutes. Do not stop whisking , or else the cornstarch will settle at the bottom and burn, or the mixture may turn clumpy. Continuous whisking until thickened is the only important step you need to follow while making this pudding.
As you continue whisking, you will see the mixture thickening up. Reduce the heat to low, and continue whisking. When it coats the back of a spoon, it is done.

4.Remove the pot off the heat, add the flavorings like rose or orange blossom water and freshly crushed ground cardamom (if using). Set aside to cool down for about 5 minutes.

5.Pour the mahalabia mixture into desired serving glasses or bowls, or one big bowl. I added some ground pistachios at the bottom of each glass, which is totally optional. Cover the glasses with a cling wrap or aluminum foil, chill in the refrigerator for 5-6 hours or overnight for best results. Garnish this delicious Middle Eastern milk pudding with rose syrup and chopped pistachios.

Notes
- You may skip the heavy cream and add milk instead. I recommend adding the cream, because the dessert sets beautifully, almost like a pannacotta, and the taste is nice and creamy. If you set it in small round bowls or molds, you can easily invert it and serve it like a jelly sort of dessert!
- Mahalabia with condensed milk: Replace the cream with condensed milk and omit the sugar.
- If you can’t find rose syrup or orange blossom water, you may flavor mahalabia with 2 tsp orange zest or vanilla extract. You can also play around with other warm spices like cinnamon or nutmeg.

You can also follow me on Facebook , Pinterest, Instagram & Twitter

Mahalabia Recipe | Muhallebi {Middle Eastern Milk Pudding}
Ingredients1x2x3x
- 3 cups whole milk
- 1 cup heavy cream
- 6 tbsp cornstarch/cornflour or rice flour
- 1/2 cup granulated sugar, adjust as per desired sweetness
- 1 tsp rose water/orange blossom water, or 1/4 tsp rose extract
- 3 green cardamom pods
For garnishing
- 2 tbsp coarsely chopped pistachios
- 3 tbsp rose syrup, diluted with 2 tbsp water
- dried rose petals, optional
Instructions
- Remove the seeds from the cardamom pods, transfer to a mortar and pestle. Pound them to a fine powder and set aside.
- Add milk in a heavy-bottomed pan, add cream, followed with cornstarch, and sugar. Using a wire whisk, whisk the mixture very well. Make sure the cornstarch is not settled at the bottom of the pot {You may mix the cornstarch with about 1/2 cup of milk and then add the cornstarch slurry to the milk mixture too, but it doesn’t make much of a difference if you use a wire whisk to mix up everything}. Then, switch on the flame to medium heat.
- Cook the mahalabia pudding mix on medium heat, while continuously whisking the milk mixture until it begins to thicken, like a custard. This will take around 8-10 minutes. Do not stop whisking, or else the cornstarch will settle at the bottom and burn, or the mixture may turn clumpy. Continuous whisking until thickened is the only important step you need to follow while making this pudding.
- As you continue whisking, you will see the mixture thickening up. Reduce the heat to low, and continue whisking. When it coats the back of a spoon, it is done.
- Remove the pot off the heat, add the flavorings like rose or orange blossom water and freshly crushed ground cardamom (if using). Set aside to cool down for about 5 minutes.
- Pour the mahalabia mixture into desired serving glasses or bowls, or one big bowl. I added some ground pistachios at the bottom of each glass, which is totally optional. Cover the glasses with a cling wrap or aluminum foil, chill in the refrigerator for 5-6 hours or overnight for best results. Garnish this delicious Middle Eastern milk pudding with rose syrup and chopped pistachios.
Notes


Mahalabia Recipe | Muhallebi {Middle Eastern Milk Pudding}
Ingredients
- 3 cups whole milk
- 1 cup heavy cream
- 6 tbsp cornstarch/cornflour or rice flour
- 1/2 cup granulated sugar, adjust as per desired sweetness
- 1 tsp rose water/orange blossom water, or 1/4 tsp rose extract
- 3 green cardamom pods
For garnishing
- 2 tbsp coarsely chopped pistachios
- 3 tbsp rose syrup, diluted with 2 tbsp water
- dried rose petals, optional
Instructions
- Remove the seeds from the cardamom pods, transfer to a mortar and pestle. Pound them to a fine powder and set aside.
- Add milk in a heavy-bottomed pan, add cream, followed with cornstarch, and sugar. Using a wire whisk, whisk the mixture very well. Make sure the cornstarch is not settled at the bottom of the pot {You may mix the cornstarch with about 1/2 cup of milk and then add the cornstarch slurry to the milk mixture too, but it doesn’t make much of a difference if you use a wire whisk to mix up everything}. Then, switch on the flame to medium heat.
- Cook the mahalabia pudding mix on medium heat, while continuously whisking the milk mixture until it begins to thicken, like a custard. This will take around 8-10 minutes. Do not stop whisking, or else the cornstarch will settle at the bottom and burn, or the mixture may turn clumpy. Continuous whisking until thickened is the only important step you need to follow while making this pudding.
- As you continue whisking, you will see the mixture thickening up. Reduce the heat to low, and continue whisking. When it coats the back of a spoon, it is done.
- Remove the pot off the heat, add the flavorings like rose or orange blossom water and freshly crushed ground cardamom (if using). Set aside to cool down for about 5 minutes.
- Pour the mahalabia mixture into desired serving glasses or bowls, or one big bowl. I added some ground pistachios at the bottom of each glass, which is totally optional. Cover the glasses with a cling wrap or aluminum foil, chill in the refrigerator for 5-6 hours or overnight for best results. Garnish this delicious Middle Eastern milk pudding with rose syrup and chopped pistachios.
Notes
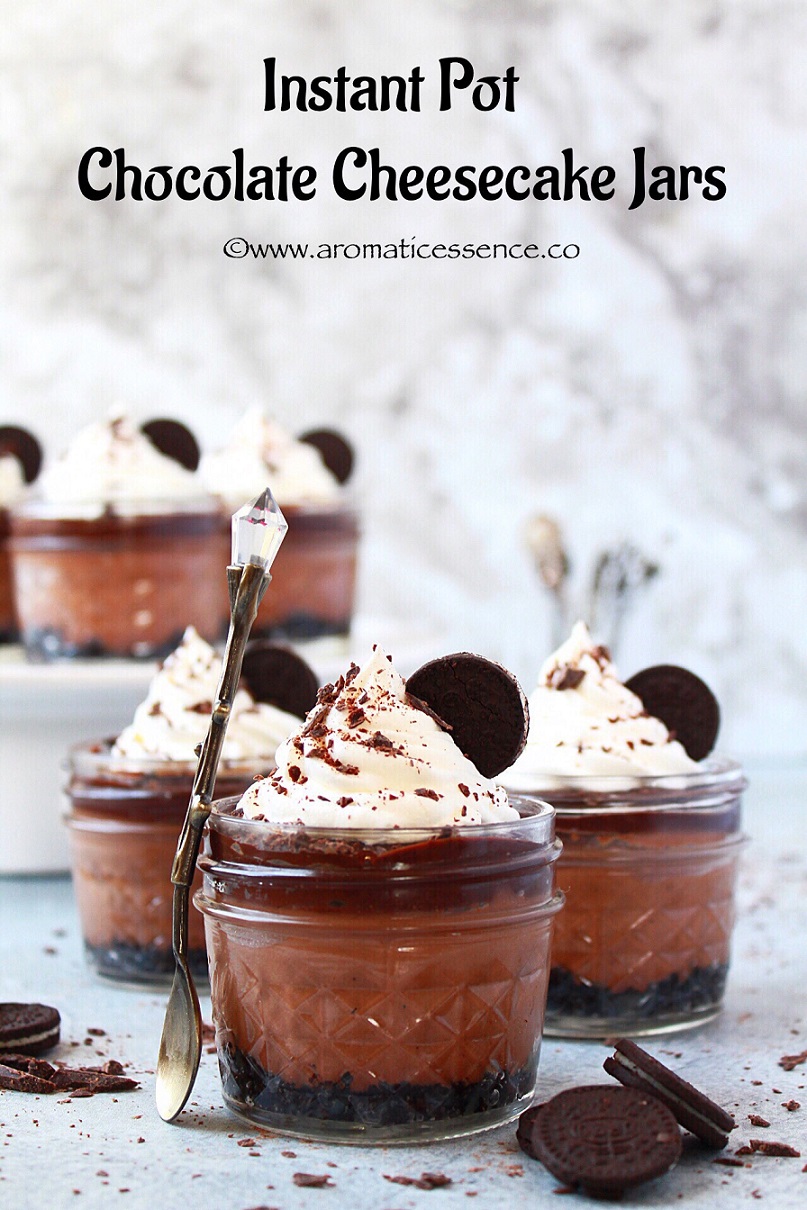
This Instant Pot chocolate cheesecake is decadent, dense and creamy, made with an easy homemade oreo crust, a delicious chocolate cheesecake filling, and a luxurious chocolate ganache to top it off! Served along with a dollop of cream, this chocolate cheesecake is one drool-worthy Instant Pot dessert!
This chocolate cheesecake was a result of my last minute, 10 pm baking decision, as is the case with most of my bakes. I had a pack of cream cheese sitting in the refrigerator. And also a couple of chocolate baking bars, so it only seemed right to take the plunge even though it was late and make a small batch chocolate cheesecake.
I’m obsessed with this Instant Pot cheesecake in jars that I shared last month! So I adapted that recipe by adding one of the most delicious things in the world- chocolate!
And with the addition of chocolate, we have here this irresistible Instant Pot chocolate cheesecake! I think these cheesecake jars are like the cutest edible gift ever!

After receiving some great feedback on my New York style cheesecake jars in the pressure cooker, I couldn’t help but experiment with the chocolate version.
Anyway, who doesn’t like chocolate, right? Like seriously! I’m yet to meet someone who can’t stand chocolate.
But if you love chocolate and cheesecake like me, then you are in for a treat with this Instant pot chocolate cheesecake! And trust me guys, this is the best remedy to satisfy your cheesecake cravings, and I’m talking the real deal ‘baked’ cheesecake!
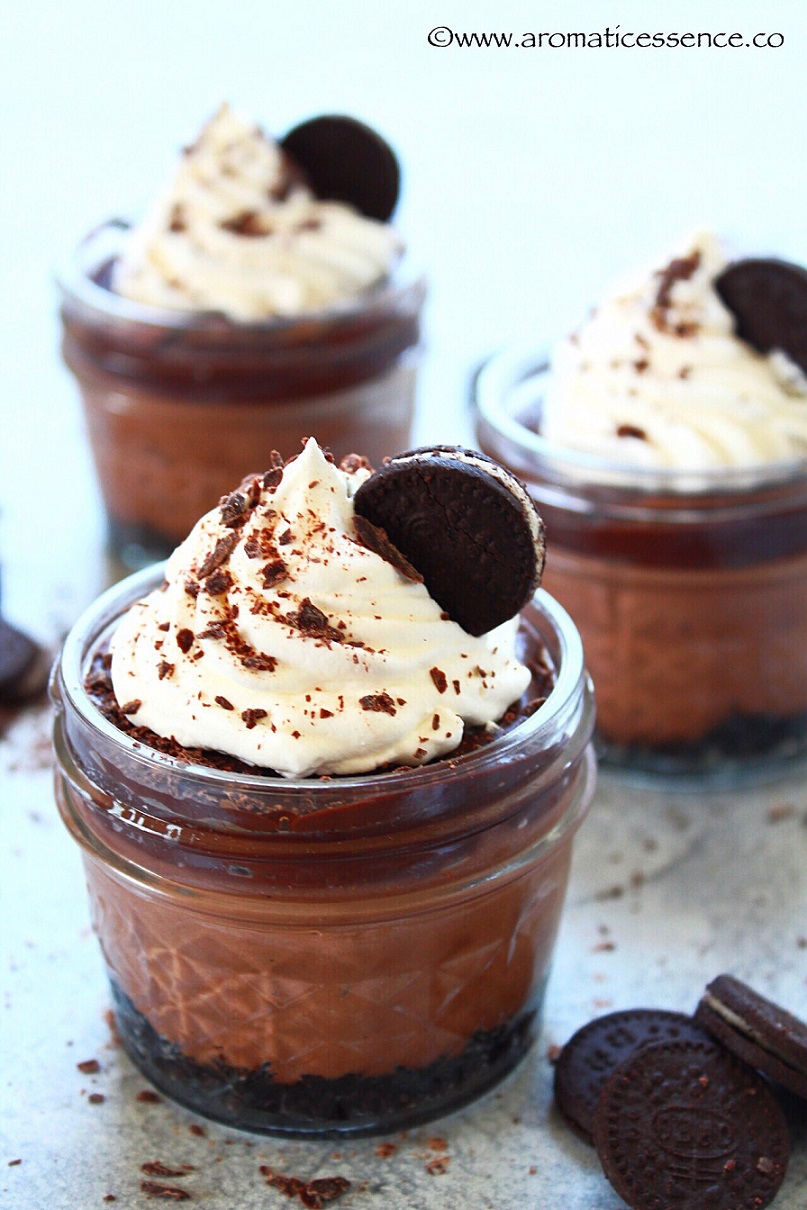
Also, look at these cute jars! Aren’t they adorable? I bet they are calling out to you, begging to be picked up and devoured! And you won’t even feel sorry that you enjoyed this decadent chocolate cheesecake , because it’s the perfect portion-controlled dessert. So it’s a win-win situation!
I have a huge sweet tooth, so curbing my cravings for sweets is something that I really have to put an effort into. But sometimes, I like to indulge. And this Instant Pot chocolate cheesecake does a good job at not making you feel guilty, knowing that you won’t overindulge eating more! You can have your ‘cheesecake’ and eat it too!

- THIS INSTANT POT CHOCOLATE CHEESECAKE COMES TOGETHER IN 4 EASY STEPS
- THINGS TO REMEMBER BEFORE MAKING THIS INSTANT POT CHOCOLATE CHEESECAKE
- MORE VARIATIONS TO TRY WITH THE SIMPLE CHOCOLATE CHEESECAKE
- STEP BY STEP INSTRUCTIONS TO MAKE INSTANT POT CHOCOLATE CHEESECAKE IN MASON JARS
- HOW TO MAKE PRESSURE COOKER CHOCOLATE CHEESECAKE IN JARS?
- Instant Pot Chocolate Cheesecake {In Jars}
THIS INSTANT POT CHOCOLATE CHEESECAKE COMES TOGETHER IN 4 EASY STEPS
- Making the chocolate cheesecake base which is an easy homemade Oreo crust .
- Smooth and luxurious chocolate cheesecake filling made with just 6 ingredients , i.e full-fat cream cheese, sugar, eggs, semi-sweet baking chocolate, sour cream, and vanilla extract. You may also use bitter-sweet chocolate if you prefer.
- Easy chocolate ganache to top the cheesecake
- Some piped whipped cream and chocolate shavings along with a dusting of cocoa powder, to make it look fancy, which of course is totally optional. But the cream also complements and cuts down that rich chocolate taste, so highly recommended!
THINGS TO REMEMBER BEFORE MAKING THIS INSTANT POT CHOCOLATE CHEESECAKE
Room temperature ingredients
Make sure all the ingredients are at room temperature. This ensures that you have a smooth and lump-free cheesecake filling without mixing it too much. Overmixing is the last thing one needs for a cheesecake batter. The ideal room temperature of cream cheese should be between 68 to 75 degrees F. You don’t need to check with a thermometer, usually about an hour on the countertop should suffice.
Melting the chocolate
The most preferred way of melting chocolate is using the double boiler, but for a small quantity like this, I find it inconvenient to use 2 things when I can just do it in the microwave. The resultant cheesecake was smooth without the grainy texture. Be careful while melting chocolate, use dry bowls and spoons or else the chocolate will ‘seize’ even if a tiny drop of water gets in.
While melting chocolate in the microwave, do it in intervals until about 90% of the chocolate has melted. The chocolate continues to melt once it is taken out of the microwave. You may risk burning the chocolate if you let it melt completely in the microwave.
Natural pressure release, gradual cooling before refrigerating the cheesecake
Let the cheesecake cool down gradually before refrigerating, the same way you would do for an oven-baked cheesecake. Refrigerating a hot cheesecake will cause it to sweat and it will turn soggy with the condensation.
MORE VARIATIONS TO TRY WITH THE SIMPLE CHOCOLATE CHEESECAKE
Though I highly suggest first trying this recipe as is first, feel free to experiment with these variations,
- White chocolate cheesecake : Swap the semi-sweet chocolate with white chocolate. You can swirl in some raspberry jam on top before baking.
- Espresso cheesecake : A little bit of coffee always elevates the flavor of chocolate. You can add about 1/2 tsp of instant espresso powder to the chocolate cheesecake batter.
- Chocolate mint cheesecake : You can use Oreos with mint filling for the base, and add 1/4 tsp of peppermint extract along with the vanilla extract.
STEP BY STEP INSTRUCTIONS TO MAKE INSTANT POT CHOCOLATE CHEESECAKE IN MASON JARS
1.Grind the oreo cookies in a food processor or blender or crush them in a ziplock bag with a rolling pin. In a bowl, combine the cookie crumbs with melted butter. Mix well.

2.Divide the crumb mixture between 6 (4-oz) Mason jars, press it with the back of a spoon.

3.If using the baking chocolate bar chop it roughly or add in chocolate chips, place in a bowl, microwave for 20-second intervals, stirring after each interval until the chocolate has melted. Stop when most of the chocolate has melted and few pieces remain, they will melt on stirring. Stir well until all the chocolate has melted and is smooth and glossy. You may even melt the chocolate in a bowl using the double boiler method. Make sure the bowl is not touching the water or else the chocolate will seize. Set the melted chocolate aside to cool slightly.

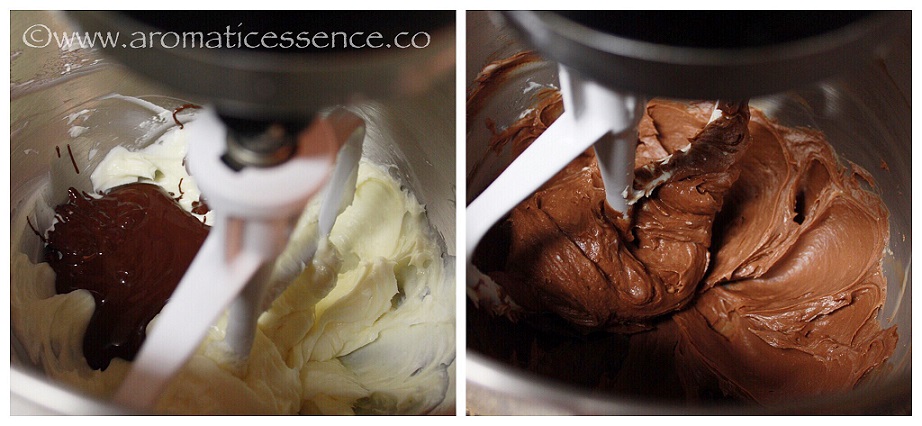
4.Next, in the mixing bowl of your stand mixer beat the cream cheese and sugar on low speed until smooth. You may use a hand blender or just a whisk too.

5.Add the melted chocolate, continue beating medium-low speed.
6.Add the egg and beat on medium-low speed until well incorporated.

7.Add the sour cream and the vanilla extract and beat well to mix.


8.Pour about 3 tbsp of the cheesecake filling in the prepared oreo crust in each jar. Give it a gentle tap on your palms to eliminate any bubbles. Cover the jars with aluminum foil.

9.Add 1.5 cups of water into the inner steel pot of the Instant Pot. Place a trivet and place the jars on the trivet. (Refer notes).

10.Close the lid of the Instant Pot, and set the valve to ‘SEALING’. Pressure cook on ‘HIGH’ for 6 minutes. It will take some time for the pressure to build up after which the timer will start.

11.Let the pot depressurize naturally (about 15 minutes), once the silver pin drops, turn the knob to ‘VENTING’ and open the lid. Transfer the jars to a wire rack with the help of tongs or gloves. Place the second batch and follow the same cooking instructions. Make sure there is at least a cup of water in the inner pot. Let the cheesecake cool completely before pouring the chocolate ganache.

12.For the chocolate ganache: Chop baking chocolate bar roughly, place in a bowl, add the heavy cream, microwave for 20-second intervals, stirring after each interval until the chocolate has melted. Stop when most of the chocolate has melted and few pieces remain, they will melt on stirring. Overheating will turn the chocolate into a thick, lumpy, grainy mass and looks dull. Divide the ganache between 6 jars, cover an refrigerate until ready to serve.


13.Let the chocolate cheesecake jars stand at room temperature for 10 minutes before serving. Serve these chocolate cheesecake jars with some whipped cream, and chocolate shavings. Scoop up some and enjoy!

NOTES:
- Update: Editing this recipe to mention that you can stack the jars offset over the trivet. So you can cook all the 6 jars in one go. You can also skip the aluminum foil, and use the two-part top lids of the Mason jars. Cover the jar with the lid that has the rubber ring, then close the jar using the outer band, but do not tighten the lid all the way, just enough to cover the jar in order to prevent any condensation from dripping in it.
HOW TO MAKE PRESSURE COOKER CHOCOLATE CHEESECAKE IN JARS?

Instant Pot Chocolate Cheesecake {In Jars}
Ingredients1x2x3x
Oreo cookie crust
- 6 Oreo cookies
- 3/4 tbsp unsalted butter
Chocolate cheesecake filling
- 8 oz full-fat cream cheese
- 1/4 cup granulated sugar
- 1 large egg
- 1/2 tsp vanilla extract
- 1/4 cup sour cream
- 3 oz semi-sweet chocolate baking bar or chocolate chips you may use bitter-sweet chocolate if you like
Chocolate ganache
- 4 oz semi-sweet chocolate baking bar/chocolate chips
- 1/4 cup heavy cream
Instructions
- Grind the oreo cookies in a food processor or blender or crush them in a ziplock bag with a rolling pin. In a bowl, combine the cookie crumbs with melted butter. Mix well.
- Divide the crumb mixture between 6 (4-oz) Mason jars, press it with the back of a spoon.
- If using the baking chocolate bar chop it roughly or add in chocolate chips, place in a bowl, microwave for 20-second intervals, stirring after each interval until the chocolate has melted. Stop when most of the chocolate has melted and few pieces remain, they will melt on stirring. Stir well until all the chocolate has melted and is smooth and glossy. You may even melt the chocolate in a bowl using the double boiler method. Make sure the bowl is not touching the water or else the chocolate will seize. Set the melted chocolate aside to cool slightly.
- Next, in the mixing bowl of your stand mixer beat the cream cheese and sugar on low speed until smooth. You may use a hand blender or just a whisk too.
- Add the melted chocolate, continue beating low medium-low speed.
- Add the egg and beat on medium-low speed until well incorporated.
- Add the sour cream and the vanilla extract and beat well to mix.
- Pour about 3 tbsp of the cheesecake filling in the prepared oreo crust in each jar. Give it a gentle tap on your palms to eliminate any bubbles. Cover the jars with the lid that has the rubber ring, then close the jar using the outer band, but do not tighten the lid all the way, just enough to cover the jar in order to prevent any condensation from dripping in it.
- Add 1.5 cups of water into the inner steel pot of the Instant Pot. Place a trivet and stack the jars offset over the trivet.
- Close the lid of the Instant Pot, and set the valve to ‘SEALING’. Pressure cook on ‘HIGH’ for 6 minutes. It will take some time for the pressure to build up after which the timer will start.
- Let the pot depressurize naturally (about 15 minutes), once the silver pin drops, turn the knob to ‘VENTING’ and open the lid. Transfer the jars to a wire rack with the help of tongs or gloves. Let the cheesecake cool completely before pouring the chocolate ganache.
- For the chocolate ganache: Chop baking chocolate bar roughly, place in a bowl, add the heavy cream, microwave for 20-second intervals, stirring after each interval until the chocolate has melted. Stop when most of the chocolate has melted and few pieces remain, they will melt on stirring. Overheating will turn the chocolate into a thick, lumpy, grainy mass and looks dull. Divide the ganache between 6 jars, cover an refrigerate until ready to serve.
- Let the chocolate cheesecake jars stand at room temperature for 10 minutes before serving. Serve these chocolate cheesecake jars with some whipped cream, and chocolate shavings. Scoop up some and enjoy!
Notes

You can also follow me on :
Regards,
Freda
