Welcome spring with this amazing Lemon Ricotta Cake! A simple, elegant, and delicious cake that is moist, lemony, and light, yet rich and decadent. Serve a slice of this cake with a dollop of whipped cream and fresh berries/berry compote, a truly delicious treat!

I’d like to dedicate this recipe to all you lovely readers, especially those who keep coming back and hanging around my little space often. I can’t thank you enough! I hope you will continue to visit the site, try more recipes and share your feedback with me <3
- An Italian-inspired cake apt for any occasion
- Some pointers for this lemon ricotta cake
- What does this cake taste like?
- You will love this cake because
- You may also enjoy these simple cake recipe
- How to make lemon ricotta cake – Step by step instructions
- Lemon Ricotta Cake Recipe
An Italian-inspired cake apt for any occasion
This cake is an adaption of my lemon blueberry cake with the inclusion of ricotta cheese. Ricotta is indeed the star ingredient in this cake and pairs exceptionally well with lemon. The two make a heavenly combination!
So this cake is absolutely tasty, it has a subtle lemon flavor, with the right amount of sweetness, it is a dense cake, but moist and decadent, and yet so light! Perfect summer treat!
I’ve yet to taste an authentic Italian ricotta cake. It is not something that you can stumble upon in a regular bakery outside Italy. Even in the country, I’m sure there are lots of regional variations. The authentic version is made with semolina or almond flour, and I’ve not incorporated either of those in this recipe.
I’m sharing my version of this lovely Italian lemon ricotta cake that always turns out beautifully. I thought it needed to be shared with you guys so that you could try and enjoy it as much as we do.
And what better occasion than this! Since it’s been 5 years of my blogging journey, it is only fair to share a sweet treat 🙂
I love chocolate-based desserts, it is right there on top of my list of favorites. But I lean towards lemon-based desserts during this season. A simple lemon loaf, lemon bars, lemon tart, lemon crinkle cookies are a few of my favorites citrus desserts!
What’s not to love after all! The bright, tart-sweet flavor of this citrus fruit adds a zing to anything and everything it is used in, be it sweet or savory!
I’ve shared a few recipes like these delicious eggless orange cupcakes and this lemon blueberry bread earlier, do check those out too!

Some pointers for this lemon ricotta cake
- Cake pan: I used a regular 8-inch round cake pan. Remember to grease the bottom and sides very well. I also like to line the bottom of the pan with parchment paper so that nothing sticks to the bottom of the pan. You may also use an 8-inch springform pan or a pan with a removable bottom to release the cake easily.
- Room temperature ingredients: It is ideal and the best practice to use room temperature ingredients when it comes to baking. Using room temperature ingredients ensures that the ingredients mix well without overworking the batter. Overmixing the batter always results in a tough cake. Remember to keep your ingredients out at least 30 minutes to an hour before you plan to bake the cake.
- Avoid overmixing: Do not overmix the batter once you add the dry ingredients to the creamed mixture. I always mention this because we do have a tendency to overmix until we see no more lumps. A few tiny lumps are fine in the batter. Mix until you see no more flour pockets and you should be good to go. This will ensure the cake has a nice and light crumb.
- Sweetness: This cake is not very sweet, the quantity of sugar in this recipe balances out the tartness of the lemon. You can reduce it to 3/4 cup if you prefer a less sweet cake.
- Fresh lemon juice: Please try and use fresh lemons. Besides the juice, you will also need the zest for that lemony flavor. And remember to zest the lemon first, before squeezing out the juice. I’ve used 2 tablespoons of lemon zest in this recipe, you could also add more for more lemon flavor or in addition to the lemon juice and zest, you can also add 1 teaspoon of lemon extract.
- Ricotta cheese: I used store-bought, whole milk ricotta cheese in a tub (BelGioioso con latte brand) and I did not drain it. If you use wetter ricotta, you may need to drain it. You can also use part-skim ricotta cheese, though I highly suggest sticking to whole milk ricotta for best results.
- Frosting: We really enjoy a slice of this cake served with lightly sweetened whipped cream and a berry compote. You can make this cake fancy by dividing it in two-layers and icing it with a simple buttercream or a lemon buttercream frosting for a heightened lemon flavor. Or simply drizzle the cake with lemon glaze.
- Loaf cake: You can transfer the batter to a 9×5-inch loaf pan for a lemon ricotta loaf cake, keep an eye on the baking time, it should take about 55-60 minutes. If you find the top browning too quickly, cover the loaf pan loosely with an aluminum foil after 45 minutes and continue baking until done.
- Cupcakes: You can make cupcakes with this batter instead of baking an entire cake. Bake for 18-20 minutes or until a toothpick inserted in the center of the cupcake comes out clean.
- Make-ahead: You can make this cake a day in advance and store it in an airtight container at room temperature for up to 2 days max. I do not recommend keeping it out for longer than that. If you still have leftovers after 2 days, refrigerate the cake in an airtight container. Bring it to room temperature before serving.
- Freezing ricotta cake: Once the cake has cooled down completely, wrap it with a cling film, and aluminum foil. Transfer to an airtight container, label, and freeze up to 2 months. Let it thaw overnight in the refrigerator. Bring to room temperature before serving.

What does this cake taste like?
The texture and flavor of this lemon ricotta cake is reminiscent of the popular Indian mawa cake , found in Iranian bakeries. Mawa Cake is a cardamom flavored, dense and moist cake infused with milk solids. Except here we have that lemony flavor from the lemon zest and juice in the recipe.
The lemon adds a refreshing element and the creamy ricotta cheese lends moisture to this cake. This cake is simply amazing and absolutely perfect to welcome spring or great to be served at Easter brunch or end a fabulous meal on a lovely note with this light dessert.
You will love this cake because
- It is simple and luscious, with the perfect balance of sweet-tart, that is great for any occasion.
- It is a lovely citrus dessert, that can be enjoyed plain with a cup of tea or coffee or can be enjoyed as a dessert topped with some whipped cream or mascarpone or creme fraiche and berries.

You may also enjoy these simple cake recipe
- Eggless date and walnut loaf cake
- Eggless mango loaf cake
- Marble loaf cake
- Eggless rava (semolina) cake
How to make lemon ricotta cake – Step by step instructions
Step 1: Preheat the oven and prepare the pan
Preheat the oven to 350° F/180° C, position a rack in the middle of the oven. Prepare an 8-inch round cake pan, by greasing it with oil spray or butter and lining the bottom of the pan with parchment paper. Trace the shape of the pan by placing it over the parchment paper, then trim and place the reverse side of the paper on to the bottom of the pan.

Step 2: Whisk dry ingredients
In a medium mixing bowl, sift 1.5 cups flour, 1.5 teaspoon baking powder, and 1/4 teaspoon baking soda. Add 1/2 teaspoon salt, whisk the dry ingredients until well combined. Set aside.

Step 3: Cream butter and sugar
In the bowl of your stand mixer fitted with the paddle attachment, beat 1/2 cup unsalted butter and 1 cup sugar on medium-high speed until light and creamy, scraping down in between, about 2-3 minutes. Or you can use an electric hand mixer/beater.

Step 4: Add ricotta cheese
Add 1 cup of whole milk ricotta cheese, continue beating on medium speed until fluffy.

Step 5: Add eggs
Add in the eggs one at a time, continue beating on medium-high speed. Scrape the sides of the bowl in between. The batter will look curdled at this point, and that is okay.

Step 6: Almond extract, lemon zest, and juice
Add 1/4 to 1/2 teaspoon almond extract (or 1.5 teaspoons of vanilla extract), 2 tablespoons of lemon zest, and 3 tablespoons of lemon juice. Beat on medium speed for another 30 seconds.

Step 7: Add dry ingredients
Add the dry ingredients and mix on the lowest possible speed until there are no more flour pockets. (DO NOT OVERMIX).

Step 8: Bake
Transfer the batter to the prepared pan. Gently tap it on the counter 2-3 times to remove the air bubbles. Sprinkle about 1 to 2 tablespoons of slivered almonds all over the top (optional). Bake on the middle rack for 35-40 minutes or until the toothpick inserted in the center of the cake comes out clean.

Step 9: Cool the cake on a wire rack
Transfer the cake to a cooling rack. Let it cool down in the pan for 15 minutes, then remove from the pan and cool on the rack completely. Invert the cake gently and peel off the parchment paper. Flip it back, slice the cake, and serve! I used some leftover berry compote that I had remaining from my granola yogurt parfait .


You can also follow me on Facebook , Pinterest, Instagram & Twitter

Lemon Ricotta Cake Recipe
Ingredients1x2x3x
- 1.5 cups of all-purpose flour, spooned and leveled 214 grams
- 1.5 teaspoons of baking powder
- 1/4 teaspoon baking soda
- 1/2 teaspoon salt
- 1/2 cup unsalted butter, 113 grams
- 1 cup granulated sugar, 210 grams
- 1 cup whole milk ricotta cheese, 245 grams
- 2 large eggs, approx 114 grams
- 1/4 to 1/2 teaspoon almond extract
- 3 tablespoons freshly squeezed lemon juice, 45 grams
- 2 tablespoons lemon zest
- 2 tablespoons of slivered almonds
Instructions
- Preheat the oven to 350° F/180° C, position a rack in the middle of the oven. Prepare an 8-inch round cake pan, by greasing it with oil spray or butter and lining the bottom of the pan with parchment paper.
- In a medium mixing bowl, sift flour, baking powder, and baking soda. Add salt, whisk the dry ingredients until well combined. Set aside.
- In the bowl of your stand mixer fitted with the paddle attachment, beat unsalted butter and sugar on medium-high speed until light and creamy, scraping down in between, about 2-3 minutes. Or you can use an electric hand mixer/beater.
- Add ricotta cheese, continue beating on medium speed until fluffy.
- Add in the eggs one at a time, continue beating on medium-high speed. Scrape the sides of the bowl in between. The batter will look curdled at this point, and that is okay.
- Add almond extract, lemon zest, and lemon juice. Beat on medium speed for another 30 seconds.
- Add the dry ingredients and mix on the lowest possible speed until there are no more flour pockets. (DO NOT OVERMIX).
- Transfer the batter to the prepared pan. Gently tap it on the counter 2-3 times to remove the air bubbles. Sprinkle some slivered almonds all over the top (optional). Bake on the middle rack for 35-40 minutes or until the toothpick inserted in the center of the cake comes out clean.
- Transfer the cake to a cooling rack. Let it cool down in the pan for 15 10 minutes, then remove from the pan and cool on the rack completely.
- Invert the cake gently and peel off the parchment paper. Flip it back, slice the cake, and serve!
Notes
Nutrition


Lemon Ricotta Cake Recipe
Ingredients
- 1.5 cups of all-purpose flour, spooned and leveled 214 grams
- 1.5 teaspoons of baking powder
- 1/4 teaspoon baking soda
- 1/2 teaspoon salt
- 1/2 cup unsalted butter, 113 grams
- 1 cup granulated sugar, 210 grams
- 1 cup whole milk ricotta cheese, 245 grams
- 2 large eggs, approx 114 grams
- 1/4 to 1/2 teaspoon almond extract
- 3 tablespoons freshly squeezed lemon juice, 45 grams
- 2 tablespoons lemon zest
- 2 tablespoons of slivered almonds
Instructions
- Preheat the oven to 350° F/180° C, position a rack in the middle of the oven. Prepare an 8-inch round cake pan, by greasing it with oil spray or butter and lining the bottom of the pan with parchment paper.
- In a medium mixing bowl, sift flour, baking powder, and baking soda. Add salt, whisk the dry ingredients until well combined. Set aside.
- In the bowl of your stand mixer fitted with the paddle attachment, beat unsalted butter and sugar on medium-high speed until light and creamy, scraping down in between, about 2-3 minutes. Or you can use an electric hand mixer/beater.
- Add ricotta cheese, continue beating on medium speed until fluffy.
- Add in the eggs one at a time, continue beating on medium-high speed. Scrape the sides of the bowl in between. The batter will look curdled at this point, and that is okay.
- Add almond extract, lemon zest, and lemon juice. Beat on medium speed for another 30 seconds.
- Add the dry ingredients and mix on the lowest possible speed until there are no more flour pockets. (DO NOT OVERMIX).
- Transfer the batter to the prepared pan. Gently tap it on the counter 2-3 times to remove the air bubbles. Sprinkle some slivered almonds all over the top (optional). Bake on the middle rack for 35-40 minutes or until the toothpick inserted in the center of the cake comes out clean.
- Transfer the cake to a cooling rack. Let it cool down in the pan for 15 10 minutes, then remove from the pan and cool on the rack completely.
- Invert the cake gently and peel off the parchment paper. Flip it back, slice the cake, and serve!
Notes
Nutrition
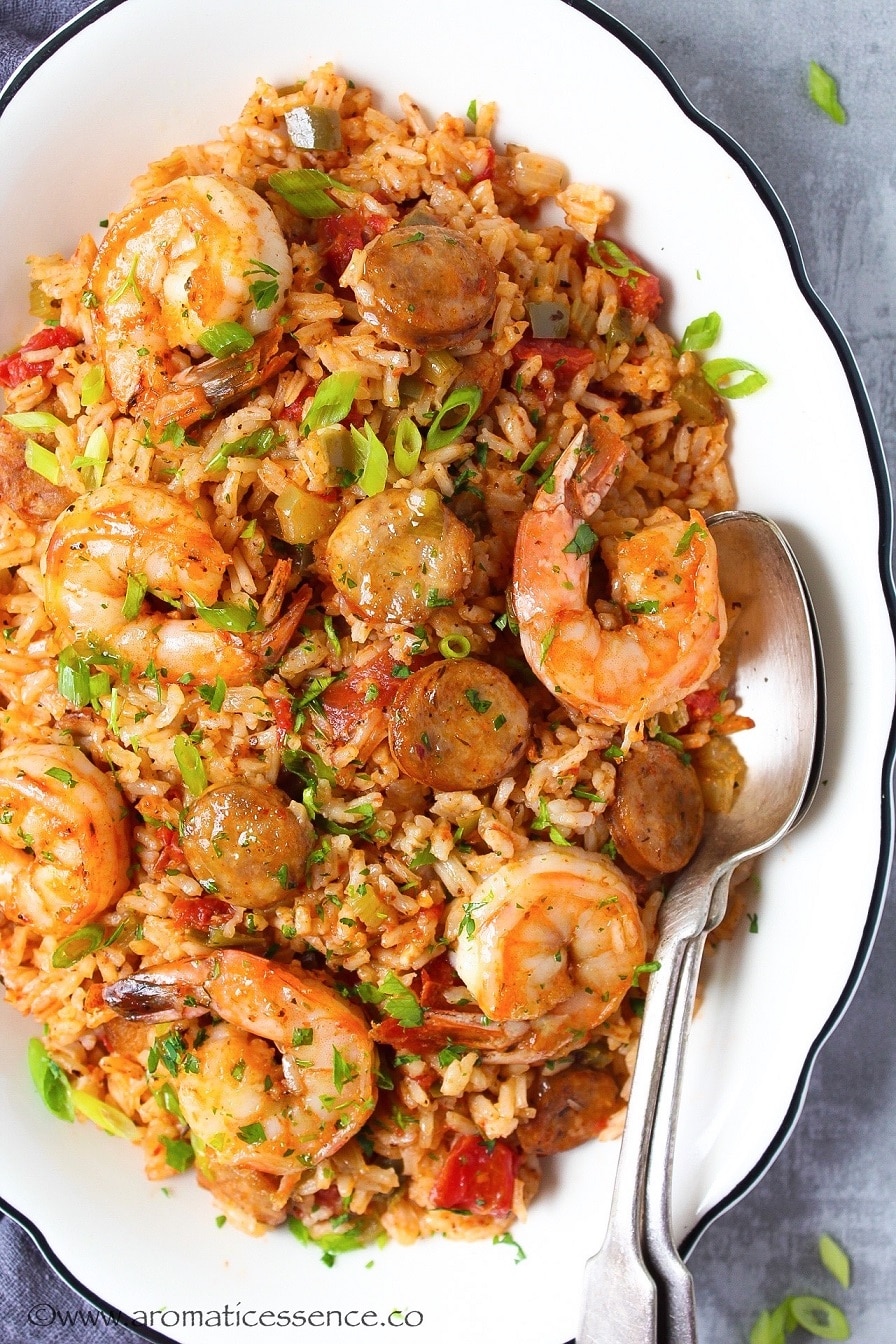
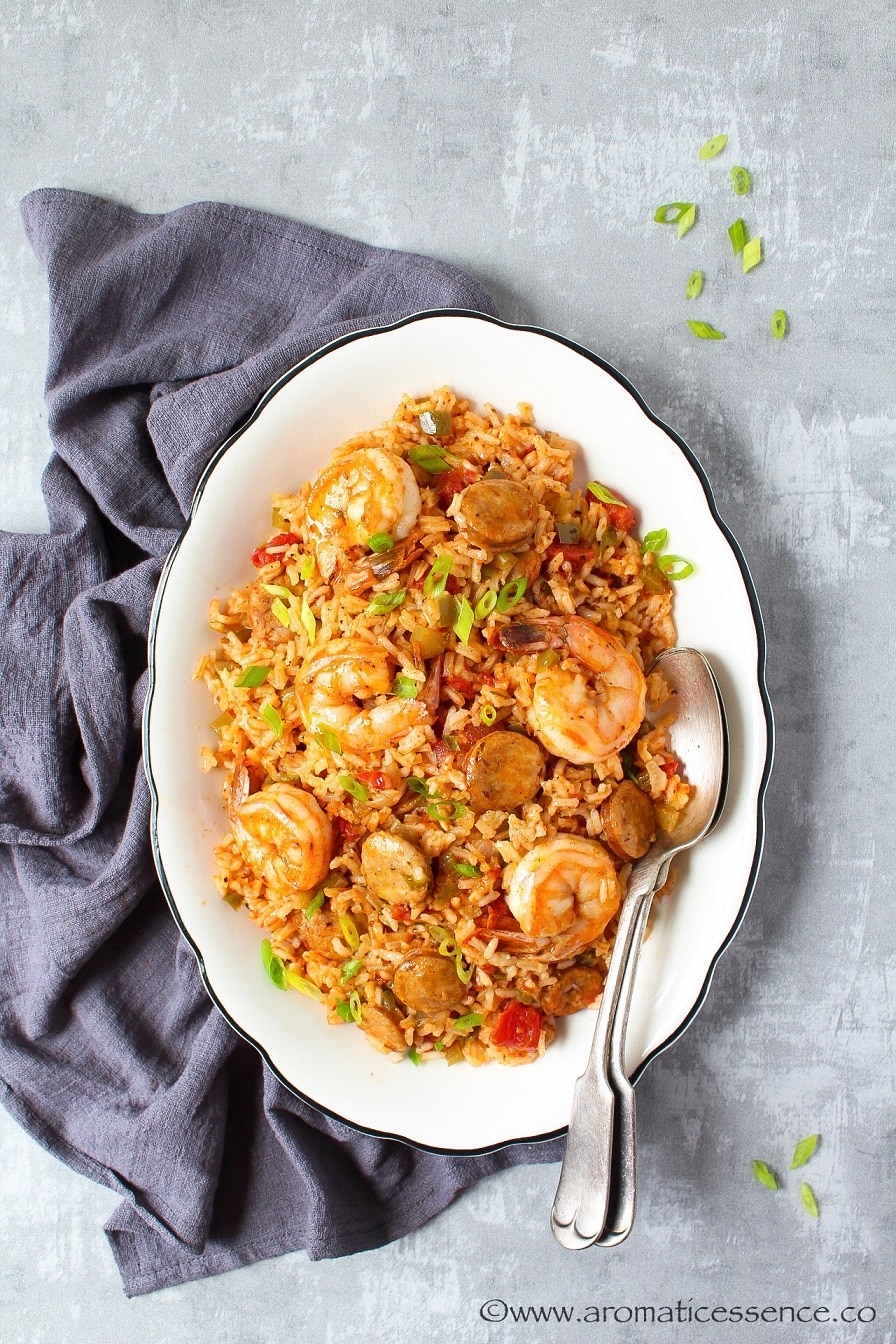
This Instant Pot Jambalaya is a hearty one-pot meal made with andouille sausage, shrimp, Cajun holy trinity, and rice simmered in a flavorful stock. You will love this pressure cooker jambalaya as it is packed with bold flavor from the Creole seasoning and andouille sausage.

While I lived in Lafayette, Louisiana for 5 years, I can truly say that I’ve had some of the best Jambalaya out there in Cajun country! Delicious, authentic stuff so good, that even my 5-year-old enjoyed it despite it being spicy!
I love Cajun/Creole food, it is rustic, hearty, delicious, and packed with bold flavors! I’m so thankful for the experience of living in that place, which opened me up to a whole lot of flavors! It was such an enriching experience! It is nearly impossible to find authentic Cajun food in India!
This post for jambalaya has been long due, so, today, I’m happy to share my version of this Louisiana classic made in the Instant Pot.
- What is jambalaya?
- Ingredients needed to make this easy Instant Pot Jambalaya
- Important points to remember before making this Instant Pot Jambalaya recipe
- How to make Instant Pot Jambalaya – Step by step instructions
- Storage and freezing instructions
- Substitutions & additions in this pressure cooker jambalaya recipe
- You may also enjoy these delicious Instant Pot recipes
- Instant Pot Jambalaya
What is jambalaya?
Jambalaya is a classic Louisiana comfort food dish that originated in the French Quarter of New Orleans. It is made with meat, vegetables, and rice, simmered in a flavorful stock.
Andouille sausage is a must in jambalaya. It also features other proteins like chicken, pork, or seafood such as crawfish, shrimp, or crab. The vegetables are the holy trinity of onions, bell peppers, and celery.
There are basically two types of jambalaya;
- Creole jambalaya: which includes tomatoes due to which it is red. You will find this version in the city of New Orleans.
- Cajun jambalaya: does not include tomatoes, and is usually brown. The brown color can be attributed to sauteing the meat and vegetables for a longer time, giving Cajun jambalaya a deeper, more complex flavor.
Creole cuisine is referred to as ‘city food’ whereas cajun cuisine is referred to as ‘country food’.
Due to New Orleans being a port city, the city folks had access to tomatoes and a variety of other exotic ingredients, which explains the use of tomatoes in Creole jambalaya.
Lafayette, Acadiana is pretty much dominated by Cajun cooking and the jambalaya I had there was always brown in color. Of course, tomatoes are available everywhere now, but some Cajun folks will still make their jambalaya sans the tomatoes. It is just how they prefer it, and honestly, it is just as delicious as the ‘red’ jambalaya.
This Instant Pot Jambalaya is inspired by Creole cuisine. I love both versions a lot, but I like to add tomatoes in my jambalaya. I think the acidity of the tomatoes adds a bright flavor to this dish.
Ingredients needed to make this easy Instant Pot Jambalaya
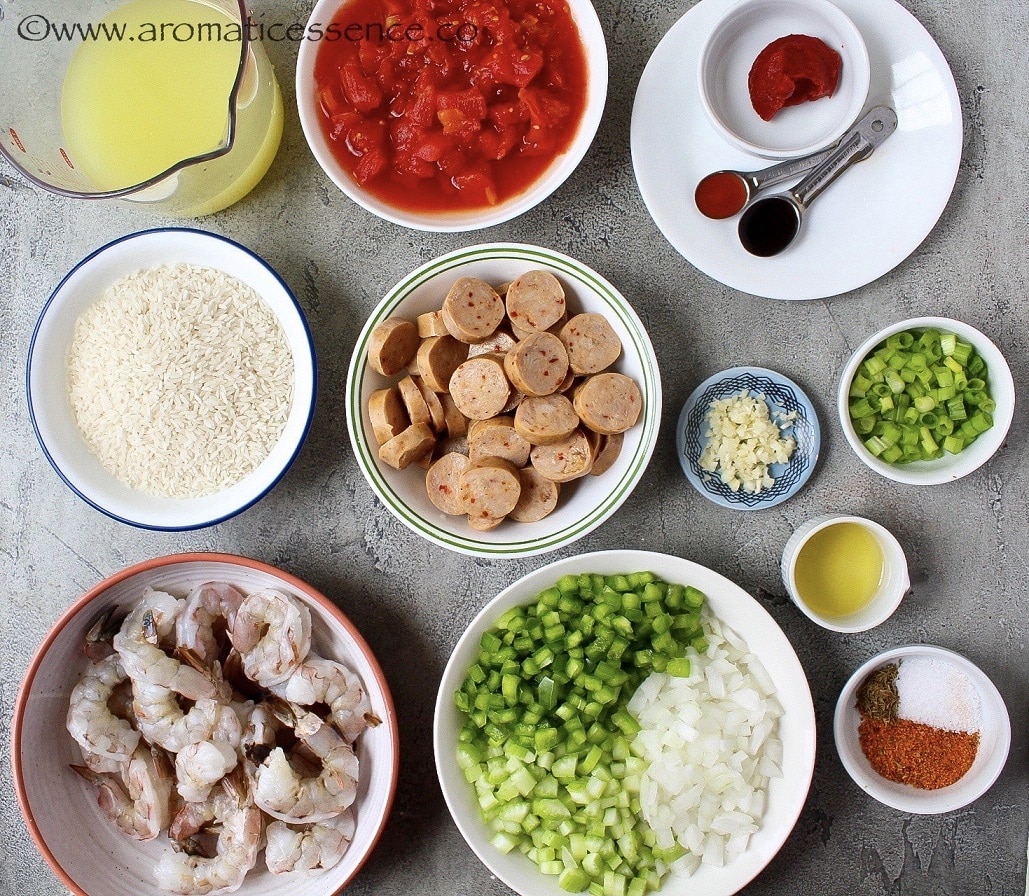
- Olive oil: To brown the meats and veggies. If you use lean andouille sausage, you may need more oil.
- Andouille sausage: This is a spiced, heavily smoked Cajun sausage. I’ve used chicken andouille sausage for today’s recipe, you can also use pork, beef, or turkey andouille sausage. Keep in mind that chicken and turkey sausage do not brown as well as pork, but it is still great in a dish like this.
- Shrimp: I’ve used fresh shrimp, but you can also use frozen. Read more in the instructions below.
- Holy Trinity & garlic: This is the Southern version of French mirepoix, which consists of equal parts of bell pepper, onion, and celery. It is used as a base for most Cajun/Creole food such as gumbo, etouffee, etc. Garlic is often referred to as ‘the Pope’. I am not sure about other places, but in Lafayette, you will find containers of varying sizes of the holy trinity near the produce section of many grocery stores.
- Creole seasoning: I use Tony Chachere’s creole seasoning (salt-free). In addition to this, you will also need some dried thyme and salt.
- Rice: I’ve used long grain rice in this recipe.
- Canned diced tomatoes & tomato paste: You may skip for a Cajun version.
- Low-sodium chicken stock: You can use better than bouillon dissolved in hot water.
- And other ingredients like Worcestershire sauce , hot sauce , green onions, bay leaves
Another traditional ingredient is tasso (pronounced as tah-so), often also known as tasso ham, though technically it is not really a ham. Tasso is heavily seasoned, cured, and smoked cured pork usually made from the shoulder of the hog.
Important points to remember before making this Instant Pot Jambalaya recipe
The rice: Choose the kind of rice you have used successfully in the Instant Pot
I tested this jambalaya recipe three times in the Instant Pot and below is a summary of what happened.
Trial 1: Success with Louisiana grown long grain rice (Cajun country rice brand)
This turned out amazing and I could have just shared the recipe. But, I always like to make sure the recipe is 100% foolproof before publishing anything here on the blog.
Trial 2: Failure with another brand of organic long grain rice
I changed the brand of rice (used organic long-grain rice) keeping the rest of the ingredients and proportions the same. To my surprise, the rice stuck at the bottom, I got the ‘BURN’ error, and the pot never came to pressure.
I removed the contents, cleaned the bottom of the pot, transferred everything back and tried to pressure-cook it the second time, and bam! Again the ‘BURN’ error. The same problem! The rice stuck at the bottom of the insert for the second time.
And finally trial 3: Back to the rice originally used in trial 1
I had to repeat this recipe again for the 3rd time to figure out if the rice was the culprit and turns out it indeed was. The jambalaya cooked perfectly with the rice that I initially used.
Conclusion
So, please use a brand of rice that works for you in the IP and make sure it is covered with the cooking liquid. You can also use basmati rice for this recipe. I have not tried this recipe with brown rice, jasmine rice, or other medium or short-grain rice. Different types of rice need different liquid proportions, so I’m afraid I won’t be able to guide. But I’ll definitely update the results here as and when I happen to try.

The brand of rice that I used for this recipe (Not sponsored)
The tomatoes: add them last and don’t stir
I do not follow this norm very strictly, because I never really have ‘BURN’ issues using tomato-based products. I mix it in for most of my recipes, except for this IP spaghetti and chili mac . Also, canned diced tomatoes are not as thick as tomato puree or crushed tomatoes.
But the newer models of the Instant Pot are very sensitive to the ‘BURN’ error, so there is a possibility that you could experience this issue. To exercise precaution, simply dump the diced tomatoes or whatever tomato product you choose on top, secure the lid and pressure cook the jambalaya.
The liquid
I always follow a 1:2 ratio to make any kind of rice dish on the stovetop. And for the Instant Pot, I follow a 1:1 ratio to cook rice.
I find a 1:1.25 ratio of liquid suitable for cooking this brand of rice. If you use basmati rice a 1:1 ratio should work for this recipe. Unfortunately, because I had to move out, I did not have the chance to test this recipe with basmati rice, but I can tell you for sure, the rice grains would be light, fluffy and separate.
The rice grains will not be as separate and distinct when you use any kind of rice other than basmati. Nonetheless, the rice is well-cooked here and perfectly flavored and as close to the authentic version
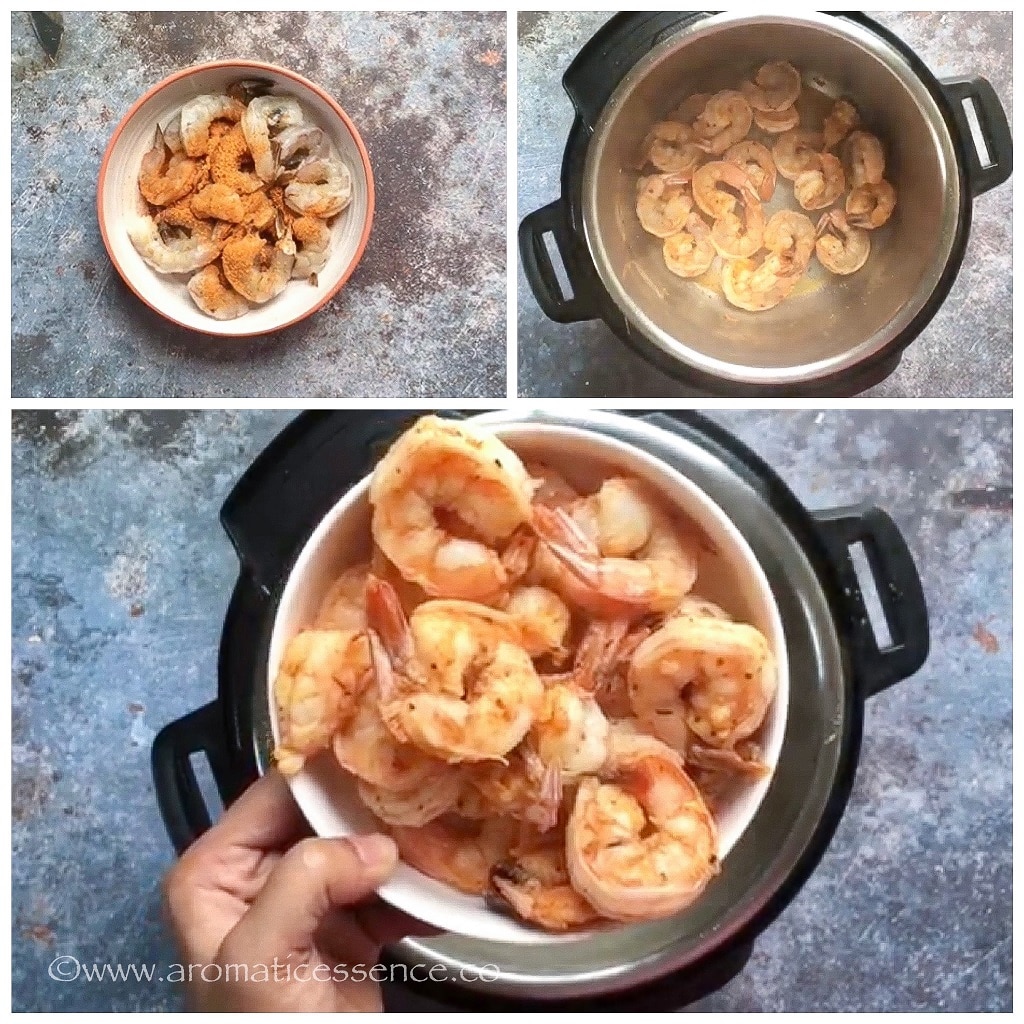
Shrimp: Add them in the end
The shrimp will definitely be overcooked and turn rubbery in the 6 minutes of pressure cooking. I like to season the shrimp with Creole seasoning and saute until it turns pink. Then I set it aside and add it back in the end after the pressure cooking cycle, put the lid back on, and let it sit for 5 minutes until warmed through.
You could use frozen cooked shrimp instead of fresh. Thaw the shrimp and simply add it at the same time in lieu of the sauteed shrimp.
How to make Instant Pot Jambalaya – Step by step instructions
{Printable recipe card below instructions}
Step 1: Season and saute the shrimp
Add 1/2 tablespoon of Creole seasoning to 1 pound of shrimp and mix well. You can remove the tails of the shrimps, I left it on purely for the pictures.
Press the ‘SAUTE’ button, and set it to ‘NORMAL’. Once its displays, ‘HOT’, then add 2 tablespoons of olive oil, let it heat up a bit, add the shrimp, cook until it turns pink. Transfer to a bowl, cover, and set aside.
Step 2: Saute the sausage
Next, add 12 oz of sliced sausage, and cook until lightly browned. Add more oil if required to saute. Transfer to a bowl and set aside.

Step 3: Saute the holy trinity and garlic
Add 1 cup each of diced onion, celery, green bell pepper. Saute until the veggies are tender and turn translucent.
The veggies will release enough moisture to deglaze the browned bits at the bottom of the pot. Covering the pot with a lid (not the IP lid, any other lid will work) helps the veggie release moisture a little faster. Or add 1/4 cup chicken stock, deglaze the pot by scraping off all the browned bits stuck at the bottom of the insert.
Add minced garlic, saute until fragrant about 30 seconds. If using jalapeno or serrano pepper, add it along with the garlic.

Step 4: Seasoning and tomato paste
Add 1 tablespoon of Creole seasoning, 1 teaspoon kosher salt, 1/4 teaspoon dried thyme, and 1 tablespoon of tomato paste, saute for another minute. You can also add 1 teaspoon of paprika and 1/4 to 1/2 teaspoon of cayenne pepper.

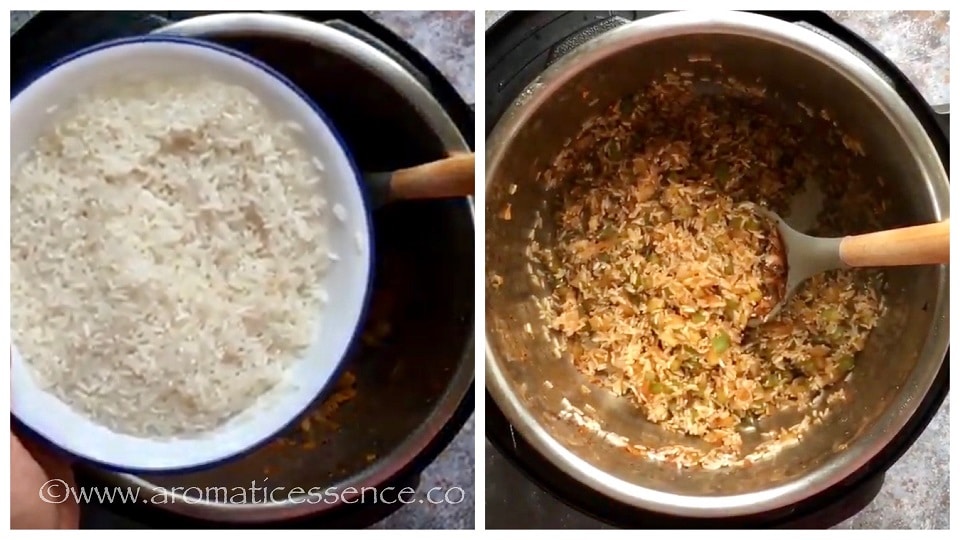
Step 5: Add the rice
Add 1.5 cups of rinsed and drained long-grain rice, saute for a few minutes, until toasty and well-coated with the spices.
Press ‘CANCEL’ to switch off the “SAUTE’ mode. At this point, make sure you do not have anything stuck at the bottom of the pot to avoid any potential ‘BURN’ error. Add a few tablespoons of water or chicken stock and deglaze the pot if required.
Step 6: Add the rest of the ingredients except sauteed shrimp
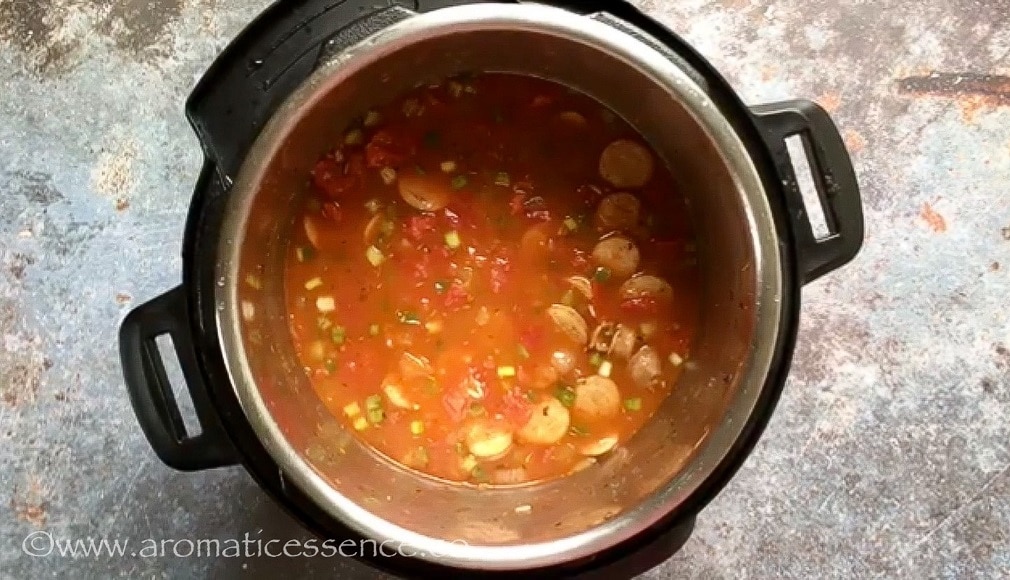
Add 14.5 oz can of diced tomatoes, 1 & 3/4 cups of low-sodium chicken stock. Add 1 teaspoon of hot sauce, and 1/2 tablespoon of Worcestershire sauce. Mix everything well. Add the sausage back to the pot along with 2 tablespoons of chopped green onions, and bay leaves (I forgot to add them this time). Mix and make sure the rice is covered with liquid.
Please note: If your IP is sensitive to the BURN’ error with tomato-based products, add the tomatoes on top and do not stir.

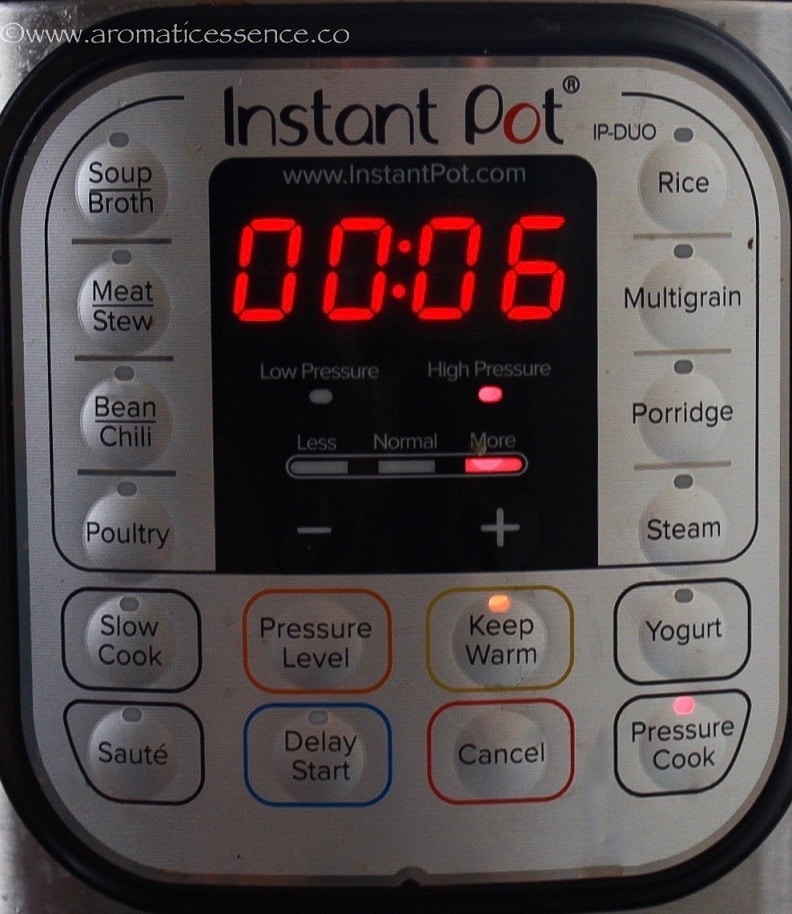
Step 7: Pressure cook the jambalaya
Close the lid of the Instant Pot. Set the valve to ‘SEALING’. Pressure cook on high for 6 minutes. It will take some time for the pressure to build up (about 12 minutes), after which the timer will begin.
Step 8: Natural pressure release (NPR) for 10 minutes
Once the cooking cycle is complete, let the pot depressurize for 10 minutes. Then do a quick release of the leftover pressure as per the manufacturer’s instructions. Press ‘CANCEL’ and switch off the IP. Once the silver pin drops, turn the knob to ‘VENTING’ and open the lid away from you.

Step 9: Add the cooked shrimp
Add the cooked shrimp back to the pot. Close the lid of the Instant Pot, let the shrimp warm through for about 5 minutes.

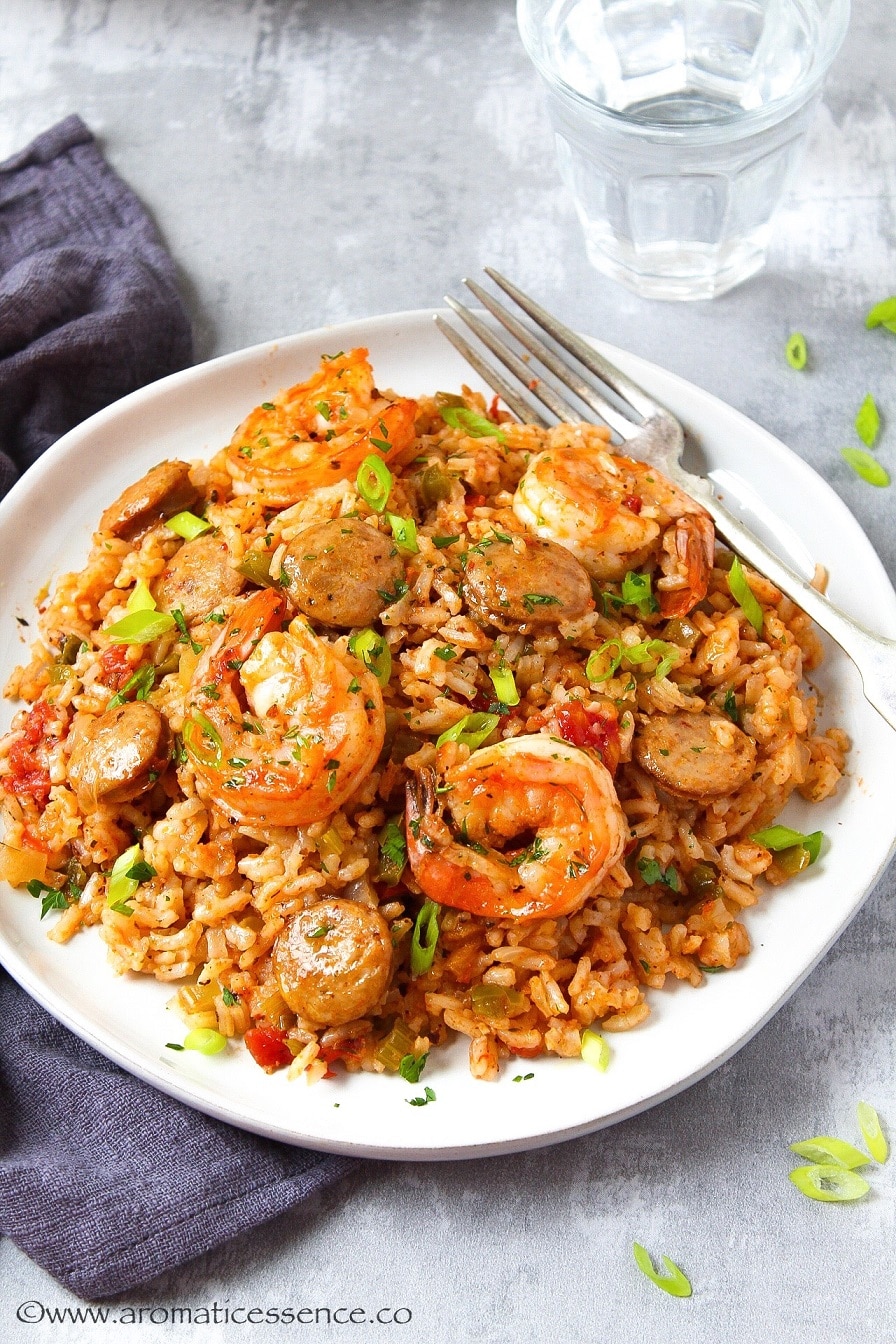
Step 10: Mix and serve
Fluff the rice with a fork. Garnish with the remaining 2 tablespoons of chopped green onions. Enjoy!

Notes
- Adjust seasonings as per your preference.
- Stovetop version: Traditionally, jambalaya is cooked in a large dutch oven, either an enamel dutch oven or seasoned cast iron pot. The recipe will remain the same, only the chicken stock will need to be increased to 3 cups. Follow steps 1 to 6, bring to a boil, reduce the heat to low, cover the pot and simmer for 15-20 minutes. Then follow step 9. Let the rice rest for about 15 minutes, then fluff with a fork. If you prefer your jambalaya to be slightly mushy, you can increase the stock to 3.5 cups.
- I used a total of 1 & 3/4 cups of chicken stock for the recipe. You may need 1/4 cup more stock to deglaze the pot in step 4 if the veggies do not add enough moisture.
- Please use a brand of rice that works for you in the Instant Pot. Like I mentioned above, sometimes, it is not only the tomato-based product that can cause the ‘BURN’ error, but it can also be the rice itself.
- If you do can’t find Cajun or Creole seasoning mix, use the following spice mix: 1 teaspoon black pepper, 1/4 to 1 teaspoon cayenne pepper, 1 teaspoon dried thyme, 1 tablespoon dried parsley, 1 teaspoon oregano, and 1 teaspoon paprika
- I do not recommend doubling this recipe in a 6-quart, as the pot is quite full with this quantity. I’m not sure about an 8-quart, as I’ve not tested it. I think the mixture is too thick to be doubled and there are chances that you could get the ‘BURN’ error. I suggest cooking two batches of jambalaya in the Instant Pot.

While it is easy to make Zatarain’s jambalaya, I prefer this homemade IP jambalaya made from scratch. It is a simple, fuss-free, wholesome, and delicious one-pot meal, brimming with tons of flavor and texture. I hope you will try to make this iconic Louisiana dish in your Instant pot and enjoy it as much as we always do!

Storage and freezing instructions
Refrigerate leftover jambalaya in an airtight container for 3 to 4 days. You can also freeze jambalaya in an airtight container for up to 3 months.
Make sure the jambalaya has not been sitting out for more than 2 hours before storing leftovers. For food safety, the USDA recommends discarding perishable food that has been sitting at room temperature for more than 2 hours, and 1 hour (for temperatures over 90° F) as bacteria grow rapidly between 40° to 140° F.
To reheat, transfer the jambalaya to a microwave-safe container or plate, nuke at 30-second intervals, stirring after each interval, until piping hot. You can also reheat it in an oven. Transfer the jambalaya to an oven-safe baking dish and cover with aluminum foil, warm it at 300° F for about 20 minutes or until heated through.
Substitutions & additions in this pressure cooker jambalaya recipe
Oil: You can substitute the oil with unsalted butter or use a mix of butter and oil.
Sausage: Traditionally, andouille sausage is used in jambalaya. You can substitute it with Polish kielbasa, chorizo, or any other smoked sausage. The jambalaya won’t have the same flavor, it will still be delicious nonetheless!
Chicken: If you’d like to add chicken, I recommend using chicken thighs. Use a pound of chicken thighs, cut into 2-inch cubes. Saute the chicken with a tablespoon of oil until it turns opaque. Remove it from the pot and set it aside. Add it back to the pot in step 6 along with the sausage.
Tasso: If you’d like to use tasso, use about 1/2 pound of tasso, diced, and saute it along with the sausage in step 3.
Rice: You can swap the rice with pasta to make pastalaya. Use about 8 oz of pasta and 2 cups of chicken stock.
Serrano or jalapeno peppers: You can add either of these peppers for added heat. You may leave the seeds on if you like it spicier.
Creole seasoning: You can swap it with cajun seasoning.
Diced tomatoes: You can also use fire-roasted diced tomatoes or Rotel. If you don’t like tomato chunks, substitute with an equal amount of crushed tomatoes or tomato puree. If you want to avoid canned tomatoes, use 2 medium fresh tomatoes. Skip tomatoes for a Cajun version, you will not need to alter the recipe.
Seafood: You can add cooked crawfish, lobster, or crab along with the sauteed shrimp, close the lid, and let it warm through.
Veggies: I love the flavor of the Holy trinity of veggies aka the Southern mirepoix . But feel free to omit the celery or swap the green bell pepper with red bell pepper if that is what you prefer. Though not traditional, you can also add more veggies like green peas, carrots, green beans, etc.
You may also enjoy these delicious Instant Pot recipes
- Chili mac
- Southern Red beans and rice
- Chili
- Spaghetti with meat sauce
- Pot roast
You can also follow me on Facebook , Pinterest, Instagram & Twitter

Instant Pot Jambalaya
Equipment
- Instant Pot DUO60 6 Qt 7-in-1
Ingredients1x2x3x
- 2 tablespoons olive oil
- 12 oz andouille sausages, cut into 1/4 inch rounds
- 1 pound large shrimp, cleaned and deveined
- 1 cup finely chopped onion
- 1 cup finely diced celery
- 1 cup finely diced green bell pepper
- 1 tablespoon minced garlic
- 1 Serrano or jalapeno pepper, seeded& finely chopped
- 1.5 tablespoons salt-free Creole seasoning, divided
- 1/4 teaspoon dried thyme
- 1 teaspoon Kosher salt, or to taste
- 1 tablespoon tomato paste
- 1 & 1/2 cups uncooked long-grain rice, rinsed and drained
- 1-(14.5) oz can diced tomatoes, do not drain
- 1 & 3/4 cups low-sodium chicken stock
- 1 teaspoon hot sauce
- 1/2 tablespoon Worcestershire sauce
- 2 bay leaves
- 1/4 cup of chopped green onions divided
Instructions
- Season shrimp with Creole seasoning and mix well.
- Press the ‘SAUTE’ button, and set it to ‘NORMAL’. Once its displays, ‘HOT’, then add olive oil, let it heat up a bit, add the shrimp, cook until it turns pink. Transfer to a bowl, cover and set aside.
- Next, add sliced sausage, and cook until lightly browned. Add more oil if required to saute. Transfer to a bowl and set aside.
- Add diced onion, celery, green bell pepper. Saute until the veggies are tender and turn translucent.
- The veggies will release enough moisture to deglaze the browned bits at the bottom of the pot. Covering the pot with a lid (not the IP lid, any other lid will work) helps the veggie release moisture a little faster. Or add 1/4 cup chicken stock, deglaze the pot by scraping off all the browned bits stuck at the bottom of the insert.
- Add minced garlic, saute until fragrant about 30 seconds. If using jalapeno or serrano pepper, add it along with the garlic.
- Add the seasoning mix and tomato paste, saute for another minute.
- Add rinsed and drained long-grain rice, saute for a few minutes, until toasty and well-coated with the spices.
- Press ‘CANCEL’ to switch off the “SAUTE’ mode. At this point, make sure you do not have anything stuck at the bottom of the pot to avoid any potential ‘BURN’ error. Add a few tablespoons of water or chicken stock and deglaze the pot if required.
- Add diced tomatoes, chicken stock along with the hot sauce, and Worcestershire sauce. Mix everything well. Add the sausage back to the pot along with 2 tablespoons of chopped green onions, and bay leaves. Mix and make sure the rice is covered with liquid.
- Please note: If your IP is sensitive to the BURN’ error with tomato-based products, add the tomatoes on top and do not stir.
- Close the lid of the Instant Pot. Set the valve to ‘SEALING’. Pressure cook on high for 6 minutes. It will take some time for the pressure to build up (about 12 minutes), after which the timer will begin.
- Once the cooking cycle is complete, let the pot depressurize for 10 minutes. Then do a quick release of the leftover pressure as per the manufacturer’s instructions. Press ‘CANCEL’ and switch off the IP. Once the silver pin drops, turn the knob to ‘VENTING’ and open the lid away from you.
- Add the cooked shrimp back to the pot. Close the lid of the Instant Pot, let the shrimp warm through for about 5 minutes.
- Fluff the rice with a fork. Garnish with the remaining 2 tablespoons of chopped green onions. Enjoy!
Video
Notes
- Adjust seasonings as per your preference.
- Stovetop version: Traditionally jambalaya is cooked in a large dutch oven, either an enamel dutch oven or seasoned cast iron pot. The recipe will remain the same, only the chicken stock will need to be increased to 3 cups. Follow steps 1 to 6, bring to a boil, reduce the heat to low, cover the pot and simmer for 15-20 minutes. Then follow step 9. Let the rice rest for about 15 minutes, then fluff with a fork. If you prefer your jambalaya to be slightly mushy, you can increase the stock to 3.5 cups.
- I used a total of 1 & 3/4 cups of chicken stock for the recipe. You may need 1/4 cup more stock to deglaze the pot in step 4 if the veggies do not add enough moisture.
- Please use a brand of rice that works for you in the Instant Pot. Like I mentioned above, sometimes, it is not only the tomato-based product that can cause the ‘BURN’ error, but it can also be the rice itself.
- If you do can’t find Cajun or Creole seasoning mix, use the following spice mix: 1 teaspoon black pepper, 1/4 to 1 teaspoon cayenne pepper, 1 teaspoon dried thyme, 1 tablespoon dried parsley, 1 teaspoon oregano, and 1 teaspoon paprika
- I do not recommend doubling this recipe in a 6-quart, as the pot is quite full with this quantity. I’m not sure about an 8-quart, as I’ve not tested it. I think the mixture is too thick to be doubled and there are chances that you could get the ‘BURN’ error. I suggest cooking two batches of jambalaya in the Instant Pot.
- Measuring cup used, 1 cup = 250 ml, 1 teaspoon = 5ml

