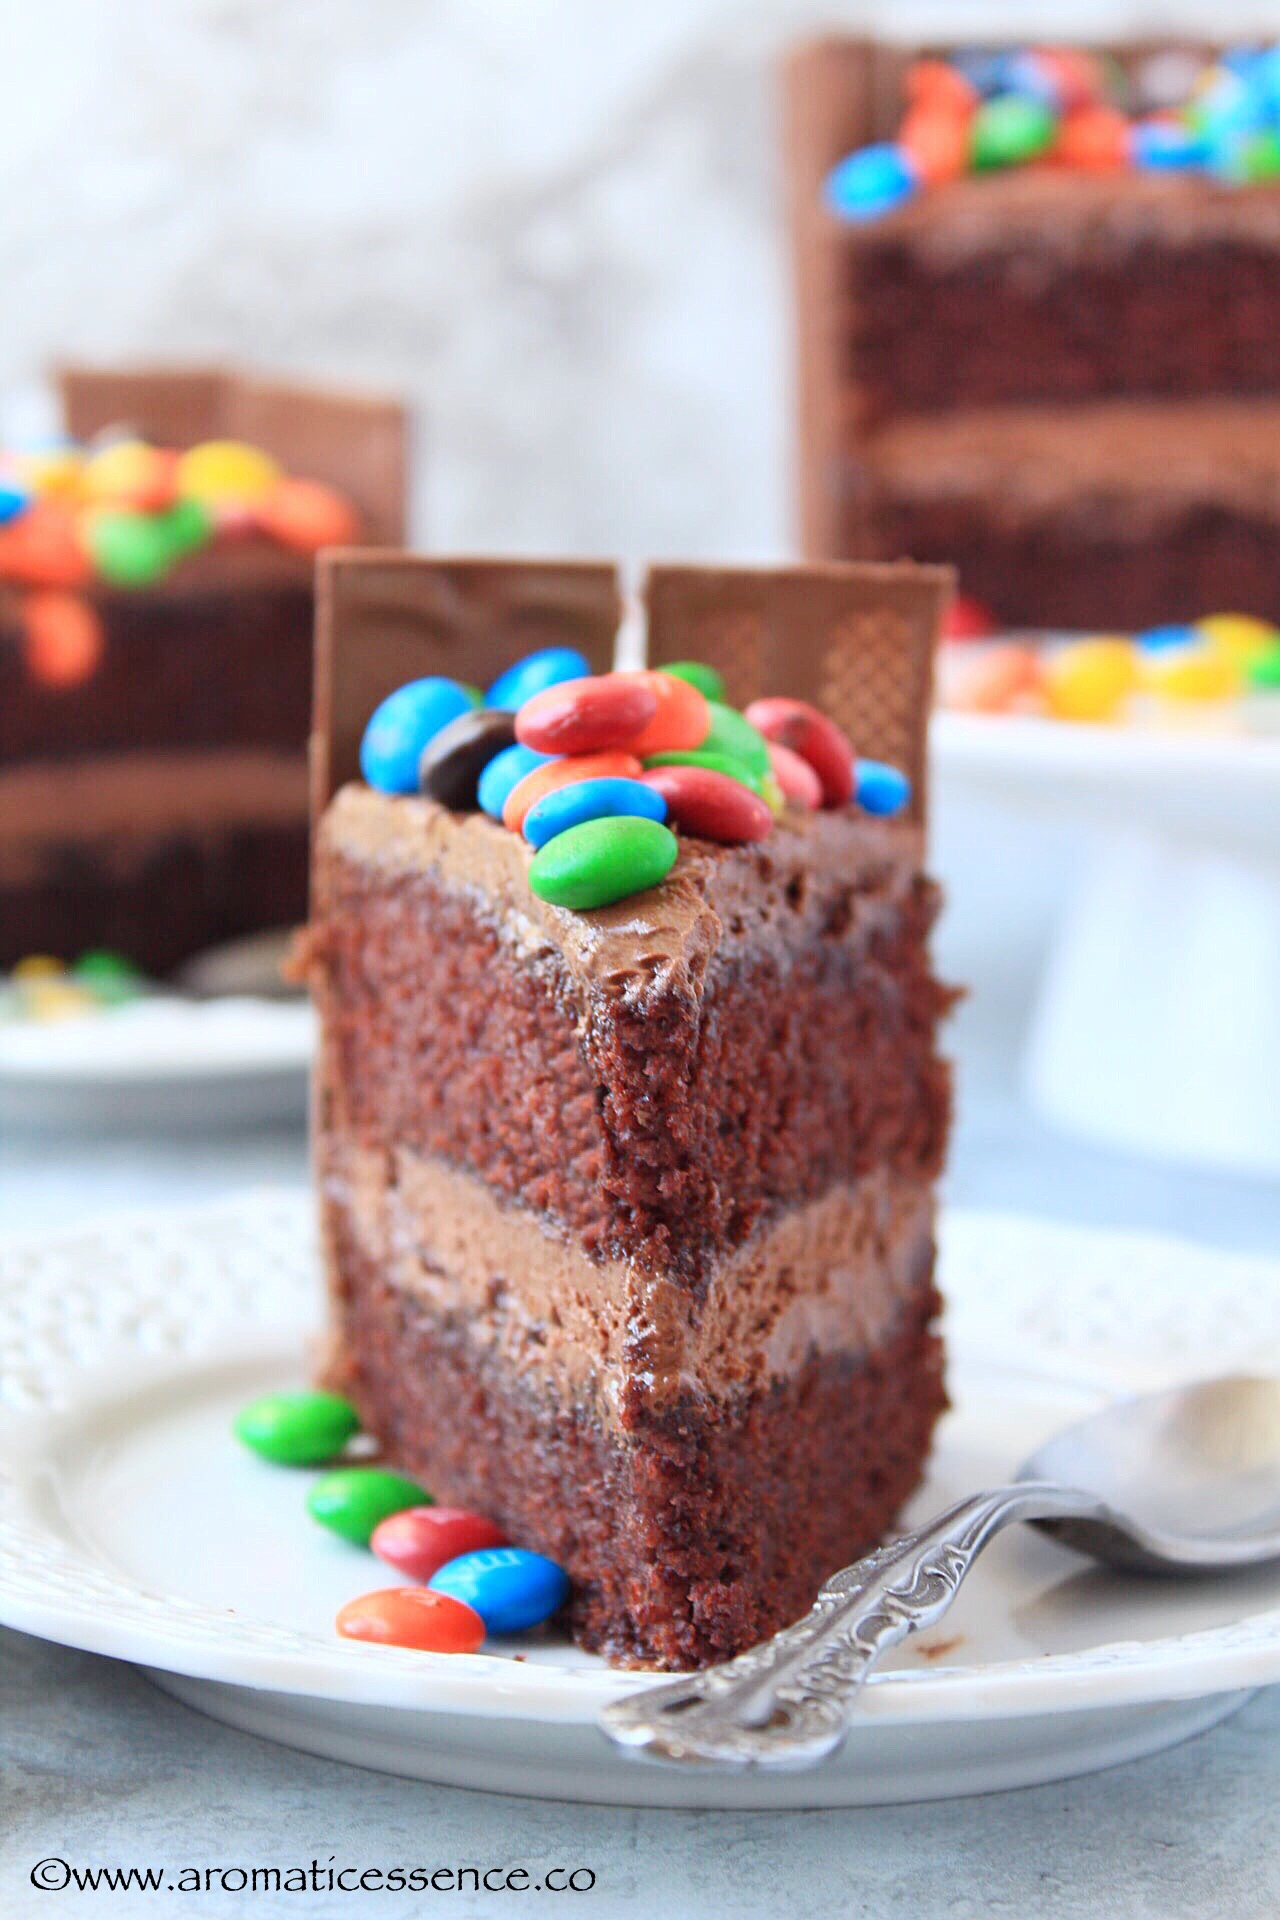
Kit Kat Cake with M&M ‘s is a super simple and fun DIY birthday cake, that looks absolutely gorgeous and is sure to make an impression! And my homemade eggless chocolate cake and chocolate frosting take this Kit Kat cake a notch-up! Everything is made from scratch except the candies of course 😀

So my son, Ethan turned 5, last Thursday, and I made him this birthday cake – a double layer kit kat cake with M&M’s.
It so happens that my baby boy has got a sweet tooth! Well, I’m not really surprised, guess where it comes from? 😀 But the good thing is that I have the amount of candy intake in the house under control. And he knows his limits too. I don’t believe in depriving a child completely of candies. They need to have a little treat once in a while and so do we 🙂

I’ve come across this M&M cake on Pinterest every now and then in my feed. But really hadn’t thought much about it. I thought it was impressive, and looked pretty fun to make one. Heck, even I wouldn’t mind a cake like that for my birthday!
Last year, we were in India, where Ethan’s birthday was celebrated. My parents wanted to throw a party for him since that was the first time he visited their house in Goa. It ended up being quite a celebration with most of my family members attending it.
Last year, I simply had his birthday cake made to order, based on one of his favorite cartoon series, Blaze and the monster machines.

But this year, since he turned 5, I wanted to make him a cake, something that he would adore and get excited about. And I couldn’t have thought about a better cake than this Kit Kat m&m cake.
The best part about making a Kit Kat cake chocolate cake is that it is so easy, looks amazing and needs no skills at all. Don’t believe me? Try making it and you will see, no kidding!
And especially if you are frosting or icing challenged, like me, I’m not sure such a term even exist, but you know what I mean, right? Then you definitely have more reason to try this Kit Kat cake. I insist!

- Kit Kat cake ingredients
- You will need 3 components to make this Candy cake
- How does this cake taste?
- Some fun variations of this cake for every occasion
- How to make Kit Kat cake from scratch – Step by step instructions
- Kit Kat Cake Recipe From Scratch | M&M’s Cake | Candy Cake (Eggless)
Kit Kat cake ingredients
This easy Kit Kat cake requires pretty basic ingredients.
- Cake mix or the usual flour, sugar, vanilla, cocoa powder, etc you require to make a cake from scratch
- Homemade or Store-bought chocolate frosting or any other frosting of your choice.
- Kit Kat bars and loads of m&m candies.
Wondering how many kit kat bars for this cake are needed? I’ve used about 39 to be precise, which was enough to cover my 8-inch, two-layered kit kat cake. You would need more or less depending upon how big or small your cake is, if its a 2 tier kit kat cake, or a square kit kat cake, etc.
Make sure that the height of the cake is less than the height of the kit kat bars.

You will need 3 components to make this Candy cake
This KitKat wrapped cake comes together in 3 easy steps
- The cake base
- The frosting
- Layering, frosting, and adding the final finishing touches…. the absolute fun part!
Let’s talk about the cake base for a minute, shall we? I’ve used my go-to chocolate cake recipe for this base, which is also known as crazy cake or wacky cake or Depression cake. I think it is the ultimate, fuss-free chocolate cake, made without any dairy or eggs, none of which I have a problem with, but I just love how decadent and moist this cake always turns out!
You just need one bowl to make this amazingly delicious and moist chocolate cake, fewer things to clean 😀 Bonus!
Now that we have our base sorted, let’s move on to the frosting. You can use store-bought frosting if you wish, but if you take the trouble of making a cake from scratch, then I’d also recommend you try making frosting from scratch. It is so easy, and you will love the homemade stuff. I’ve already shared an in-depth post on my favorite chocolate frosting, which you will find here .

How does this cake taste?
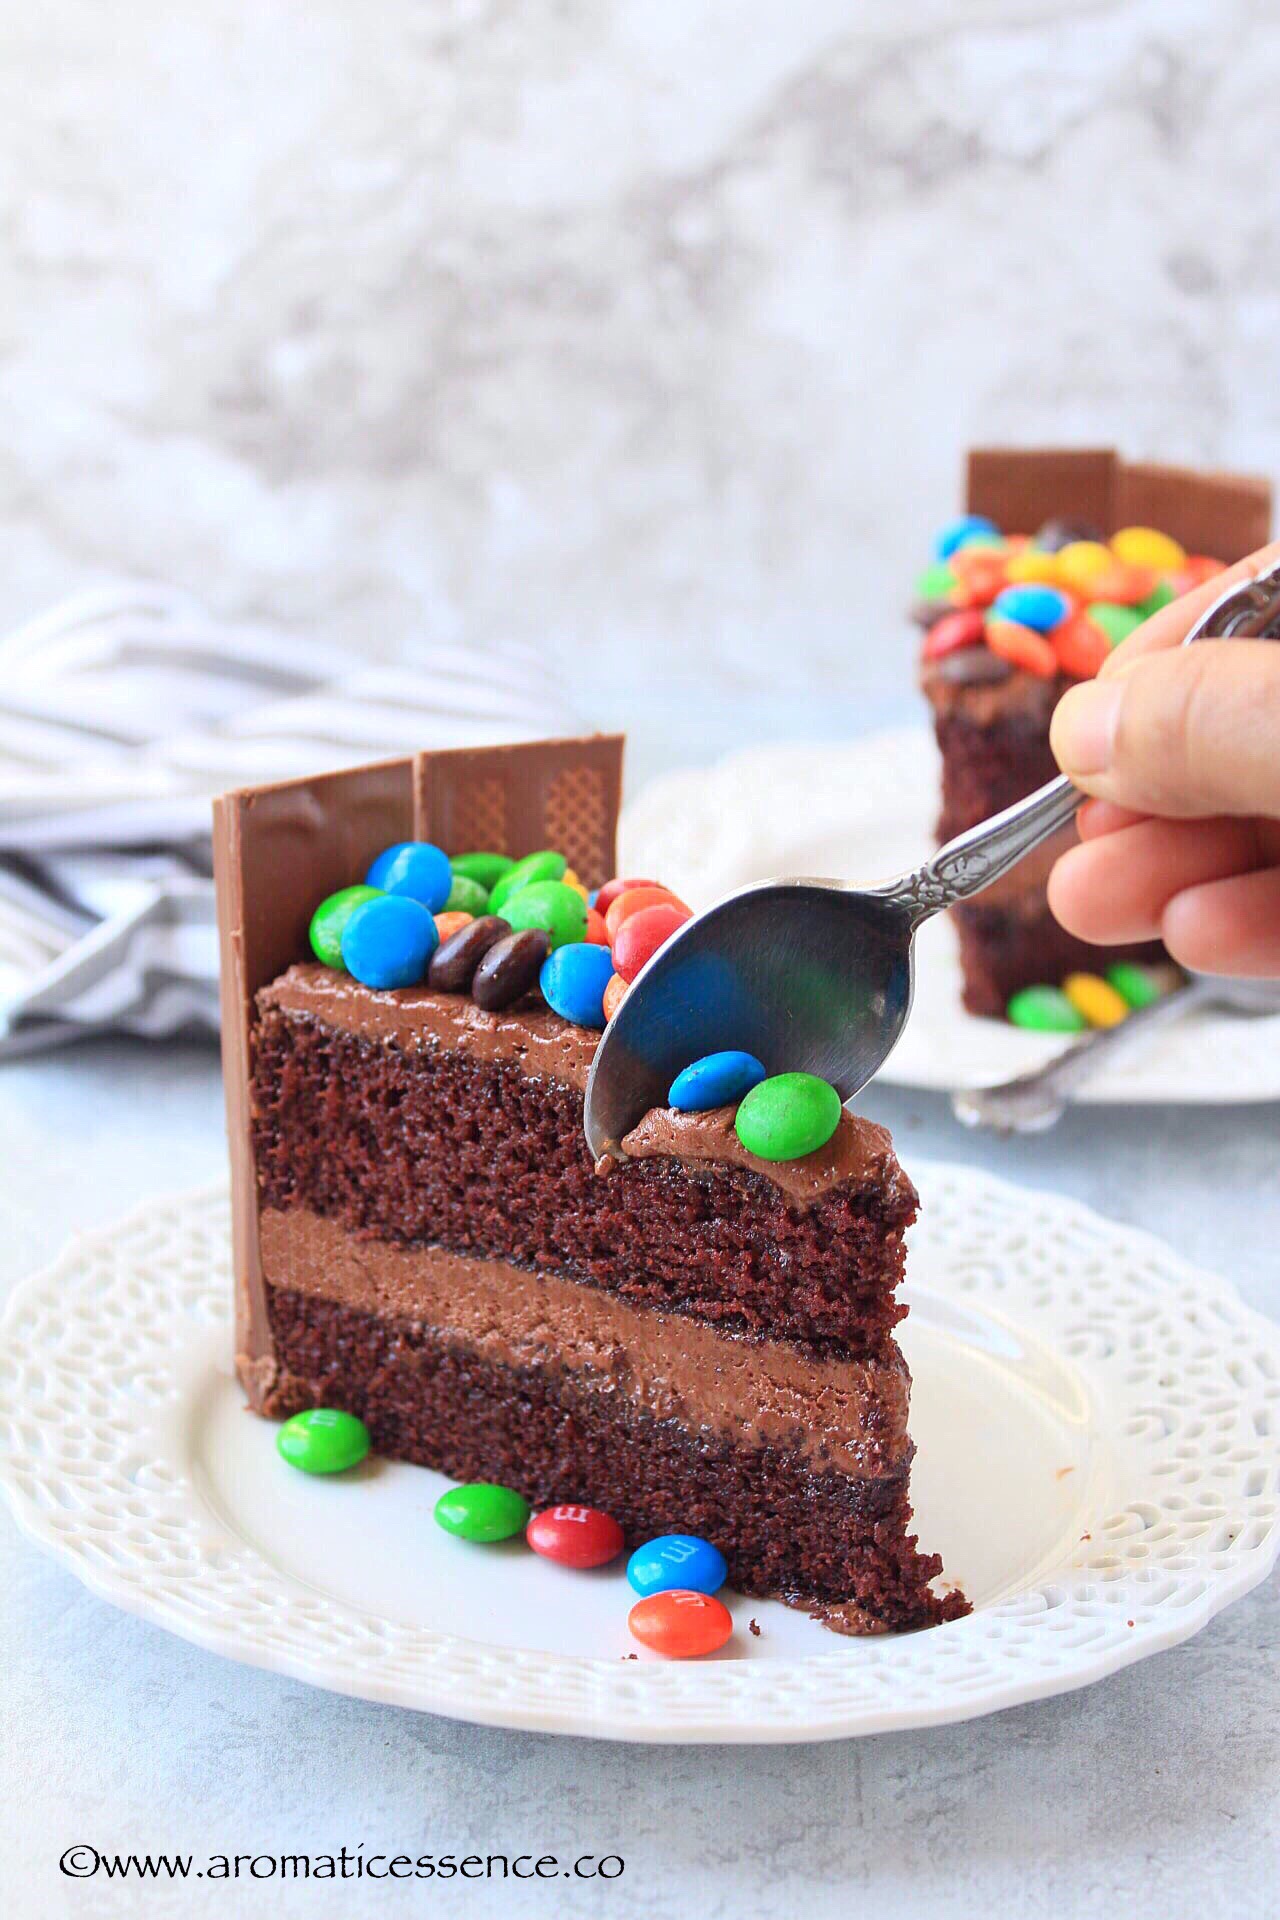
This candy cake is basically a chocolate cake with KitKat border, it tastes just like a regular chocolate cake with chocolate buttercream frosting. The Kit Kat’s and M&M’s definitely add an interesting texture. But I almost got a sugar rush from finishing one slice. So, although, I’ve given the serving size of 8 people, I think you can easily increase it to 12 people.
Some fun variations of this cake for every occasion
- Kit Kat cake with strawberries: Replace the m&m’s with strawberries or chocolate-covered strawberries.
- KitKat Malteser cake: Replace the m&m’s with maltesers.
- White kit kat cake: Simple use white chocolate Kit Kar bars and a vanilla cake along with frosting of your choice.
- KitKat skittles cake: Replace the m&m’s with skittles or smarties for a smarties cake.
- KitKat Reese’s cake: Replace the m&m’s with Reese’s peanut butter cups, also use peanut chocolate butter frosting. Perfect for a peanut butter fan!
- Kit Kat red velvet cake: Simple use your favorite red velvet cake as the base, or use my tried and tested eggless red velvet cake recipe .
- Twix m&m cake: Replace the Kit Kat bars with Twix bars.
- Some seasonal cake ideas you can make using this Kit Kat chocolate cake – Halloween kit kat cake, kit kat easter basket cake, Christmas Kit Kat Cake, etc. Simply fill the cake with candy-themed decor.
- Or include your child’s favorite cartoon character like Peppa Pig, minions, paw patrol, etc made with fondant on the top of the cake.
How to make Kit Kat cake from scratch – Step by step instructions
Step 1: For the chocolate cake base
p.s. I’m resharing stepwise pictorials for reference from the crazy chocolate cake recipe I’ve shared before.


Step 2: For the chocolate frosting
Recipe here . This recipe will yield will about 2 cups of frosting, scale the recipe by 1.5 times to cover the entire, 8-inch two-layer cake.
Step 3: Assembling the cake
Once the cake has completely cooled down, scrape off the dome shape of the cake with the help of a long serrated knife to have a flat top. Also, transfer some cream to a piping bag and snip off the edge of the piping bag before you begin piping, to pipe out the layers in between. I do this so that the cream layer looks even all over. You may simply transfer the cream with the help of a spatula if that is convenient for you.

Put a little chocolate frosting on the serving platter or cake stand.

Transfer the first layer to the stand. Brush it with generously with sugar syrup.

Pipe out the chocolate frosting in circular motions starting from the outer circumference towards the center. Smooth out the frosting with an offset spatula.

Repeat the same with the second layer. Frost the top and sides of the cake well. It does not have to be perfect, so you really don’t need to smooth it out.


Line the Kit Kat bars vertically by sticking them to the sides of the cake, it should stick pretty well to the frosting. If not, apply some frosting on the back of the kit kat bar and stick it. Wrap a bow around the Kit Kat’s to secure them in place.

Fill the top of the cake with M&M’s. This cake will stay well for up to 3 days at room temperature or cover and store in the refrigerator for up to 5 days. H ave a break have a KitKat cake slice 😀

Notes
- You may use 1 (15.25 oz) of chocolate cake mix and bake in 2 8-inch cake pans as per package instructions. Replace every egg for 1/4 cup yogurt for an eggless version.
- Refrigerate the Kit Kat’s so that they don’t smudge when you stick them to the cake.

You can also follow me on Facebook , Pinterest, Instagram & Twitter

Kit Kat Cake Recipe From Scratch | M&M’s Cake | Candy Cake (Eggless)
Ingredients1x2x3x
Measuring cup used, 1 Cup = 250 ml, 1 tsp = 5 ml, Make sure all ingredients are at room temperature.
For the chocolate cake base
- 3 cups all-purpose flour, {Spooned and leveled}
- 1/3 cup +1 tbsp unsweetened cocoa
- 2 cups sugar
- 2 tsp baking soda
- 2 tsp instant coffee powder, optional
- 1 tsp salt
- 2 tsp white vinegar
- 2 tsp pure vanilla extract
- 1/2 cup + 2 tbsp vegetable oil
- 2 cup water, room temperature
For the chocolate buttercream frosting
- Approx 2.5 to 3 cups of chocolate frosting, or any other frosting of your choice
For the decor
- 5 packs of (3 oz) Kit Kat bars (king size), about 40 Kit Kat bars
- 10.53 oz bag of M&M’s, you may even add more, but this is the minimum you will need to cover the cake
For the sugar syrup
- Dissolve 1 tbsp of sugar in 2 to 3 tbsp water
Instructions
- FOR THE CHOCOLATE CAKE BASE
- Preheat oven to 350 degrees F. Prepare two 8 inches round cake pans, by greasing it with oil and lining the bottom of the pan with pre-cut parchment paper. Trace the shape of the pan by placing it over the parchment paper, then trim and place the reverse side of the paper on to the bottom of the pan.
- Sieve the flour, baking soda, cocoa powder and coffee powder in a mixing bowl. Add sugar and salt and whisk to combine everything well.
- Make 3 depressions in the dry ingredients - two small, one larger.
- Pour vinegar in one depression, vanilla in the other and vegetable oil in larger depression.
- Pour water over all, mix well just until combined and no more flour pockets are visible. The batter may have a few lumps and that is okay, do not over mix.
- Divide the batter equally between the two cake pans, tap the pans on the countertop to remove air bubbles. Bake on the middle rack for about 35 minutes or until a toothpick inserted comes out clean. Transfer to a wire rack, let it cool completely before frosting. You can cover the cake and refrigerate it until you are ready to frost it. {Note: Oven baking times may vary, check your cake to avoid over baking it, but check no sooner than 30 minutes}.
FOR THE CHOCOLATE FROSTING
- Recipe here . This recipe will yield will about 2 cups of frosting, scale the recipe by 1.5 times to cover the entire, 8-inch two layer cake.
ASSEMBLING THE CAKE
- Once the cake has completely cooled down, scrape off the dome shape of the cake with the help of a long serrated knife to have a flat top. Also, transfer some cream to a piping bag and snip off the edge of the piping bag before you begin piping, to pipe out the layers in between. I do this so that the cream layer looks even all over. You may simply transfer the cream with the help of a spatula if that is convenient for you.
- Put some of the frosting on the serving platter or cake stand.
- Transfer the first layer to the stand. Brush it with generously with sugar syrup.
- Pipe out the chocolate frosting in circular motions starting from outer circumference towards the center. Smooth out the frosting with an offset spatula.
- Repeat the same with the second layer. Frost the top and sides of the cake well. It does not have to be perfect, so you really don’t need to smooth it out.
- Line the Kit Kat bars vertically by sticking them to the sides of the cake, it should stick pretty well to the frosting. If not, apply some frosting on the back of the kit kat bar and stick it. Wrap a bow around the Kit Kat’s to secure them in place.
- Fill the top of the cake with M&M’s. This cake will stay well for up to 3 days at room temperature or cover and store in the refrigerator for up to 5 days. Have a break have a KitKat cake slice 😀
Notes
- You may use 1 (15.25 oz) of chocolate cake mix and bake in 2 8-inch cake pans as per package instructions. Replace every egg for 1/4 cup yogurt for an eggless version.
- Refrigerate the Kit Kat’s so that they don’t smudge when you stick them to the cake.


Kit Kat Cake Recipe From Scratch | M&M’s Cake | Candy Cake (Eggless)
Ingredients
Measuring cup used, 1 Cup = 250 ml, 1 tsp = 5 ml, Make sure all ingredients are at room temperature.
For the chocolate cake base
- 3 cups all-purpose flour, {Spooned and leveled}
- 1/3 cup +1 tbsp unsweetened cocoa
- 2 cups sugar
- 2 tsp baking soda
- 2 tsp instant coffee powder, optional
- 1 tsp salt
- 2 tsp white vinegar
- 2 tsp pure vanilla extract
- 1/2 cup + 2 tbsp vegetable oil
- 2 cup water, room temperature
For the chocolate buttercream frosting
- Approx 2.5 to 3 cups of chocolate frosting, or any other frosting of your choice
For the decor
- 5 packs of (3 oz) Kit Kat bars (king size), about 40 Kit Kat bars
- 10.53 oz bag of M&M’s, you may even add more, but this is the minimum you will need to cover the cake
For the sugar syrup
- Dissolve 1 tbsp of sugar in 2 to 3 tbsp water
Instructions
- FOR THE CHOCOLATE CAKE BASE
- Preheat oven to 350 degrees F. Prepare two 8 inches round cake pans, by greasing it with oil and lining the bottom of the pan with pre-cut parchment paper. Trace the shape of the pan by placing it over the parchment paper, then trim and place the reverse side of the paper on to the bottom of the pan.
- Sieve the flour, baking soda, cocoa powder and coffee powder in a mixing bowl. Add sugar and salt and whisk to combine everything well.
- Make 3 depressions in the dry ingredients - two small, one larger.
- Pour vinegar in one depression, vanilla in the other and vegetable oil in larger depression.
- Pour water over all, mix well just until combined and no more flour pockets are visible. The batter may have a few lumps and that is okay, do not over mix.
- Divide the batter equally between the two cake pans, tap the pans on the countertop to remove air bubbles. Bake on the middle rack for about 35 minutes or until a toothpick inserted comes out clean. Transfer to a wire rack, let it cool completely before frosting. You can cover the cake and refrigerate it until you are ready to frost it. {Note: Oven baking times may vary, check your cake to avoid over baking it, but check no sooner than 30 minutes}.
FOR THE CHOCOLATE FROSTING
- Recipe here . This recipe will yield will about 2 cups of frosting, scale the recipe by 1.5 times to cover the entire, 8-inch two layer cake.
ASSEMBLING THE CAKE
- Once the cake has completely cooled down, scrape off the dome shape of the cake with the help of a long serrated knife to have a flat top. Also, transfer some cream to a piping bag and snip off the edge of the piping bag before you begin piping, to pipe out the layers in between. I do this so that the cream layer looks even all over. You may simply transfer the cream with the help of a spatula if that is convenient for you.
- Put some of the frosting on the serving platter or cake stand.
- Transfer the first layer to the stand. Brush it with generously with sugar syrup.
- Pipe out the chocolate frosting in circular motions starting from outer circumference towards the center. Smooth out the frosting with an offset spatula.
- Repeat the same with the second layer. Frost the top and sides of the cake well. It does not have to be perfect, so you really don’t need to smooth it out.
- Line the Kit Kat bars vertically by sticking them to the sides of the cake, it should stick pretty well to the frosting. If not, apply some frosting on the back of the kit kat bar and stick it. Wrap a bow around the Kit Kat’s to secure them in place.
- Fill the top of the cake with M&M’s. This cake will stay well for up to 3 days at room temperature or cover and store in the refrigerator for up to 5 days. Have a break have a KitKat cake slice :D
Notes
- You may use 1 (15.25 oz) of chocolate cake mix and bake in 2 8-inch cake pans as per package instructions. Replace every egg for 1/4 cup yogurt for an eggless version.
- Refrigerate the Kit Kat’s so that they don’t smudge when you stick them to the cake.
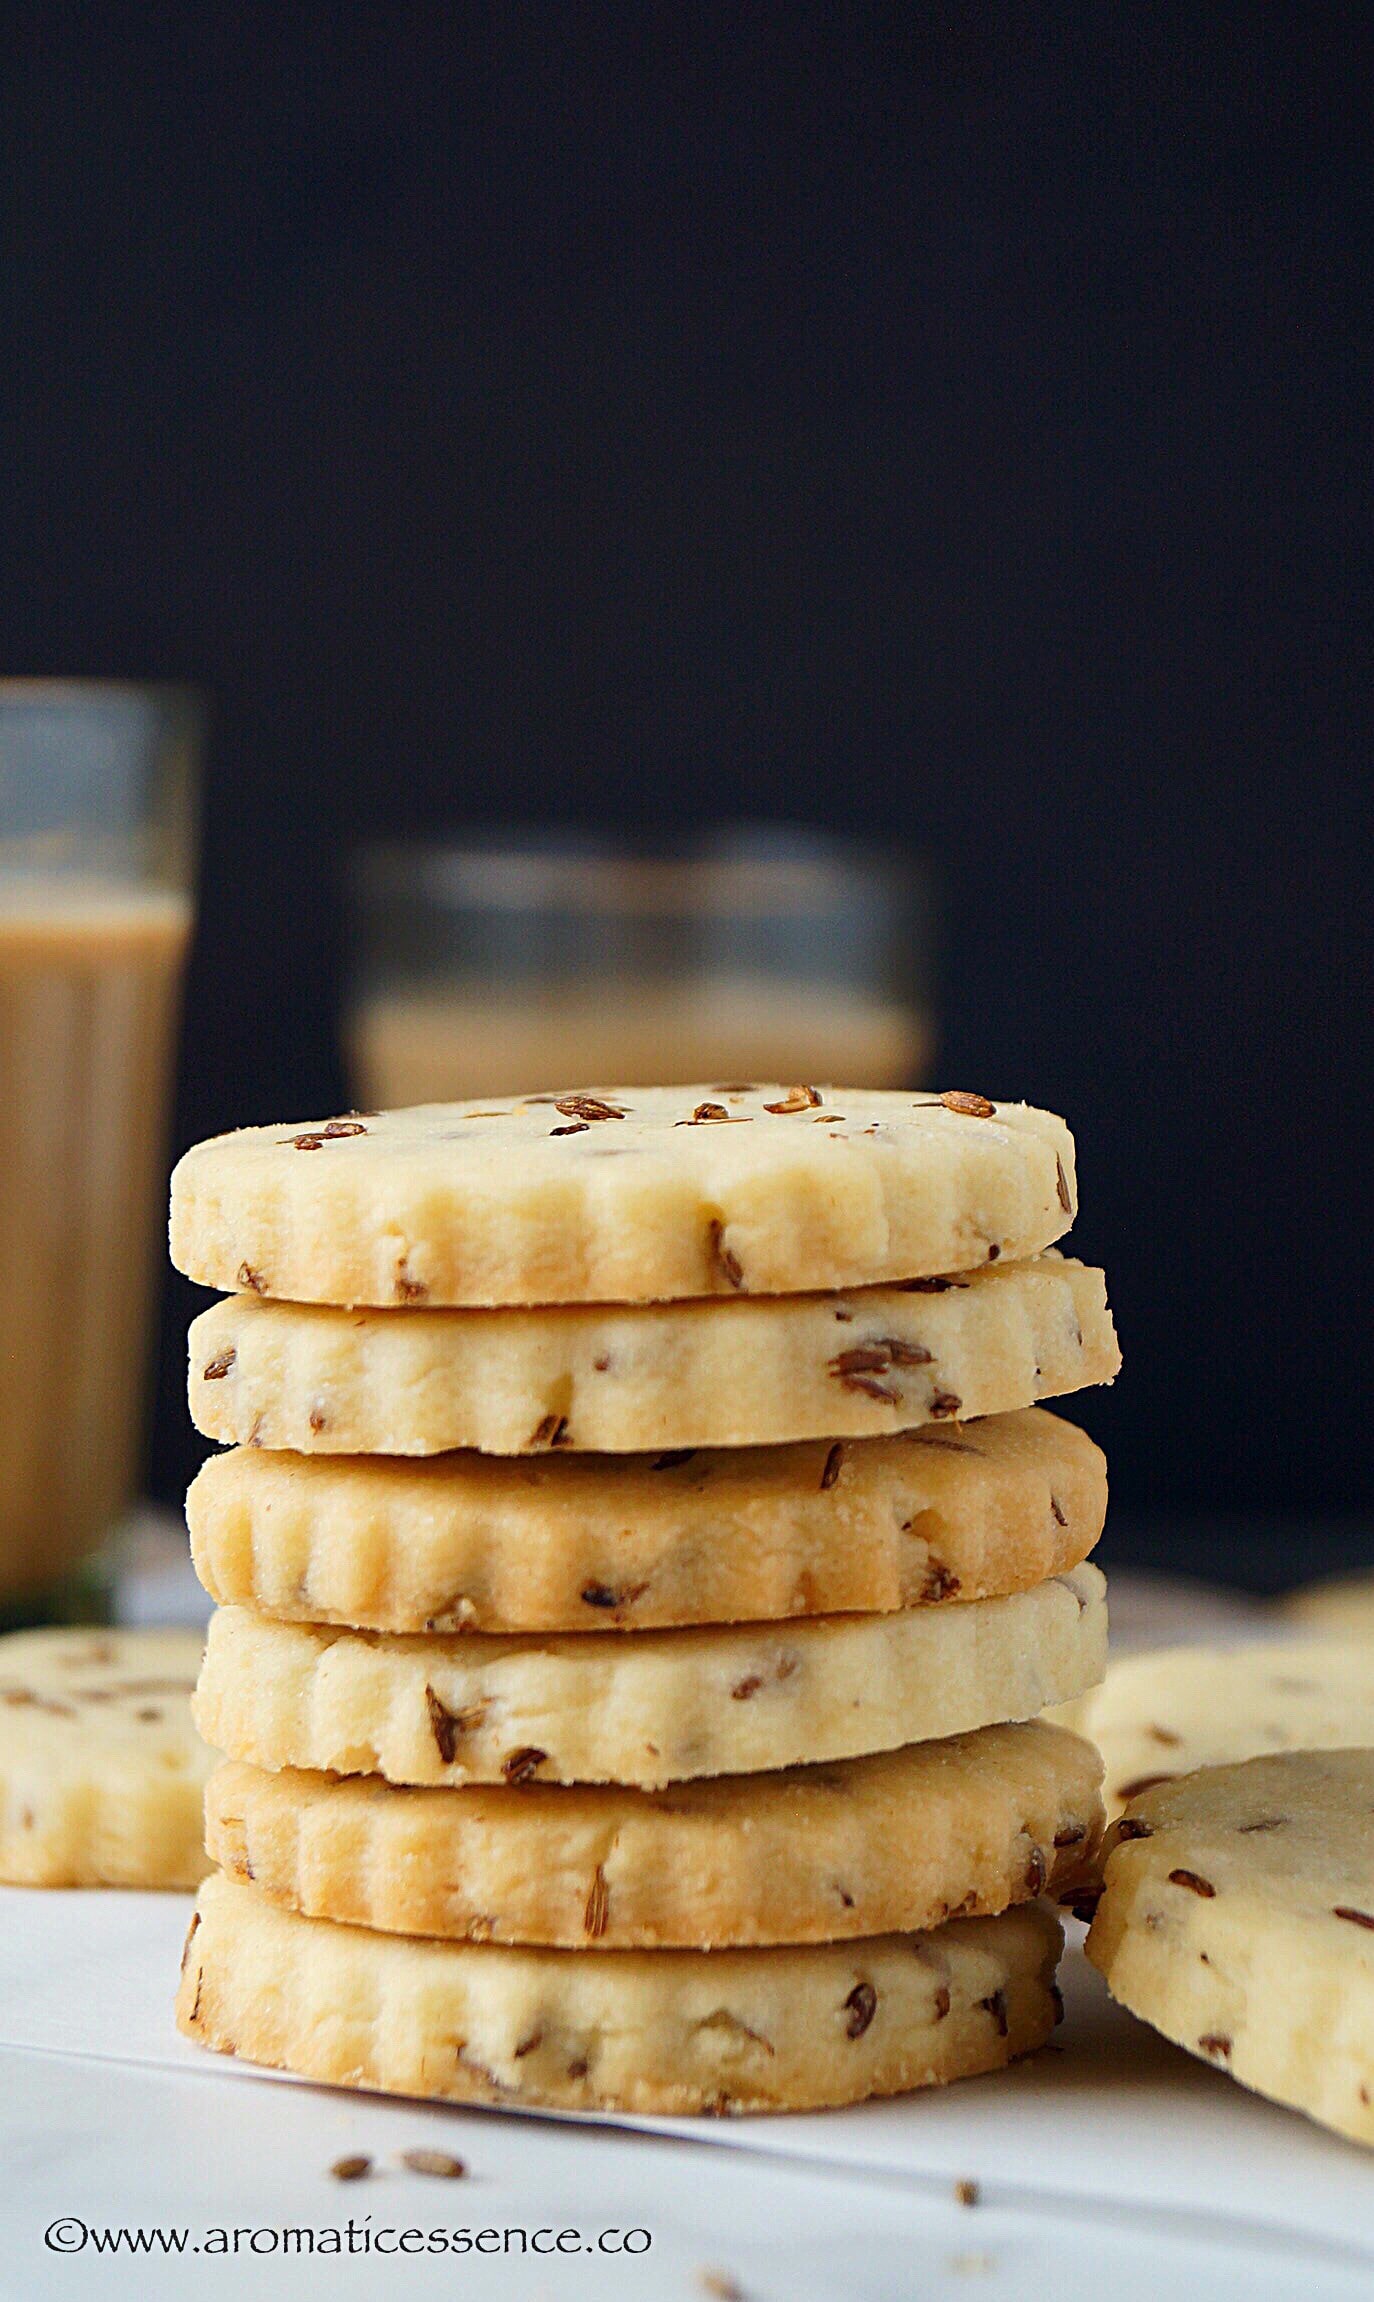
Jeera Biscuits ( cumin cookies) are sweet, salty, crispy, crunchy and crumbly Indian bakery style eggless cookies, flavored with roasted cumin seeds.

Jeera or zeera is the Hindi name for cumin seeds. Zeera biscuits are an amazing mix of savory and sweet and a welcome break from the overloaded sweet cookies. These namkeen biscuits (savory cookies) will satisfy your sweet and salty craving all in one go. They are buttery, crispy and so addictive.
If you have enjoyed some of the eggless cookies that I’ve shared earlier, you are definitely going to enjoy this savory Indian biscuit recipe too. They are also known as salt biscuits .
These sweet and salty biscuits are packed with the fragrant earthy aroma of roasted cumin. So good!

The base of these jeera butter biscuits is adapted from one of my favorite types of biscuits, Karachi bakery style fruit biscuits . Except, we don’t slice and bake here rather chill the dough until it’s workable, roll it and use a cookie cutter to form desired shapes. And of course, the amount of sugar is reduced by half, as this is more of a savory cookie.
We love to enjoy these salted jeera biscuits with our evening cuppa over some chit-chat or frankly I can have them anytime. Khari biscuits and rusks are also some of my favorite Indian tea-time snacks.
I enjoyed these snacks as a kid and it makes me happy to see my son enjoy it too. Of course, anything cooked/baked by me and is well received by him is always a bonus 😀

- How do you make these namkeen zeera biscuits?
- If you enjoyed this easy, sweet and savory salt biscuits, you may also like these eggless biscuit recipes
- How to make jeera biscuits (cumin cookies) – Step by step instructions
- Jeera Biscuits | Indian Cumin Cookies
How do you make these namkeen zeera biscuits?
You need pantry basics for this eggless jeera biscuit recipe i.e flour, butter, powder, powdered sugar, salt, and of course the star ingredient, cumin seeds.
- You will start off by creaming butter and sugar until light and creamy.
- Add in the dry ingredients.
- Shape the dough as disc and refrigerate for some time.
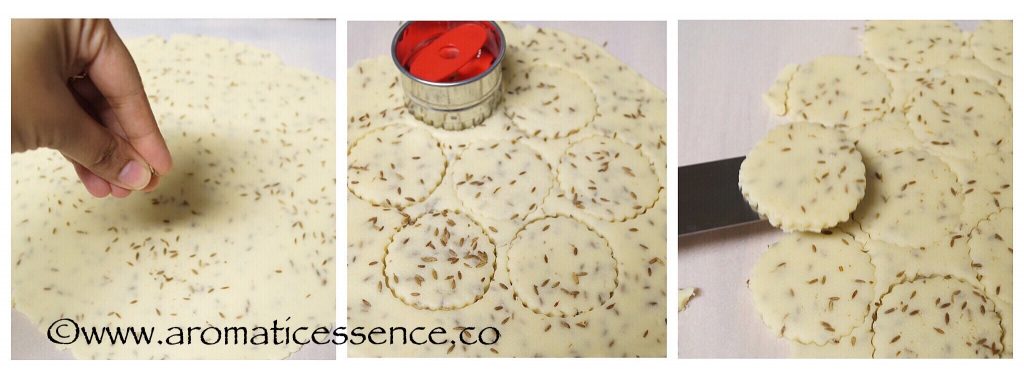
- Roll out the dough, sprinkle some more cumin seeds, cut out desired shapes.
- Bake until a nice golden brown.
You can also make ajwain cookies with this same recipe. Swap the cumin seeds with ajwain (carom seeds).
- Karachi fruit biscuits
- Badam pista biscuits
- Whole wheat and oats digestive cookies
- Nankhatai (Indian shortbread cookies)
- Coconut cookies
So let’s get on to the recipe and make some tasty tea time munchies!

How to make jeera biscuits (cumin cookies) – Step by step instructions
Step 1: Roast cumin seeds
Place the butter on your countertop until it reaches room temperature and is softened. You do not want it to be too soft. It should have some resistance when you push a finger through it.
Dry roast 1 tablespoon of cumin seeds on a skillet until fragrant. Transfer to a plate to cool completely. Then transfer to your work surface and crush it lightly with the help of a rolling pin.

Step 2: Dry ingredients
Sift 1 cup + 2 tablespoons of all-purpose flour in a mixing bowl. Add 3/4 of the crushed cumin seeds, along with 3/4 teaspoon of salt.

Step 3: Cream butter and sugar
Place 1/2 cup of softened butter in the bowl of your stand mixer (you can use your hand mixer or a whisk too), sift in 1/4 cup of powdered sugar, beat on low heat initially, until the powdered sugar is mixed with the butter, then increase the speed to medium and beat till light and creamy.

Step 4: Add dry ingredients to the creamed butter-sugar mixture
Now switch to the lowest speed and add the flour in 3 parts. Gently bring the dough together. Do not knead. If at all the dough is dry, sprinkle few teaspoons of milk at a time, do not add too much.

Step 5: Refrigerate the cookie dough
Shape the dough in a disc and wrap in a cling film. Refrigerate it for 15-30 minutes to make it workable.

Step 6: Roll and cut out
Preheat the oven to 180 degrees C/350 degrees F. Line a baking sheet with parchment paper or Silpat. Remove the disc from the refrigerator, place between 2 parchment papers, and roll it to 1/4 inch thickness.
Sprinkle the remaining cumin seeds, and gently press int the dough. Cut out desired shapes using a cookie cutter. Collect the scraps, form a disc, and repeat the same procedure or make small balls from the scraps and flatten them between your palms.
Step 7: Bake
Transfer the cookies with the help of an offset spatula on the baking sheet at least 2 inches apart.

Bake for 12 -15 minutes or 15-18 minutes for crispier cookies. When the bottom of the cookies begins to brown, they are done. They will be soft in the middle but will firm upon cooling. Cool in the baking tray for five minutes and then transfer to the wire rack to cool completely. Jeera biscuits will last for about two weeks in an airtight container.

Notes
- If you don’t prefer salty cookies, use only 1/4 tsp salt or up to 1 tsp of salt if you prefer saltier cookies. I’ve used 3/4 tsp of salt.
- You can use whole wheat flour in place of all-purpose flour for whole wheat jeera biscuits. Simply adjust the consistency of the dough with milk by adding 1 tbsp milk at a time. With all-purpose flour, I didn’t need to add any milk.
- You can roll out the dough a little thicker if you like chunkier cookies. Baking time will increase, so keep an eye.

You can also follow me on Facebook , Pinterest, Instagram & Twitter

Jeera Biscuits | Indian Cumin Cookies
Ingredients1x2x3x
- 1 cup +2 tablespoons allpurpose flour/maida, (spooned and leveled), 160 grams
- 1/2 cup softened unsalted butter, 113 grams
- 1/4 cup powdered sugar/confectioner’s sugar, 35 grams
- 1 tbsp cumin seeds
- 1/4 to 3/4 tsp salt
- 1-2 tbsp milk, if required
Instructions
- Place the butter on your countertop until it reaches room temperature and is softened. You do not want it to be too soft. It should have some resistance when you push a finger through it. Dry roast the cumin seeds on a skillet until fragrant. Transfer to a plate to cool completely. Then transfer to your work surface and crush it lightly with the help of a rolling pin.
- Sift the flour in a mixing bowl. Add 3/4 of the crushed cumin seeds, along with the salt.
- Place butter in the bowl of your stand mixer (you can use your hand mixer or a whisk too), sift in powdered sugar, beat on low heat initially, until the powdered sugar is mixed with the butter, then increase the speed to medium and beat till light and creamy.
- Now switch to the lowest speed and add the flour in 3 parts. Gently bring the dough together. Do not knead. If at all the dough is dry, sprinkle few teaspoons of milk at a time, do not add too much.
- Shape the dough in a disc and wrap in a cling film. Refrigerate it for 15-30 minutes to make it workable.
- Preheat the oven to 180 degrees C/350 degrees F. Line a baking sheet with parchment paper or Silpat. Remove the disc from the refrigerator, place between 2 parchment papers and roll it to 1/4 inch thickness. Sprinkle the remaining cumin seeds, and gently press int the dough. Cut out desired shapes using a cookie cutter. Collect the scraps, form a disc, and repeat the same procedure or make small balls from the scraps and flatten them between your palms.
- Transfer the cookies with the help of an offset spatula on the baking sheet at least 2 inches apart.
- Bake for 12 -15 minutes or 15-18 minutes for crispier cookies. When the bottom of the cookies begins to brown, they are done. They will be soft in the middle but will firm upon cooling. Cool in the baking tray for five minutes and then transfer to the wire rack to cool completely. Jeera biscuits will last for about two weeks in an airtight container.
Notes
- If you don’t prefer salty cookies, use only 1/4 tsp salt or up to 1 tsp of salt if you prefer saltier cookies. I’ve used 3/4 tsp of salt.
- You can use whole wheat flour in place of all-purpose flour for whole wheat jeera biscuits. Simply adjust the consistency of the dough with milk by adding 1 tbsp milk at a time. With all-purpose flour, I didn’t need to add any milk.
- You can roll out the dough a little thicker if you like chunkier cookies. Baking time will increase, so keep an eye.
- Nutrition Disclaimer: Nutrition facts are approximate values calculated using an online nutrition calculator. If you rely on them for your diet, please use your preferred nutrition calculator.
- Measuring cup used, 1 Cup = 250 ml, 1 tsp = 5 ml
Nutrition

