Khajur roll is a festive and delicious Indian dessert made by combining chopped walnuts, almonds, cashew nuts, and pistachios with pitted dates. The chewy texture, natural sweetness, and caramel-like flavour of the dates complement the nuttiness making this date and nut roll a perfectly balanced dessert.

Khajur rolls are a healthier alternative to the sugar-laden sweets that are available in the market during the festive season. If you are someone who needs a sweet treat after a meal or if you are simply looking to gift sugar-free mithai to your friends and family, these date and nut rolls certainly won’t disappoint.
Khajur rolls are also known by other names like dry fruit barfi roll, dry fruit halwa, date rolls, khajoor dates barfi, dry fruit mithai, date and nut roll, etc to name a few.
These khajoor dry fruit rolls have a soft and chewy texture and a subtle crunch from the nuts and the poppy seeds. They are sweet, nutty, and flavored with the exotic fragrance of cardamom.
Why should you try this recipe?
☑ Beginner-friendly recipe
☑ Not only delicious but also a good source of energy
☑ Free from refined sugar
☑ Much more economical to make it at home
☑ Can be enjoyed as a snack or dessert.
☑ Perfect for gifting this festive season

Ingredients you’ll need
- Dates: This forms the base of the recipe and also provides the sweetness needed for the rolls. Use any soft variety of dates.
- Nuts: I’ve used a mix of almonds, cashew nuts, pistachios, and walnuts. You can use either 1 or a combination of nuts. But stick to the ratio mentioned in the recipe for best results.
- Ghee: A small amount of ghee is used to roast the nuts and dates. Roasting the nuts in ghee helps in crisping them up while also enhancing their nutty flavour. Also, roasting the dates helps caramelize the sugars in them which gives these rolls a delicious depth of flavor.
- Cardamom: To flavor these rolls.
- Poppy seeds, slivered pistachios, and dried rose petals: These are used to coat the exterior of the roll. The poppy seeds and pistachios add a subtle crunch and also add a visual contrast making individual pieces of this date roll look beautiful!

How to make Khajur roll recipe – Step-by-step process
Step 1: Dates paste
Transfer 250 grams of pitted and roughly chopped dates into a blender. Process the dates using the pulse mode to make a coarse paste. ( Photos 1 & 2 )
Also, grease a plate with a little ghee or oil and set aside. ( Photo 3 )

Step 2: Roast poppy seeds, nuts, and dates paste
Dry roast 10 grams of poppy seeds on medium-low heat for 1 to 2 minutes. Set aside. ( Photos 4 to 6 )

Heat 1/2 tablespoon ghee in a pan over medium-low heat. Add the chopped nuts (25 grams each of chopped cashew nuts, almonds, walnuts, and pistachios) and roast until they become slightly golden. Set aside. ( Photos 7 to 10 )

Heat the remaining half tablespoon of ghee. Add the dates paste and cook on low heat until it softens, around 3 to 4 minutes. ( Photos 11 to 13 )

Step 3: Combine nuts and cardamom powder with the roasted dates paste
Add the roasted nuts and 1/2 teaspoon cardamom powder to the dates mixture, mix well, and cook for another 2-3 minutes on low heat. ( Photos 14 to 16 )
Turn off the heat and transfer the date-nut mixture to a plate. Allow it to cool down for a few minutes. ( Photo 17 )

Step 4: Shape the mixture, refrigerate and slice
Grease your palms with a little ghee or oil and shape the mixture into a 7-inch-long log by pressing it with both your palms. ( Photos 18 & 19 )

Place poppy seeds, 1 teaspoon each of slivered pistachios, and dried rose petals on a plate or silpat. ( Photo 20 )
Roll the log in the poppy seed mixture, ensuring an even coating on the exterior of the log. ( Photos 21 & 22 )
Wrap the log in parchment paper, aluminium foil, or plastic wrap and refrigerate for about 30 to 60 minutes to firm up. ( Photos 23 & 24 )

Step 5: Slice and serve
Unwrap the parchment paper and slice the log into 1/2-inch thick pieces. Enjoy! ( Photos 25 & 26 )

Storage instructions
Room temperature: These khajur rolls will keep well in an airtight container at room temperature for 1 to 2 weeks in a cool, dark place.
Refrigerator: For a longer shelf life, it’s best to refrigerate these date rolls in an air-tight container. It will help maintain their freshness. They will stay good in the refrigerator for up to 1 month.
Freezer: You can freeze khajur rolls for several months. Wrap each roll individually in a cling wrap and place them in a freezer-safe bag or in an airtight container. Thaw in the refrigerator for a few hours before you intend to serve.

Tips to make the best khajur roll recipe
The ratio of dates to dry fruits: Please stick to the ratio of dates to dry fruits as specified in the recipe. Adding extra dry fruits will make it difficult to shape the mixture into a log. I like to use a 1:2.5 ratio of dry fruits to dates.
Dates: I’ve used Omani dates for this recipe. These plump, soft, and moist dates have a rich sweet flavor and a chewy texture. Any soft variety of dates works well for this recipe. If you can get your hands on Medjool dates, definitely use those, they are the best! If you have a dry variety of dates, you can rehydrate them by soaking them in hot water for about 30 minutes. This will help to soften them up.
Sweetness: These khajur dry fruit rolls are pretty sweet with the variety of dates I’ve used in this recipe. The sweetness may vary from one variety to another. If the dates aren’t too sweet, you can add a couple of tablespoons of maple syrup, agave nectar, jaggery, or any other sweetener of your choice.
Yield: I got about 14 decent-sized pieces with this quantity. But you can either make smaller or bigger rolls and slice the roll as desired. You can also scale this recipe easily to yield more servings.
Variations
- Make it a ladoo or barfi: Instead of making khajur roll, you can shape the mixture into ladoos or set it in a pan and cut it into desired pieces.
- Play around with the coating: Instead of poppy seeds, you can use desiccated coconut or crushed nuts to coat the khajur rolls. Crushed pistachios give these rolls a very beautiful appearance.
- Dry fruits: You can add more dry fruits like figs, apricots, plums, prunes, raisins, cranberries, etc. Feel free to use whatever you have at hand.
- Seeds: You can also add pumpkin seeds, watermelon seeds, muskmelon seeds, flaxseeds, sesame seeds, etc.
- Spices: Feel free to play around with the spices. You can use nutmeg, cinnamon, allspice, etc to give it a different flavor.
- Flavour: You can also flavour these rolls with rose essence, vanilla extract, almond extract, or saffron extract, etc.

What is khajur sweet?
Khajur sweet or khajur ki mithai is a delicious Indian dessert made from dates, nuts, and/or seeds, and ghee and usually flavoured with cardamom. The dates-nut mixture can either be shaped as a ladoo, barfi, or roll. It is prepared during special and festive occasions like Diwali, Holi, Eid, etc.
Can I make it vegan?
Yes, of course, you can! Simply swap the ghee with your preferred cooking oil.
Are khajur rolls healthy?
The ingredients used in these rolls are packed with good fats, fiber, protein, vitamins, minerals, and antioxidants. They provide warmth and energy to the body, making it ideal to enjoy during the winter. Moreover, these are free from refined sugar, making them a healthier choice to enjoy as a dessert. Having said that, they are high in calories and should be consumed in moderation.
You may also enjoy these Diwali recipes
- Coconut ladoo
- Rava laddoo
- Karanji
- Shankarpali
- No-cook kaju katli
- Mawa barfi

Khajur Roll Recipe | Indian Date And Nut Rolls
Ingredients1x2x3x
- 250 grams pitted dates roughly chopped, 2 cups
- 25 grams chopped walnuts ¼ cup
- 25 grams chopped pistachios little less than ¼ cup
- 25 grams chopped cashew nuts ¼ cup
- 25 grams chopped almonds ¼ cup
- 10 grams poppy seeds approx 1 tablespoon
- 1 tablespoon ghee divided, plus more more to grease plate and palms
- 1/2 teaspoon cardamom powder
Other ingredients
- 1 teaspoon slivered pistachios optional
- 1 teaspoon edible dried rose petals optional
Instructions
Dates paste
- Transfer the pitted and roughly chopped dates into a blender. Process the dates using the pulse mode to make a coarse paste.
- Also, grease a plate with a little ghee or oil and set aside.
Roast poppy seeds, nuts and dates paste
- Dry roast the poppy seeds on medium-low heat for 1 to 2 minutes. Set aside.
- Heat ghee in a pan over medium-low heat. Add the nuts and roast until they become slightly golden. Set aside.
- Heat the remaining half tablespoon of ghee. Add the dates paste and cook on low heat until it softens, around 3 to 4 minutes.
Combine nuts and cardamom powder with the roasted dates paste
- Add the roasted nuts and cardamom powder to the dates mixture, mix well and cook for another 2-3 minutes on low heat.
- Turn off the heat and transfer the date-nut mixture to a plate. Allow it to cool down for a few minutes.
Shape the mixture into a log and refrigerate
- Grease your palms with a little ghee or oil and shape the mixture into a 7-inch-long log by pressing it with both your palms.
- Place poppy seeds, slivered pistachios, and dried rose petals on a plate or silpat. Roll the log in the poppy seed mixture, ensuring an even coating on the exterior of the log.
- Wrap the log in parchment paper, aluminium foil, or plastic wrap and refrigerate for about 30 to 60 minutes to firm up.
Slice and serve
- Unwrap the parchment paper slice the log into 1/2-inch thick pieces. Enjoy!
Video
Notes
Nutrition

Khajur Roll Recipe | Indian Date And Nut Rolls
Ingredients
- 250 grams pitted dates roughly chopped, 2 cups
- 25 grams chopped walnuts ¼ cup
- 25 grams chopped pistachios little less than ¼ cup
- 25 grams chopped cashew nuts ¼ cup
- 25 grams chopped almonds ¼ cup
- 10 grams poppy seeds approx 1 tablespoon
- 1 tablespoon ghee divided, plus more more to grease plate and palms
- 1/2 teaspoon cardamom powder
Other ingredients
- 1 teaspoon slivered pistachios optional
- 1 teaspoon edible dried rose petals optional
Instructions
Dates paste
- Transfer the pitted and roughly chopped dates into a blender. Process the dates using the pulse mode to make a coarse paste.
- Also, grease a plate with a little ghee or oil and set aside.
Roast poppy seeds, nuts and dates paste
- Dry roast the poppy seeds on medium-low heat for 1 to 2 minutes. Set aside.
- Heat ghee in a pan over medium-low heat. Add the nuts and roast until they become slightly golden. Set aside.
- Heat the remaining half tablespoon of ghee. Add the dates paste and cook on low heat until it softens, around 3 to 4 minutes.
Combine nuts and cardamom powder with the roasted dates paste
- Add the roasted nuts and cardamom powder to the dates mixture, mix well and cook for another 2-3 minutes on low heat.
- Turn off the heat and transfer the date-nut mixture to a plate. Allow it to cool down for a few minutes.
Shape the mixture into a log and refrigerate
- Grease your palms with a little ghee or oil and shape the mixture into a 7-inch-long log by pressing it with both your palms.
- Place poppy seeds, slivered pistachios, and dried rose petals on a plate or silpat. Roll the log in the poppy seed mixture, ensuring an even coating on the exterior of the log.
- Wrap the log in parchment paper, aluminium foil, or plastic wrap and refrigerate for about 30 to 60 minutes to firm up.
Slice and serve
- Unwrap the parchment paper slice the log into 1/2-inch thick pieces. Enjoy!
Video
Notes
Nutrition
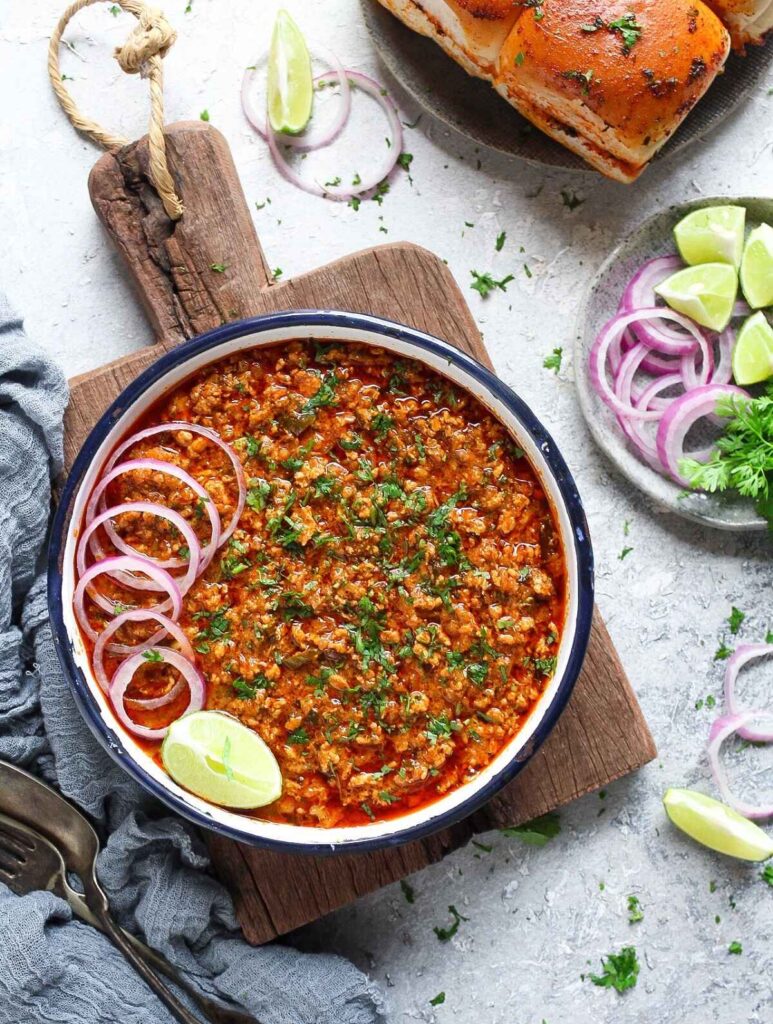
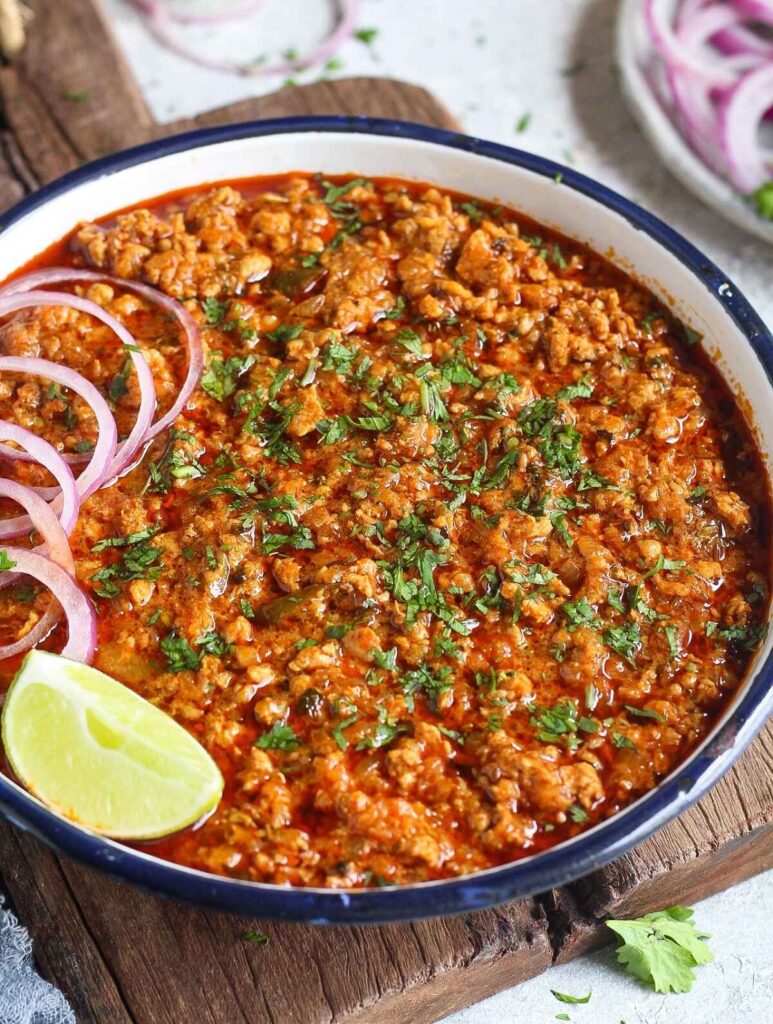
Chicken keema masala is a delicious Indian-style minced chicken curry, packed with bold, savoury, and robust flavors. It is made with minced chicken, aromatics, tomatoes, curd, and a blend of Indian spices. Serve with bread or rice for a filling and hearty, busy weeknight meal!
Minced meat is pretty versatile and a great ingredient to have around in the freezer. It comes in handy to make quick recipes.
I love using chicken keema to make recipes like chicken seekh kebab , chicken galouti kebab , chapli kebab, meatball curry, nargisi kofta curry , etc to name a few.
Why you will love this recipe?
☑ It is a delicious way to transform bland and boring minced chicken using basic ingredients
☑ Can be made ahead
☑ It is a very comforting dish
☑ Leftovers are great to make so many other delicious recipes (check recipe tips for suggestions)
☑ It can be adapted to suit your personal preference
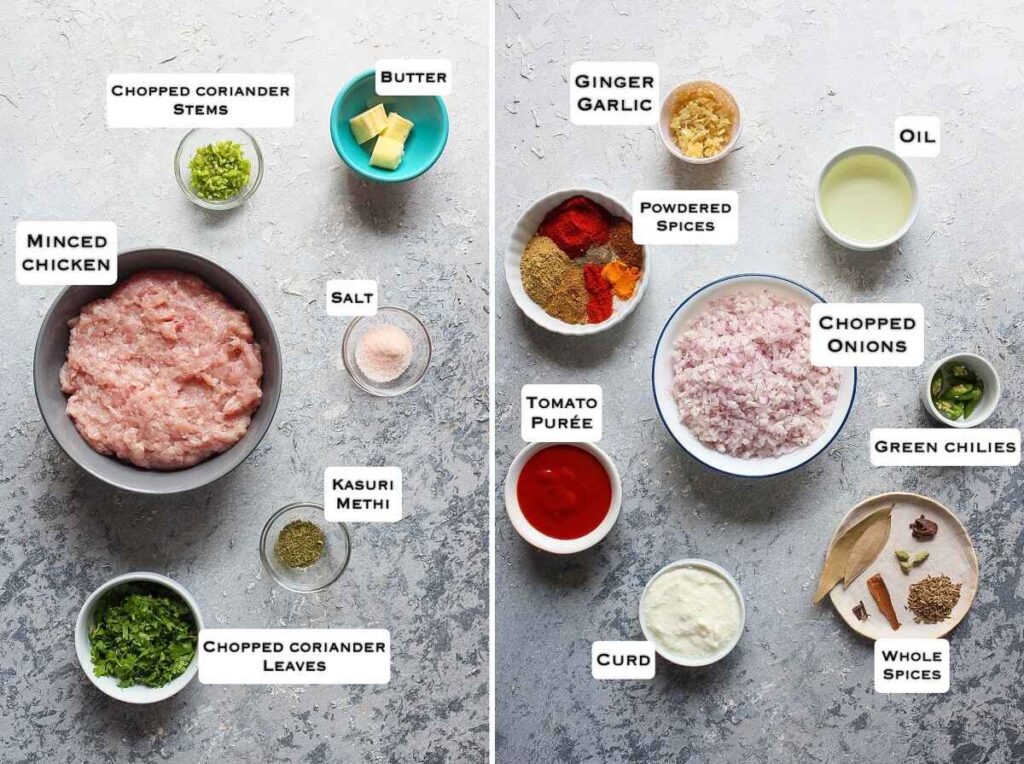
Ingredients needed
To make this chicken kheema masala recipe, you will need;
- Ground chicken: I’ve used packaged minced chicken that I source online from Licious (not sponsored, it is what I genuinely love using).
- Aromatics: These are the usual suspects, i.e. onions, ginger, and garlic. I’ve used red onions and coarsely crushed the ginger and garlic in a mortar and pestle. You may use store-bought or homemade ginger garlic paste instead.
- Spices: You will need whole spices like bay leaves, cloves, cinnamon, black cardamom, green cardamom, and cumin seeds along with powdered spices like coriander, cumin, red chili, Kashmiri chili, garam masala powder, salt, and black pepper.
- Tomatoes: I’ve used readymade tomato puree, but you can puree 2 fresh tomatoes, and use that instead. You may also use canned crushed tomatoes or 2 tablespoons of tomato paste instead. It adds a tangy taste to the keema. But you may skip it if you wish to.
- Curd or yogurt: Adds a subtle tanginess, along with some richness and creaminess to the dish.
- Herbs: Dried fenugreek leaves add an earthy flavor and fresh coriander leaves add an element of freshness. I’ve also added a bit of tender coriander stems as it has more flavour than the leaves.
- Cooking fat: I’ve used oil, but you can also use ghee or a combination of oil plus ghee. You can also use mustard oil, heat on medium-low heat until smoky.
- Butter: You will also need some butter to finish off the dish!
There are many ways to make this recipe, some don’t include curd, some skip the whole spices, and some make it with a green spice paste (check out my green masala keema recipe ).
I personally love the green masala keema, but this version is an adaption of my Mom-in-law’s recipe and it leans more toward the North Indian flavors. It is simple and delicious and I really hope you will give it a go! I’m pretty certain it will make the cut to your weekly rotation meals!
How to make chicken keema masala – Step-by-step process
Step 1: Onion-tomato masala
Heat 3 to 4 tablespoons oil in a kadai on medium heat. Add whole spices and cumin seeds, and saute for a few seconds until the spices are aromatic. ( Photos 1 and 2 )
Add 2 cups of finely chopped onions, and saute until they turn golden brown. ( Photos 3 and 4 )
Add 2 tablespoons of crushed ginger garlic, and saute until the raw smell vanishes. ( Photos 5 and 6 )

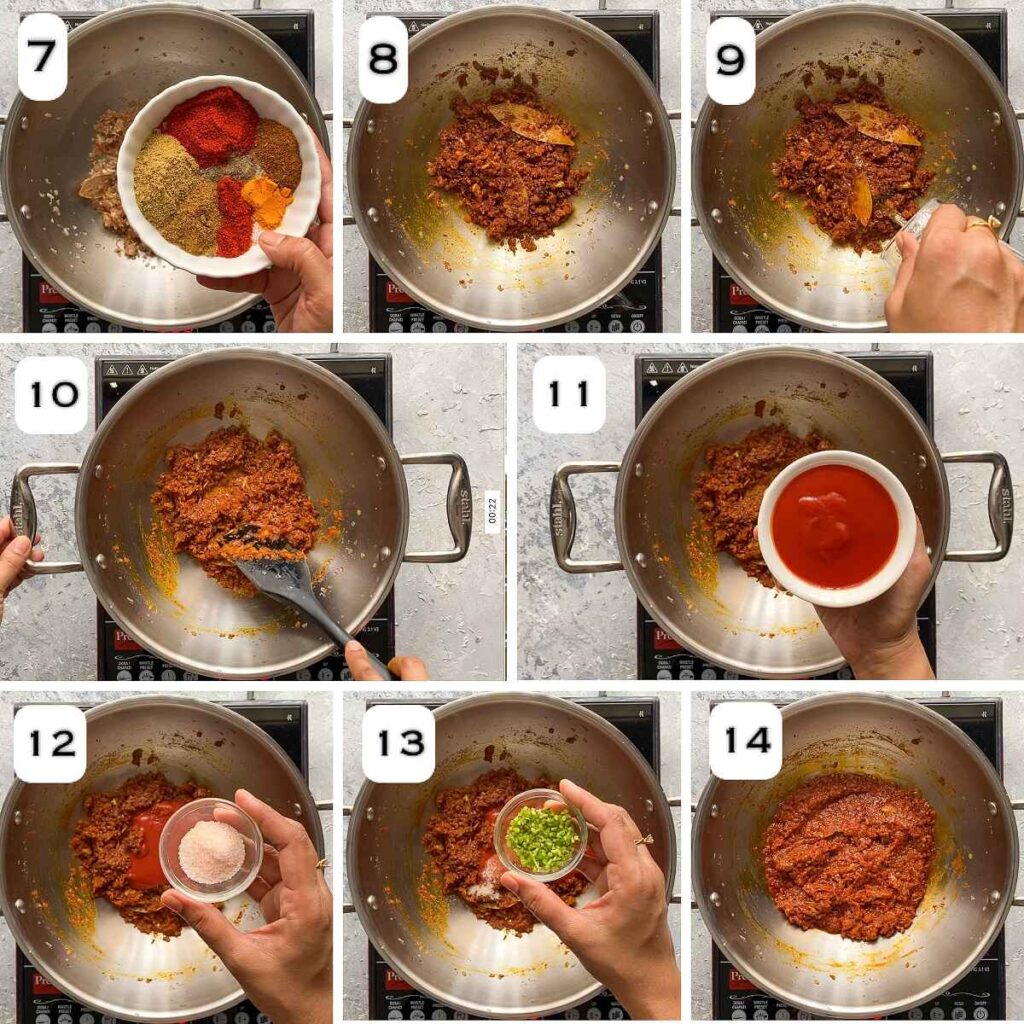
Add 1 tablespoon of coriander powder, 1 tablespoon Kashmiri red chili powder, 1 teaspoon of cumin powder, ½ teaspoon spicy red chili powder, 1 teaspoon of garam masala, ¼ teaspoon of turmeric, and ¼ teaspoon of black pepper, and saute on medium-low heat for another 30 seconds. ( Photos 7 and 8 )
Pro tip for the novice cook: Since there are quite a number of powdered spices in this step, I recommend measuring out the spices beforehand in a small bowl instead of adding them individually. This will help to prevent the spices from burning.
Add about 1/4 cup of water to prevent the spices from burning. ( Photos 10 and 11 )
Add ½ cup of tomato puree, salt to taste, and 1 to 2 tablespoons of chopped coriander stems. ( Photos 11 to 13 )
Mix well, and cook on medium heat, stirring frequently, until the fat separates. ( Photo 14 )
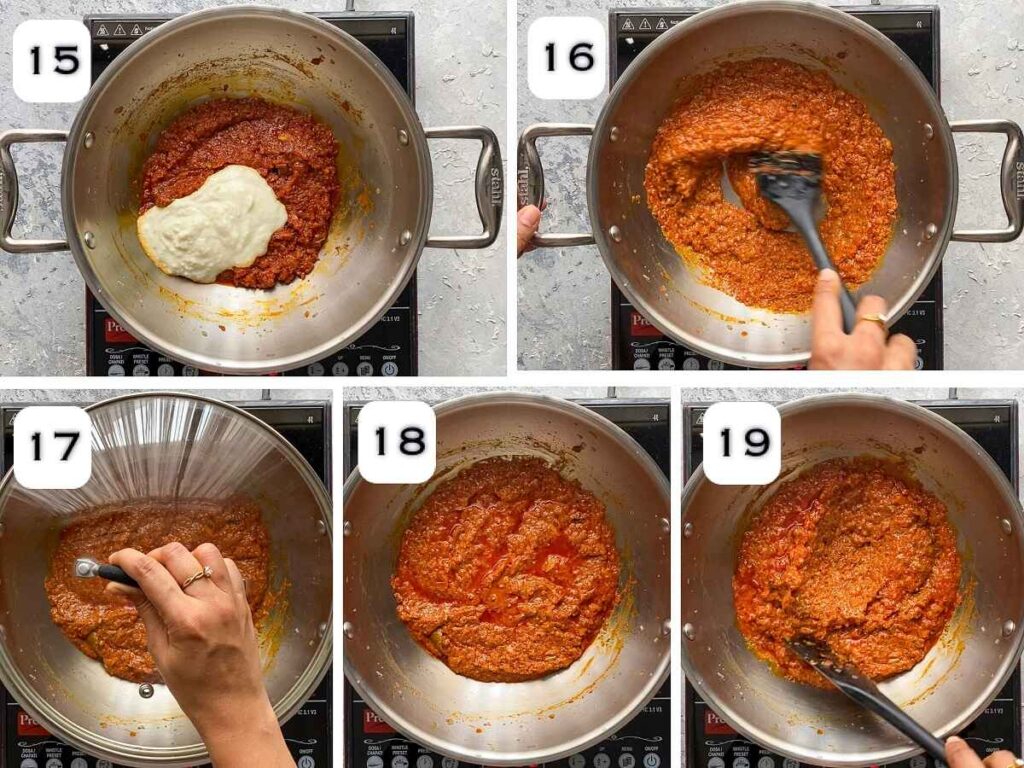
Turn down the heat to low, add ½ cup of whisked curd, mix well, cover, and cook for another 1-2 minutes. ( Photos 15 to 17 )
Open the lid, and give it a good mix. ( Photos 18 and 19 )
Step 2: Combine minced chicken with onion-tomato base and cook
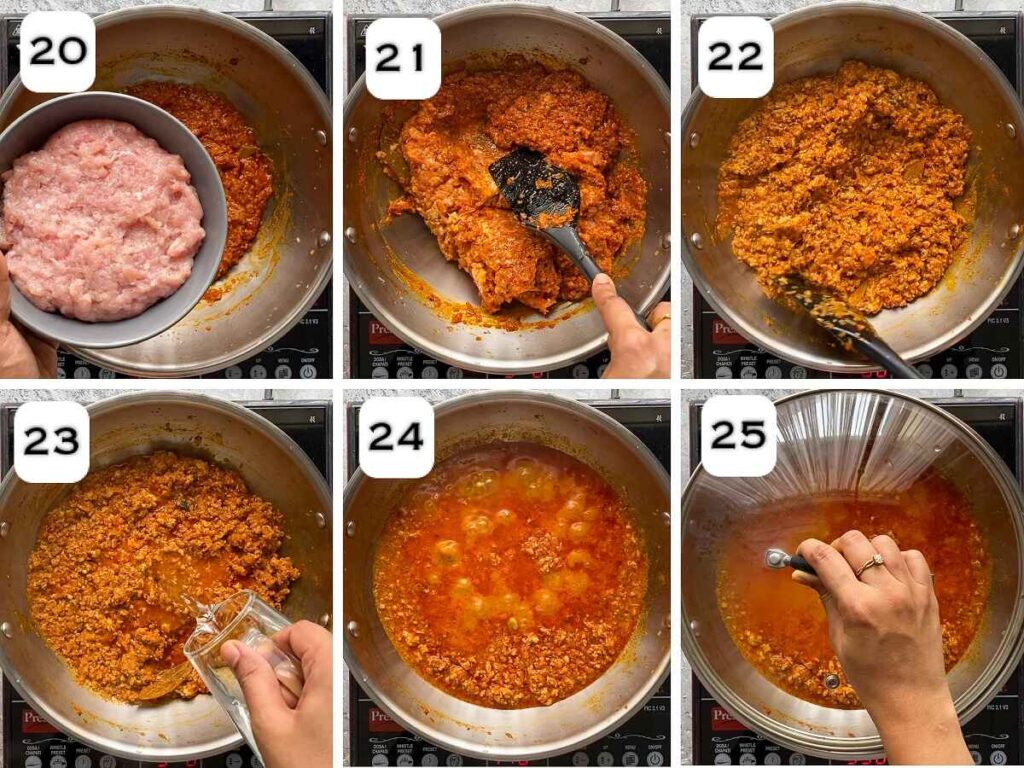
Add 450 grams of minced chicken, and mix on medium-low heat, breaking it with a spatula to ensure even cooking until well incorporated with the masala. Be sure to stir constantly to prevent the formation of lumps. ( Photos 20 and 21 )
Pro tip: Be sure to lower the heat while adding the keema or you will end up with big chunks of keema.
Then increase the heat to medium-high and keep cooking for another 7 to 8 minutes. ( Photo 22 )
Add 1 cup hot water, mix well, and bring to a boil. Reduce the heat to low, cover, and simmer, stirring occasionally for another 10 minutes. ( Photos 23 to 25 )
Step 3: Add the remaining ingredients
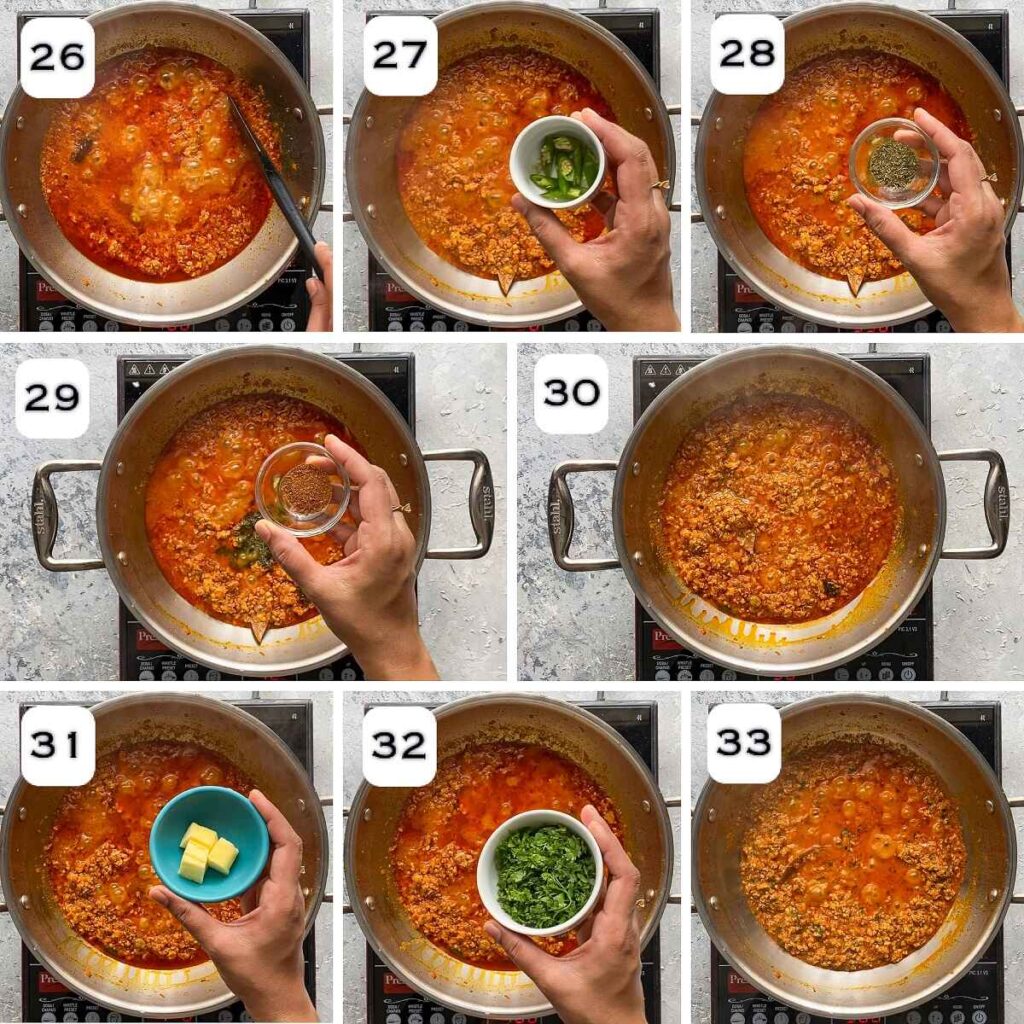
Open the lid (you may skim off some of the oil floating on top if you wish to) and give it a good mix. ( Photo 26 )
Add 2 chopped green chilies, ½ teaspoon of crushed kasuri methi, and the remaining ½ teaspoon of garam masala. ( Photos 27 to 28 )
Mix well and cook for another 2 minutes. Taste and adjust seasonings if needed. ( Photo 30 )
Finally, add 1 tablespoon cubed butter and ¼ cup chopped coriander leaves. Mix well and switch off the heat. ( Photos 31 to 33 )
Serve hot with pav!
Serving suggestions
I love serving this yummy chicken keema masala with some buttered and toasted pav along with some onion rings and lemon wedges on the side.
You can also serve it with steamed rice, jeera rice, or vegetable pulao .
Mop it up with bread like baguette, sourdough dinner rolls, or flatbreads like parathas, rumali roti, chapati, kulcha , naan, etc!
Another delicious option is to stuff them between sliders to make an Indian version of sloppy joes!

Storage instructions
- Refrigerator: Once the chicken keema has cooled down completely, transfer it into an airtight container, and refrigerate for up to 5 days.
- Freeze: You may also portion individual servings of chicken keema in freezer-safe zip top bags or containers. Remember to label the contents and freeze for up to 2 months. Thaw overnight in the fridge.
- Reheat: Reheat leftover or thawed chicken keema in a pan over medium heat, stirring frequently, until heated through. You may also reheat it in the microwave.
Recipe Tips
Use a heavy-bottomed pot: There is a lot of roasting in this recipe, so please be sure to use a heavy-bottomed pot or a good quality nonstick pot. This will prevent the ingredients from burning at the bottom of the pot.
Bhuno the ingredients well: We all love shortcuts, don’t we? Unfortunately, there is none when it comes to bhuno which is a Hindi word to roast or stir-fry ingredients like spices, vegetables, or meat over medium heat. Be sure to cook the ingredients really well, do not rush through the process. You can splash some water in between if at any point, you feel that the ingredients are sticking to the bottom of the pot. When you see the oil separating, it is a good indication that the masala is well-cooked.
Shortcut version: The good news is that you can use premade onion tomato or bhuna masala. Make this versatile masala base in bulk, freeze them in ice trays, and use the frozen bhuna masala cubes to make this dish or any other North Indian recipe. Saute about 3/4 cup of the bhuna masala in a little oil, add curd, cook well, and then add the chicken mince, and follow the rest of the recipe. Convenient, isn’t it?
Do not skimp on the onions: Caramelized onions add a depth of flavor and a hint of sweetness to the recipe. It may seem like a lot, but it reduces on caramelizing.
Tomatoes: You may skip the tomatoes if you wish to.
Curd: Try and use fresh curd. It should not be sour.
Spice tolerance: This recipe is not very spicy. You can increase the heat by increasing the spicy red chili powder, and black pepper, and using dark green chilies instead of mild green ones.
Consistency: We like a semi-thick consistency of chicken keema masala. If you like a saucier curry, add more water. Likewise, if you prefer a dry version, use 1/2 cup of water instead of 1 cup and cook until most of the moisture evaporates.
Make it creamy: You can add about 2 to 3 tablespoons of cream toward the end of the cooking process to add some richness and creaminess to the keema.
Transform leftovers: This is the best kind of leftovers you can have in your fridge. You can use leftover chicken keema to make quesadillas, tacos, burritos, sandwiches (grilled or open-faced), paratha, or wraps, as a topping for pizzas, naan pizza, etc. You can also use them to make keema puffs or keema samosas. Just be sure to dry off the excess liquid while making these recipes. Also, do pick out the whole spices before using this keema as stuffing, biting into whole spices is not a very pleasant experience.
Variations
- Mint leaves: You can also add a handful of fresh mint leaves along with the coriander leaves.
- Chicken keema matar: You can add about 1/2 cup of frozen green peas (matar) toward the end of cooking, and cook for another 2 to 3 minutes.
- Aloo keema: You can also add about 2 medium diced potatoes just before adding the water.
- Keema shimla mirch: You can add about 200 grams of diced capsicum (bell pepper) cubes.
- Aloo keema matar: You can add both potatoes and green peas.
- Tawa keema: Add a tablespoon of pav bhaji masala along with the other spices.
- Greens: You can add some chopped fresh methi leaves, spinach leaves, collard greens, kale, or dill leaves for some variation.
What is chicken keema?
Chicken keema or chicken qeema is a delicious minced meat preparation featuring tender and juicy minced chicken in a spicy, flavorful, and robust onion-tomato-based sauce, seasoned with an array of spices and fresh and dried herbs.
You can enjoy it as a dry preparation or as a semi-thick curry, depending on your personal preference.
Generally, keema or qeema refers to minced meat or ground meat in Hindi. Keema may be made from almost any kind of meat. Keema is popular not only in India but also in Pakistan and Bangladesh.
Can I make this recipe in the Instant Pot?
Yes, you can! Switch on the Instant Pot and set the ‘SAUTE’ button to ‘MEDIUM’. Follow the same steps as above right up to browning the ground chicken. Then add 1 cup of hot water, and give it a good mix. Make sure that there are no browned bits stuck at the bottom of the pot.
Close the lid of the Instant Pot and press ‘CANCEL’, set the valve to ‘SEALING’, and pressure cook on ‘HIGH’ for 4 minutes. Let the pressure release naturally for 10 minutes.
Press ‘SAUTE’ and add the remaining ingredients. If you prefer a thicker curry, adjust the consistency by simmering for a few more minutes.
How to make this recipe in a stovetop pressure cooker?
Follow the same steps as above right up to browning the ground chicken. Then add 1/2 cup of hot water, and give it a good mix. Pressure cook on medium-high heat for 2 to 3 whistles. Let the pressure release naturally. Open the lid and add the remaining ingredients.
Is chicken keema good for health?
Since chicken keema is made with lean meat, it is a healthier alternative to mince made with red meat. However, I’d suggest cutting back on the oil and spices to make this a bit lighter.
How to make a vegetarian version of this recipe?
Swap the chicken mince with soy/TVP granules. You can also use mushrooms, cauliflower rice, or a combination of these to make a vegetarian version. Cooking time will reduce, and skip the water or use it sparingly as the veggies may turn mushy.
How to grind chicken at home without a meat grinder?
Try and use chicken thighs instead of breasts for a flavorful and juicy chicken keema. Cut the chicken pieces into small chunks. Depending on the size of your food processor, work in batches if needed. Place the chunks in a food processor and pulse until you reach your desired consistency of the minced meat. I suggest keeping it coarse. Avoid using a blender as you’ll end up with a chicken paste.
You can also finely chop the chicken pieces using a sharp knife.

Chicken Keema Masala Recipe
Ingredients1x2x3x
- 3 to 4 tablespoons oil
- 2 bay leaves
- 3 cloves
- 1 inch cinnamon
- 1 black cardamom crushed
- 3 green cardamom
- 1 teaspoon cumin seeds
- 2 cups finely chopped onion 250 grams
- 2 tablespoons coarsely crushed ginger garlic 20 grams
- ½ cup tomato puree 110 grams
- Salt to taste, I’ve used 1½ tsp of pink Himalayan salt
- 1 tablespoon chopped coriander stems
- ½ cup whisked curd room temperature
- 450 grams minced chicken thaw for 30 mins if refrigerated
- 1 cup hot water adjust as per desired thickness of curry
- 2 green chilies
- ½ teaspoon crushed kasuri methi
- ¼ cup chopped coriander leaves
- 1 tablespoon unsalted butter
Spice mix
- 1 tablespoon coriander powder
- 1 tablespoon Kashmiri chili powder or paprika
- 1 teaspoon cumin powder
- ½ teaspoon red chili powder or cayenne adjust as per desired spice level
- 1½ teaspoon garam masala divided
- ¼ teaspoon turmeric
- ¼ teaspoon black pepper
Instructions
Onion-tomato masala
- Heat oil in a kadai on medium heat. Add whole spices and cumin seeds, and saute for a few seconds until the spices are aromatic.
- Add finely chopped onions, and saute until they turn golden brown.
- Add crushed ginger garlic, and saute until the raw smell vanishes.
- Add the spice mix and saute on medium-low heat for another 30 seconds.
- Pro tip for the novice cook: Since there are quite a number of powdered spices in this step, I recommend measuring out the spices beforehand in a small bowl instead of adding them individually. This will help to prevent the spices from burning.
- Add about 1/4 cup of water to prevent the spices from burning.
- Add tomato puree, salt to taste, and chopped coriander stems. Mix well and cook on medium heat, stirring frequently, until the fat separates.
- Turn down the heat to low, add whisked curd, mix well, cover, and cook for another 1-2 minutes. Open the lid, and give it a good mix.
Combine minced chicken with onion-tomato base and cook
- Add minced chicken, and mix on medium-low heat, breaking it with a spatula to ensure even cooking. until well incorporated with the masala. Be sure to stir constantly to prevent the formation of lumps.
- Pro tip: Be sure to lower the heat while adding the keema or you will end up with big chunks of keema.
- Then increase the heat to medium-high and keep cooking for another 7 to 8 minutes.
- Add 1 cup hot water, mix well, and bring to a boil. Reduce the heat to low, cover, and simmer,stirring occasionally. for another 10 minutes.
Add the remaining ingredients
- Open the lid (you may skim off some of the oil floating on top if you wish to) and give it a good mix.
- Add chopped green chilies,crushed kasuri methi, remaining ½ teaspoon of garam masala.
- Mix well and cook for another 2 minutes. Taste and adjust seasonings if needed
- Finally, add cubed butter and chopped coriander leaves. Mix well and switch off the heat. Serve hot with pav!
