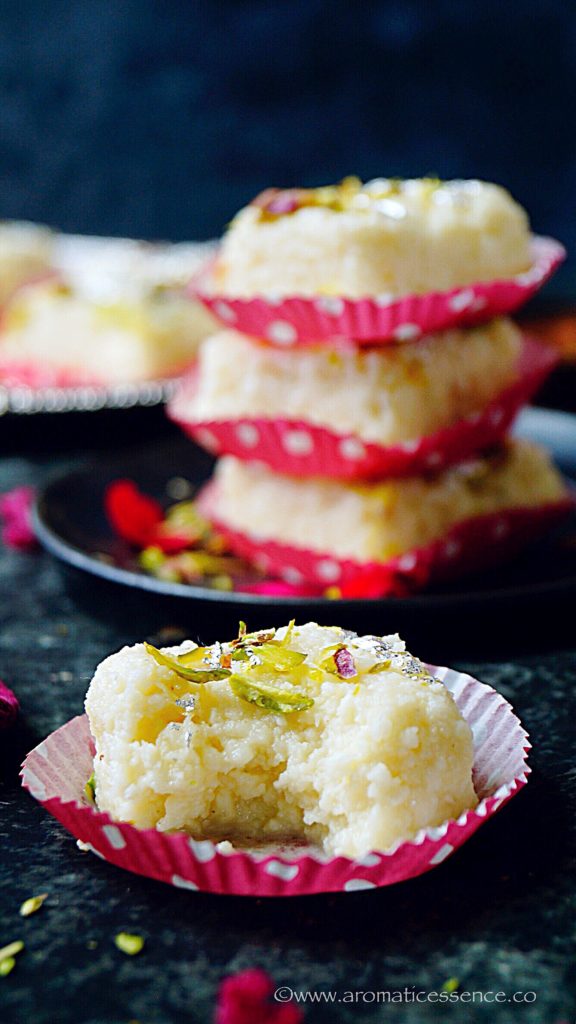
Kalakand recipe with step-by-step pictures using fresh homemade paneer. Learn how to make this moist, juicy and absolutely delicious Indian kalakand sweet at home with this recipe.

And I’m preparing this delicious treat to celebrate a special milestone in my blogging existence! Yes, folks, my blog completed 3 years on the 17th of this month.
As I write this post, I’m filled with nostalgic moments. I remember signing up with the free version of WordPress on my mobile at midnight. Just like that, on a whim:) And from there to the present day, I’ve always had mixed feelings about my decision. Sometimes I wonder if the efforts I put into this blog are worth the time and energy I spend. I’m still trying to figure out the nuances that come along with blogging.
What has touched me most throughout this journey is all the amazing feedback I get from you people. It also kind of keeps me going to share more. So for now, I intend to stick around and see how it goes from here.

An occasion needs some celebration and this time I’m sharing a dessert as I usually do. Kalakand is a labor-intensive sweet, and there are shortcuts and the instant versions where you can make kalakand with ricotta cheese, which will help you make some yummy kalakand in a matter of minutes.
But I’m sharing with you the long way! Why? Simply since I had excess milk in the refrigerator which was nearing expiration. And it was also perfect to indulge in some good stuff for an occasion 😀
The version I’m sharing involves making kalakand from paneer and sweetened condensed milk, both of which are made from scratch. I anyways, prefer to use fresh, homemade paneer for this recipe, as it makes the end product so moist and juicy.
This is not an authentic recipe to make kalakand, but yields results that are comparable to the ones sold at the sweet marts.
- WHAT IS KALAKAND?
- KALAKAND INGREDIENTS
- HOW TO MAKE KALAKAND AT HOME? | HOW TO MAKE INDIAN MILK CAKE?
- KALAKAND RECIPE WITH CONDENSED MILK
- ENJOYED THIS KALAKAND? THEN DON’T FORGET TO CHECK OUT SOME MORE DELICIOUS INDIAN SWEETS THAT I’VE SHARED ON THE BLOG
- STEP BY STEP INSTRUCTIONS TO MAKE KALAKAND RECIPE WITH MILK | INDIAN MILK CAKE
- HOW TO MAKE KALAKAND SWEET?
- Kalakand | How To Make Kalakand | Indian Milk Cake
WHAT IS KALAKAND?
Kalakand is heavenly Indian sweet, a sort of milk fudge. The granular texture of this fudge is what gives it it’s characteristic specialty. I ndian sweet, kalakand is moist, insanely delicious and a real treat for sweet lovers!
KALAKAND INGREDIENTS
For this Kalakand recipe, you will just need 4 basic ingredients
- Milk
- Vinegar/lemon juice
- Sugar
- cardamom powder
HOW TO MAKE KALAKAND AT HOME? | HOW TO MAKE INDIAN MILK CAKE?
The traditional recipe requires us to simmer and thicken down the milk, then alum is added to get the granular texture, lastly, sugar is added and the mixture is further cooked until you get this fudgy consistency.
The shorter method just requires to combine paneer or ricotta cheese and sweetened condensed milk, cook for about 10-15 minutes, and set it. Or you could make kalakand in the microwave, by cooking these 2 ingredients.
Now the milk here is different as compared to the milk available in India, it’s difficult to get layers of cream on boiling the milk as we do in India. So it doesn’t tend to be as rich, to compensate that I’ve added some mawa or khoya (milk solids), which is totally optional and can be avoided and not an ingredient that would require you to make a special trip to the grocery store. So feel free to skip it.
KALAKAND RECIPE WITH CONDENSED MILK
For 225-250 grams paneer, use half a tin of condensed milk, about 200 grams. Mix the two, and microwave it, keep stirring in intervals.
Or transfer the mixture to a nonstick skillet, cook till it leaves sides. Do not dry it out else it may crumble when you try to cut it into pieces. A little moisture should be retained. Add a few tablespoons of milk if the mixture looks too dry.
When you used condensed milk, I highly recommend you use fresh homemade paneer, the readymade paneer doesn’t give that soft texture.

One bite of this kalakand burfi and you can feel the juices trickling down your throat. I can’t explain how good this is, if you have eaten some then you already know. But if you haven’t, then my friend, you have to!
ENJOYED THIS KALAKAND? THEN DON’T FORGET TO CHECK OUT SOME MORE DELICIOUS INDIAN SWEETS THAT I’VE SHARED ON THE BLOG
- Kesar peda
- Chocolate peda
- Mango burfi
- Badam pista burfi
- No-cook instant shahi rabdi
- No-cook kesar pista kulfi
- Rasmalai
- Gulab Jamun
- Rava laddu
STEP BY STEP INSTRUCTIONS TO MAKE KALAKAND RECIPE WITH MILK | INDIAN MILK CAKE
TO MAKE THE PANEER
1.Bring milk to boil in heavy bottomed pot/pan. Stir in between to avoid the milk from burning or sticking at the bottom of the vessel.

2.Once the milk boils, switch off the heat and let it stand for about 5 minutes. Now add vinegar/ lemon juice, 1 tablespoon at a time, stirring with each addition, until the milk splits and you see the greenish whey.

3.Line a strainer with muslin cloth over a big bowl, drain the split milk, collect the whey. You can use this whey for kneading dough for bread’s/ chapatis or even make a soup.

4.Gather the edges of the muslin cloth, squeeze out the water ( exercise precaution as it will be very hot ). Wash the chenna well under running water to get rid of the vinegar or lemon juice smell.

5.Make a knot/ or secure with a thread /rubber band and hang it for about 30 minutes. Do not let it dry completely, let it retain little moisture.

6.After 30 minutes, open the assembly, transfer it to a bowl, since it is fresh you can easily crumble the paneer with your hands. Set aside. (Will yield approx 250 grams of paneer ).

TO MAKE THE KALAKAND
1.Heat 1 litre / 4 cups milk in a heavy-bottomed pot (I prefer to use a wide pan to speed up things). Also, grease the tin in which you intend setting the kalakand and keep it aside.

2.Bring the milk to a boil, stirring often to avoid the milk from burning or sticking at the bottom of the vessel. Continue boiling until it reduces to 1.5 cups.

3.Add sugar, stir until sugar dissolves.

4.Lower the heat and add the crumbled paneer, mix well.

5.Also, add the mava if using, stir continuously, cook until most of the moisture is gone, and the entire mixture is thick and homogeneous. Do not dry it out completely. If the mixture is dry , when it sets, and you try to cut it into pieces, it will crumble.
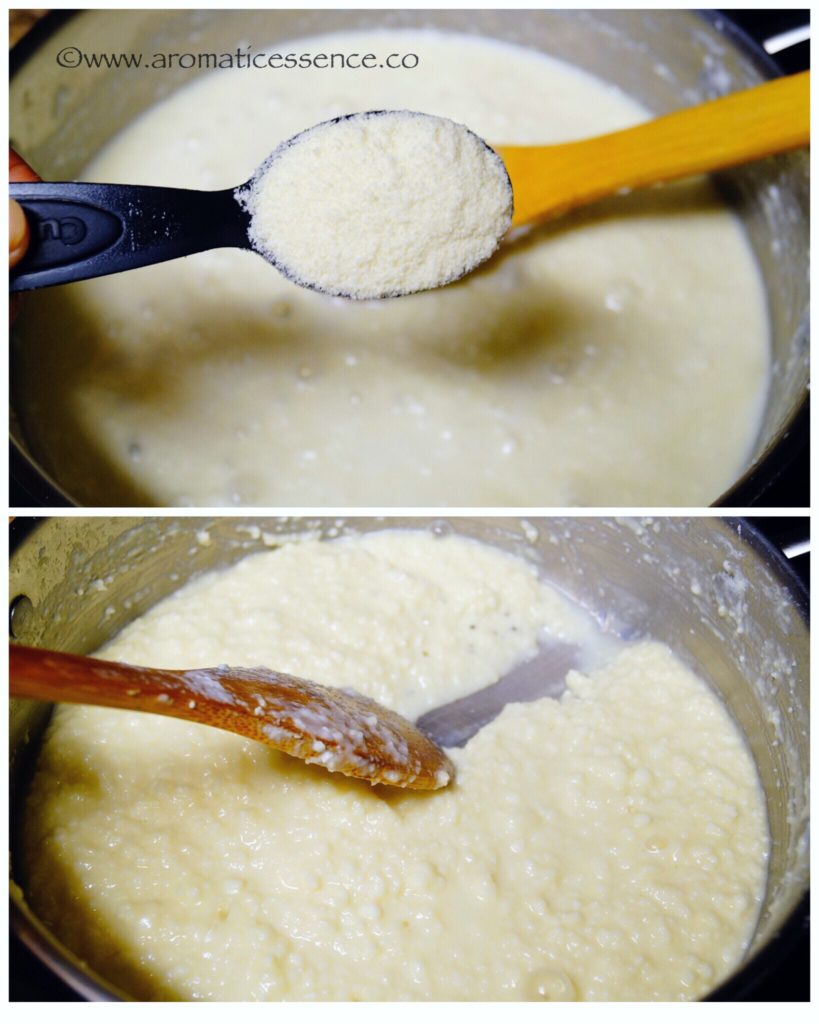
6.When the mixture stops bubbling and begins to clump, it is ready, add cardamom powder, mix and switch off the heat.

7.Transfer to a greased tin/thali, to a height of 1/2 to 1 inches, or as you desire. Sprinkle slivered pistachios or any other nuts of your choice. Press the nuts into the mixture with the help of a spatula. Decorate with silver varak (optional). Leave it to set for about 2-3 hours. Slice and serve. Since this is a milk based sweet, it is best to store it in the refrigerator up to 4-5 days.

NOTE
1.You can skip making paneer at home, and use store-bought instead. If using frozen, bring it to room temperature and use.
HOW TO MAKE KALAKAND SWEET?

Kalakand | How To Make Kalakand | Indian Milk Cake
Ingredients1x2x3x
Measuring cup used, 1 cup = 250 ml, 1 tsp = 5 ml.
For the paneer
- 1.5 litres whole milk
- 2 tbsp white distilled vinegar/lemon juice, as required
For the kalakand
- 1 litre whole milk
- 3/4 cup sugar, adjust as per desired sweetness
- 250 grams freshly prepared paneer
- 2 tbsp milk mava powder/grated or crumbled mava, optional
- 1/4 tsp green cardamom powder
- 1/2 tsp ghee, to grease the tin
- 1 tbsp sliced pistachios
- 1/2 sheet silver leaf/ silver varak, optional
Instructions
To make the paneer
- Bring milk to boil in heavy bottomed pot/pan. Stir in between to avoid the milk from burning or sticking at the bottom of the vessel.
- Once the milk boils, switch off the heat and let it stand for about 5 minutes. Now add vinegar/ lemon juice, 1 tablespoon at a time, stirring with each addition, until the milk splits and you see the greenish whey.
- Line a strainer with muslin cloth over a big bowl, drain the split milk, collect the whey. You can use this whey for kneading dough for bread’s/ chapatis or even make a soup.
- Gather the edges of the muslin cloth, squeeze out the water (exercise precaution as it will be very hot). Wash the chenna well under running water to get rid of the vinegar or lemon juice smell.
- Make a knot/ or secure with a thread /rubber band and hang it for about 30 minutes. Do not let it dry completely, let it retain little moisture.
- After 30 minutes, open the assembly, transfer it to a bowl, since it is fresh you can easily crumble the paneer with your hands. Set aside. (Will yield approx 250 grams of paneer).
To make the kalakand
- Heat 1 liter / 4 cups milk in a heavy-bottomed pot (I prefer to use a wide pan to speed up things). Also, grease the tin in which you intend setting the kalakand and keep it aside.
- Bring the milk to a boil, stirring often to avoid the milk from burning or sticking at the bottom of the vessel. Continue boiling until it reduces to 1.5 cups.
- Add sugar, stir until sugar dissolves.
- Lower the heat and add the crumbled paneer, mix well.
- Also, add the mava if using, stir continuously, cook until most of the moisture is gone, and the entire mixture is thick and homogeneous. Do not dry it out completely. If the mixture is dry, when it sets, and you try to cut it into pieces, it will crumble.
- When the mixture stops bubbling and begins to clump, it is ready, add cardamom powder, mix and switch off the heat.
- Transfer to a greased tin/thali, to a height of 1/2 to 1 inches, or as you desire. Sprinkle slivered pistachios or any other nuts of your choice. Press the nuts into the mixture with the help of a spatula. Decorate with silver varak (optional). Leave it to set for about 2-3 hours. Slice and serve. Since this is a milk-based sweet, it is best to store it in the refrigerator up to 4-5 days.
Notes
- You can skip making paneer at home, and use store-bought instead. If using frozen, bring it to room temperature and use.

I would love to hear from you! Please feel free to share your feedback with photos and suggestions to me at aromaticessence77@gmail.com
You can also follow me on :
Facebook @ Aromaticessence
Pinterest @ Aromatic Essence
Instagram @ aromatic_essence77
Twitter @ freda_dias
Regards,
Freda

Kalakand | How To Make Kalakand | Indian Milk Cake
Ingredients
Measuring cup used, 1 cup = 250 ml, 1 tsp = 5 ml.
For the paneer
- 1.5 litres whole milk
- 2 tbsp white distilled vinegar/lemon juice, as required
For the kalakand
- 1 litre whole milk
- 3/4 cup sugar, adjust as per desired sweetness
- 250 grams freshly prepared paneer
- 2 tbsp milk mava powder/grated or crumbled mava, optional
- 1/4 tsp green cardamom powder
- 1/2 tsp ghee, to grease the tin
- 1 tbsp sliced pistachios
- 1/2 sheet silver leaf/ silver varak, optional
Instructions
To make the paneer
- Bring milk to boil in heavy bottomed pot/pan. Stir in between to avoid the milk from burning or sticking at the bottom of the vessel.
- Once the milk boils, switch off the heat and let it stand for about 5 minutes. Now add vinegar/ lemon juice, 1 tablespoon at a time, stirring with each addition, until the milk splits and you see the greenish whey.
- Line a strainer with muslin cloth over a big bowl, drain the split milk, collect the whey. You can use this whey for kneading dough for bread’s/ chapatis or even make a soup.
- Gather the edges of the muslin cloth, squeeze out the water (exercise precaution as it will be very hot). Wash the chenna well under running water to get rid of the vinegar or lemon juice smell.
- Make a knot/ or secure with a thread /rubber band and hang it for about 30 minutes. Do not let it dry completely, let it retain little moisture.
- After 30 minutes, open the assembly, transfer it to a bowl, since it is fresh you can easily crumble the paneer with your hands. Set aside. (Will yield approx 250 grams of paneer).
To make the kalakand
- Heat 1 liter / 4 cups milk in a heavy-bottomed pot (I prefer to use a wide pan to speed up things). Also, grease the tin in which you intend setting the kalakand and keep it aside.
- Bring the milk to a boil, stirring often to avoid the milk from burning or sticking at the bottom of the vessel. Continue boiling until it reduces to 1.5 cups.
- Add sugar, stir until sugar dissolves.
- Lower the heat and add the crumbled paneer, mix well.
- Also, add the mava if using, stir continuously, cook until most of the moisture is gone, and the entire mixture is thick and homogeneous. Do not dry it out completely. If the mixture is dry, when it sets, and you try to cut it into pieces, it will crumble.
- When the mixture stops bubbling and begins to clump, it is ready, add cardamom powder, mix and switch off the heat.
- Transfer to a greased tin/thali, to a height of 1/2 to 1 inches, or as you desire. Sprinkle slivered pistachios or any other nuts of your choice. Press the nuts into the mixture with the help of a spatula. Decorate with silver varak (optional). Leave it to set for about 2-3 hours. Slice and serve. Since this is a milk-based sweet, it is best to store it in the refrigerator up to 4-5 days.
Notes
- You can skip making paneer at home, and use store-bought instead. If using frozen, bring it to room temperature and use.
These eggless hot cross buns are fruity, sweet, and spiced with warm spices. These delicious buns are perfect with a hot cup of your favorite beverage.

Hot cross buns are traditionally eaten on Good Friday in the British Isles, Australia, Canada, Ireland, New Zealand, South Africa and some parts of the Americas. It marks the end of Lent and different parts of the hot cross bun have a certain meaning, including the cross representing the crucifixion of Jesus, and the spices inside signifying the spices used to embalm him at his burial. { Wiki }

The history of how these buns developed is not very clear and one that is surrounded by lots of myths and speculations. There are a number of theories about their origin. You can read some of it here.
Hot cross buns are quite popular in India too. I do not know about other places, but in Mumbai, these hot cross buns are usually distributed in the Church during the Maundy Thursday mass service, one bun per family. Along with the bun, a pamphlet of prayer is also distributed. This is supposed to be recited by the head of the family on Good Friday, the bread broken and shared with all the family members. That’s the little tradition I know of.

In India, you won’t find these buns being sold throughout the year, as they are in the UK and other places. These appear only around Good Friday in stores. Unless things have changed now, I am not sure.
It’s been over 5years I have not celebrated Easter in Mumbai. If you ask me about the memories I associate with Easter, they have to just be these buns and Mom making marzipan Easter eggs. Oh, by the way, these Easter eggs are no-cook and egg-free and you should definitely check the recipe here .

Easter egg shaped cookies, and other kinds of treats that I see here are all new to me, we didn’t have things like, dyeing eggs, Easter egg hunt et al. Well, my son is living these new traditions, and what do I say, he loves it.
He’s kind of an ‘egg-o-maniac’ (is that a word??). I mean all these plastic egg filled candies and surprise toys all over the stores, available throughout the year or some commercial on TV popping up, what’s a kid got to do. He’s more fascinated with the surprise inside the egg rather than the egg itself. The other day, I collected a huge pile of these plastic eggs, while I was spring cleaning! Sigh!! Never ending woes!

Finally, on to the recipe for eggless hot cross buns, let’s talk about these buns. Have you tried making hot cross buns before? No?
Then you definitely should, if you like, spicy, sweet and fruity bread. I love sweet breads like Kugelhopf and Panettone/Stollen. And these Hot cross buns are similar to Kugelhopf, except that these are shaped in the form of a bun, well Hot cross ‘buns’.
All these breads are made from an enriched dough with ingredients like eggs, milk, and butter. I’ve adapted the recipe for these Hot cross buns from the Kugelhopf recipe.

I’ve made these buns eggless for my vegetarian readers. You can add an egg to this recipe, as the traditional recipe calls for, but frankly, I do not miss it. If you do wish to add an egg, use 1 egg and reduce the milk by 1/4 cup. I’ve also added dried cranberries for some color, feel free to use whatever dried fruit you have at hand.
I’ve also used agave nectar for the final glaze after the buns were baked, though in the traditional hot cross buns recipe a thick sugar syrup is used. You can choose to glaze these eggless hot cross buns with whatever you feel like, even diluted jam (jam mixed with few teaspoons of warm water) is great!
These eggless hot cross buns turned out amazing, we kind of gobbled a couple right away, with all that glaze they looked too tempting to not have any 😀
Okay, I guess we should just get on to the recipe to make these delicious eggless hot cross buns 🙂
- STEP BY STEP INSTRUCTIONS TO MAKE EGGLESS HOT CROSS BUNS | EASY HOT CROSS BUNS | HOMEMADE HOT CROSS BUNS RECIPE
- HOW TO MAKE EGGLESS HOT CROSS BUNS | LIGHT AND FLUFFY HOT CROSS BUNS?
- Eggless Hot Cross Buns Recipe
STEP BY STEP INSTRUCTIONS TO MAKE EGGLESS HOT CROSS BUNS | EASY HOT CROSS BUNS | HOMEMADE HOT CROSS BUNS RECIPE
1.Add active dry yeast & sugar to 1/4 cup of lukewarm milk. Leave it in a warm place for about 10-15 minutes or until it is all frothy and bubbly. If the yeast is not frothy and bubbly, it means it is not activated, discard and start over again. Do not proceed without activating the yeast first. In the meanwhile, also condition your dried fruit. For that, place the dried fruit in a bowl, add hot water, and let it steep for about 10 minutes. This process softens the dried fruit, which will keep it moist and plump in the final baked buns. Discard the water and used the softened dried fruits.

2.In a medium saucepan, heat the remaining 1 & 1/4 cup milk with 6 tablespoons butter and granulated sugar over low heat, stirring, until mixture is warm (105 to115°F), butter is melted, and sugar is dissolved.

3.Next, weigh out the flour, add the cinnamon, ginger, nutmeg, clove spice powders along with the salt. Whisk to mix well.

4.Sift the ingredients in the bowl of your stand mixer fitted with the dough hook attachment, add the proofed yeast mixture. Mix on low speed.

5.Next, add in the warm milk in a slow stream and continue mixing at low speed. Knead for about 7 minutes on low speed.

6.Then add the currants, cranberries, and raisins along with the orange zest. Continue beating until dough is smooth, supple, elastic and tacky, another 3-4 minutes. The dough will be sticky. Do not add any extra flour.

7.Dust your work surface with very little flour, knead for another minute. You will know it is done, when the dough springs back when you press it with your fingers. Tuck the edges of the dough towards the centre to form a ball.


8.Transfer it to a big greased bowl. Spray some oil spray on the dough or apply little oil over the dough. Cover with a clean kitchen napkin, and set aside in a warm place to proof or double in size, approx 1&1/2 to 2 hours, depending on climatic conditions.

9.After the dough has risen, deflate it, by punching it down with your fist and transfer to the working surface. Knead again for another 2 minutes, add very little flour if the dough is too sticky.


10.Shape the dough in the form of a log, cut the dough with a scraper/dough knife/ regular knife (do not tear it by hand as it will tear the gluten strands) into 15-16 equal portions. You may also make 12 bigger buns instead of 16 medium-sized ones.

11.Shape them into buns by tucking the edges underneath towards the center, roll the dough against your work surface or between your palms to form a smooth round ball.

12.Place them in a sufficiently large baking tray greased with oil/lined with parchment paper, spacing each at least 2 inches apart. Cover with a damp kitchen cloth and let it proof for the second time. This will take approximately 30 minutes depending on the weather conditions.

13.Prepare the flour paste to make the cross by mixing both the ingredients in a bowl until smooth. Fill it in a piping bag or ziplock bag and snip off one end just before you start piping the cross.

14.Preheat the oven to 375 F. Brush the risen dough balls with milk for a nice golden brown colored crust.

15.Then pipe a cross in the centre of the buns with the prepared flour paste.


16.Bake for about 20-22 minutes or until they are done and the top is golden brown. The top of the rolls will appear hard as soon as you remove it from the oven. When you tap on it you should be able to hear a hollow sound. Brush the buns with agave nectar as soon as the buns are out of the oven. I baked these in 2 batches.
These eggless hot cross buns are best served warm, on the day they are baked, as they are soft. The texture tends to get dense as it cools, somewhat like a bagel. If you have leftovers, split the buns in half, toast lightly and slather butter along with some jam if you wish.
To store- Once the buns are cool completely, transfer to an airtight container up to 2 days.


NOTES
1.If you do not have a stand mixer, you can add the contents in a big bowl, mix well and tip out the shaggy dough on your work surface dusted with flour, knead for about 10-12 minutes, add the dried fruits, orange zest, continue kneading for another 2-3 minutes until you have a smooth, supple, elastic and tacky dough. Tuck the edges of the dough towards the center to form a ball and proceed from step 8 onwards.
2.If you wish to add an egg, add it after mixing in the milk-butter mixture.
3.If you wish to do a sugar glaze – While the bun is baking, bring to boil 3 tbsp sugar with about 1/4 cup water, simmer for 2-3 minutes until it thickens, brush over the buns as soon as they are out of the oven. You can also use diluted honey to glaze the buns.
4.If you are using agave nectar for the glaze, use as such. There is no need to dilute it, unlike honey, if that is what you are using.
5.Have a look at this quick video for the correct techniques to knead bread dough.
6.Also, check out this video to learn how to shape dinner rolls or buns perfectly.

HOW TO MAKE EGGLESS HOT CROSS BUNS | LIGHT AND FLUFFY HOT CROSS BUNS?

Eggless Hot Cross Buns Recipe
Ingredients1x2x3x
Measuring cup used, 1 Cup = 250 ml, 1 tsp = 5 ml
- 500 grams all-purpose flour or strong bread flour
- 2 & 1/4 tsp active dry yeast
- 1 & 1/2 cups lukewarm milk
- 85 grams / 6 tbsp butter, softened
- 70 grams sugar, plus 1 teaspoon sugar to activate the yeast
- 1 tsp salt or to taste
- 1 tsp cinnamon powder
- 1/2 tsp nutmeg powder
- 1/2 tsp ginger powder
- 1/4 tsp clove powder
- 60 grams dried currants
- 60 grams golden raisins
- 30 grams dried cranberries
- 1 tbsp orange or lemon zest
- Milk, as required for brushing the rolls before baking
- Oil spray/2 tsp oil, to grease the bowl the dough and baking sheet
For the cross
- 1/4 cup all-purpose flour + 3 tbsp water mixed together to form a smooth paste
For the glaze
- Agave nectar, as required (Refer notes)
Instructions
- Add active dry yeast & one teaspoon sugar to 1/4 cup of lukewarm milk. Leave it in a warm place for about 10-15 minutes or until it is all frothy and bubbly. If the yeast is not frothy and bubbly, it means it is not activated, discard and start over again. Do not proceed without activating the yeast first.
- In the meanwhile, also condition your dried fruit. For that, place the dried fruit in a bowl, add hot water, and let it steep for about 10 minutes. This process softens the dried fruit, which will keep it moist and plump in the final baked buns. Discard the water and used the softened dried fruits.
- In a medium saucepan, heat the remaining 1 & 1/4 cup milk with 6 tablespoons butter and granulated sugar over low heat, stirring, until mixture is warm (105 to115°F), butter is melted, and sugar is dissolved.
- Next, weigh out the flour, add the cinnamon, ginger, nutmeg, clove spice powders along with the salt. Whisk to mix well.
- Sift the ingredients in the bowl of your stand mixer fitted with the dough hook attachment, add the proofed yeast mixture. Mix on low speed.
- Next, add in the warm milk in a slow stream and continue mixing at low speed. Knead for about 7 minutes on low speed.
- Then add the currants, cranberries, and raisins along with the orange zest. Continue beating until dough is smooth, supple, elastic and tacky, another 3-4 minutes. The dough will be sticky. Do not add any extra flour.
- Dust your work surface with very little flour, knead for another minute. You will know it is done, when the dough springs back when you press it with your fingers. Tuck the edges of the dough towards the center to form a ball.
- Transfer it to a big greased bowl. Spray some oil spray on the dough or apply little oil over the dough. Cover with a clean kitchen napkin, and set aside in a warm place to proof or double in size, approx 1&1/2 to 2 hours, depending on climatic conditions.
- After the dough has risen, deflate it, by punching it down with your fist and transfer to the working surface. Knead again for another 2 minutes, add very little flour if the dough is too sticky.
- Shape the dough in the form of a log, cut the dough with a scraper/dough knife/ regular knife (do not tear it by hand as it will tear the gluten strands) into 15-16 equal portions. You may also make 12 bigger buns instead of 16 medium-sized ones.
- Shape them into buns by tucking the edges underneath towards the centre, roll the dough against your work surface or between your palms to form a smooth round ball.
- Place them in a sufficiently large baking tray greased with oil/lined with parchment paper, spacing each at least 2 inches apart. Cover with a damp kitchen cloth and let it proof for the second time. This will take approximately 30 minutes depending on the weather conditions.
- Prepare the flour paste to make the cross by mixing both the ingredients in a bowl until smooth. Fill it in a piping bag or ziplock bag and snip off one end just before you start piping the cross.
- Preheat the oven to 375 F. Brush the risen dough balls with milk for a nice golden brown colored crust.
- Then pipe a cross in the centre of the buns with the prepared flour paste.
- Bake for about 20-22 minutes or until they are done and the top is golden brown. The top of the rolls will appear hard as soon as you remove it from the oven. When you tap on it you should be able to hear a hollow sound. Brush the buns with agave nectar as soon as the buns are out of the oven. Serve warm. I baked these in 2 batches.
- These eggless hot cross buns are best served warm, on the day they are baked, as they are soft. The texture tends to get dense as it cools, somewhat like a bagel. If you have leftovers, split the buns in half, toast lightly and slather butter along with some jam if you wish.
- To store - Once the buns are cool completely, transfer to an airtight container up to 2 days.
Notes
- If you do not have a stand mixer, you can mix the contents in a big bowl, mix well and tip out the shaggy dough on your work surface dusted with flour, knead for about 10-12 minutes, add the dried fruits, orange zest, continue kneading for another 2-3 minutes until you have a smooth, supple, elastic and tacky dough. Tuck the edges of the dough towards the center to form a ball and proceed from step 8 onwards.
- If you wish to add an egg, add it after mixing in the milk-butter mixture.
- If you wish to do a sugar glaze- While the bun is baking, bring to boil 3 tbsp sugar with about 1/4 cup water, simmer for 2-3 minutes until it thickens, brush over the buns as soon as they are out of the oven. You can also use diluted honey to glaze the buns.

I would love to hear from you! Please feel free to share your feedback with photos and suggestions to me at aromaticessence77@gmail.com
You can also follow me on :
Facebook @ Aromaticessence
Pinterest @ Aromatic Essence
Instagram @ aromatic_essence77
Twitter @ freda_dias
Regards,
Freda
