Kaju Katli recipe | Kaju Katari | Kaju barfi recipe with step-by-step pictures. Kaju Katli is one of the most popular and loved exotic Indian sweets. Here’s an easy, fuss-free, no-cook recipe to help you make your very own homemade Kaju katli!

Kaju katli is that one Indian mithai (sweet) that is gifted to friends and family on most joyous occasions and festivals. Sometimes it is just a box of this sweet, or else a mix of a variety of burfis, pedas, dry fruits etc.
The festival of lights- Diwali is approaching pretty soon which makes me miss Mumbai even more, especially during these festivities. I’m sure you are busy preparing for Diwali, with all the housework and of course planning about the various snacks and sweets that need to be prepared.

- What is kaju katli?
- Ingredients needed
- How is this sweet prepared traditionally?
- Kaju katli vs kaju barfi
- How to make Kaju katli – Step by step process
- Storage instructions
- Try a variation
- You may also like these Indian desserts
- Kaju Katli Recipe | Kaju Barfi (Easy, No-Cook Recipe)
What is kaju katli?
Kaju is the Hindi name for cashew nut and katli means a thin slice. Kaju katli is a diamond-shaped Indian sweet, sort of an Indian cashew candy or cashew fudge.
It is one of my favorite Indian sweets. If you ask me to pick one favorite Indian sweet, I’d really have a tough time choosing. I love all these Indian desserts, and if I have a kaju katli box in front of me, I can tell you for sure that it is not going to last another day 😀 It is really addictive!

Ingredients needed
For this easy homemade kaju katli recipe , you will require 3 ingredients and zero cooking .
- Cashew nut powder.
- Powdered or confectioner’s sugar.
- Rosewater, rose essence, or cardamom, for flavoring which is completely optional.
Wondering how to make cashew powder ? It is super easy, simply transfer some cashew nuts into a blender or food processor and grind it into a fine powder. The only important thing you have to remember is-
- Grind it in batches.
- This is done so that you do not over grind it, which will result in a paste rather than powder. The longer you grind the cashew nuts, it will ooze out the natural oils present in it, which in turn will make the entire thing pasty.

How is this sweet prepared traditionally?
So traditionally, cashew katli recipe is made by making a thick sugar syrup, to which the powdered cashews are added. The mixture is cooked to a stage where it forms a dough. It is then kneaded while it is still warm, rolled out, and cut into diamond shapes.
Quite a tedious task, no? Plus for a beginner, there is no guarantee that you will nail it in the first go. I mean it seems easy, 3 ingredients, but the method is pretty tricky as it depends on the consistency of the sugar syrup, if the syrup is too thick, the fudge will turn hard. And a good kaju katli is supposed to be soft, melt-in-the-mouth, and yet hold that shape. Tricky, eh?
The recipe that I’m sharing is completely different, as it is a no-cook one. It is basically my Mom’s marzipan recipe . We used to make marzipan using the cooking method, quite similar to the traditional kaju katli. Dealing with that hot cashew dough was a nightmare, as we needed to work quickly on the marzipan shapes, or else the dough would turn hard. But once my Mom got this no-cook recipe from her friend, we never looked back on that old method.
In this no-cook recipe, you simply make a dough of the cashew nut powder and powdered sugar with the help of some water or sugar solution, then roll it out between two parchment paper or on a greased board. Decorate with edible silver leaf paper. Cut it into diamond shapes.
How easy was that right? No headache of any sugar syrup consistency, nor any cooking, nor any fear of burning your fingers while dealing with that hot dough.
The recipe is pretty easy to memorize too, remember it is 1:1 :: cashew nuts: powdered sugar by weight and not volume.

Kaju katli vs kaju barfi
Kaju katli is sometimes also known as kaju barfi. A barfi is usually quite a thick piece, around 1-2 inches thick, katli, on the other hand, is thin, like a quarter of an inch thick.
Indian sweet barfi is also made with mawa or khoya and sugar, katli on the hand is almost vegan, except for the little ghee that may be used for greasing to help roll out the dough.
Other than these two minor differences, they are practically the same. And who cares really? Simply enjoy the soft, melt-in-the-mouth cashew goodness.

This Diwali, don’t buy kaju katli, rather make it at home along with your other regular goodies. This pure, unadulterated, and delicious, sweet cashew fudge will surely impress your friends and family 🙂
How to make Kaju katli – Step by step process
Grind the cashews to a fine powder, in batches. I ground 1 cup of cashew nuts in 4 batches, by pulsing it 8-10 times. Sieve it using a sifter by pressing the powder with the back of a spoon. If you are left with larger cashew nut pieces, collect them all, and grind again further to a fine powder. {Do no skip sifting the powder, as it is essential for that smooth finish}.


Now mix the powdered sugar with the ground cashew nut powder along with few drops of rose essence and make a dough using water, adding little at a time. I used a total of 2 tablespoons. It is ok if you see some oil releasing whilst kneading the dough. It depends on the quality of cashew nuts. The katlis will be air-dried later.

Transfer the dough between two parchment papers or on a greased board, roll out to a thickness of about 1/4-inch.

Place the silver varak if using over the rolled out dough, then cut into diagonal shapes.

Transfer to a tray, let it air dry for 6-8 hours. Once it has dried up completely, transfer to an airtight container.

Notes
- If you don’t have rose essence, you can use a mix of rose water + regular water to knead the dough.
- Or you don’t like the rose flavor in kaju katli, add about 1/8 tsp of cardamom powder in step 2.
- If you do not like any flavor in your kaju katlis, simply skip adding any.
Storage instructions
This particular recipe for kaju katli has a pretty good shelf life, as there is no milk nor ghee used here. Store kaju ki katli in an airtight container. It will last for about 2 weeks at room temperature and up to a month or even two months in the refrigerator. Only if it lasts that long 😀 If it is too hot and humid where you live, store it in the refrigerator after 3-4 days, if you have leftovers.
Try a variation
Chocolate kaju katli recipe – Add some cocoa powder, along with the sifted powdered sugar and follow the same recipe.
Kesar kaju katli – Dry roast some saffron (kesar) strands, then powder it in the mortar pestle, and add to the cashew nut powder and sugar mixture, proceed with the recipe as mentioned below.
Kaju badam katli recipe – Use half of cashew nut powder and blanched almond powder.
Badam katli – Swap the cashew powder entirely with blanched almond powder.
Kaju pista roll – Prepare the cashew dough, and use the same procedure to make a pistachio dough, shape it into a thin cylindrical roll. Roll out the cashew dough to a rectangular shape, similar to the way shown in the instructions below, but slightly thinner. Pace this cylindrical pista roll on one end, then start rolling the cashew dough, until you reached the other end. Cut out about 1 inch thick slices.
Instant shahi rabri
Kalakand
Instant Mango Shrikhand
Kesar peda
Chocolate peda
Badam pista barfi
Gulab jamun
Rasmalai
Rava laddu
Mango burfi
You can also follow me on Facebook , Pinterest, Instagram & Twitter

Kaju Katli Recipe | Kaju Barfi (Easy, No-Cook Recipe)
Ingredients1x2x3x
Measuring cup used, 1 Cup = 250 ml, 1 tsp = 5 ml
- 1 cup / 5.3 oz / 150 grams cashew nuts, roasted and unsalted
- 1 & 1/4 cup / 5.3 oz / 150 grams powdered/confectioner’s/icing sugar, you may reduce it to 1 cup, or adjust as per desired sweetness
- 4-5 drops rose essence or 1/8 tsp cardamom powder, optional
- 2 tbsp warrm water (approx)
- 1 sheet edible silver leaf (varak), optional
Instructions
- Grind the cashews to a fine powder, in batches. I ground 1 cup of cashew nuts in 4 batches, by pulsing it 8-10 times. Sieve it using a sifter by pressing the powder with the back of a spoon. If you are left with larger cashew nut pieces, collect them all, and grind again further to a fine powder. {Do no skip sifting the powder, as it is essential for that smooth finish}.
- Now mix the powdered sugar with the ground cashew nut powder along with few drops of rose essence and make a dough using water, adding little at a time. I used a total of 2 tablespoons. It is ok if you see some oil releasing whilst kneading the dough. It depends on the quality of cashew nuts. The katlis will be air-dried later.
- Transfer the dough between two parchment papers or on a greased board, roll out to a thickness of about 1/4-inch.
- Place the silver varak if using over the rolled out dough, then cut into diagonal shapes.
- Transfer to a tray, let it air dry for 6-8 hours. Once it has dried up completely, transfer to an airtight container.
Notes
- If you don’t have rose essence, you can use a mix of rose water + regular water to knead the dough.
- Or you don’t like the rose flavor in kaju katli, add about 1/8 tsp of cardamom powder in step 2.
- If you do not like any flavor in your kaju katlis, simply skip adding any.


Kaju Katli Recipe | Kaju Barfi (Easy, No-Cook Recipe)
Ingredients
Measuring cup used, 1 Cup = 250 ml, 1 tsp = 5 ml
- 1 cup / 5.3 oz / 150 grams cashew nuts, roasted and unsalted
- 1 & 1/4 cup / 5.3 oz / 150 grams powdered/confectioner’s/icing sugar, you may reduce it to 1 cup, or adjust as per desired sweetness
- 4-5 drops rose essence or 1/8 tsp cardamom powder, optional
- 2 tbsp warrm water (approx)
- 1 sheet edible silver leaf (varak), optional
Instructions
- Grind the cashews to a fine powder, in batches. I ground 1 cup of cashew nuts in 4 batches, by pulsing it 8-10 times. Sieve it using a sifter by pressing the powder with the back of a spoon. If you are left with larger cashew nut pieces, collect them all, and grind again further to a fine powder. {Do no skip sifting the powder, as it is essential for that smooth finish}.
- Now mix the powdered sugar with the ground cashew nut powder along with few drops of rose essence and make a dough using water, adding little at a time. I used a total of 2 tablespoons. It is ok if you see some oil releasing whilst kneading the dough. It depends on the quality of cashew nuts. The katlis will be air-dried later.
- Transfer the dough between two parchment papers or on a greased board, roll out to a thickness of about 1/4-inch.
- Place the silver varak if using over the rolled out dough, then cut into diagonal shapes.
- Transfer to a tray, let it air dry for 6-8 hours. Once it has dried up completely, transfer to an airtight container.
Notes
- If you don’t have rose essence, you can use a mix of rose water + regular water to knead the dough.
- Or you don’t like the rose flavor in kaju katli, add about 1/8 tsp of cardamom powder in step 2.
- If you do not like any flavor in your kaju katlis, simply skip adding any.
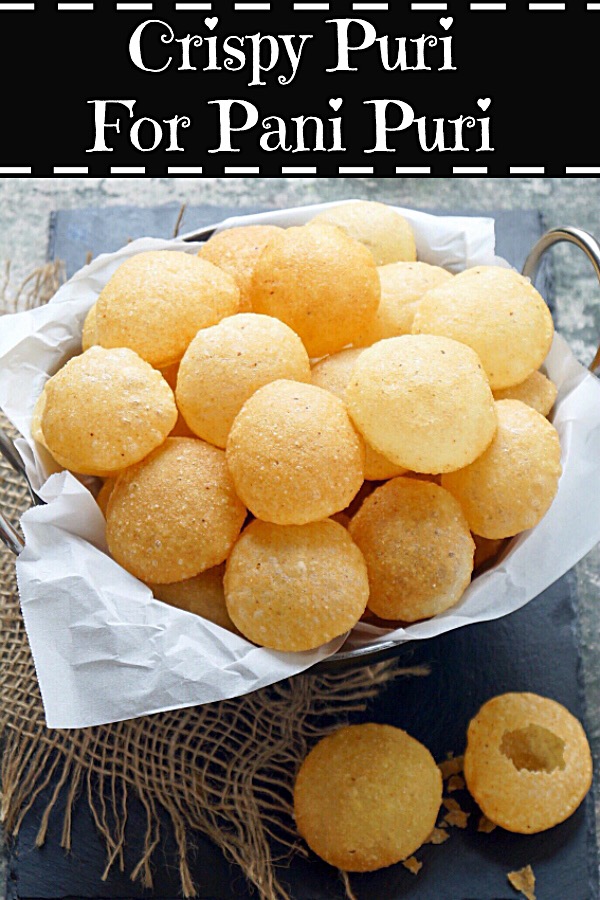
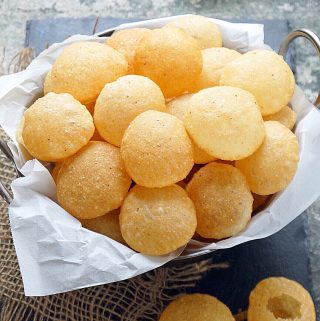
Puri recipe for pani puri | suji ke gol gappe | puchka recipe with step-by-step pictures. Tips and tricks to make the perfect puri for pani puri.

It’s been a while I’ve shared some chaat recipes aka Indian street food on the blog here. Ever since I’ve been in the US I’ve lost track of the last time I indulged in some chaat. It was a regular affair back home.
Pani Puri or golgappa is hands down my favorite Indian street food, followed by dahi puri, sev puri and much more actually. And now I’ve mastered the art of making some at home, that we enjoy guilt-free. Well, I’m not talking about the calories of course, rather of the quality, prepared with clean ingredients and fresh water.
Sure, ready-made puri is readily available in Indian stores, not only the ready to fry pani puri or golgappa but also the ones that are already fried. It does make life simpler. But, I prefer to make my own puris at home. It is really easy, although a bit time consuming, you can’t beat freshly made homemade puris. You know what goes into it, and the quality of oil you used to fry them.
Golgappa does sound like a pretty strange name, right? It does not have an English name. The puri or golgappa is basically a crispy sphere filled will all sorts of tongue-tickling deliciousness. Stay tuned for that part in my coming post.

- Puri ingredients
- You can make these pani puri shells in 3 easy steps
- Tips to make the perfect puri for pani puri
- You may also enjoy these Indian street food recipes
- How to make crispy puri for paani puri/suji golgappa – Step by step instructions
- Puri Recipe for Pani Puri | How To Make Suji Golgappa
Puri ingredients
Fine semolina, flour, and salt are the main ingredients to make this crispy puri for paani puri. I’ve tried various combinations of making this puri, so I can share a foolproof recipe here with you guys.
You can also make maida puri with maida or atta golgappa with wheat flour or a mix of rava and maida or rava and atta. When I initially began making puris at home, I experimented with various permutations and combinations.
My previous experience in R&D bug surfaces now and then, even though I don’t work as of now. But I love to experiment where required. I tried the following 3 variations to make these pani puri shells, just to see if you really need a leavener such as baking soda to make these puff up.
- First Experiment: semolina + salt + flour (maida) + water
- Second Experiment: semolina + salt + flour (maida) + baking soda + water
- Third Experiment: semolina + salt + flour, dough kneaded with club soda.
All these 3 doughs yielded delicious, crispy and puffy puris. So the bottom line is that you may or may not add baking soda.
It is basic science, the moisture in the dough makes these puri swell upon coming in contact with the hot oil, the steam escapes causing it to puff, the same science that applies to the soft and puffy puris.
Here the puris are crisp and not soft, coz the dough here is made mainly of semolina, and maida is added as a binding agent.
I do add a little baking soda though, coz almost all the puris will puff up. When you don’t add baking soda, you have to rely heavily on rolling out the dough as evenly as possible.
It is completely doable and will come with practice. But if you are a beginner at making puris, adding a pinch of baking soda or kneading the dough with club soda would be your safe bet to make perfectly puffed up puris.

You can make these pani puri shells in 3 easy steps
The recipe to make puchka balls or puri is really uncomplicated and pretty easy to execute.
- Step 1: Make a dough that is not too hard nor too soft.
- Step 2: Next roll out the dough. Cut it into rounds and place them on a damp cloth covered with another damp cloth. Traditionally the dough is divided into small marble-sized balls, and each ball is rolled out individually. Some people use a roti maker to flatten out individual balls. Basically, they use this appliance as a pani puri maker. If you have it, go ahead and use it, it does flatten out the dough evenly, which will help in the puris puffing us evenly. But it is not a necessity and a must-have. Do it as I did, and you will have good results as well. Seriously, no biggie!
- Step 3: Next, fry the puri in moderately hot oil until golden brown.
These are the 3 main steps, but I’ve broken down them further in the stepwise instructions so that it is easy for you to understand.
I’ve never tried a baked pani puri recipe, and I’m not sure if it would work. You need that chemistry of the interaction with the hot oil and the moisture in the dough for it to puff up. I just don’t think that can be achieved in the oven. You would end up with a crispy cookie of sorts instead is what I feel.

Tips to make the perfect puri for pani puri
There is no specific secret of crispy pani puri, just keep in mind the following, and you will be making puris like a pro.
The consistency of the dough
The puri for pani puri needs to be crispy, and that is achieved only with the activation of gluten strands in the semolina. That’s why it is important to knead the dough well, so it is elastic enough when rolled out without any tearing.
The thickness of the dough when you roll it out
You have to be careful about the thickness of the dough. It has to be thin, or else they won’t puff up whilst frying.
The temperature of the oil whilst frying the puris
The oil should be heated on medium-high heat, it should be hot enough that the puris begin to float and puff up. Fry them until they are golden brown and crisp. Spread the fried puris on a tray lined with absorbent paper to drain off excess oil.
Do not stack the puris one over the other while they are still hot, as they can get soft and soggy. Once they are completely cool, transfer to an airtight container.

So next time you want to have some chaat, especially pani puri at home, you ought to make your own puris. And I’ve got you covered with the best poori recipe, so what are you waiting for? Ahh! the pani?? Stay tuned, coz that’s coming up in a few days along with the complete Bombay pani puri recipe .
You may also enjoy these Indian street food recipes
- Ragda Patties
- Kutchi dabeli
- Veg Frankie
- Don’t forget to check this post on the 3 essential chutney’s for chaat snacks as well.
How to make crispy puri for paani puri/suji golgappa – Step by step instructions
How to make rava pani puri dough?
1.In a medium-sized bowl, add 1 cup fine rava, 2 tablespoons flour, 1/8 teaspoon baking soda, and a pinch of salt. Mix well.

2.Now add water, 1-2 tablespoons at a time, and knead a smooth, elastic dough that is neither too soft nor too stiff. Remember, rava absorbs water, so if you knead a very stiff dough, it will get difficult to roll out the dough later. It will take about 8-10 minutes to knead the dough.

3.Cover the dough with a damp kitchen napkin, set aside for 30 minutes.

Rolling out the dough
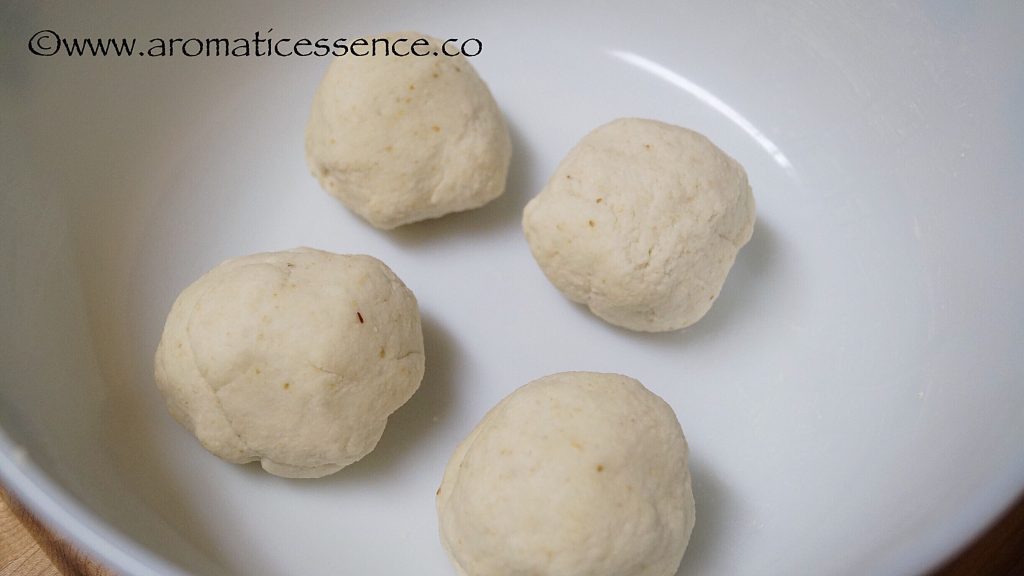
1.After the resting period, knead the dough again for another 5 minutes. Divide the dough into 4 parts.
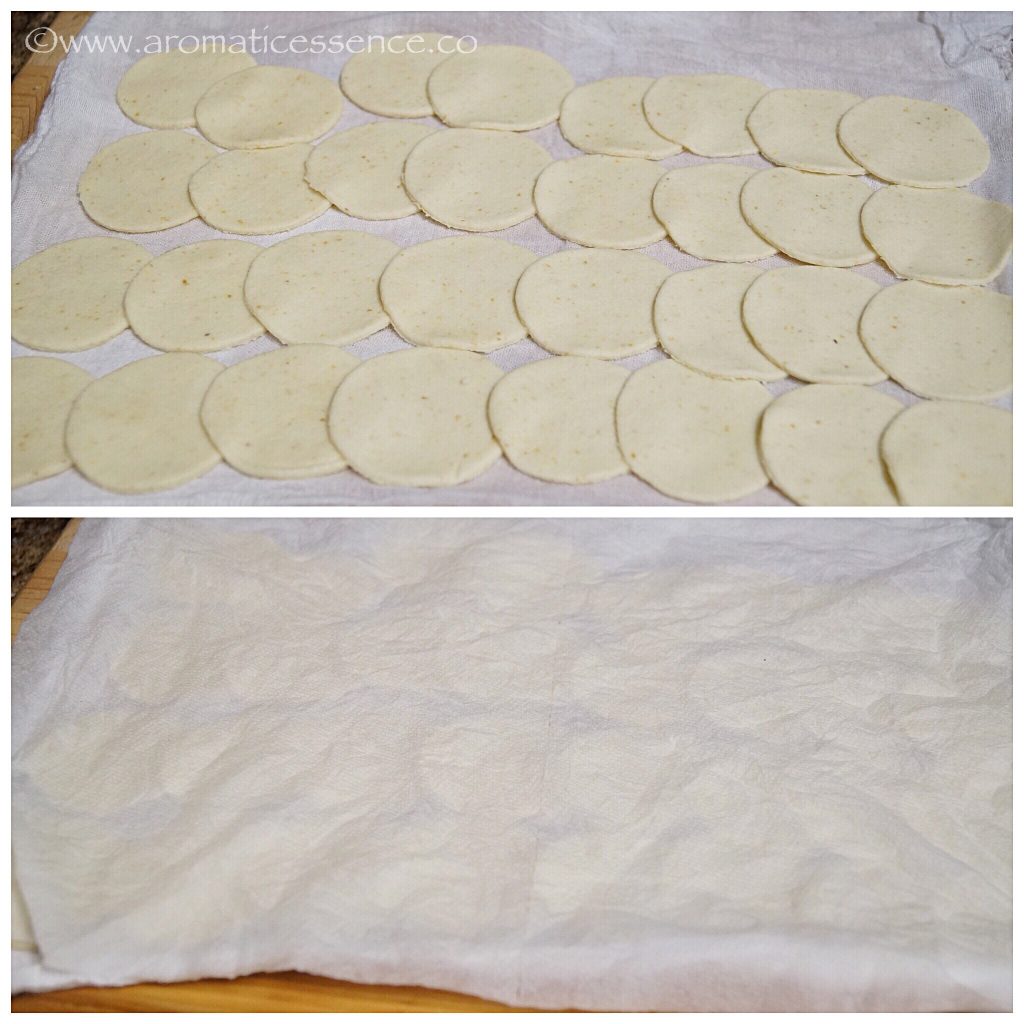
2.Grease the rolling pin and board or work surface with oil. Take one part, and roll it evenly to a diameter of 6.5 inches approx and 2 mm in thickness. The rolled out dough should not be too thick as the puris won’t puff up, and they should neither be so thin that you can see the surface of the board through it. Using a round cutter or a sharp bowl, cut out circles (or fancy shapes for a change :D).

3.Transfer the cut-outs onto a damp cloth, cover with another damp cloth. Repeat the same with the other 3 parts. Collect the scraps together and knead again, roll it out repeat the same procedure until all the dough is used up.
Frying the puris
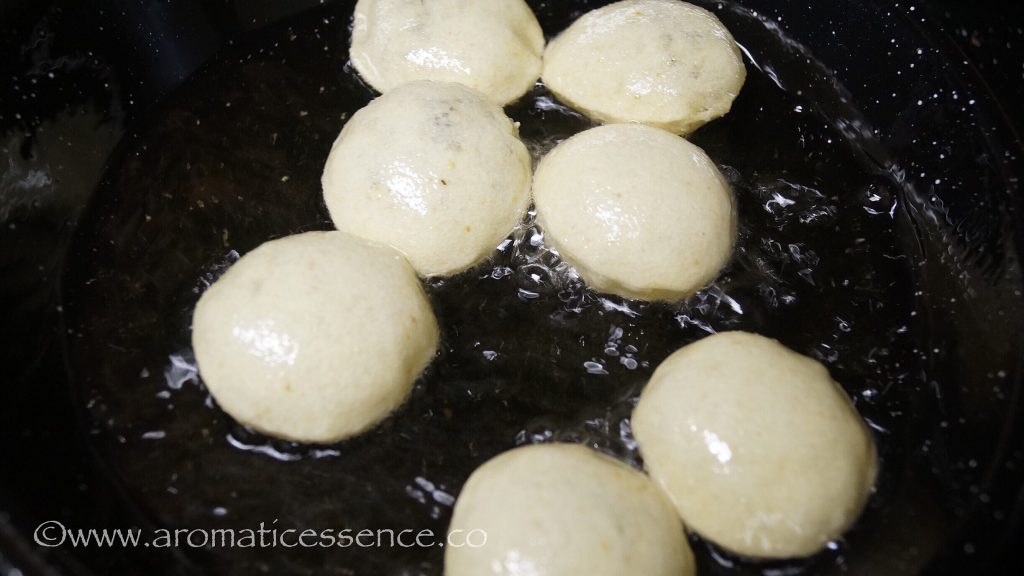
1.Heat oil over medium-high heat in a heavy-bottomed wok/kadai. To check the right temperature and thickness of the puri, test one puri, it should sizzle, float and puff up immediately.

2.Gently slide a few puris in the oil, fry on medium-high heat, you will see them rising on top and puffing up within a few seconds. You may nudge the puris with a slotted spoon to help them puff up. Reduce the temperature to medium-low once the puris puff up to maintain the temperature.
3.Keep flipping them on both sides until it reaches a light golden brown color. The ones that don’t puff up can be used for other chaat snacks like sev puri etc.

4.Fry the remaining puris, in the same way, maintaining the temperature of the oil as required. If the oil is too hot, the puris will burn, and if it is warm, the puris will absorb a lot of oil.

Notes
- Do not try to roll out the entire dough, especially if you are a beginner, as you may have spots of uneven thickness. For best results, I find it’s good to divide the dough into at least 4 parts. Rolling a smaller part of the dough gives an even thickness, which in turn helps most puris puff up.
- If you followed all the steps correctly and still find that even though the puri puffed up they are soft and not as crisp, then how do you troubleshoot that? It is very easy, turn on the oven and preheat it to the lowest temperature for about 15 minutes. Switch off the oven and place all the puris in a baking tray, and bake for about 15 minutes. They will crisp up. Once it is completely cool, transfer to an airtight container.

You can also follow me on Facebook , Pinterest, Instagram & Twitter
Puri Recipe for Pani Puri | How To Make Suji Golgappa
Ingredients1x2x3x
- 1 cup fine rava/sooji/semolina
- 2 tablespoons all-purpose flour (maida), or an equivalent amount of atta flour
- 1/8 teaspoon baking soda, optional but recommended
- Pinch of salt
- 5-6 tablespoons room temperature water for kneading (approx 90 ml), You may need more or less depending on the quality of the rava
- 1 to 2 teaspoons oil, for greasing the board and rolling pin
- Oil, as required, to fry the puris
Instructions
How to make rava pani puri dough?
- In a medium-sized bowl, add rava, flour, baking soda, and salt. Mix well.
- Now add water, 1-2 tablespoons at a time, and knead a smooth, elastic dough that is neither too soft nor too stiff, takes about 8-10 minutes to knead the dough. Remember, rava absorbs water, so if you knead a very stiff dough, it will get difficult to roll out the dough later.
- Cover the dough with a damp kitchen napkin, set aside for 30 minutes.
Rolling out the dough
- After the resting period, knead the dough again for another 5 minutes. Divide the dough into 4 parts.
- Grease the rolling pin and the board or work surface with oil. Take one part, and roll it evenly to a diameter of 6.5 inches approx and 1.5 to 2 mm in thickness. The rolled out dough should not be too thick as the puris won’t puff up, and they should neither be so thin that you can see the surface of the board through it. Using a round cutter or a sharp bowl, cut out circles (or fancy shapes for a change :D).
- Transfer the cut-outs onto a damp cloth, cover with another damp cloth. Repeat the same with the other 3 parts. Collect the scraps together and knead again, roll it out repeat the same procedure until all the dough is used up.
Frying the puris
- Heat oil over medium heat in a heavy bottomed wok/kadai. To check the right temperature and thickness of the puri, test one puri, it should sizzle, float and puff up immediately.
- Gently slide a few puris in the oil, fry on medium-high heat,you will see them rising on top and puffing up within a few seconds. You may nudge the puris with a slotted spoon to help them puff up. Reduce the temperature to medium-low once the puris puff up to maintain the temperature.
- Keep flipping them on both sides until it reaches a light golden brown color. The ones that don’t puff up can be used for other chaat snacks like sev puri etc.
- Fry the remaining puris, in the same way, maintaining the temperature of the oil as required. If the oil is too hot, the puris will burn, and if it is warm, the puris will absorb a lot of oil.
Notes
- Do not try to roll out the entire dough, especially if you are a beginner, as you may have spots of uneven thickness. For the best results, I find it’s good to divide the dough into at least 4 parts. Rolling a smaller part of the dough gives an even thickness, which in turn helps most puris puff up.
- If you followed all the steps correctly and still find that even though the puri puffed up they are soft and not as crisp, then how do you troubleshoot that? It is very easy, turn on the oven and preheat it to the lowest temperature for about 15 minutes. Switch off the oven and place all the puris in a baking tray, and bake for about 15 minutes. They will crisp up. Once it is completely cool, transfer to an airtight container.
- Measuring cup used, 1 Cup = 250 ml, 1 tsp = 5 ml