Looking for an easy, fuss-free cookie bar recipe? Then you’ve got to try these easy jam bars! You require a handful of ingredients and minimal effort to whip up a batch of this scrumptious and moreish, jam crumble bars!

I love baking all sorts of cookies, crunchy and crispy or soft and chewy, the slice-and-bake kinds or the cut-out kinds. What’s not to love about a batch of freshly baked homemade cookies after all, right?
- Fuss-free jam crumble bars
- What you need to make these easy jam bars
- Few tips to know before you make this recipe
- Quick FAQs
- How to make jam bars – Step by step instructions
- Jam Bars Recipe | Jam Crumble Bars
Fuss-free jam crumble bars
As much as I love to bake cookies, I have to admit it does take some amount of time and energy. You need to prepare the dough, chill it, roll it out, cut out the shapes, and then finally bake.
On the contrary, these jam bars or jam squares, call it what you may, are the easiest kind of cookie bar you can whip up.
They are also great for on-the-go breakfast or as a snack. Or as a dessert served warm with a scoop of vanilla ice cream! Yum yum!
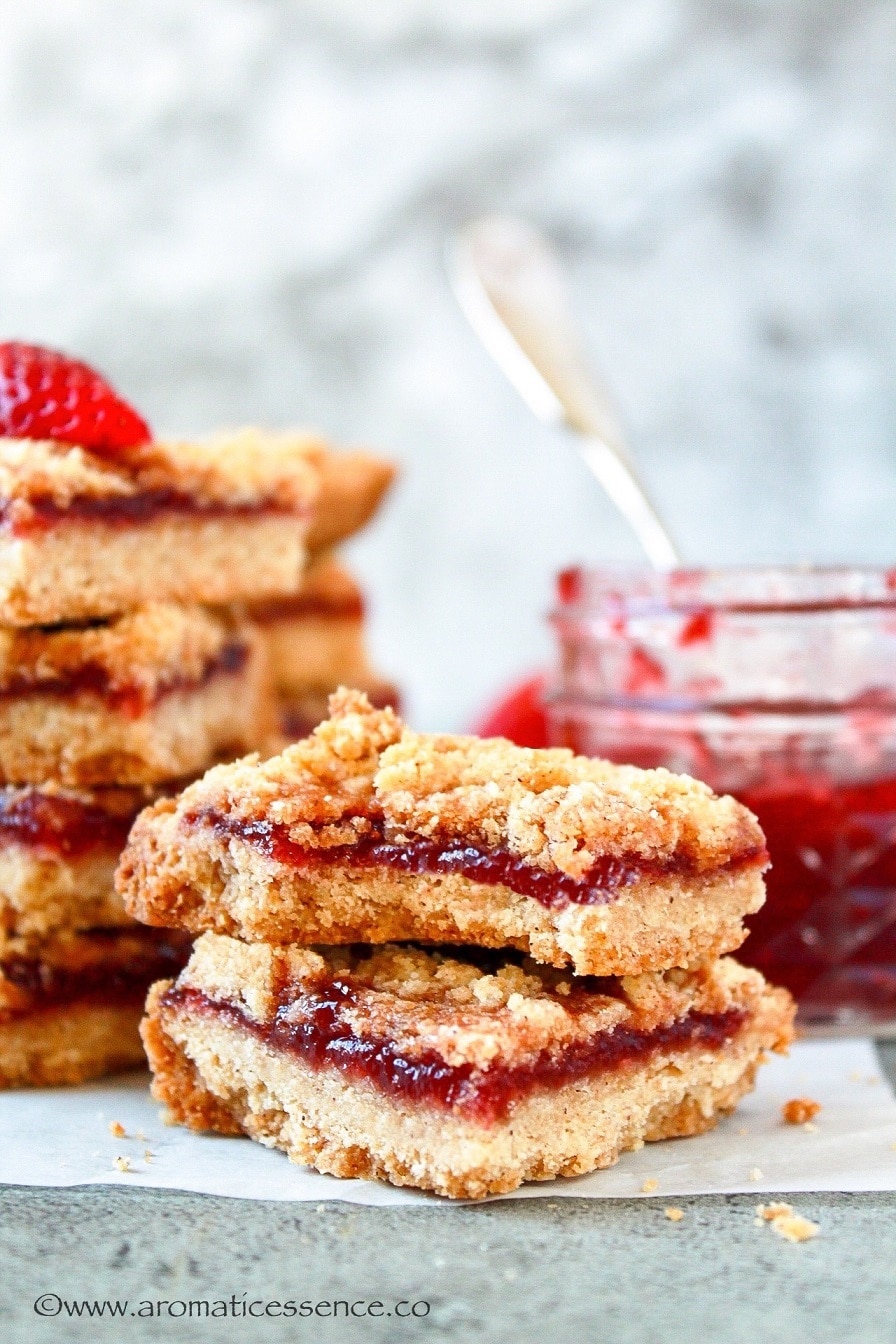
These yummy bars have a crispy, buttery crust, moist jammy center, and a crumbly, crunchy topping. They are addictive for a reason!
You will be amazed to see how you can bake a batch of these bakery-style jam bars that only need few ingredients and practically no effort 🙂
What you need to make these easy jam bars
There are 3 components to make crumb bars;
- The crust
- Filling
- Topping
For the crust and crumble topping
The great thing about making any sort of crumble bar is that you only need one dough for the crust and topping. The method of application changes for both and the end product is nothing short of delicious.
For this versatile dough, you will need,
Flour: regular all-purpose flour. For a healthier touch, you can swap white flour with whole wheat pastry flour. Or a mix of whole wheat pastry flour and almond flour. You can also throw in rolled oats for a touch of healthy. However, these jam bars without oatmeal are pretty great too!
Sugar: I’ve used two kinds of sugar for the recipe, i.e. granulated and brown sugar. White sugar gives these cookie bars the desired crispy and crunchy factor while the brown sugar keeps these bars moist.
Ground cinnamon: I highly recommend you add some sort of warm spice to the dough as it really elevates the final taste of these jam bars. You can play around with other spices like nutmeg, cardamom, all-spice, etc
Baking powder
Kosher salt
For the filling
Jam or preserves of choice: I used my homemade Instant Pot strawberry jam for this jam square recipe.
This is my favorite part as you can use various jams like blueberry, raspberry, apricot, mango, lingonberry, blackberry, etc to make a different flavored jam crumble bar.
You can also opt for sugar-free jam or preserves to reduce the sugar content. Overall, these are not really over-the-top sweet.

Few tips to know before you make this recipe
- Line the pan with parchment paper with overhang: Not only does it make cleaning up a breeze but more importantly, it makes it easier to lift the entire thing out of the pan.
- If the jam is stiff or cold: Transfer the amount of jam required to a microwave-safe bowl and warm it for 20-30 seconds to make it spreadable.
- Avoid spreading the jam near the edges of the pan: Leave some room around the edges of the crust when you spread the jam. Doing so will ensure that there is less chance of the jam touching the sides of the pan and getting burnt.
- Press the crust and bake it first: Press the crust really well and bake it. This helps the bars hold together, and they will not fall apart when you try to cut it into squares.
Can I double this recipe?
Yes, you can easily double this recipe. Use a 9×13-inch baking pan if you double it. You will definitely want to double this recipe, it is so good!
Can I make this recipe vegan?
Yes, absolutely! You can swap the butter for vegan butter, unsalted margarine, or coconut oil.
Can I use fresh strawberries to make strawberry jam bars?
This recipe is adapted from the blueberry crumb bars I shared last year. I thought it would be easy to just substitute the blueberries with chopped strawberries, but I was rather disappointed to see that the recipe didn’t work for fresh strawberries at all.
Basically, the fresh strawberries turn into a dull reddish pink in color on baking and also released a lot of moisture, which affected the texture of these bars. Also, they lacked that intense strawberry flavor. So, I do not recommend adding fresh strawberries here. Though, this recipe works great for other berries.
If you have a lot of strawberries and really want to use them, you can make a strawberry compote instead and then use that in this recipe. You can find the recipe for the compote in my strawberry fool post.
It is an extra step but totally worth it!
How to store these jam crumble bars?
Store these bars in an airtight container at room temperature for up to 2 to 3 days (only if they last that long :D). Or store it in the refrigerator for up to 1 week.
Can you freeze these bars ?
You can definitely make these ahead and freeze. Store the bars in an freezer-safe container, separate the bars with layer of parchment paper so that they don’t stick. Freeze up to 3 months. Thaw at room temperature when you are ready to serve.

How to make jam bars – Step by step instructions
{Printable recipe card below instructions}
p.s. I attached pics for steps 1-4 from my blueberry crumb bars post, as the process is the same.
Step 1: Preheat the oven and prepare the pan
Preheat the oven to 375 degrees F (190 degrees C). Grease an 8-inch square pan, and line with parchment paper with overhang.
Step 2: Mix the dry ingredients
In the bowl of a food processor, add 1 & 1/2 cups flour, 1/2 tsp baking powder, 1/4 tsp salt, and 1/2 tsp cinnamon. Also, add in 1/4 cup each of white and brown sugar. Pulse it a couple of times to mix the dry ingredients.

Step 3: Add butter and process the mixture
Add 1/2 cup of cold, cubed butter, and process until the dough looks coarse and crumbly. If you try to squeeze some dough in your hands, it should clump together. Alternatively, you can add all the dry ingredients in a medium bowl. Use a fork or pastry cutter to blend in the cubed butter until you have a crumbly dough.

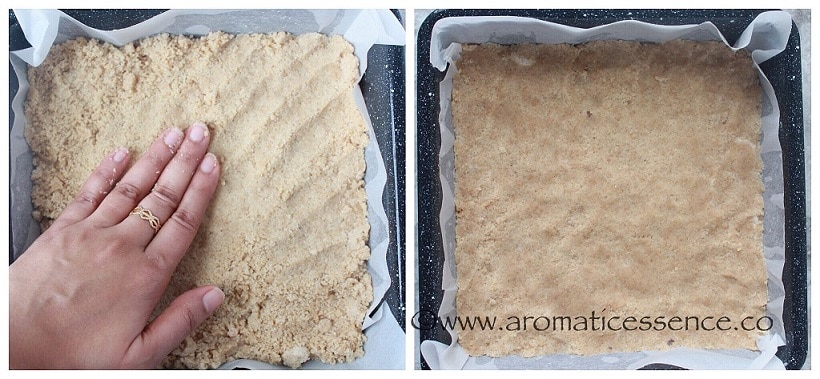
Step 4: Pat the dough into the prepared pan and bake the crust
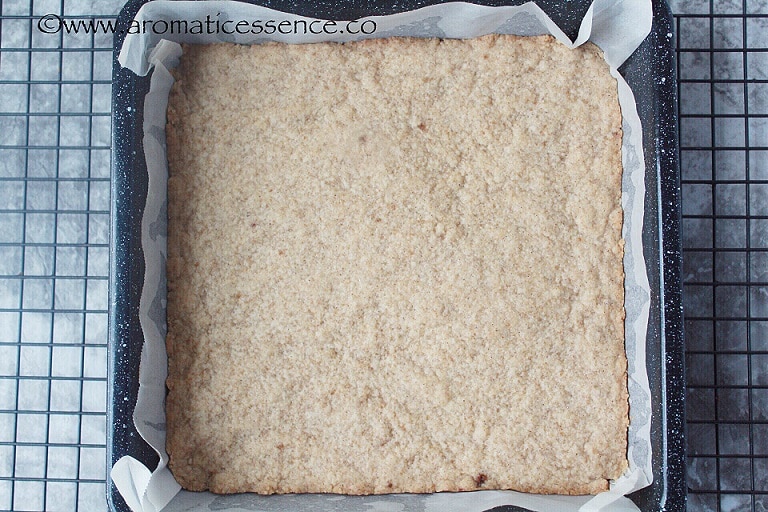
Reserve 3/4 cup of the dough for the crumble topping. Pat the rest of the dough into the prepared pan. Bake the crust for 10 minutes.
Remove the baking pan after 10 minutes. Let it rest for 5 minutes.
Step 5: Spread the jam
Spread the jam all over the baked crust leaving about 1/8 inch space from the edges of the crust.

Step 6: Crumble remaining dough
Crumble the remaining reserved dough over the jam.

Step 7: Bake
Bake in a preheated oven for 35 minutes, or until the topping is golden brown. Transfer the pan to a wire rack, cool completely before cutting into squares.

Notes
- If you’d like to add oats in these bars: Use 1 cup of all purpose flour and 1 cup of rolled oats. Transfer the crumbly dough prepared in step 3, to a mixing bowl. Add the rolled oats, and work it in gently. Or you can follow the same recipe and just add 1/2 cup of rolled oats to 3/4th of the reserved crumble topping.
- You can also add a few tablespoons of chopped nuts like pecans, walnuts, or coconut flakes, etc to the reserves topping.
You can also follow me on Facebook , Pinterest, Instagram & Twitter

Jam Bars Recipe | Jam Crumble Bars
Ingredients1x2x3x
- 1.5 cups all-purpose flour, leveled and sifted
- 1/4 cup granulated sugar
- 1/4 cup light/dark brown sugar
- 1/2 tsp baking powder
- 1/4 tsp salt
- 1/2 cup cold unsalted butter
- 1/2 tsp ground cinnamon
- 1/2 - 2/3 cup strawberry jam
Instructions
- Preheat the oven to 375 degrees F (190 degrees C). Grease an 8-inch square pan, and line with parchment paper with overhang.
- In the bowl of a food processor, add flour, baking powder, salt, and cinnamon. Also, add in white and brown sugar. Pulse it a couple of times to mix the dry ingredients.
- Add cold, cubed butter, and process until the dough looks coarse and crumbly. If you try to squeeze some dough in your hands, it should clump together. Alternatively, you can add all the dry ingredients in a medium bowl. Use a fork or pastry cutter to blend in the cubed butter until you have a crumbly dough.
- Reserve 3/4 cup of the dough for the crumble topping. Pat the rest of the dough into the prepared pan. Bake the crust for 10 minutes.
- Remove the baking pan after 10 minutes. Let it rest for 5 minutes.
- Spread the jam all over the baked crust leaving about 1/8 inch space from the edges of the crust.
- Crumble the remaining reserved dough over the jam.
- Bake in a preheated oven for 35 minutes, or until the topping is golden brown. Transfer the pan to a wire rack, cool completely before cutting into squares.
Notes
- If you’d like to add oats in these bars: Use 1 cup of all purpose flour and 1 cup of rolled oats. Transfer the crumbly dough prepared in step 3, to a mixing bowl. Add the rolled oats, and work it in gently. Or you can follow the same recipe and just add 1/2 cup of rolled oats to 3/4th of the reserved crumble topping.
- You can also add a few tablespoons of chopped nuts like pecans, walnuts, or coconut flakes, etc to the reserved topping.
- Measuring cup used, 1 cup = 250 ml, 1 teaspoon = 5 ml


Jam Bars Recipe | Jam Crumble Bars
Ingredients
- 1.5 cups all-purpose flour, leveled and sifted
- 1/4 cup granulated sugar
- 1/4 cup light/dark brown sugar
- 1/2 tsp baking powder
- 1/4 tsp salt
- 1/2 cup cold unsalted butter
- 1/2 tsp ground cinnamon
- 1/2 - 2/3 cup strawberry jam
Instructions
- Preheat the oven to 375 degrees F (190 degrees C). Grease an 8-inch square pan, and line with parchment paper with overhang.
- In the bowl of a food processor, add flour, baking powder, salt, and cinnamon. Also, add in white and brown sugar. Pulse it a couple of times to mix the dry ingredients.
- Add cold, cubed butter, and process until the dough looks coarse and crumbly. If you try to squeeze some dough in your hands, it should clump together. Alternatively, you can add all the dry ingredients in a medium bowl. Use a fork or pastry cutter to blend in the cubed butter until you have a crumbly dough.
- Reserve 3/4 cup of the dough for the crumble topping. Pat the rest of the dough into the prepared pan. Bake the crust for 10 minutes.
- Remove the baking pan after 10 minutes. Let it rest for 5 minutes.
- Spread the jam all over the baked crust leaving about 1/8 inch space from the edges of the crust.
- Crumble the remaining reserved dough over the jam.
- Bake in a preheated oven for 35 minutes, or until the topping is golden brown. Transfer the pan to a wire rack, cool completely before cutting into squares.
Notes
- If you’d like to add oats in these bars: Use 1 cup of all purpose flour and 1 cup of rolled oats. Transfer the crumbly dough prepared in step 3, to a mixing bowl. Add the rolled oats, and work it in gently. Or you can follow the same recipe and just add 1/2 cup of rolled oats to 3/4th of the reserved crumble topping.
- You can also add a few tablespoons of chopped nuts like pecans, walnuts, or coconut flakes, etc to the reserved topping.
- Measuring cup used, 1 cup = 250 ml, 1 teaspoon = 5 ml
These Instant Pot refried beans are made from scratch with dried beans, aromatics, and a few spices. They are creamy, delicious, and healthier than anything you can get in a can. Learn how to make the best refried beans in your electric pressure cooker using soaked or unsoaked beans, both of which are covered in this post.

I know most of us resort to canned refried beans to accompany our Mexican or Tex-Mex meals. But what if I told you there was a better alternative.
Make refried beans in the Instant Pot! This homemade version is made effortlessly, is packed with so much flavor, and is way better than the canned stuff.
You wouldn’t believe me if I told you that I’ve purchased canned refried beans just once in my life. I got it to make the 7 layer dip. You can easily get away with using canned refried beans in a recipe like that which has so many components. However, on its own, I’ll pass! No bland canned taste for us.
It was then that I decided that it would be the last time I would ever buy canned refried beans!
But this Instant Pot refried beans is another story altogether! It is seriously so good and totally restaurant-worthy, even better if I may say so.
- Why is it called refried beans? Is it fried twice ?
- Ingredients needed to make this pressure cooker refried beans
- To soak or not to soak beans?
- Why should you be making your own refried beans in the Instant Pot?
- Customize this recipe
- Storage and freezing instructions
- How to use refried beans
- Quick FAQs
- You may also enjoy these Instant Pot recipes
- How to make Instant Pot refried beans from scratch – Step by step instructions
- Instant Pot Refried Beans Recipe
Why is it called refried beans? Is it fried twice ?
Refried beans come from the Spanish words frijoles refritos . Frijoles are beans and refritos simply means well-fried.
It is literally a mistranslation. Refried beans are simply well-cooked beans that are fried with some sort of fat and mashed as they are cooking to a smooth or chunky consistency.
Ingredients needed to make this pressure cooker refried beans
You will need a handful of basic pantry staples to make the yummiest refried beans at home.
- Pinto beans
- Olive oil
- Aromatic’s like freshly diced onion and minced garlic
- Seasoning, I used some ground cumin, chili powder, chipotle chile powder for that smoky flavor, salt, and Mexican dried oregano.
- Water/Stock/Broth
- A squeeze of lime juice to finish it off.
The traditional refried beans recipe is just made with lard, onions, garlic, beans, epazote (an aromatic herb that reduces flatulence), some salt and pepper to season. But I do like to add additional spices to enhance the flavor of my homemade refried beans.

To soak or not to soak beans?
I, personally prefer to soak beans, just as I learned from my Grandma and Mom! Before I had the IP, I used my handy stovetop pressure cooker to cook all sorts of beans and legumes.
But, I love my IP so much more for its safety features and the timer. You don’t have to keep a tab on the number of whistles and all sorts of things that come with handling a stovetop pressure cooker.
I will not get into the controversial digestive issues that can arise from not soaking the beans. It really depends on how your body deals with beans, so you would know better.
If you feel like you do fine without soaking, then, by all means, skip the soaking part.
But here are 2 reasons why I like to soak beans
- They cook evenly
- Cooks in a fraction of time, I’m talking 15 minutes as opposed to 45-50 minutes. You barely need a minute or two max to soak the beans and yes, of course, to remember to actually soak them :p
I understand, sometimes, we just don’t remember to soak the beans. Been there, done that! That’s why I’ve given instructions for soak and no soak method in the recipe card. Pick whatever works for you. Soak or no soak, both methods yield delicious refried beans nonetheless.
Why should you be making your own refried beans in the Instant Pot?
- You need simple ingredients
- It is ready in a fraction of time even if you start off with unsoaked dried beans
- Hands down it beats the store-bought stuff with respect to flavor
- Easily customizable
- Can feed a crowd
- Prepared sans any preservatives
- Vegan and vegetarian friendly
- Freezes beautifully
- Budget-friendly
Customize this recipe
Like I always say, when you make something yourself, you have the opportunity to customize it to your liking. Here are a couple of options worth considering.
Bacon: Swap the olive oil with bacon grease for that smoky flavor. Feel free to add an additional tablespoon for more flavor.
Lard: As I mentioned, lard is used to make authentic refried beans. So, you may simply use that instead.
Ham hock: You can throw in a ham hock along with the beans and broth, just before pressure cooking.
Fat-free: Skip the oil or fat of any sort, and sauté the aromatics and spices with stock or broth or water.
Dump-and-go recipe: You can dump in all the ingredients and pressure cook to keep things even more simple. I always love to sauté my aromatics and spices because it does add a depth of flavor but feel free to skip that part.
Flavor: For a fun variation, you can experiment with different seasonings like taco, ranch seasoning, etc. Or add a small can of tomato sauce, or a few tablespoons of tomato paste, or a can of Rotel, a few dashes of hot sauce or swirl in some sour cream once your purée the beans. None of these goes into the authentic stuff, but hey, that doesn’t mean you can’t experiment 😀

Storage and freezing instructions
Store leftover refried beans in an airtight container for up to 1 week.
Freeze: Transfer individual serving portions into resealable freezer-safe bags or containers, label, and freeze the bags flat up to 3 months.
Defrost overnight in the refrigerator.
Transfer to a microwave-safe bowl and reheat in the microwave with a splash of stock. Or you may reheat it in a skillet over low heat with some stock until heated through.
How to use refried beans
- This Instant Pot refried beans is the perfect side dish to serve along with your favorite Mexican dishes.
- Simply serve it as a bean dip with some tortilla chips
- Use it as a filling for burritos, wraps, quesadillas or enchiladas
- Inside tacos
- Bean tostadas
- 7-layer dip
- Mexican lasagna or casserole
- Huevos rancheros
- To thicken soups, curries or chili
What beans are used to makerefried beans?
Traditionally, pinto beans are used to make refried beans. They are nutty, creamy, and have an earthy taste. When cooked, they turn soft and can be mashed easily
Can I use other beans to make this Instant Pot refried beans?
Yes, definitely! If you don’t have pinto beans, you can try using black beans, kidney beans or even red beans to make this easy bean dip.
The flavor will vary depending on the type of bean you choose. You could use a combination of beans too, experiment, and see what you may like.
Can I use canned pinto beans to make refried beans?
You really wouldn’t need to use your Instant Pot if you opt for canned pinto beans. You can make it on the stovetop following the instructions mentioned for the sautéing part, add your rinsed and drained canned beans, about 1/3 to 1/2 cup broth. Cover and simmer for 5-10 minutes. Blend or mash the beans to your desired consistency.
You may also enjoy these Instant Pot recipes
Chana masala
Southern red beans and rice
How to make Instant Pot refried beans from scratch – Step by step instructions
Step 1: Sort, rinse and soak beans
Sort 1 pound of pinto beans well to remove any shriveled beans or debris. Rinse the beans in a colander under running water. Transfer the beans to a large bowl, add about 6 cups of water, soak overnight or for 8-10 hours.

Step 2: Sauté aromatics and seasonings
Press the ‘SAUTE’ button, and set it to ‘NORMAL’. Once its displays, ‘HOT’, then add 2 tablespoons of olive oil, add 1 cup of chopped onion and sauté until translucent.
Add minced garlic (about 4 garlic cloves), sauté until the garlic is fragrant.

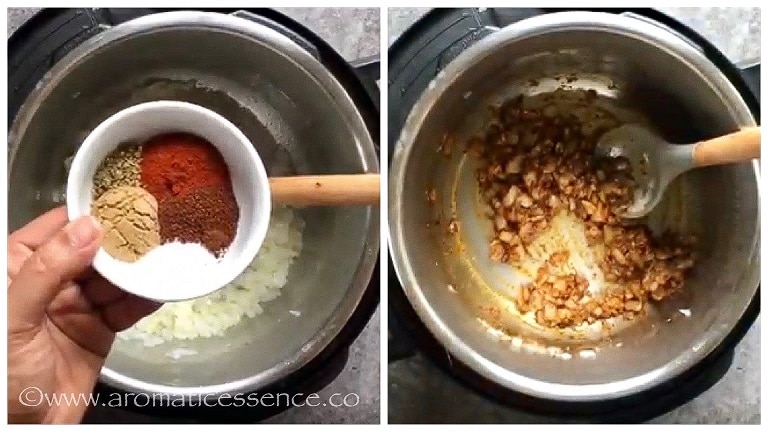
Add the spices (1 teaspoon each of ground cumin, chili powder, chipotle chili, and kosher salt along with 1/2 teaspoon Mexican dried oregano) and sauté for another 30 seconds.
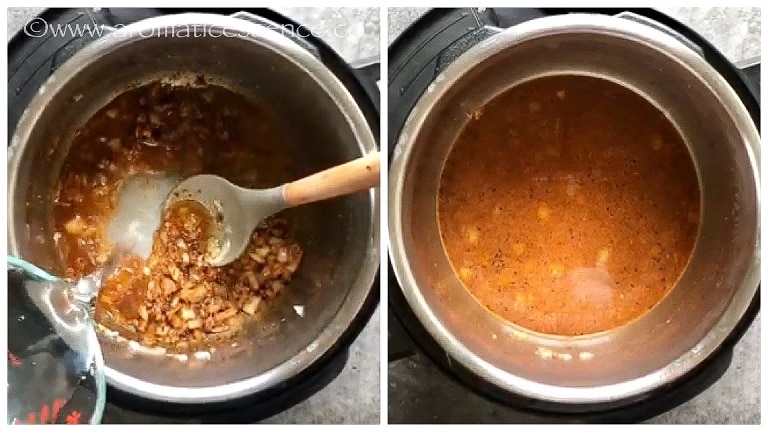
Step 3: Deglaze the pot
Add about 1/2 cup of water or broth, and scrape the bottom of the pot to remove anything that is stuck at the bottom of the pot.
Press ‘CANCEL’ to switch off the “SAUTE’ mode.
Step 4: Add the drained beans and remaining liquid
Drain the beans and add them to the pot. Add the remaining 3.5 cups of water or broth. You can also throw in 2 bay leaves. Give everything a good mix.

Step 5: Pressure cook
Close the lid of the Instant Pot. Set the valve to ‘SEALING’. Pressure cook on high for 15 minutes. It will take some time for the pressure to build up (about 16 minutes), after which the timer will begin.
Step 6: Natural pressure release (NPR)
Once the cooking cycle is complete, let the pot depressurize naturally.
Press ‘CANCEL’ and switch off the IP. Once the silver pin drops, turn the knob to ‘VENTING’ and open the lid away from you.

Step 7: Purée the beans
Drain the beans through a colander, reserving the liquid. Discard the bay leaves.
Purée the beans with an immersion blender, adding the reserved liquid little at a time, until you reach your desired consistency. I used about 1.75 cups of the liquid to purée the beans. Drizzle some freshly squeezed lime or lemon juice, and mix well.
For chunky refried beans you may also use a potato masher to mash the beans.

Step 8: Serve
Check for seasoning and adjust with more salt if required. I added another 1/2 teaspoon of salt.

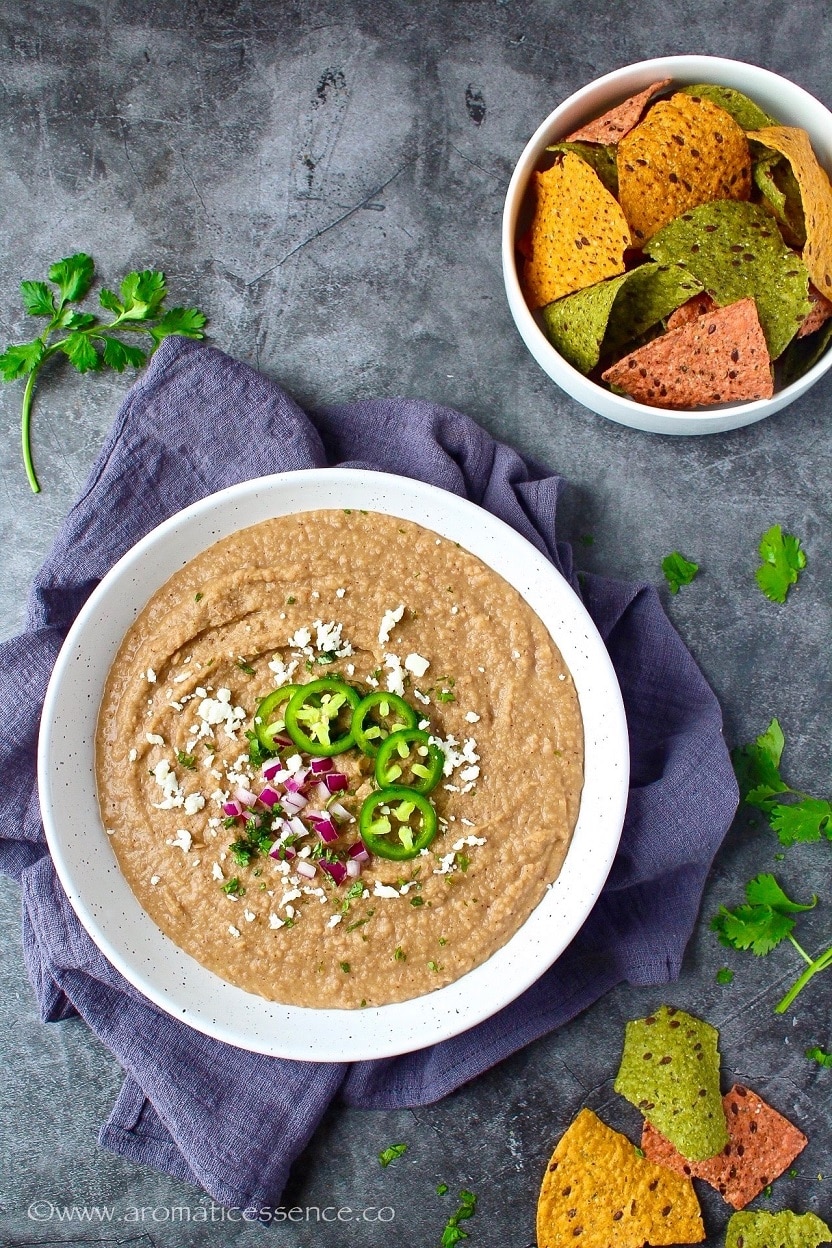
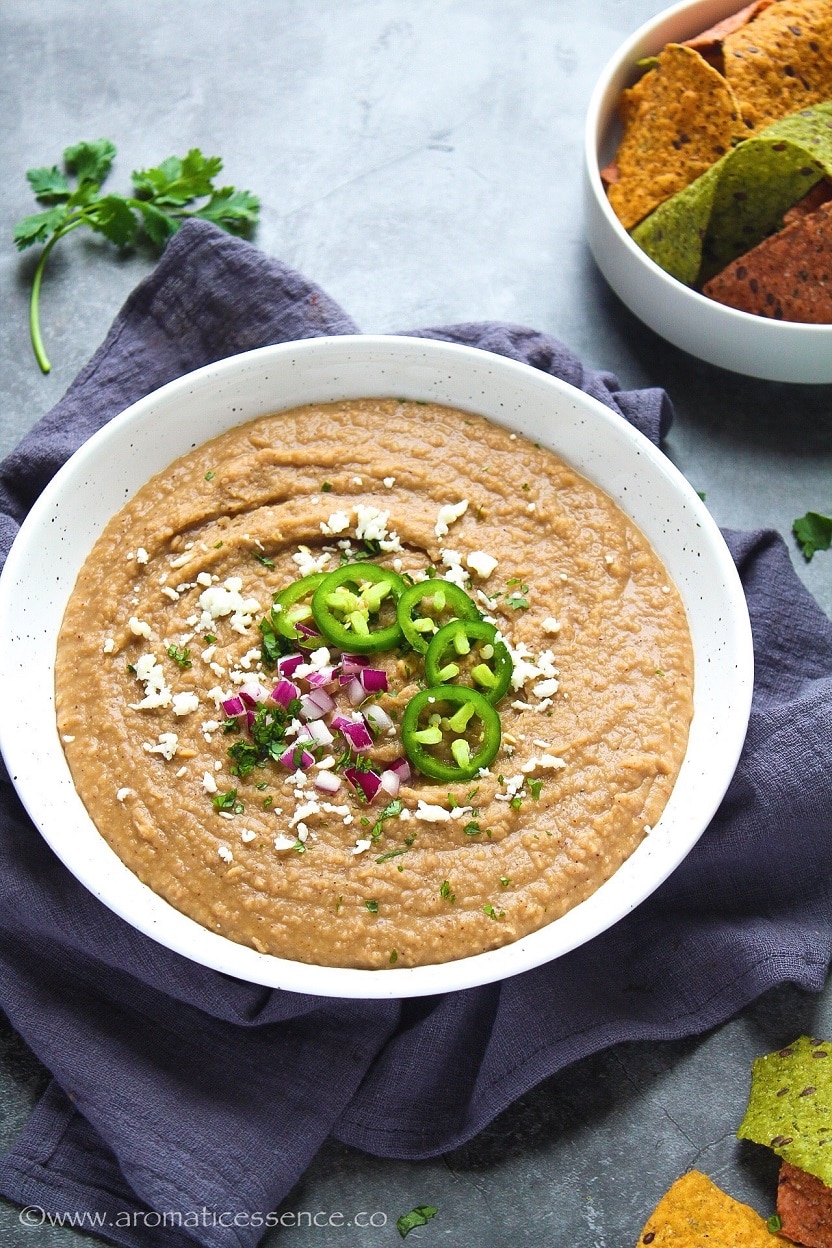
Dish out the refried beans, garnish with diced onions, tomatoes, crumbled cotija cheese, queso fresco, or Mexican shredded cheese, and chopped cilantro. Serve with tortilla chips or see more ways to use refried beans above the instructions. Buen provecho!
Notes
- For the no-soak method: Follow step 1 of sorting and rinsing the beans, then follow the rest of the steps. Increase the liquid to 6 cups and pressure cook on high for 45-50 minutes followed by a natural pressure release.
- Alternatively, you can make this Instant Pot creamy refried beans using another method. First, pressure-cook the soaked or unsoaked beans with the liquid. Empty the contents from the pot, and sauté aromatics and spices. Add the cooked beans and liquid and mash or blend to your desired consistency.
- The beans, soaked or unsoaked should ideally be well cooked in the time specified. But, sometimes other factors like the age of dried beans or the hardness of the water might affect the cooking time of the beans. If they are not cooked, put the lid back on and pressure cook on ‘HIGH’ for another 10-15 minutes followed by a natural pressure release.
- You can also blend the beans in a regular blender or a food processor. Make sure the beans and liquid have cooled down, and blend in batches.
- You will have approx 1.75 cups of leftover bean stock. Do not discard it, it can be used in soups or curries.
- This recipe is kid-friendly as the spice level is pretty low. If you’d like to increase the spice level, add 1 serrano or jalapeño pepper, diced, along with the minced garlic. You can also add 1/2 teaspoon or more of cayenne pepper.

You can also follow me on Facebook , Pinterest, Instagram & Twitter

Instant Pot Refried Beans Recipe
Equipment
- Instant Pot 6 quart
Ingredients1x2x3x
- 1 pound dried pinto beans
- 2 tablespoons olive oil/vegetable oil
- 1 cup chopped onion
- 4 garlic cloves minced
- 4 cups of water or low-sodium vegetable broth
- 1 teaspoon ground cumin
- 1 teaspoon chili powder
- 1 teaspoon chipotle chile powder
- 1/2 tsp Mexican dried oregano
- 1 teaspoon kosher salt or to taste
- 2 bay leaves optional
- Juice of half a lime optional
Instructions
- Sort the beans well to remove any shriveled beans or debris. Rinse the beans in a colander under running water. Transfer the beans to a large bowl, add about 6 cups of water, soak overnight or for 8-10 hours
- Press the ‘SAUTE’ button, and set it to ‘NORMAL’. Once its displays, ‘HOT’, then add olive oil, add chopped onion and sauté until translucent.
- Add minced garlic, sauté until the garlic is fragrant.
- Add the spices and sauté for another 30 seconds.
- Add about 1/2 cup of water or broth and scrape the bottom of the pot to remove anything that is stuck at the bottom of the pot.
- Press ‘CANCEL’ to switch off the “SAUTE’ mode.
- Drain the beans and add them to the pot. Add the remaining 3.5 cups of water or broth and bay leaves (if using). Give everything a good mix.
- Close the lid of the Instant Pot. Set the valve to ‘SEALING’. Pressure cook on high for 15 minutes. It will take some time for the pressure to build up (about 16 minutes), after which the timer will begin.
- Once the cooking cycle is complete, let the pot depressurize naturally.
- Press ‘CANCEL’ and switch off the IP. Once the silver pin drops, turn the knob to ‘VENTING’ and open the lid away from you.
- Drain the beans through a colander, reserving the liquid. Discard the bay leaves.
- Purée the beans with an immersion blender, adding the reserved liquid little at a time, until you reach your desired consistency. I used about 1.75 cups of the liquid to purée the beans. Drizzle some freshly squeezed lime or lemon juice, and mix well.
- For chunky refried beans you may also use a potato masher to mash the beans.
- Check for seasoning and adjust with more salt if required. I added another 1/2 teaspoon of salt.
- Dish out the refried beans, garnish with diced onions, tomatoes, crumbled cotija cheese, queso fresco, or Mexican shredded cheese, and chopped cilantro.
Notes
- For the no-soak method: Follow step 1 of sorting and rinsing the beans, then follow the rest of the steps. Increase the liquid to 6 cups and pressure cook on high for 45-50 minutes followed by a natural pressure release.
- Alternatively, you can make this Instant Pot creamy refried beans using another method. First, pressure-cook the soaked or unsoaked beans with the liquid. Empty the contents from the pot, and sauté aromatics and spices. Add the cooked beans and liquid and mash or blend to your desired consistency.
- The beans, soaked or unsoaked should ideally be well cooked in the time specified. But, sometimes other factors like the age of dried beans or the hardness of the water might affect the cooking time of the beans. If they are not cooked, put the lid back on and pressure cook on ‘HIGH’ for another 10-15 minutes followed by a natural pressure release.
- You can also blend the beans in a regular blender or a food processor. Make sure the beans and liquid have cooled down, and blend in batches.
- You will have approx 1.75 cups of leftover bean stock. Do not discard it, it can be used in soups or curries.
- This recipe is kid-friendly as the spice level is pretty low. If you’d like to increase the spice level, add 1 serrano or jalapeño pepper, diced, along with the minced garlic. You can also add 1/2 teaspoon or more of cayenne pepper.
- Cook time includes time taken for pressure-build up and natural pressure release.
- Measuring cup used, 1 cup = 250 ml, 1 teaspoon = 5 ml

