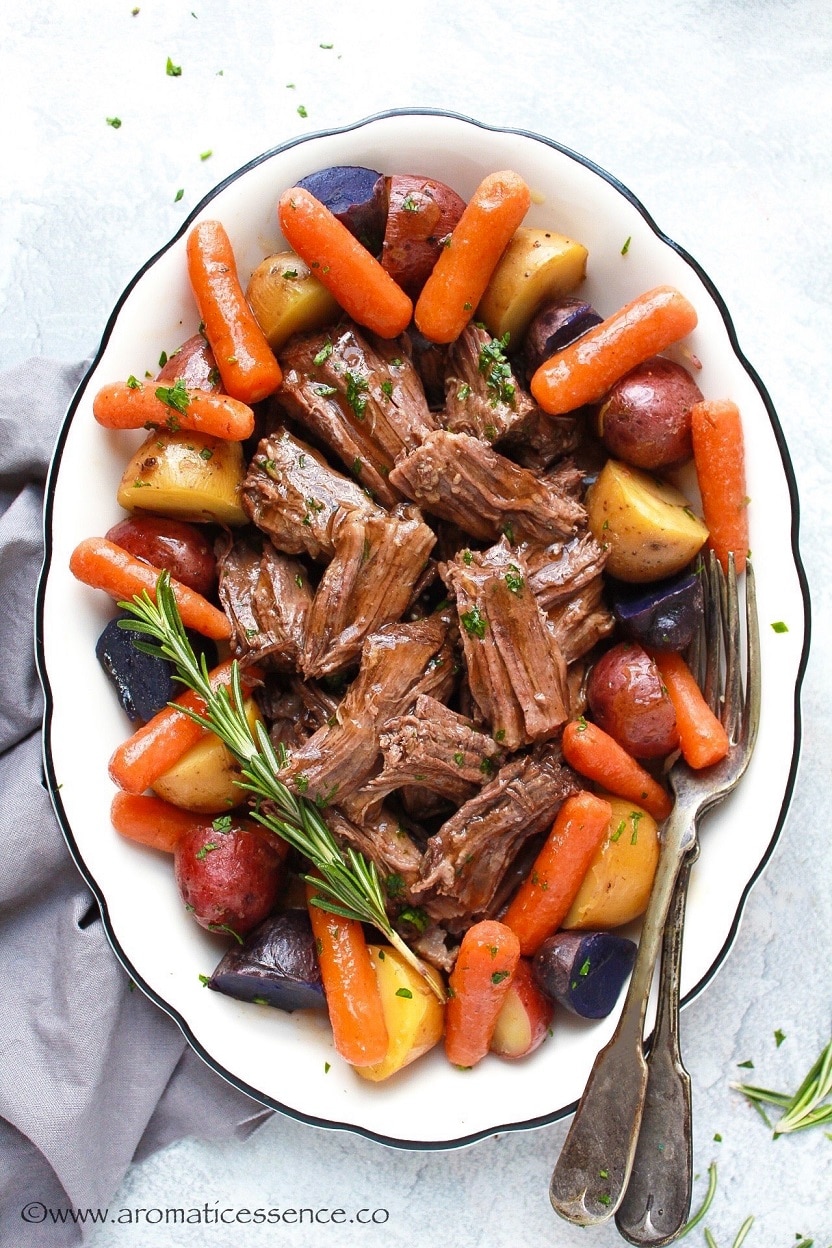
This Instant Pot Pot Roast is incredibly easy and tastes like it has been slow-cooked for hours! Whip up a batch of this tender and juicy pot roast in your Instant Pot for the ultimate, fuss-free meal that is absolutely comforting, wholesome, and so delicious!
Growing up my mother hardly ever prepared beef at home. It would make an occasional appearance every other Sunday. It would most probably be roast beef, prepared the Goan way. Goa is a small state in India that used to be a Portuguese colony, so the food is heavily influenced by Portuguese cuisine.
I’m sure most of you are not familiar with the Goan preparation of roast beef, it is quite different from the American version. It is marinated with ginger garlic, lemon juice or vinegar and a ton of warming spices like cinnamon, cloves, peppercorns and then pressure-cooked. Technically, I think it should be called pot roast 😀 I hope I can share that here in the future.
This pot roast is reminiscent of my Mom’s roast beef. I can relate to it for 2 reasons;
- She always uses a stove-top pressure cooker to cook the beef roast.
- The beef is always so tender and juicy.
A lot of folks usually get confused between a pot roast and roast beef. The major difference between the two is the cooking technique used. Pot roast uses the technique of braising and for roast beef, the beef is seasoned and roasted in an oven without any liquid.
Different cuts of meat are suitable for either a pot roast and roast beef, though cuts that work for roast beef can also be used for pot roast.
If you prefer thinly sliced roast beef, you should opt for roast beef cooked to your desired doneness. But if you are looking for tender, melt-in-the-mouth beef, that shreds easily, then this post is for you! So, today, let’s talk about this delicious, Instant Pot pot roast with vegetables and gravy!

- An easy and simple recipe for Instant Pot pot roast
- The best cut of meat for pot roast
- Cook time for pressure cooker pot roast
- Frozen roast in the Instant Pot
- Side dishes
- My 5 simple tips to make the perfect Instant Pot beef pot roast
- Ideas to use up leftover pot roast
- More Instant Pot beef recipes
- How to make Instant Pot Pot Roast – Step by step instructions
- Instant Pot Pot Roast | Instant Pot Chuck Roast
An easy and simple recipe for Instant Pot pot roast
I love a classic pot roast that has been cooking for hours. It naturally tastes rich and savory with deep flavors due to the slow cooking process. But have you tried cooking a roast in a pressure cooker? It will completely change the way you ever cook a pot roast. You get the same results in a fraction of time as opposed to the 8-10 hours required in a slow cooker.
This Instant Pot pot roast is simply amazing, the meat just shreds apart at the touch of a fork. In fact, it always falls apart when I try to remove it from the pot. Not only is the meat so tender, but it is also flavorful at the same time, infused with all the deliciousness from the herbs and aromatics.
A handy tip – Use a trivet and place the seared roast on it, that way you can just pull the cooked roast intact out of the pot.
You only need a few easy steps to make this tasty IP pot roast which are;
- Brown the chuck roast on both sides
- Saute the aromatics
- Deglaze the pot with red wine
- Dump in the rest of the ingredients except the potatoes and carrots, press a button, walk away and do your thing for an hour 😀
- Come back, open the lid, add the veggies, and press a button again, set for 10 minutes this time.
- Open the lid, remove everything, and thicken the liquid with a cornstarch slurry to make the gravy, which is a completely optional step.
So, basically you need only 6 brief steps for this recipe. Though I’ve stretched it out in pictorials below to make each and every step as clear as possible.

The best cut of meat for pot roast
I know it is pretty intimidating to tackle a huge chunk of beef, especially if this is your first time making a pot roast. You may even be unsure of what cut of beef to use and hence it can be pretty unnerving.
Chuck roast, is undoubtedly the classic choice when it comes to making pot roast. The meat is from the front portion i.e neck and shoulder blade of the animal. It also goes by other names such as beef chuck arm, chuck 7-bone pot roast, chuck shoulder pot roast, chuck roll roast, chuck eye roast to name a few.
It is best to make pot roast with well-marbled and inexpensive, tough cuts of beef, like a chuck roast. The slow cooking process breaks down the collagen in the connective tissue found in the muscles resulting in succulent, fall-apart beef.
You can transform the flavor-packed, pot roast juices into a gravy using a cornstarch slurry or roux. The gravy has a rich, velvety, mouth-feel, so I suggest going in for that extra step.
You can also consider using round roast, rump roast, brisket or short ribs. Though you will have the most flavorful and best results with a chuck roast.

Cook time for pressure cooker pot roast
As per the Instant Pot cooking chart , you need 20-25 minutes to cook a pound of a large chunk of beef for pot roast. So you can adjust the time based on this.
I’ve had great results using 20 minutes per pound, so I stick to that time.
I prefer to add the potatoes and carrots towards the end because I’m not a fan of mushy vegetables.
Frozen roast in the Instant Pot
If you plan an impromptu pot roast supper and forgot to thaw the meat, the good news is that you can still make this Instant Pot pot roast.
You may skip the browning process, and add about 30 minutes extra cooking time to the 1 hour specified in the recipe, i.e 10 minutes extra/pound for frozen beef roast. The flavor won’t be the same, but it will work in a pinch. I highly recommend using thawed beef.
Keep in mind that the Instant Pot will take more time to pressurize if you use frozen roast beef, so plan accordingly.
Side dishes
Considering this recipe also uses potatoes and carrots, you really don’t need anything else, since it is a pretty, wholesome dish on its own.
But if you are looking to add a fresh element, you could serve a simple green salad.
If you skip the potatoes, you can serve it over mashed potatoes instead.
Even this homemade crusty artisan bread and dinner rolls are excellent options to mop up all that velvety, rich, glorious gravy!
And how about this Instant Pot cheesecake with strawberry topping to end your meal on a sweet note?
My 5 simple tips to make the perfect Instant Pot beef pot roast
- Brown the beef: Browning = flavor, definitely worth the extra 10 minutes! You want all those browned bits, known as fond stuck at the bottom of the pot, that’s the good stuff.
- Saute the aromatics: Continue building up that flavor by sauteing the onions and garlic. You can also choose to add celery and mushroom along with the onions and garlic.
- Deglaze the pot with red wine or broth: Deglazing removes the caramelized bits that are stuck at the bottom of the pot and thereby imparts that deep, complex flavor to the pot roast. It will also prevent any potential ‘BURN’ error.
- Natural pressure release for at least 10 minutes: Do not do a quick release when it comes to meat. Quick-release is known to make the meat tough. Allow for a natural pressure release for a minimum of 10 minutes before doing a quick release.
- Meat still tough after the specified time? If you find that beef is still tough, it may just need more cooking time. Put the lid back on and pressure cook on high for an additional 15-20 minutes with a natural pressure release.
Ideas to use up leftover pot roast
I love having leftovers to pull a quick and easy meal. More often than now, I use it to make sandwiches. When I want to switch things up a little, I make
- Pot roast pasta
- Stews or soups like this Instant Pot beef and barley soup . You can find instructions for the same in the link.
- Casseroles
What are some of your favorite ways to use up leftovers? I’d love to know!
More Instant Pot beef recipes
Mongolian beef
Chili
Beef and barley soup
How to make Instant Pot Pot Roast – Step by step instructions
Step 1: Season one side of the chuck roast
Press the ‘SAUTE’ button, and set it to ‘NORMAL’. Meanwhile, season one side of the roast (3 to 3.5 lbs) with 1 teaspoon kosher salt, 1/2 teaspoon pepper, and 1/2 teaspoon garlic powder.

Step 2: Sear the chuck roast until well browned
Once its displays, ‘HOT’, add 1 tablespoon of oil and place the roast seasoned side down in the pot, brown on one side for 4-5 minutes. Do not try to move the beef, let it sear undisturbed. Season the other side with 1 teaspoon kosher salt, 1/2 teaspoon pepper, and 1/2 teaspoon garlic powder.

Flip and brown the other side for another 4-5 minutes.

Set the roast aside on a plate.

Step 3: Saute aromatics
Next, add onions (about 2 medium, cut into quarters), along with a pinch of salt, sauté the onions until translucent, scraping the browned bits stuck at the bottom. As the onion sweats, it will release moisture which will help in loosening any browned bits. You can add a splash of broth if needed to help release the browned bits.

After 5-6 minutes, add 1 tablespoon of minced garlic, and saute another minute.

Step 4: Deglaze the pot
Add 1/2 cup of red wine, deglaze the pot, scrape off any remaining browned bits. It is important to remove the browned bits or else you may get a ‘BURN’ error.

Step 5: Add remaining ingredients
Press ‘CANCEL’. Add 1.5 cups of beef broth, along with 2 tablespoons Worcestershire sauce. Return the beef back to the pot along with any juices. Add 2 sprigs of rosemary and 3-4 thyme sprigs.

Step 6: Pressure cook the roast
Close the lid of the Instant Pot. Set the valve to ‘SEALING’. Pressure cook on high for 1 hour. It will take some time for the pressure to build up (about 10 minutes), after which the timer will begin.
I used a 3.5 lb chuck roast, so the actual time needed would be 70 minutes. I pressure cooked it for 60 minutes and saved the last 10 minutes to add the potatoes and carrots. So, adjust the cooking time depending upon the weight of your beef roast.
Eg: 4 pounds (Total pressure cooking time needed=1 hour 20 minutes): Pressure cook for 1 hour 10 minutes + NPR for 10 minutes + add potatoes and carrots + pressure cook for another 10 minutes + NPR for 10 minutes.

Step 7: First natural pressure release (NPR) for 10 minutes
Let the pot depressurize for about 10 minutes, then do a quick release of any leftover pressure. Once the silver pin drops, turn the knob to ‘VENTING’ and open the lid away from you.

Step 8: Add potatoes and carrots and pressure cook the veggies
Add 1.5 lbs baby potatoes and 1 lb baby carrots on top.

Close the lid of the Instant Pot. Set the valve to ‘SEALING’. Pressure cook on high for 10 minutes. It will take some time for the pressure to build up (about 13 minutes).
Step 9: Second natural pressure release (NPR) for 10 minutes
Let the pot depressurize for about 10 minutes, then do a quick release of any leftover pressure. Once the silver pin drops, turn the knob to ‘VENTING’ and open the lid away from you.

Step 10: Shred or cut the beef roast
Remove the beef and veggies from the pot. Shred the beef roast or cut into chunks. Serve the shredded beef along with veggies. Drizzle the juices if desired or thicken the gravy as mentioned in the next step.

Step 11: Pot roast gravy
I like to drain the juices into a large bowl through a fine-mesh sieve and skim off the excess fat floating on top. You may skip this step and skim off the fat from the pot directly.
To thicken the juices: Switch the IP on ‘SAUTE’ mode, once the liquid comes to a boil, add the cornstarch slurry (2 tablespoon cornstarch mixed with 2 tablespoons of cold water), keep stirring continuously until gravy has thickened. Season with salt and pepper, and other spices like garlic, onion powder, etc if required to add more flavor. If it has not thickened to your liking, add more cornstarch slurry.
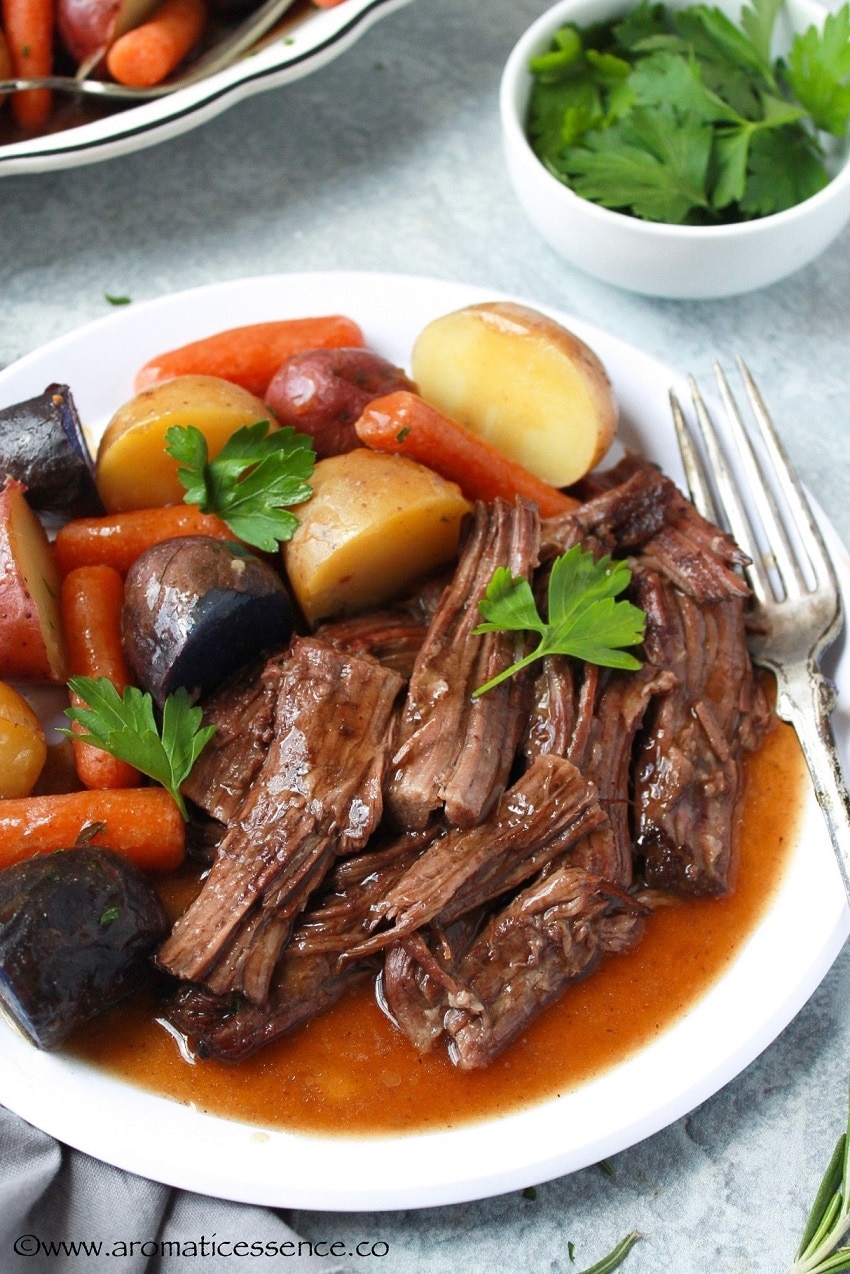
Serve the pot roast with potatoes, carrots, and gravy. Enjoy!

Notes
- Substitutions: You can substitute the beef broth with beef consomme or 1.5 teaspoons of better than bouillon beef stock base dissolved in 1.5 cups of hot water. Chicken stock or vegetable stock will also do if that’s all that you have. You can also substitute the fresh herbs with dried, use 1 teaspoon of dried rosemary and 1/2 teaspoon of dried thyme.
- Leftovers: Wait for the pot roast to come to room temperature, no longer than 4 hours. Refrigerate leftover shredded or sliced pot roast in an airtight container along with the gravy for up to 3 days.
- Freeze: Immediately freeze leftovers in an airtight freezer-safe container leaving 1/2 inch of headspace for up to 2 months. If you choose to freeze the carrots and potatoes, keep in mind that the texture will change and become soft on reheating. You can always divide the meat and veggies and freeze separately. Remember to label the contents. Thaw in the refrigerator the night before. Reheat in a pan, pouring the gravy first, let it bubble, then add the beef, and heat until warmed through. Once thawed, do not re-freeze.
- Oven-method: Use a 5-quart dutch oven, follow steps 1-5, cover the pot and cook in a preheated oven at 325 degrees F for 3 to 3.5 hours or until fork-tender. Add the veggies halfway through the cooking.
- Veggies: You can also add about 2 stalks of celery, and 2 leeks (the white and green portion), along with the onions. Or add a can of green beans in the end.
- You can also throw in a packet of onion soup mix if you like.

You can also follow me on Facebook , Pinterest, Instagram & Twitter

Instant Pot Pot Roast | Instant Pot Chuck Roast
Equipment
- Instant Pot DUO60 6 Qt 7-in-1
Ingredients1x2x3x
- 3 to 3.5 lbs chuck roast
- 1 teaspoon coarsely crushed black pepper
- 2 teaspoons kosher salt divided
- 1 teaspoon garlic powder
- 1 tablespoon canola or olive oil
- 2 medium onions cut into quarters, 400 grams
- 1 tablespoon freshly minced garlic
- 1/2 cup red wine, such as Merlot, Cabernet Sauvignon, Pinot Noir, Zinfandel
- 1.5 cups of beef broth
- 2 tablespoons Worcestershire sauce
- 4-5 sprigs of thyme, or 1/2 teaspoon dried thyme
- 2 sprigs of rosemary, or 1 teaspoon dried rosemary
- 1.5 lb baby potatoes, scrubbed clean, I used the gemstone variety
- 1 lb baby carrots or about 4-5 large carrots peeled and cut into large chunks
- 2 tablespoon cornstarch mixed with 2 tablespoon water
Instructions
- Press the ‘SAUTE’ button, and set it to ‘NORMAL’. Meanwhile, season one side of the roast with kosher salt, pepper, and garlic powder.
- Once its displays, ‘HOT’, add oil and place the roast seasoned side down in the pot, brown on one side for 4-5 minutes. Do not try to move the beef, let it sear undisturbed. Season the other side with kosher salt, pepper, and garlic powder.
- Flip and brown the other side for another 4-5 minutes.
- Set the roast aside on a plate.
- Next, add onions, along with a pinch of salt, sauté the onions until translucent, scraping the brown bits stuck at the bottom. As the onion sweats, it will release moisture which will help in loosening any browned bits. You can add a splash of broth if needed to help release the browned bits.
- After 5-6 minutes, add the minced garlic, and saute another minute.
- Add red wine, deglaze the pot, scrape off any remaining browned bits. It is important to remove the browned bits or else you may get a ‘BURN’ error.
- Press ‘CANCEL’. Add beef broth, along with Worcestershire sauce. Return the beef back to the pot along with any juices. Add rosemary and thyme sprigs.
- Close the lid of the Instant Pot. Set the valve to ‘SEALING’. Pressure cook on high for 1 hour. It will take some time for the pressure to build up (about 10 minutes), after which the timer will begin.
- Let the pot depressurize for about 10 minutes, then do a quick release of any leftover pressure. Once the silver pin drops, turn the knob to ‘VENTING’ and open the lid away from you.
- Add the potatoes and carrots on top.
- Close the lid of the Instant Pot. Set the valve to ‘SEALING’. Pressure cook on high for 10 minutes. It will take some time for the pressure to build up (about 13 minutes).
- Let the pot depressurize for about 10 minutes, then do a quick release of any leftover pressure. Once the silver pin drops, turn the knob to ‘VENTING’ and open the lid away from you.
- Remove the beef and veggies from the pot. Shred the beef roast or cut into chunks. Serve the shredded beef along with veggies. Drizzle the juices if desired or thicken the gravy as mentioned in the next step.
- I like to drain the juices into a large bowl through a fine-mesh sieve and skim off the excess fat floating on top. You may skip this step and skim off the fat from the pot directly.
- To thicken the juices: Switch the IP on ‘SAUTE’ mode, once the liquid comes to a boil, add the cornstarch slurry, keep stirring continuously until gravy has thickened. Season with salt and pepper, and other spices like garlic, onion powder, etc if required to add more flavor. If it has not thickened to your liking, add more cornstarch slurry.
- Serve the pot roast with potatoes, carrots, and gravy. Enjoy!
Notes


Instant Pot Pot Roast | Instant Pot Chuck Roast
Equipment
- Instant Pot DUO60 6 Qt 7-in-1
Ingredients
- 3 to 3.5 lbs chuck roast
- 1 teaspoon coarsely crushed black pepper
- 2 teaspoons kosher salt divided
- 1 teaspoon garlic powder
- 1 tablespoon canola or olive oil
- 2 medium onions cut into quarters, 400 grams
- 1 tablespoon freshly minced garlic
- 1/2 cup red wine, such as Merlot, Cabernet Sauvignon, Pinot Noir, Zinfandel
- 1.5 cups of beef broth
- 2 tablespoons Worcestershire sauce
- 4-5 sprigs of thyme, or 1/2 teaspoon dried thyme
- 2 sprigs of rosemary, or 1 teaspoon dried rosemary
- 1.5 lb baby potatoes, scrubbed clean, I used the gemstone variety
- 1 lb baby carrots or about 4-5 large carrots peeled and cut into large chunks
- 2 tablespoon cornstarch mixed with 2 tablespoon water
Instructions
- Press the ‘SAUTE’ button, and set it to ‘NORMAL’. Meanwhile, season one side of the roast with kosher salt, pepper, and garlic powder.
- Once its displays, ‘HOT’, add oil and place the roast seasoned side down in the pot, brown on one side for 4-5 minutes. Do not try to move the beef, let it sear undisturbed. Season the other side with kosher salt, pepper, and garlic powder.
- Flip and brown the other side for another 4-5 minutes.
- Set the roast aside on a plate.
- Next, add onions, along with a pinch of salt, sauté the onions until translucent, scraping the brown bits stuck at the bottom. As the onion sweats, it will release moisture which will help in loosening any browned bits. You can add a splash of broth if needed to help release the browned bits.
- After 5-6 minutes, add the minced garlic, and saute another minute.
- Add red wine, deglaze the pot, scrape off any remaining browned bits. It is important to remove the browned bits or else you may get a ‘BURN’ error.
- Press ‘CANCEL’. Add beef broth, along with Worcestershire sauce. Return the beef back to the pot along with any juices. Add rosemary and thyme sprigs.
- Close the lid of the Instant Pot. Set the valve to ‘SEALING’. Pressure cook on high for 1 hour. It will take some time for the pressure to build up (about 10 minutes), after which the timer will begin.
- Let the pot depressurize for about 10 minutes, then do a quick release of any leftover pressure. Once the silver pin drops, turn the knob to ‘VENTING’ and open the lid away from you.
- Add the potatoes and carrots on top.
- Close the lid of the Instant Pot. Set the valve to ‘SEALING’. Pressure cook on high for 10 minutes. It will take some time for the pressure to build up (about 13 minutes).
- Let the pot depressurize for about 10 minutes, then do a quick release of any leftover pressure. Once the silver pin drops, turn the knob to ‘VENTING’ and open the lid away from you.
- Remove the beef and veggies from the pot. Shred the beef roast or cut into chunks. Serve the shredded beef along with veggies. Drizzle the juices if desired or thicken the gravy as mentioned in the next step.
- I like to drain the juices into a large bowl through a fine-mesh sieve and skim off the excess fat floating on top. You may skip this step and skim off the fat from the pot directly.
- To thicken the juices: Switch the IP on ‘SAUTE’ mode, once the liquid comes to a boil, add the cornstarch slurry, keep stirring continuously until gravy has thickened. Season with salt and pepper, and other spices like garlic, onion powder, etc if required to add more flavor. If it has not thickened to your liking, add more cornstarch slurry.
- Serve the pot roast with potatoes, carrots, and gravy. Enjoy!
Notes
Tahini, tahina or tahine is a popular Middle-Eastern and Mediterranean condiment, that is vegan, soy-free, dairy-free and naturally gluten-free. You only need two ingredients to make your own homemade tahini from scratch.

It’s time to wrap up my posts on soups and warming foods, coz Spring is almost here 😀 If it is still cold where you are at, I encourage you to try this Instant Pot tortellini soup which has been the most tried and tested soup recipe from my blog this season! A big bowl of this cozy soup is perfect to warm you up.
- What is tahini?
- Let’s talk about the ingredients
- Ways to use this fabulous condiment
- How to make tahini – Step by step instructions
- How To Make Tahini
What is tahini?
Tahini is a smooth and creamy paste or seed butter, made with ground hulled sesame seeds and oil. It is one of the important ingredients in hummus and baba ganoush (roasted eggplant dip) .
Tahini is a superfood, it is packed with healthy fats, vitamins, minerals, proteins, calcium, B vitamins, Vitamin E, and fatty acids.
It has a mild nutty flavor, a very subtle bitterness, is creamy and rich. Tahini should be consumed in moderation, as it is a high-calorie food, so a little goes a long way!
Let’s talk about the ingredients
- Sesame seeds
There are a variety of sesame seeds available commercially, raw, hulled, unhulled, sprouted, toasted, in a variety of colors. You can use any kind of sesame seeds, but the flavor and texture of the resultant prepared tahini will differ in flavor and texture.
Hulled v/s unhulled sesame seeds:
Unhulled sesame seeds are those that have their husks or outer covering still intact. And hulled sesame seeds are those in which the outer covering has been removed during the manufacturing process.
Personally, I love the flavor and texture of tahini made with hulled sesame seeds as it makes smooth and creamy tahini. The texture of tahini made with unhulled seeds is a little coarse, although it is more nutritious than hulled ground sesame seeds.
Where to buy sesame seeds? I usually buy sesame seeds from the Indian grocery store. You will also find it easily in some Middle Eastern or Lebanese stores. You can also buy sesame seeds from the bulk food aisle of your grocery store. In fact, it is much more economical to buy sesame seeds from the bulk bins rather than picking up those small bottles from the spice section of your grocery store.
However, there is a slight drawback when buying from the bulk bins because we do not know how long it has been sitting there. If the seeds are not fresh, the tahini might not taste as good. Buy as much as you need for a batch, 1 cup of sesame seeds yields about 3/4 cup or more of tahini, depending upon the amount of oil you use for blending.
- Oil
Use a neutral-flavored oil such as canola, grapeseed, sunflower, safflower or vegetable oil, etc to make tahini. A strong-flavored oil like extra-virgin olive oil may alter the taste of the tahini, and also make it taste bitter.
Also, try and avoid using toasted sesame oil, as that will lend a very strong flavor to the tahini. It is suitable for finishing off dishes like stir-fry, et all. If you do want to use sesame oil, remember to use light sesame oil, as that is a pretty neutral-flavored oil like canola.
You can also make oil-free tahini if you like, as sesame is an oil-rich seed, but you will need a high-speed blender to ensure you have a smooth paste.
Ways to use this fabulous condiment
Tahini is a very versatile condiment, so don’t limit it only to hummus and baba ganoush, here are a few other ways of using it;
- You can make an easy tahini sauce by adding a few ingredients like lemon juice, garlic, and some water to the prepared sesame seed paste. It is perfect for falafels or for drizzling over roasted vegetables, kabobs, meats, fish, or burgers.
- Serve it as a dip for crudités or pita bread.
- Tahini is also great as a spread on toast, drizzled with a little honey or maple syrup.
- It is fantastic in salad dressings.
- Use it to thicken up curries.
- You can also use it in desserts like halva or use it to make tahini cookies or muffins.

Seriously folks, consider making your own tahini. This is such a basic recipe and is quite economical to whip it up at home, rather than buying a bottle that costs $$!
Besides, if you don’t use it as much, and need it just to make hummus, you can customize the quantity as required. That way you also have minimal wastage.
How to make tahini – Step by step instructions
{Printable recipe card below stepwise pictorials}
Step 1: Toast the sesame seeds
Method 1-(Stove-top): Heat a wide, heavy-bottomed skillet over medium-low heat. Add 1 cup of hulled sesame seeds, toast it, stirring frequently for 5-7 minutes or until it begins to give off a nutty aroma and turns a light golden color.

Switch off the heat, and transfer the toasted seeds to a plate. Set it aside until it cools down completely.

Method 2 (Oven): Toast the sesame seeds in the oven. Place the sesame seeds on a rimmed baking sheet, in a single layer. Toast at 350° F for about 10 minutes, stirring frequently in between, until the seeds turn a light golden color. Transfer the roasted seeds to a bowl or plate and let it cool to room temperature.
Step 2: Process the sesame seeds with oil
Transfer the toasted sesame seeds to a food processor with sharp metal blades. You can also throw in a pinch of salt. I used a mini food processor (1.5 cups capacity). If you use a large capacity food processor, you may want to double or triple the batch, so that the seeds are above the blade in order to process well.

Process the seeds until it turns into a coarse paste.

Add oil, a tablespoon at a time to facilitate grinding. Blend after each addition, scrape the sides and the bottom of the bowl occasionally. Stop when you have a smooth, creamy, pourable consistency tahini sauce.
The quantity of oil is variable in this recipe, you may need more or less depending upon the quality and freshness of the sesame seeds, the power of your blender or food processor and also on the consistency of the tahini.

Store your homemade tahini in an airtight container or glass jar in the refrigerator for up to a month. You can store it for longer, but for food safety practices, I suggest using it up within a month. If you do not consume tahini as much, it is best to make a small batch.
If the oil separates and forms a layer on top over a period of time, simply stir the tahini with a spoon.
Notes
- The quantity of sesame seeds in this recipe is quite small for it to be used in a blender. Consider doubling or tripling the recipe for a high-powered blender like Vitamix or any other blender, the seeds should cover the blades for it to work. The process is the same, pulse the seeds first until it turns to a coarse, crumbly paste, scraping down the sides of the jar occasionally. Add a tablespoon of oil at a time, continue blending until it reaches your desired consistency. For a high-powered blender, you may not require to add any oil as the seeds will release enough oil to blend into a smooth paste.
- To make raw tahini , skip the roasting step, and follow step 2 directly.
- If you choose to use unhulled sesame seeds, remember to rinse the seeds with water, let them dry up completely, then follow steps 1 & 2. Rinsing unhulled sesame seeds removes some of the bitterness, so I recommend following this procedure.
- Is your homemade tahini bitter? Your tahini could taste bitter if you did not use a neutral-flavored oil or the seeds that you purchased from the bulk aisle could have been old. Sesame seeds have a high oil content and can turn rancid over a period of time if not stored properly. To make the best tahini, try and use fresh sesame seeds.

You can also follow me on Facebook , Pinterest, Instagram & Twitter

How To Make Tahini
Ingredients1x2x3x
- 1 cup hulled sesame seeds
- 1/4 cup neutral-flavored oil or as needed
Instructions
- Method 1-(Stove-top): Heat a wide, heavy-bottomed skillet over medium-low heat. Add the hulled sesame seeds, toast it, stirring frequently for 5-7 minutes or until it begins to give off a nutty aroma and turns a light golden color. Switch off the heat, and transfer the toasted seeds to a plate. Set it aside until it cools down completely.
- Method 2 (Oven): Toast the sesame seeds in the oven. Place the sesame seeds on a rimmed baking sheet, in a single layer. Toast at 350° F for about 10 minutes, stirring frequently in between, until the seeds turn a light golden color. Transfer the roasted seeds to a bowl or plate and let it cool to room temperature.
- Transfer the toasted sesame seeds to a food processor with sharp metal blades. I used a mini food processor (1.5 cups capacity). If you use a large capacity food processor, you may want to double or triple the batch, so that the seeds are above the blade in order to process well.
- Process the seeds until it turns into a coarse paste.
- Add oil, a tablespoon at a time to facilitate grinding. Blend after each addition, scrape the sides and the bottom of the bowl occasionally. Stop when you have a smooth, creamy, pourable consistency tahini sauce.
- Store your homemade tahini in an airtight container or glass jar in the refrigerator for up to a month. You can store it for longer, but for food safety practices, I suggest using it up within a month. If you do not consume tahini as much, it is best to make a small batch.
- If the oil separates and forms a layer on top over a period of time, simply stir the tahini with a spoon.
Notes
- The quantity of sesame seeds in this recipe is too less to be used in a blender. Consider doubling or tripling the recipe for a high-powered blender like Vitamix or any other blender, the seeds should cover the blades for it to work. The process is the same, pulse the seeds first until it turns to a coarse, crumbly paste, scraping down the sides of the jar occasionally. Add a tablespoon of oil at a time, continue blending until it reaches your desired consistency. For a high-powered blender, you may not require to add any oil as the seeds will release enough oil to blend into a smooth paste.
- To make raw tahini , skip the roasting step, and follow step 2 directly.
- If you choose to use unhulled sesame seeds, remember to rinse the seeds with water, let them dry up completely, then follow steps 1 & 2. Rinsing unhulled sesame seeds removes some of the bitterness, so I recommend following this procedure.
- Is your homemade tahini bitter ? Your tahini could taste bitter if you did not use a neutral-flavored oil or the seeds that you purchased from the bulk aisle could have been old. Sesame seeds have a high oil content and can turn rancid over a period of time if not stored properly. To make the best tahini, try and use fresh sesame seeds.

