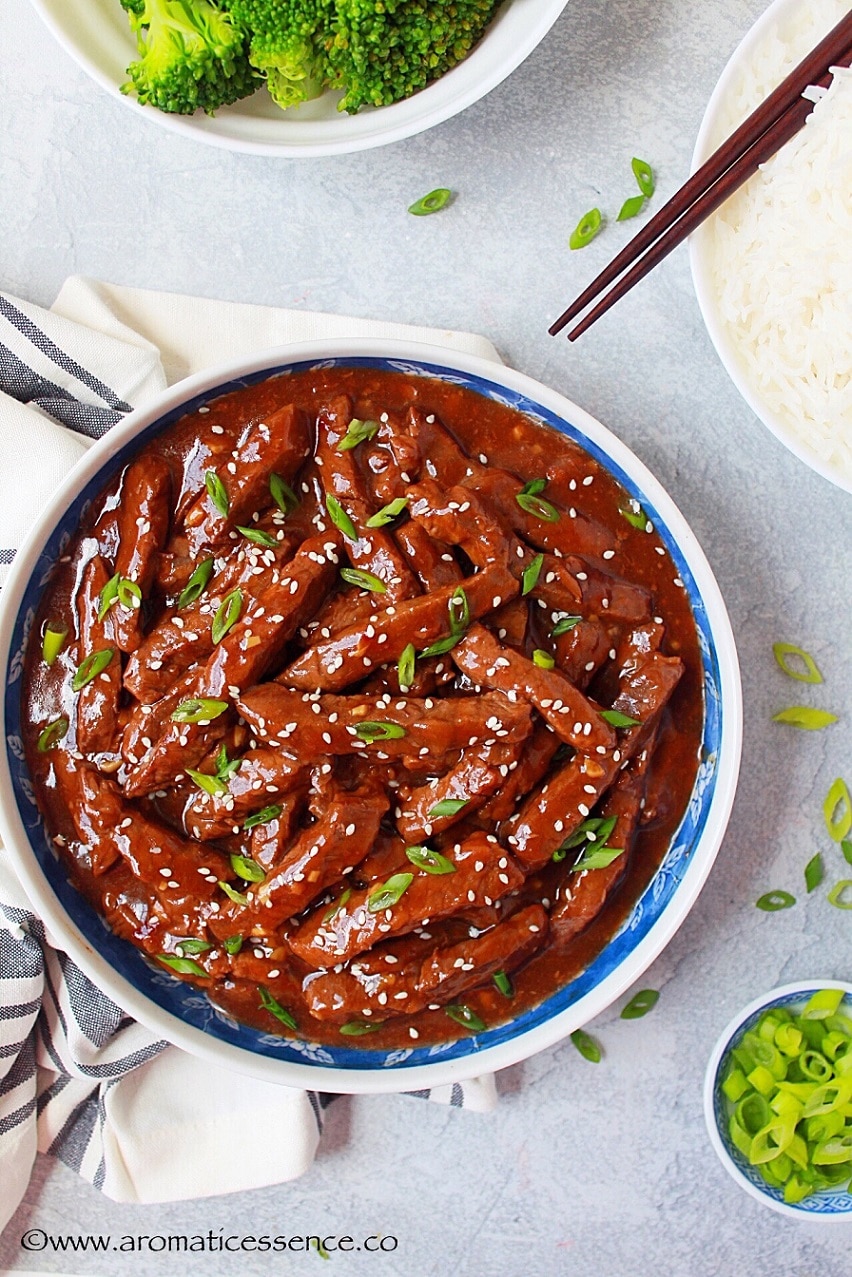
T his Instant Pot Mongolian Beef is the perfect dish to satisfy all your quick fix Asian/Chinese food cravings! Tender, succulent pieces of beef are cooked in a sweet and savory sauce that is sure to make you go for seconds. Trust me this homemade pressure-cooker Mongolian beef is way better than any Chinese take-out that you have had before.

Who can resist Chinese food? I’m not talking the real deal Chinese food, let’s face it, not many places serve authentic Chinese cuisine here in the US. It’s the same deal in India, we have our Indo-Chinese dishes to satisfy the Indian palate. I’ve yet to taste some authentic Chinese or Mongolian cuisine for that matter.
This Mongolian beef is purely an American dish, also popular in Australian-Asian restaurants. You will certainly find it in most of the buffet and Chinese restaurants.
Now, don’t we all love PF Chang’s Mongolian beef coated with that thick, sticky, sweet and savory brown sauce? hmm hmm..
Well, guess what? You don’t need to visit an Asian restaurant or order take out anymore, you can easily make this in the pressure cooker/instant pot and enjoy it at home.
This homemade Mongolian beef has an amazing balance of ingredients, with the right amount of umami flavors from the low sodium soy sauce, earthy sweetness from the brown sugar, a pop of zing from fresh aromatics like garlic and ginger, a little something from the hoisin sauce and a kick of spice to round it all off. Hmm yum yum!
- Why is it called Mongolian beef anyway?
- Ingredients needed for this pressure cooker Mongolian beef
- Tips to make the best Instant Pot Mongolian beef
- Customize this recipe
- Side dishes
- You may also enjoy these hearty Instant Pot beef recipes
- How to make Instant Pot Mongolian beef – Step by step instructions
- Instant Pot Mongolian Beef
Why is it called Mongolian beef anyway?
This dish is named after a cooking style rather than the country of origin. This cooking style known as the Mongolian barbecue was made popular in Taiwan, China where meat and veggies were stir-fried on a large, round cast iron griddle.
It has now become a popular cooking technique in the Western world, however, there is no connection with authentic Mongolian cuisine. So that was a little info for you if you weren’t aware of it.

Ingredients needed for this pressure cooker Mongolian beef
To make this easy pressure cooker Mongolian beef you will need,
- 1/4 inch thick beef strips, (more on that mentioned in tips below)
- For the Mongolian sauce recipe, you will need low sodium soy sauce, brown sugar, hoisin sauce, rice wine vinegar , black pepper , lots of fresh minced garlic and ginger . You will also need some beef stock . I’ve also added some red pepper flakes to lend a subtle heat.
Tips to make the best Instant Pot Mongolian beef
1. The meat: What cut of beef to use for this dish?
Flank steak or skirt steak are the most popular choices for this recipe. However, London broil, top round, sirloin tip, flat iron are also good options. To ensure you have a tender and melt in the mouth beef it is essential that you slice it correctly. Always cut it across the grain or else you will end up with tough, chewy meat.
Pro-tip: Keep your meat in the freezer for 45-60 minutes. And then go ahead and slice it. Freezing the meat makes it much easier to slice it uniformly.
You can always get your butcher to cut the meat in thin slices or buy pre-cut, packaged beef strips at the store. I actually got a really good deal on the pre-cut beef strips for stir-fry which turned out to be cheaper than buying a steak and slicing it myself, so I just used that instead. Worked like a charm in this recipe.
2. The sauce
I feel the sauce for this recipe is a very personal one. I know some people don’t mind if it is salty, some folks enjoy the sweet sauce, while some do not like it that sweet at all.
Mongolian sauce tends to be on the sweeter side, and so you definitely need some amount of sugar, brown sugar to be more specific in this recipe. The sugars caramelize on cooking giving the sauce a richer flavor. The sauce here that I’m sharing has the right balance of flavors and hits just the right spot for us.
I experimented with 3 different quantities of soy sauce and brown sugar each since those are the two important ingredients for this Mongolian sauce.
Experiment 1: I used 1/4 cup each of both, the resultant sauce was sort of diluted after adding the beef stock. It lacked the savory flavor and had a tiny bit of sweetness.
Experiment 2: I used 1/3 cup each of both, the resultant sauce was slightly better in terms of the savory taste, the sweetness was okay too. But it still lacked something.
Experiment 3: I used 1/2 cup each of both the ingredients. The resultant sauce was spot on, had the savory flavors going on along with the perfect amount of sweetness. I finally settled for these proportions after eating Mongolian beef for days.. haha 😀
3. Fresh aromatics
Since this homemade Mongolian sauce uses such few ingredients, fresh aromatics like ginger and garlic contribute a lot to the flavor of the sauce.
Please do try and use fresh minced ginger and garlic, as the sauce is far superior with fresh aromatics rather than the powdered form or minced garlic in a jar. When you want to make the best, I say spending the extra 5 minutes on mincing ingredients is totally worth it.

Customize this recipe
This Mongolian beef has a savory and slightly sweet flavor, with tender, juicy and melt-in-the-mouth beef. It is much better than any greasy, Chinese take-out. Thanks to the pressure cooking process, the beef is infused with a lot of flavor from the homemade Mongolian sauce, making this an incredibly tasty dish!
Customize your Mongolian beef to suit your family’s palate,
Like it sweeter? Add 2/3 to 3/4 cup of brown sugar in this recipe.
Not a fan of sweet sauce? Reduce the brown sugar to 1/4 cup.
Prefer a spicy Mongolian beef? Then add more red pepper flakes, you can also add some dried Chinese red chillies, broken in half. And if that is still not spicy enough, add some Sriracha sauce after it’s cooked.
Don’t care much for soy sauce? Reduce it to 1/4-1/3 cup in this recipe.
If you like a crispy Mongolian beef , then do not use the Instant Pot. I would prepare it on the stovetop by velveting the beef, a process similar to the one in my orange chicken recipe . Velveting is a process of coating the meat with eggs or egg white and starch such as cornstarch. This helps in locking in the moisture of the meat while it is being stir-fried before coating in the sauce.
The resultant meat has a crispy exterior from the coating, but the meat itself is moist and tender. With the Instant Pot, the meat is always tender, regardless of any searing. I’ve simply seared the meat to brown it on the outsides for added flavor. But this is totally optional. If you have time to spare, marinate the beef strips with the Mongolian sauce, dump everything and pressure cook. Really easy with great results.

Side dishes
You can serve this Instant Pot Mongolian beef with either of the following,
- Asian style noodles such as chilli garlic noodles .
- Vegetarian Fried Rice
- Stir-fried veggies or steamed veggies of choice, such as broccoli, bok choy, carrots, etc
- Or simply enjoy Mongolian beef piled over rice or swap the rice for healthier options like quinoa or cauliflower fried rice.
You may also enjoy these hearty Instant Pot beef recipes
- Instant Pot spaghetti with meat sauce
- Pot roast
- Chili
- Beef barley soup
How to make Instant Pot Mongolian beef – Step by step instructions
Step 1: Prepare the Mongolian beef sauce
In a medium bowl, add 1/2 cup less-sodium soy sauce, 1/2 cup light/dark brown sugar, 2 tablespoons hoisin sauce, 2 tablespoons rice vinegar, 2 tablespoons minced garlic, 1 tablespoon minced ginger, 1/2 teaspoon red pepper flakes, and 1/4 teaspoon black pepper. Mix well to combine. Add 3/4 cup of beef stock or water, mix everything and set it aside. You can make the sauce a day ahead and store it in the refrigerator.


Step 2: Sear the beef strips
Press ‘SAUTE’ button, and set it to ‘NORMAL’. Once it displays ‘HOT’, add 1 tablespoon vegetable oil, place the beef strips in a single layer. Sear it for about 2 minutes on one side, then flip and cook the side for another minute. Do not crowd the pot by piling the beef, it will steam in its own juices. I did this in 3 batches. Transfer the beef to a plate and set aside.

Step 3: Deglaze the pot
Add 1/4 cup of beef stock or water, scrape off the browned bits with a wooden spatula. Make sure nothing is stuck or else you may get a ‘BURN’ message.

Step 4: Add all the ingredients and pressure cook
Add the prepared Mongolian sauce mixture and the beef along with its juices. Mix lightly.

Close the lid of the Instant Pot. Set the valve to ‘SEALING’. Pressure cook on high for 10 minutes. It will take some time for the pressure to build up (about 5 minutes), after which the timer will begin. You can prepare the cornstarch slurry during this time, and set it aside.

Step 5: Natural pressure release (NPR) for 10 minutes
Let the pot depressurize for 10 minutes. Then do a quick release of any leftover pressure as per the manufacturer’s instructions. Once the silver pin drops, turn the knob to ‘VENTING’ and open the lid away from you.

Step 6: Add cornstarch slurry
Press the ‘CANCEL’ button and turn on the ‘SAUTE’ button. Push the meat to one side of the pot. Once the sauce begins to bubble, add the cornstarch slurry (whisk it again before pouring as cornstarch settles down) into the sauce, and keep stirring until it thickens and turns glossy. Mix the beef with the sauce to coat it evenly.


Step 7: Serve
You can add some scallion greens cut into 2 inches and mix it in. Finish off with 1/2 teaspoon of sesame oil. Press the ‘CANCEL’ button and switch off the Instant Pot. Serve hot with steamed rice and sides of your choice. Garnish with more scallion greens and toasted sesame seeds if desired.

NOTES
- If you have time to spare, marinate the beef strips with the mixture of soy sauce, brown sugar, ginger, garlic, red pepper flakes, black pepper, hoisin sauce, rice vinegar for a couple of hours. Then dump everything in the Instant pot, add 3/4 cup of beef broth, and cook as directed.
- Mongolian beef and broccoli: Add about 3 cups of steamed broccoli florets in the last step i.e step 6, after adding the cornstarch slurry and thickening the sauce and mix it in gently. Or, steam the broccoli florets directly in the IP after thickening the sauce. Press ‘CANCEL’ to turn off saute mode and add the florets, close the lid and let it sit for 10 minutes.
- If you’d like to add veggies, you can add some onion wedges, diced carrots, bell peppers, etc. in step 4. Make sure the veggies are chunky, or else they will turn mushy, place them over the beef.
- You can cook rice using the Pot in Pot method. Use a tall trivet, add equal amounts of white rice and water with a pinch of salt in a bowl, and place it on the stand. Pressure cook everything for 10 mins with 10 mins NPR. This will not work for brown rice as it needs more cooking time.
- You can double the recipe, cooking time remains the same.
You can also follow me on Facebook , Pinterest, Instagram & Twitter

Instant Pot Mongolian Beef
Equipment
- Instant Pot 6 quart
Ingredients1x2x3x
- 1.5 lbs flank steak, sliced across the grain into 1/4 inch thin strips
For the sauce
- 2 tablespoons minced garlic
- 1 tablespoon minced ginger
- 1/2 cup less-sodium soy sauce
- 1/2 cup light/dark brown sugar
- 2 tablespoon hoisin sauce
- 2 tablespoon rice vinegar, substitute with apple cider vinegar
- 1/2 teaspoon red pepper flakes, optional
- 1/4 teaspoon ground black pepper
- 1 cup beef stock or 1cup water + 1 tsp better than bouillon beef base, divided
To thicken the sauce
- 2 tablespoon cornstarch mixed with 1/4 cup cold water
Other ingredients
- 1 tablespoon vegetable oil
- 1/2 teaspoon sesame oil
- 2-3 stalks scallion greens, cut diagonally
- 1/2 tablespoon toasted sesame seeds, optional
Instructions
- In a medium bowl, add soy sauce, light/dark brown sugar, hoisin sauce, rice vinegar, minced garlic, minced ginger, red pepper flakes, and black pepper. Mix well to combine. Add 3/4 cup of beef stock or water, mix everything and set it aside. You can make the sauce a day ahead and store it in the refrigerator.
- Press ‘SAUTE’ button, and set it to ‘NORMAL’. Once it displays ‘HOT’, add oil, place the beef strips in a single layer. Sear it for about 2 minutes on one side, then flip and cook the side for another minute. Do not crowd the pot by piling the beef, it will steam in its own juices. I did this in 3 batches. Transfer the beef to a plate and set aside.
- Add 1/4 cup of beef stock or water, scrape off the browned bits with a wooden spatula. Make sure nothing is stuck or else you may get a ‘BURN’ message.
- Add the prepared Mongolian sauce mixture and the beef along with its juices. Mix lightly.
- Close the lid of the Instant Pot. Set the valve to ‘SEALING’. Pressure cook on high for 10 minutes. It will take some time for the pressure to build up (about 5 minutes), after which the timer will begin. You can prepare the cornstarch slurry during this time, and set it aside.
- Let the pot depressurize for 10 minutes. Then do a quick release of any leftover pressure as per the manufacturer’s instructions. Once the silver pin drops, turn the knob to ‘VENTING’ and open the lid away from you.
- Press the ‘CANCEL’ button and turn on the ‘SAUTE’ button. Push the meat to one side of the pot. Once the sauce begins to bubble, add the cornstarch slurry (whisk it again before pouring as cornstarch settles down) into the sauce, and keep stirring until it thickens and turns glossy. Mix the beef with the sauce to coat it evenly.
- You can add some scallion greens cut into 2 inches and mix it in. Finish off with sesame oil. Press the ‘CANCEL’ button and switch off the Instant Pot. Serve hot with steamed rice and sides of your choice. Garnish with more scallion greens and toasted sesame seeds if desired.
Notes
- If you have time to spare, marinate the beef strips with the mixture of soy sauce, brown sugar, ginger, garlic, red pepper flakes, black pepper, hoisin sauce, rice vinegar for a couple of hours. Then dump everything in the Instant pot, add 3/4 cup of beef broth, and cook as directed.
- Mongolian beef and broccoli: Add about 3 cups of steamed broccoli florets in the last step i.e step 6, after adding the cornstarch slurry and thickening the sauce and mix it in gently. Or, steam the broccoli florets directly in the IP after thickening the sauce. Press ‘CANCEL’ to turn off saute mode and add the florets, close the lid and let it sit for 10 minutes.
- If you’d like to add veggies, you can add some onion wedges, diced carrots, bell peppers etc. in step 4. Make sure the veggies are chunky, or else they will turn mushy, place them over the beef.
- You can cook rice using the Pot in Pot method. Use a tall trivet, add equal amounts of white rice and water with a pinch of salt in a bowl, and place it on the stand. Pressure cook everything for 10 mins with 10 mins NPR. This will not work for brown rice as it needs more cooking time.
- You can double the recipe, cooking time remains the same.
- Nutrition Disclaimer: Nutrition values are calculated for a single serving. This recipe should yield about 6 servings. These are approximate values, if you rely on them for your diet, please use your preferred nutrition calculator.
- Measuring cup used, 1 cup = 250 ml, 1 tsp = 5 ml
Nutrition


Instant Pot Mongolian Beef
Equipment
- Instant Pot 6 quart
Ingredients
- 1.5 lbs flank steak, sliced across the grain into 1/4 inch thin strips
For the sauce
- 2 tablespoons minced garlic
- 1 tablespoon minced ginger
- 1/2 cup less-sodium soy sauce
- 1/2 cup light/dark brown sugar
- 2 tablespoon hoisin sauce
- 2 tablespoon rice vinegar, substitute with apple cider vinegar
- 1/2 teaspoon red pepper flakes, optional
- 1/4 teaspoon ground black pepper
- 1 cup beef stock or 1cup water + 1 tsp better than bouillon beef base, divided
To thicken the sauce
- 2 tablespoon cornstarch mixed with 1/4 cup cold water
Other ingredients
- 1 tablespoon vegetable oil
- 1/2 teaspoon sesame oil
- 2-3 stalks scallion greens, cut diagonally
- 1/2 tablespoon toasted sesame seeds, optional
Instructions
- In a medium bowl, add soy sauce, light/dark brown sugar, hoisin sauce, rice vinegar, minced garlic, minced ginger, red pepper flakes, and black pepper. Mix well to combine. Add 3/4 cup of beef stock or water, mix everything and set it aside. You can make the sauce a day ahead and store it in the refrigerator.
- Press ‘SAUTE’ button, and set it to ‘NORMAL’. Once it displays ‘HOT’, add oil, place the beef strips in a single layer. Sear it for about 2 minutes on one side, then flip and cook the side for another minute. Do not crowd the pot by piling the beef, it will steam in its own juices. I did this in 3 batches. Transfer the beef to a plate and set aside.
- Add 1/4 cup of beef stock or water, scrape off the browned bits with a wooden spatula. Make sure nothing is stuck or else you may get a ‘BURN’ message.
- Add the prepared Mongolian sauce mixture and the beef along with its juices. Mix lightly.
- Close the lid of the Instant Pot. Set the valve to ‘SEALING’. Pressure cook on high for 10 minutes. It will take some time for the pressure to build up (about 5 minutes), after which the timer will begin. You can prepare the cornstarch slurry during this time, and set it aside.
- Let the pot depressurize for 10 minutes. Then do a quick release of any leftover pressure as per the manufacturer’s instructions. Once the silver pin drops, turn the knob to ‘VENTING’ and open the lid away from you.
- Press the ‘CANCEL’ button and turn on the ‘SAUTE’ button. Push the meat to one side of the pot. Once the sauce begins to bubble, add the cornstarch slurry (whisk it again before pouring as cornstarch settles down) into the sauce, and keep stirring until it thickens and turns glossy. Mix the beef with the sauce to coat it evenly.
- You can add some scallion greens cut into 2 inches and mix it in. Finish off with sesame oil. Press the ‘CANCEL’ button and switch off the Instant Pot. Serve hot with steamed rice and sides of your choice. Garnish with more scallion greens and toasted sesame seeds if desired.
Notes
- If you have time to spare, marinate the beef strips with the mixture of soy sauce, brown sugar, ginger, garlic, red pepper flakes, black pepper, hoisin sauce, rice vinegar for a couple of hours. Then dump everything in the Instant pot, add 3/4 cup of beef broth, and cook as directed.
- Mongolian beef and broccoli: Add about 3 cups of steamed broccoli florets in the last step i.e step 6, after adding the cornstarch slurry and thickening the sauce and mix it in gently. Or, steam the broccoli florets directly in the IP after thickening the sauce. Press ‘CANCEL’ to turn off saute mode and add the florets, close the lid and let it sit for 10 minutes.
- If you’d like to add veggies, you can add some onion wedges, diced carrots, bell peppers etc. in step 4. Make sure the veggies are chunky, or else they will turn mushy, place them over the beef.
- You can cook rice using the Pot in Pot method. Use a tall trivet, add equal amounts of white rice and water with a pinch of salt in a bowl, and place it on the stand. Pressure cook everything for 10 mins with 10 mins NPR. This will not work for brown rice as it needs more cooking time.
- You can double the recipe, cooking time remains the same.
- Nutrition Disclaimer: Nutrition values are calculated for a single serving. This recipe should yield about 6 servings. These are approximate values, if you rely on them for your diet, please use your preferred nutrition calculator.
- Measuring cup used, 1 cup = 250 ml, 1 tsp = 5 ml
Nutrition
This Mexican salsa verde, aka green salsa or tomatillo salsa, is a fresh and delicious salsa recipe made with tomatillos, chile peppers, and few basic ingredients. It is awesome as a dip with chips and great with just about anything!

A lot of folks think this Mexican green salsa is made with green tomatoes. Though green tomato and tomatillos look similar, they are quite different. Tomatillo is a cousin of the tomato family, it is covered with a papery husk and has a bright green outer skin. They are rather tart if eaten raw.
They are available in practically every grocery store, which gives you all the more reason to make your own homemade salsa verde. It is really easy to pick up a jar of salsa verde while you go grocery shopping, then why would you bother making it at home? I’ve tasted the salsa’s from jars and frankly, they don’t come close to the homemade fresh tomatillo salsa. I think this homemade version is far better than the one you get in the restaurant too. No kidding! You can totally customize it to your liking.
The authentic salsa verde is made in a molcajete, a Mexican version of the mortar and pestle, made from volcanic stone. I was really tempted to pick one up on my trip to Mexico last year, but then I skipped it, as I had enough baggage already, and it was quite large and heavy. I sort of still regret not getting it, however, it is available online so I may just get one!
Just like pesto, the taste, and texture of tomatillo salsa are elevated when prepared in the molcajete rather than a food processor. But it is not so bad either, still beats the ones available in jars.

- SALSA VERDE INGREDIENTS
- THERE ARE THREE WAYS OF MAKING SALSA VERDE
- CUSTOMIZE YOUR HOMEMADE SALSA VERDE SAUCE
- WAYS TO USE ROASTED TOMATILLO SALSA
- YOU MAY ALSO ENJOY,
- STEP BY STEP INSTRUCTIONS TO MAKE ROASTED TOMATILLO SALSA
- HOW TO MAKE SALSA VERDE {ROASTED TOMATILLO SALSA}?
- How To Make Salsa Verde {Roasted Tomatillo Salsa}
SALSA VERDE INGREDIENTS
To make this green tomatillo sauce, you will need,
- Tomatillos, choose the smaller ones in size as they tend to be sweeter than the larger ones. Do not peel the husk until you are ready to use them.
- Onions
- Garlic
- Chile peppers, feel free to use any of your choice. Jalapeño is best for a mild Verde sauce
- Cilantro
- Ground cumin
- Lime juice, roasting brings out the sweetness of the tomatillos, and hence I like to add a little lime juice to add some zing. This is totally optional.
- Salt & pepper

THERE ARE THREE WAYS OF MAKING SALSA VERDE
Raw tomatillo salsa: All the ingredients are blended raw. This can taste pretty tart, I recommend adding an avocado here to cut that tartness from the tomatillos.
Boiled tomatillo salsa: A dd tomatillos along with the onions and chile peppers in a pot, cover with sufficient water and bring to a boil, cook for about 5 minutes or until the color of tomatillos change from bright green to olive green. Then blend it with the rest of the ingredients using some of the cooking liquid to thin out if required.
Roasted tomatillo salsa : The process of which is explained in details below.
CUSTOMIZE YOUR HOMEMADE SALSA VERDE SAUCE
Like a mild salsa verde? Remove the seeds and the membranes of the chile peppers, use 1 or half of a jalapeño pepper instead of serrano chile peppers.
Prefer a spicy salsa verde? Leave the seeds of the chile peppers on, or you may scoop them out before blending and add in the seeds later, to add heat.
How about a creamy salsa verde ? Make some tomatillo avocado salsa by adding 1 diced avocado and blend with the roasted or boiled tomatillos.

WAYS TO USE ROASTED TOMATILLO SALSA
There are a number of ways to enjoy this salsa de tomatillo. You don’t have to restrict it only as a dip for chips.
Use it in,
- Enchilada Verdes or green enchilada.
- Huevos rancheros
- Salsa verde shredded-chicken, which can be used to fill enchiladas, tacos, burritos, taquitos, or a healthy bowl with some Mexican quinoa or rice and veggies.
You can easily make a large batch and can this green salsa to enjoy all year around!

This roasted tomatillo salsa is packed with a punch of zesty flavors. It is slightly tangy, smoky, and refreshing with a kick of heat from the serrano peppers. Try it, I bet you will never go back to the commercial ones!
YOU MAY ALSO ENJOY,
Corn salsa
Paneer Tacos
Chicken quesadilla
STEP BY STEP INSTRUCTIONS TO MAKE ROASTED TOMATILLO SALSA
{Printable recipe card below instructions}
1.Place the oven rack on the highest rack setting. Preheat the broiler (500 degrees F) while you prep the ingredients. Remove the papery husks from the tomatillos (2 lbs), and rinse well with warm water to get rid of the stickiness. Pat dry with a clean kitchen napkin.

HOW TO ROAST TOMATILLOS?
1.Place the tomatillos, onion wedges (about 1 small onion), 5-6 garlic cloves (skin on), and 2 serrano peppers on a rimmed baking tray. Drizzle about 1 tbsp oil, and sprinkle salt. Toss the ingredients to coat well.

2.Place the baking tray on the topmost rack, and broil for 4-5 minutes, or until charred on top.
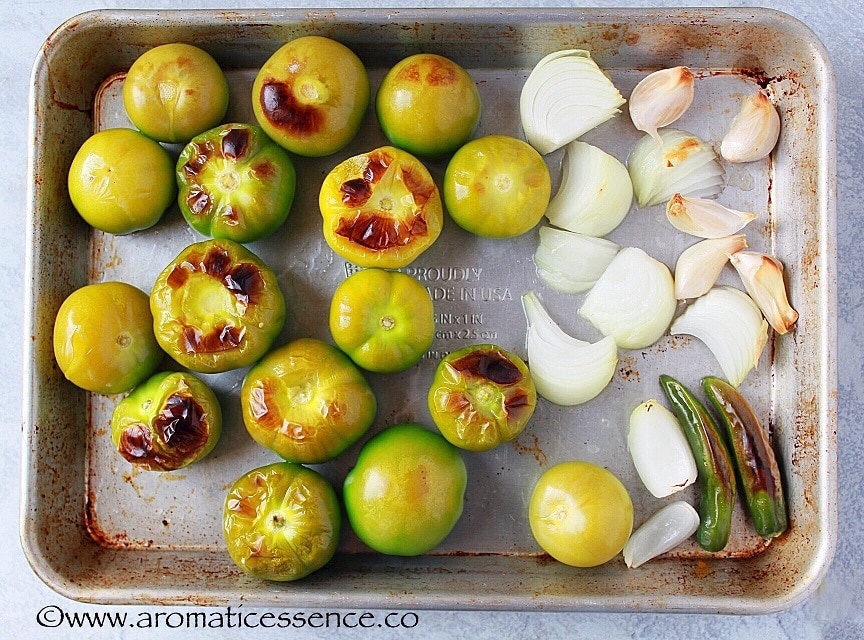
3.Flip the vegetables, and char the other side for another 4-5 minutes. Keep a close eye during the broiling process or you may end up burning the veggies.

4.Remove the baking tray from the oven and place on a cooling rack, set aside until cool enough to handle.

MAKING SALSA VERDE
1.Once cool enough, transfer the roasted tomatillos, onions, chile peppers in the bowl of a food processor or into a blender. Remove the garlic from the skin and add it to the processor along with any juices that may have collected on the tray. {For mild salsa, remove the seeds from the roasted serrano peppers, save the seeds if you want to add some heat to the salsa after blending in step 6}. Add a handful of cilantro, 2 tbsp lime juice, and 1/2 tsp salt.

2.Pulse until all the ingredients are coarsely combined. You can leave it chunky or thin it out with some water for a smooth salsa. I did not add any water. The juices from the roasted tomatillos were enough to blend the salsa. Season to taste and adjust with more salt, sugar, serrano chile seeds or lime juice if desired.

3.Chill salsa in the refrigerator for about 2-3 hours, this allows the flavors to mingle to deepen, serve with chips or in any of your favorite Mexican recipes.

NOTES
This salsa is fairly spicy due to the use of Serrano peppers. If you’d like a mild salsa verde, remove the seeds, and blend the salsa. Or use half or 1 jalapeno pepper, or as required to adjust to your required heat tolerance.
HOW TO MAKE SALSA VERDE {ROASTED TOMATILLO SALSA}?

How To Make Salsa Verde {Roasted Tomatillo Salsa}
Ingredients1x2x3x
Measuring cup used, 1 cup = 250 ml, 1 tsp = 5 ml
- 2 lbs tomatillos
- 1 large white onion, about 3.5 oz, peeled and cut into wedges
- 2 serrano chile peppers, stemmed, refer notes
- 5 to 6 unpeeled garlic cloves, you can add more or less
- 1 to 2 tbsp lime juice, to taste
- 1/2 tsp ground cumin
- A handful of cilantro with tender stems, about 15-20 sprigs
- 1/2 tsp salt or to taste
- 1 tbsp vegetable oil
Instructions
- Place the oven rack on the highest rack setting. Preheat the broiler (500 degrees F) while you prep the ingredients. Remove the papery husks from the tomatillos (2 lbs), and rinse well with warm water to get rid of the stickiness. Pat dry with a clean kitchen napkin.
- Transfer the tomatillos, onion wedges (about 1 small onion), 5-6 garlic cloves (skin on), and 2 serrano peppers on a rimmed baking tray. Drizzle about 1 tbsp oil, and sprinkle salt. Toss the ingredients to coat well.
- Place the baking tray on the topmost rack, and broil for 4-5 minutes, or until charred on top.
- Flip the vegetables, and char the other side for another 4-5 minutes. Keep a close eye during the broiling process or you may end up burning the veggies.
- Remove the baking tray from the oven and place on a cooling rack, set aside until cool enough to handle.
- Once cool enough, transfer the roasted tomatillos, onions, chile peppers in the bowl of a food processor or into a blender. Remove the garlic from the skin and add it to the processor along with any juices that may have collected on the tray. {For mild salsa, remove the seeds from the roasted serrano peppers, save the seeds if you want to add some heat to the salsa after blending in step 6}. Add a handful of cilantro, 2 tbsp lime juice, and 1/2 tsp salt.
- Pulse until all the ingredients are coarsely combined. You can leave it chunky or thin it out with some water for a smooth salsa. I did not add any water. The juices from the roasted tomatillos were enough to blend the salsa. Season to taste and adjust with more salt, sugar, serrano chile seeds or lime juice if desired.
- Chill salsa in the refrigerator for about 2-3 hours, this allows the flavors to mingle to deepen, serve with chips or in any of your favorite Mexican recipes.
Notes
Nutrition

You can also follow me on :
Regards,
Freda
