Instant pot carrot soup with ginger with step by step pictures. This thick, creamy, and delicious carrot ginger soup has an amazing balance of sweet and savory flavors and is so easy to make using the Instant Pot. Vegan & Gluten-free!

I hope you guys had a wonderful Thanksgiving with family and friends. And after all those delicious, heavy meals, I’m sure you are looking forward to enjoying something light, for a few days at least. Christmas is not very far off 😀
This Instant Pot carrot soup with ginger is the need of the hour and I’m sure making this frequently during the coming months. Nothing beats a bowl of warm soup, that is full of anti-inflammatory and nourishing ingredients, and this carrot ginger soup is just that!
This vegan carrot soup recipe is thick, creamy and is so easy to make in the Instant Pot. Yessss! guys, I finally got myself another kitchen gadget. I already have a traditional pressure cooker, so I never really thought about adding another appliance to my already cramped up kitchen counter.

For what its worth, I am actually enjoying this electric pressure cooker. I’ve tried making chili , pot roast , lentil curry , rice pudding, pasta , and even noodles so far, and I must say I’m in love with it.
I love that it requires no babysitting, no spluttering, and the delay timer feature is one of my favorites. Simply set the timer and walk away, no more counting of whistles like it is done for the traditional pressure cooker.
Cooking meals in the Instant Pot are absolutely perfect for busy days. Even if you own a traditional pressure cooker, I highly recommend you get one during deals this Black Friday. Oh well! I couldn’t wait, so I got one two weeks earlier 😀
So coming back to today’s post, this creamy Instant pot carrot soup with ginger is actually good-for-you. I love adding ginger to soup for the health benefits it provides.
Ginger is an age-old ingredient that is used in Indian cooking. I, by default, always have some stashed up in my refrigerator. Adrak wali chai (ginger tea) is my remedy for a bad cold/cough, it just makes me feel good instantly. Please try and use fresh ginger in this recipe, while the commercial paste is okay, the extra time spent peeling and mincing fresh ginger is just worth it.

- Ingredients required for this soup
- Best spices for carrot soup
- What does this soup taste like?
- Carrot ginger soup benefits
- What to serve with this pressure cook carrot soup?
- Try some of these variations to switch things up
- You may also like these vegan soup recipes
- How to make Instant Pot carrot soup with ginger – Step by step instructions
- Instant Pot Carrot Soup With Ginger | Vegan Carrot Ginger Soup
Ingredients required for this soup
To make this healthy Instant Pot carrot soup with ginger, you will need,
- Carrots and ginger
- Onions
- Potato, which is kind of optional and may be omitted. But it adds a creamy texture to the soup.
- Garlic, which again is optional, but I love adding garlic to every and any savory dish.
- Coconut sugar/brown sugar, to lend some sweetness and counterbalance the kick from the ginger. Feel free to skip it.
- Vegetable or chicken stock or water plus some bouillon cubes
- Salt and pepper to season the soup
Best spices for carrot soup
A minimally spiced carrot soup tastes just as good, especially if you have some fresh carrots. However, it is nice to spice things up sometimes. You can use a number of spices like turmeric, cumin, coriander, cinnamon, nutmeg, cloves, curry powder spice mix, or pastes like curry paste, miso, etc to add a punch of flavor to this Instant Pot carrot soup.
Herbs like rosemary, thyme, sage, bay leaves, etc are also great in carrot soup. Citrus like oranges, lemons, limes are also a wonderful flavor addition to carrot soup. Besides these, even lemongrass stalk is awesome for a slightly lemony flavor.
What does this soup taste like?
This Instant Pot carrot soup has a smooth, silky, velvety texture with a sweet and savory taste. You get that throat warming effect from the ginger after a few seconds of slurping the soup. It is really mild and you can control the amount of ginger by adding as much as you like.
If you add other spices or pastes those will contribute to the flavors as well. So it is totally up to you, feel free to customize the soup and add your own flavors.
Carrot ginger soup benefits
The two main ingredients in this soup are carrots and ginger , both of which are loaded with numerous health benefits.
Carrots are a good source of beta-carotene. They are also rich in vitamin A & K, fiber, minerals, and anti-oxidants. Eating carrots on a regular basis reduces your risk of diseases, helps improve immunity and a host of other health benefits.
Ginger is known for its anti-inflammatory, antimicrobial, and antioxidant properties. It is good to soothe an upset stomach, for treating cold, flu, to relieve nausea and much more.
And since these two ingredients go into easy homemade carrot soup, it is obviously good for you since it provides so many health benefits. You should definitely make this healthy soup more often during this season. And you don’t even have to stick to this same basic recipe. I agree it can get mundane and boring having the same thing over and over.
So as always, I’m listing out variations for you to try coz there is no dearth of flavors when it comes to soups. This is the best carrot ginger soup base recipe, and you can make it your own by varying the flavors.
What to serve with this pressure cook carrot soup?
Serve this vegan carrot and ginger soup with toppings of your choice and some crusty bread .
A quick salad, or roasted veggies, grilled cheese sandwich are other hearty options.
Try some of these variations to switch things up
The following are some of my favorite variations of this basic carrot soup recipe.
- Carrot lentil ginger soup: Wash, and soak 1/2 cup of red lentils or any other lentils of choice for about 15-20 minutes. Drain, and add it after sautéing the carrots. Add 1 quart of stock and 1 cup of water. Pressure cook on high for 10 mins. Let the pressure release naturally for 5-10 minutes then do a quick release.
- Carrot orange ginger soup: Add 1 cup of freshly squeezed or store-bought orange juice along with a tbsp of orange zest after pureeing the soup. Turn on sauté and cook just until heated through. Skip the ginger for a plain carrot orange soup.
- Sriracha carrot soup: If you like spicy carrot soup, add some kick by adding as much Sriracha or other hot sauce to this soup.
- Carrot soup with yogurt: Replace the coconut cream with yogurt in this recipe.
- Carrot and cinnamon soup: Replace the nutmeg with cinnamon or use 1/4 tsp or more of both the spices if you like.
- Thai carrot soup: Add 2-3 tbsp Thai red curry paste song with minced ginger and garlic, sauté until it is fragrant.
- Carrot apple ginger soup: Add one apple, cored and chopped along with the potatoes and carrots in this recipe. Skip the ginger for a plain carrot apple soup.
- Carrot ginger turmeric soup: Add about 1/2 tsp of ground turmeric, along with ginger and garlic. Do not use too much turmeric, as it makes the dish bitter.
- Sweet potato and carrot soup: Use half of the carrots and sweet potatoes in this recipe, so a pound of each.
- Butternut squash carrot ginger soup: Use a pound each of butternut squash and carrots.
- Curried carrot soup: Add 1 tbsp or more as required of curry powder or individual ground spices like cumin, coriander, turmeric, cayenne, etc along with ginger and garlic. Sauté until the spices are fragrant.

- Hot and sour soup (vegan)
- Sweet Corn veggie soup
- Pumpkin Soup
How to make Instant Pot carrot soup with ginger – Step by step instructions
Step 1: Saute chopped onions
Press the ‘SAUTE’ button, and set it to ‘NORMAL’. Once its displays, ‘HOT’, then add 1 tablespoon coconut oil and let it heat up. Then, add 1 cup of chopped onions, and sauté until translucent.

Step 2: Add ginger and garlic
Add 2 tablespoons of minced ginger and 1/2 tablespoon of minced garlic, sauté until aromatic, about 30 seconds to a minute

Step 3: Add carrots, potatoes, and seasonings
Next, add the diced carrots (2 pounds) and potatoes (about 1 medium), along with 1 teaspoon of kosher salt, 1/4 teaspoon of ground white pepper, and 1 tp 2 teaspoons of coconut or brown sugar. Sauté for a minute.

Step 4: Add the broth and bay leaf
Add 4 cups of low-sodium vegetable broth and 1 bay leaf, give everything a good mix.

Step 5: Pressure-cook the soup
5.Press CANCEL’ close the lid of the Instant Pot with the valve on ‘SEALING’ position. Press the manual or pressure cook button and pressure cook on high for 6 minutes. It will take some time for the pressure to build up, about 10 minutes after which the timer will start.

Step 6: Natural pressure release (NPR) for 5 minutes
Let the pressure release gradually for about 5 minutes. Then release any leftover pressure by doing a quick release.

Step 7: Puree the soup
Once the silver pin drops, turn the knob to ‘VENTING’ and open the lid away from you. Discard the bay leaf. Blend the contents in the pot until smooth, using an immersion blender. Or let it cool down a little and puree the soup in a blender in batches.

Step 8: Add coconut cream and nutmeg
Add 1/4 cup of coconut cream and 1/2 teaspoon of ground nutmeg. Give it a good stir, check for seasonings and adjust with more salt and pepper if required.

Step 9: Serve
Dish out the soup in serving bowls, and garnish with soup toppings like cream, croutons, nuts, seeds, herbs, etc or anything of your choice.

Notes
- You can dump all the contents of this soup in the pot, and let it cook. But I love to sauté the onions and the aromatics until they are fragrant. It simply adds a depth of flavor and complexity to the soup.
- You can also add some chopped celery along with the onions.
- Cooking time includes the time taken for the pressure to build up and natural pressure release time. The actual cooking time is about 12 minutes.
- Stovetop version: Use a soup pot and follow up to step 4, bring to a rapid boil, then lower the heat, cover and cook for about 25 minutes or until carrots are tender. Proceed from step 7.
You can also follow me on Facebook , Pinterest, Instagram & Twitter

Instant Pot Carrot Soup With Ginger | Vegan Carrot Ginger Soup
Equipment
- Instant Pot DUO60 6 Qt 7-in-1
Ingredients1x2x3x
- 1 tablespoon coconut oil/vegetable oil
- 1 cup chopped yellow onions/shallots
- 2 tablespoon of minced ginger
- 1/2 tablespoon minced garlic
- 2 pounds carrots, peeled and diced
- 1 medium potato, about 1 cup
- 1 teaspoon kosher or to taste
- 1/4 teaspoon white pepper powder, or to taste
- 1 to 2 teaspoon coconut sugar, optional
- 4 cups low sodium vegetable broth
- 1 Bay leaf
- 1/4 cup coconut cream
- 1/2 teaspoon ground nutmeg
Instructions
- Press the ‘SAUTE’ button. Once it is hot, add coconut oil. Add the chopped onions, and sauté until translucent.
- Then add minced ginger and garlic, sauté until aromatic.
- Next, add the diced carrots and potatoes, along with salt, white pepper, and coconut or brown sugar. Sauté for a minute.
- Add the broth and bay leaf, give everything a good mix.
- Press /CANCEL’, close the lid of the Instant Pot with the valve on ‘SEALING’ position. Press the manual or pressure cook button and pressure cook on high for 6 minutes. It will take some time for the pressure to build up, (about 10 minutes) after which the timer will start.
- Let the pressure release gradually for about 5 minutes. Turn the knob to ‘VENTING’ to release any leftover pressure by doing a quick release.
- Once the silver pin drops, open the lid and discard the bay leaf. Blend the contents in the pot until smooth, using an immersion blender. Or let it cool down a little and puree the soup in a blender in batches.
- Add the coconut cream and ground nutmeg. Give it a good stir, check for seasonings and adjust with more salt and pepper if required.
- Dish out the soup in serving bowls, and garnish with soup toppings like cream, croutons, nuts, seeds, herbs, etc or anything of your choice.
Notes
- You can dump all the contents of this soup in the pot, and let it cook. But I love to sauté the onions and the aromatics until they are fragrant. It simply adds a depth of flavor and complexity to the soup.
- You can also add some chopped celery along with the onions.
- Cooking time includes the time taken for the pressure to build up and natural pressure release time. Actual cooking time is about 12 minutes.
- Stovetop version: Use a soup pot and follow up to step 4, bring to a rapid boil, then lower the heat, cover and cook for about 25 minutes or until carrots are tender. Proceed from step 7.
- Measuring cup used, 1 cup = 250 ml, 1 tsp = 5 ml


Instant Pot Carrot Soup With Ginger | Vegan Carrot Ginger Soup
Equipment
- Instant Pot DUO60 6 Qt 7-in-1
Ingredients
- 1 tablespoon coconut oil/vegetable oil
- 1 cup chopped yellow onions/shallots
- 2 tablespoon of minced ginger
- 1/2 tablespoon minced garlic
- 2 pounds carrots, peeled and diced
- 1 medium potato, about 1 cup
- 1 teaspoon kosher or to taste
- 1/4 teaspoon white pepper powder, or to taste
- 1 to 2 teaspoon coconut sugar, optional
- 4 cups low sodium vegetable broth
- 1 Bay leaf
- 1/4 cup coconut cream
- 1/2 teaspoon ground nutmeg
Instructions
- Press the ‘SAUTE’ button. Once it is hot, add coconut oil. Add the chopped onions, and sauté until translucent.
- Then add minced ginger and garlic, sauté until aromatic.
- Next, add the diced carrots and potatoes, along with salt, white pepper, and coconut or brown sugar. Sauté for a minute.
- Add the broth and bay leaf, give everything a good mix.
- Press /CANCEL’, close the lid of the Instant Pot with the valve on ‘SEALING’ position. Press the manual or pressure cook button and pressure cook on high for 6 minutes. It will take some time for the pressure to build up, (about 10 minutes) after which the timer will start.
- Let the pressure release gradually for about 5 minutes. Turn the knob to ‘VENTING’ to release any leftover pressure by doing a quick release.
- Once the silver pin drops, open the lid and discard the bay leaf. Blend the contents in the pot until smooth, using an immersion blender. Or let it cool down a little and puree the soup in a blender in batches.
- Add the coconut cream and ground nutmeg. Give it a good stir, check for seasonings and adjust with more salt and pepper if required.
- Dish out the soup in serving bowls, and garnish with soup toppings like cream, croutons, nuts, seeds, herbs, etc or anything of your choice.
Notes
- You can dump all the contents of this soup in the pot, and let it cook. But I love to sauté the onions and the aromatics until they are fragrant. It simply adds a depth of flavor and complexity to the soup.
- You can also add some chopped celery along with the onions.
- Cooking time includes the time taken for the pressure to build up and natural pressure release time. Actual cooking time is about 12 minutes.
- Stovetop version: Use a soup pot and follow up to step 4, bring to a rapid boil, then lower the heat, cover and cook for about 25 minutes or until carrots are tender. Proceed from step 7.
- Measuring cup used, 1 cup = 250 ml, 1 tsp = 5 ml
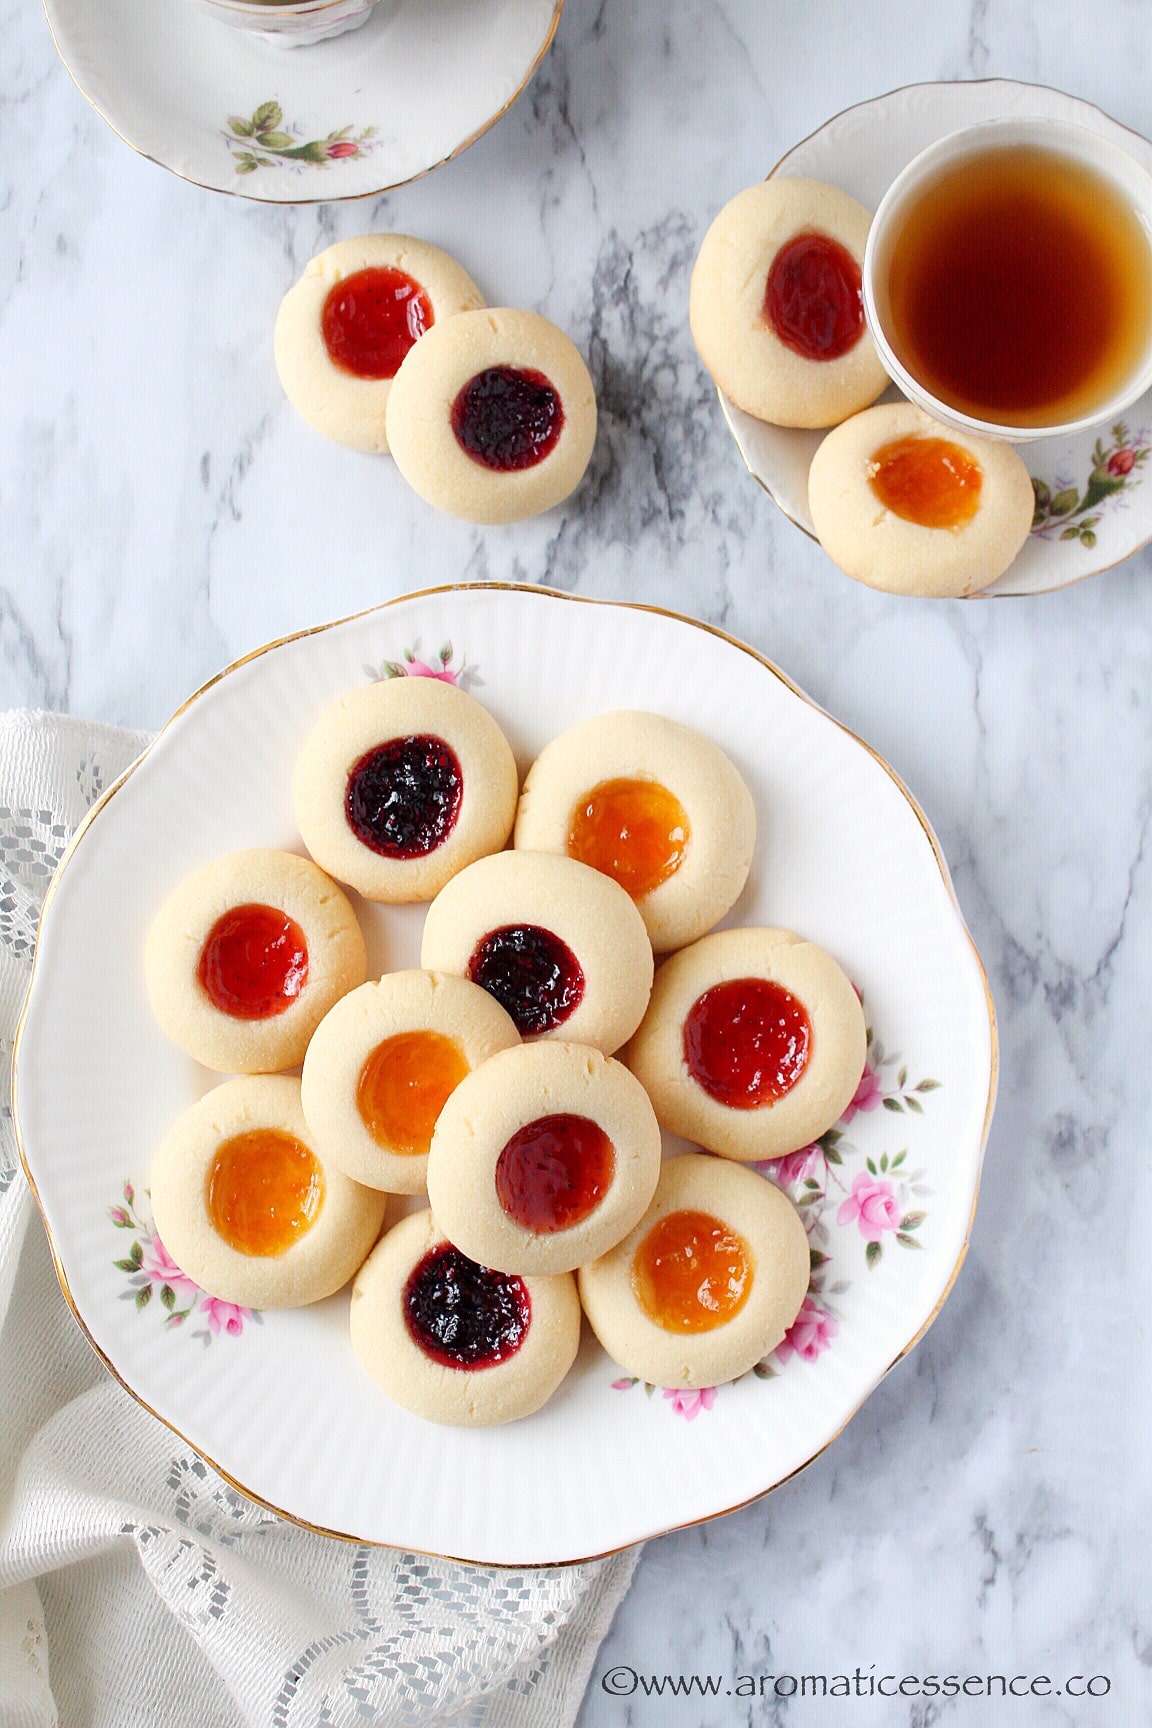
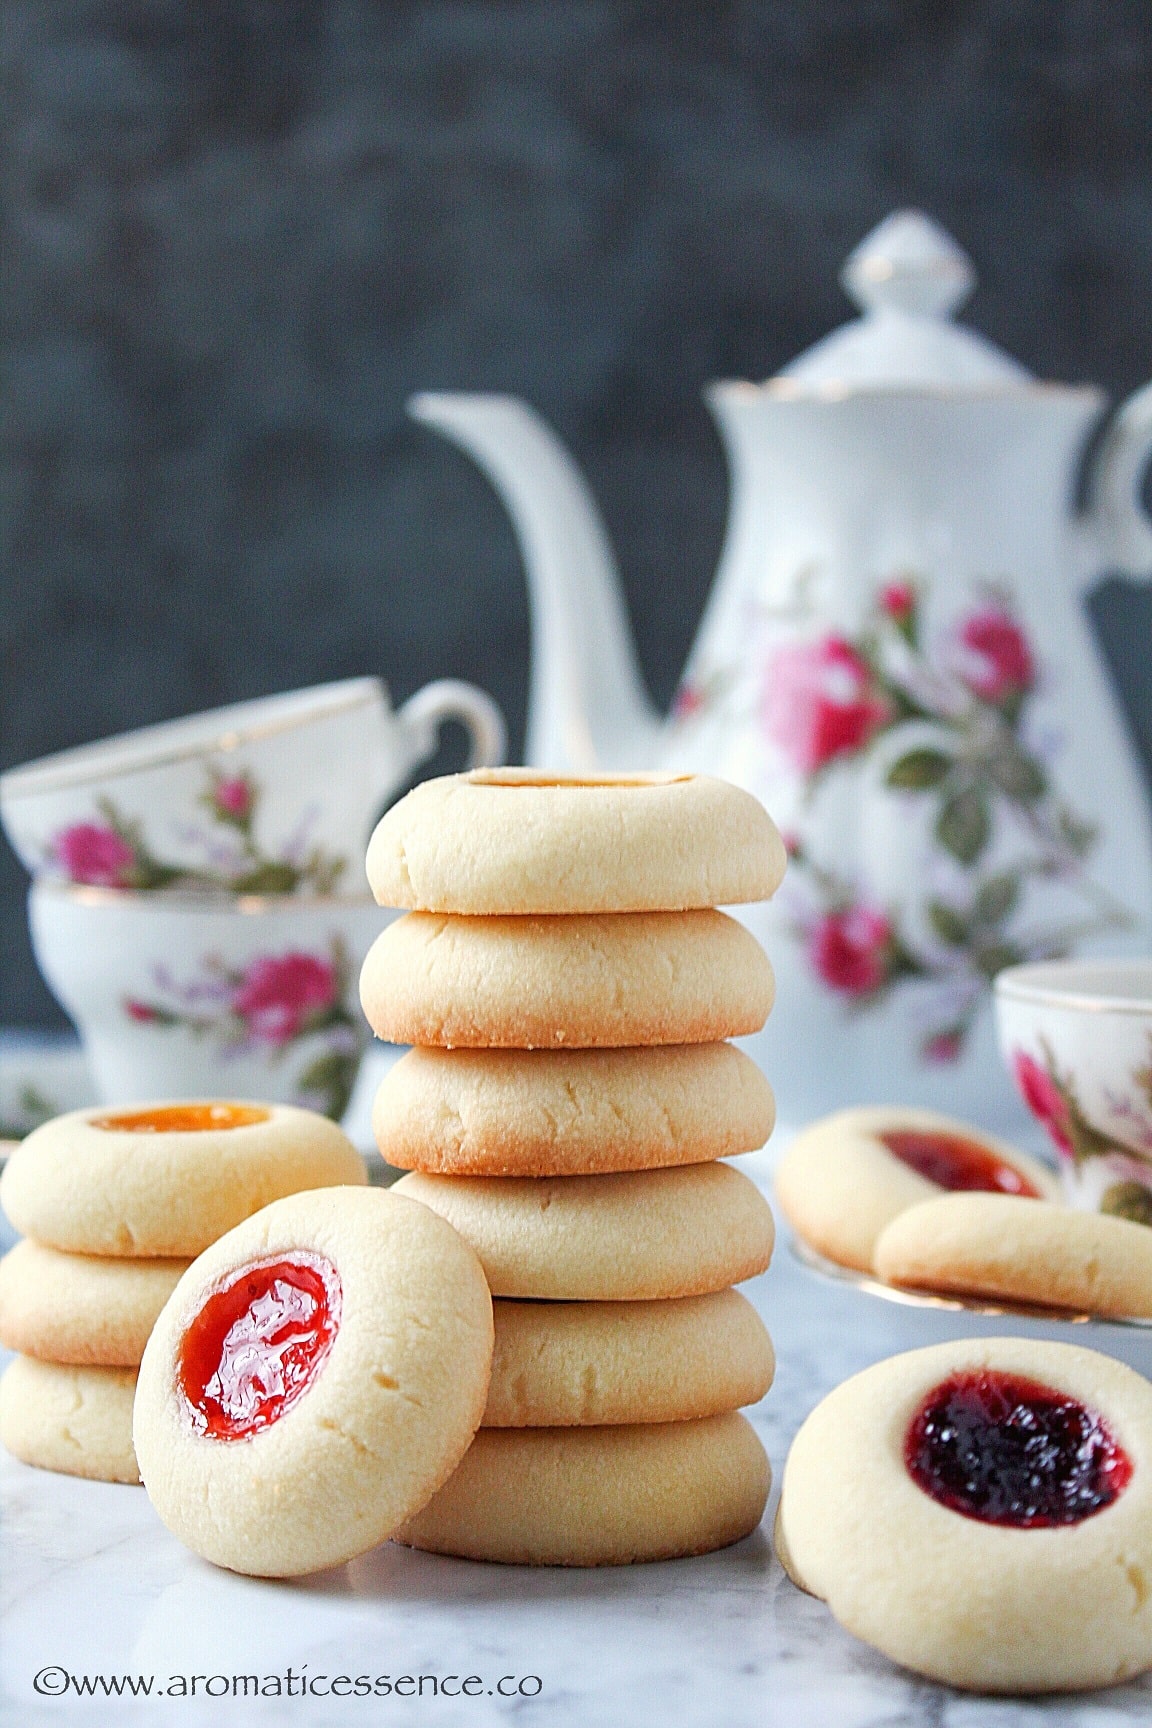
These Eggless thumbprint cookies | shortbread thumbprint cookies | shortbread jelly cookies are rich, buttery, tender, crumbly and melt in the mouth. Made with just five basic ingredients, these are easily adaptable to endless variations. Bake up a batch, or two or more this Holiday season coz they will be gone sooner than you think!

The Holidays are going to be upon us pretty soon. And I’ve made a list of goodies to share with you guys, starting with this classic Holiday favorite- Thumbprint Cookies, traditionally known as rosenmunnar , which are basically, buttery Swedish cookies with jam in the middle .
If you are looking for some easy Holiday cookies | Christmas cookie recipes , you have to add these awesome homemade thumbprint cookies to your cookie platter because –
- They are really easy , I promise. You just need about 15-20 mins of prep time for the cookie dough, shaping, and filling it with jam.
- There is no chilling or rolling involved . So no worries about the dough cracking and sticking and loads of other issues.
- Plus guys, look how pretty they look especially when you fill them with an assortment of jams or jellies.
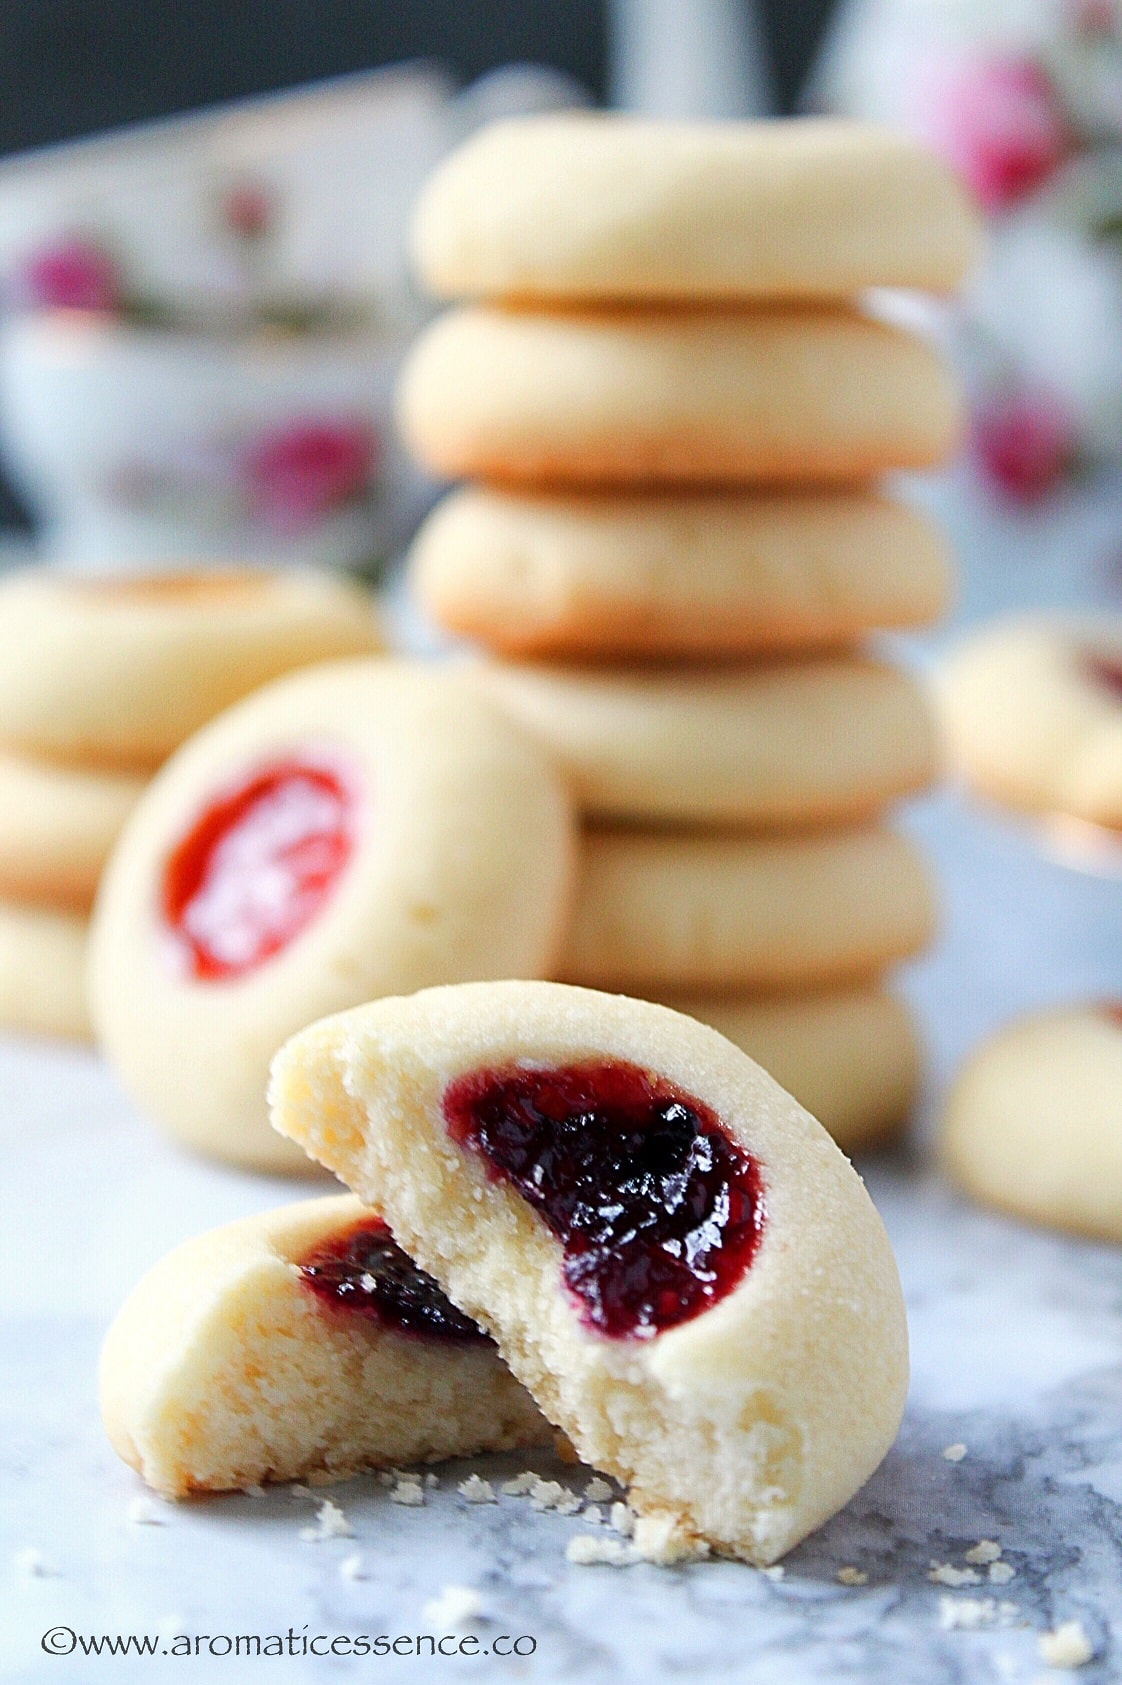
- The taste – what it all comes down to after all. These jelly-filled cookies taste amazing, imagine taking a bite of these cookies, they are crisp yet so tender they literally crumble in your mouth with a little bit of the chewy texture from the sweet jam/jelly. These are little bites of heaven!
EGGLESS THUMBPRINT COOKIES INGREDIENTS | WHAT ARE THE INGREDIENTS FOR THUMBPRINT COOKIES?
These easy thumbprint cookies require just 5 basic ingredients , not counting salt and your flavoring agents.
- Butter, salted or unsalted both work in this recipe.
- Flour
- Cornstarch, an ingredient that makes these cookies really light and gives it an amazing crisp-tender texture. You can skip the cornstarch if you don’t have it and substitute it with flour instead. But if you do have some in your pantry, I highly recommend using it in this recipe.
- Confectioners sugar or powdered/icing sugar, another ingredient which also gives a nice, light texture to these eggless thumbprint cookies.
- Jams, jellies or preserves of choice. I’ve used an assortment of mixed berry, strawberry and mango jam. It did make for a stunning and gorgeous cookie platter!

These thumbprint cookies are adapted from my Karachi Fruit Biscuits, which is basically similar to a shortbread cookie. It is one of the most tried and tested recipes on my blog, and it has been loved by all those who have tried it. It is that one cookie dough that I always have at the back of my hand. I don’t even need to look at the recipe, because I have made it so many times that I’ve literally lost track of the number of cookies I’ve dished out using that failproof cookie dough recipe.
The best part is how versatile it is, either slice-and-bake, or roll it out and make cut-outs, or roll the dough into balls, flatten and make individual cookies. It always yields such amazing treats to enjoy sans the eggs. This is the best thumbprint cookie recipe ever, without the eggs, and after trying these out I’m sure you will agree with me on this one. You could also use this dough to make reindeer cookies and many other theme related shapes for any occasion.
You could also make vegan thumbprint cookies by using vegan butter instead.
I’ve flavored these jam thumbprints | jelly thumbprint cookies with pure vanilla extract to make a vanilla thumbprint cookie recipe . You can get creative here and create your own variations. Don’t know from where to start? I’ve given a list of variations further down and how to go about it. I bet you will enjoy those flavors too:)

VARIATIONS OF THUMBPRINT COOKIES USING THIS BASIC COOKIE DOUGH
These eggless thumbprint cookies are a gorgeous and lovely treat all year round. I don’t think they should be reserved only for the Holidays, they would be apt for any occasion. Here’s a very basic thumbprint cookie recipe along with numerous variations. So pick a few, and make some of these goodies to treat your family and friends this Holiday season.
Thumbprint cookies with kisses | Hershey thumbprint cookies: Press a Hershey’s kisses candy into each indentation as soon as you remove it from the oven.
Candy thumbprint cookies: Roll the cookie dough into 1-inch balls and press a candy melt in the center of each cookie. Bake for about 15 mins until edges are golden brown.
Red and green thumbprint cookies | Holiday thumbprint cookies: Press red or green candy melts or a halved candied cherry in the center of the cookies and bake as directed below. You can also roll the cookie dough in red or green sugar or use red and green sprinkles after filling the indentations with melted chocolate, Nutella etc
Caramel thumbprint cookies: Use about 10 caramels, such as Kraft’s. Melt the caramels with 1 tbsp heavy cream in the microwave or in a pot over medium-low heat until smooth. Take it off the heat and set aside. Once the caramel is warm, fill each indentation of the baked cookies up to the brim. You may sprinkle sea salt or nuts. Let it cool completely before serving.
Raspberry almond shortbread thumbprint cookies: Use 1/2 teaspoon almond extract instead of vanilla extract and use raspberry preserves or jelly to fill the indentations. Bake as directed in the recipe below.
Walnut or pecan thumbprint cookies: Use about 1/2 to 3/4 cup of crushed walnuts or pecans for this recipe. Roll the cookie dough ball in flax egg or egg white and then coat it by rolling the ball in crushed nuts. Place them on a baking sheet, make the indentation and proceed with the recipe.
Lemon raspberry thumbprint cookies: Add about 1/2 tbsp of lemon zest along with vanilla extract to the dough. Fill the indentations with raspberry preserves or jelly. Bake as directed in the recipe below.
Nutella thumbprint cookies: Fill the indentation with Nutella after the cookies have cooled down. Transfer the Nutella into a piping bag or ziplock bag (ends snipped off) and fill the cookies. Top with shredded coconut, sprinkles etc
Raspberry thumbprint cookies: Use raspberry jam/jelly to fill the indentation.
Blueberry thumbprint cookies: Use blueberry jam/jelly to fill the indentation.
Apricot thumbprint cookies: Use apricot preserves/jelly to fill the indentation.
Cinnamon thumbprint cookies: Swap 1/2 teaspoon of vanilla extract with the same amount of ground cinnamon.
Cardamom thumbprint cookies: Swap 1/2 teaspoon of vanilla extract with the same amount of green cardamom powder.
Thumbprint cookies with icing: For the icing, take 1/2 cup of powdered sugar and 1-2 teaspoons of milk, some lemon zest. Adjust the consistency of the icing with more milk if required. Combine everything and drizzle over the cookies once they cool down.
Chocolate thumbprint cookies: Use this recipe of chocolate cookies, and make thumbprint cookies instead.
HOW TO STORE THUMBPRINT COOKIES?
CAN YOU FREEZE THUMBPRINT COOKIES? IF YES, THEN HOW TO FREEZE THUMBPRINT COOKIES?
YOU MAY ALSO LIKE THESE EASY EGGLESS COOKIE RECIPES
STEP BY STEP INSTRUCTIONS TO MAKE EGGLESS THUMBPRINT COOKIES | BUTTER AND JAM THUMBPRINTS | SHORTBREAD BUTTER THUMBPRINT COOKIES
HOW TO MAKE EGGLESS THUMBPRINT COOKIES | JAM COOKIES? | THUMBPRINT BISCUITS RECIPE?
Eggless Thumbprint Cookies | Shortbread Thumbprint Cookies | Rosenmunnar
HOW TO STORE THUMBPRINT COOKIES?
Once you fill the thumbprints they are good for around 2 days at room temperature, as the moisture in the jams tends to soften them. If you plan on making these thumbprint cookies in advance, bake them without adding the jam. Store the baked thumbprints in an airtight container and fill in the jam only before serving. This way they will keep for longer.
CAN YOU FREEZE THUMBPRINT COOKIES? IF YES, THEN HOW TO FREEZE THUMBPRINT COOKIES?
Yes, you can definitely freeze the cookies. Simply follow these steps-
- Place all the thumbprints in a good airtight container such as Tupperware.
- Place parchment paper or wax paper between each layer of cookies so that they don’t stick together.
- Make sure the container is sealed tightly as you don’t want other odors passing on to the cookies.
- Place the container in a foil and then into a plastic bag to avoid as much air from getting into the container.
- If you have the time and patience you may also wrap each cookie individually in waxed paper and place them all in a container or zip lock bag.
- Thaw it overnight in the refrigerator or at room temperature for about 30 mins before serving. You can freeze them with or without the jam.
- Eggless Bourbon biscuits
- Eggless badam pista biscuits, Karachi bakery style
- Coconut cookies
- Nankhatai (Indian shortbread cookies)
- Linzer cookies
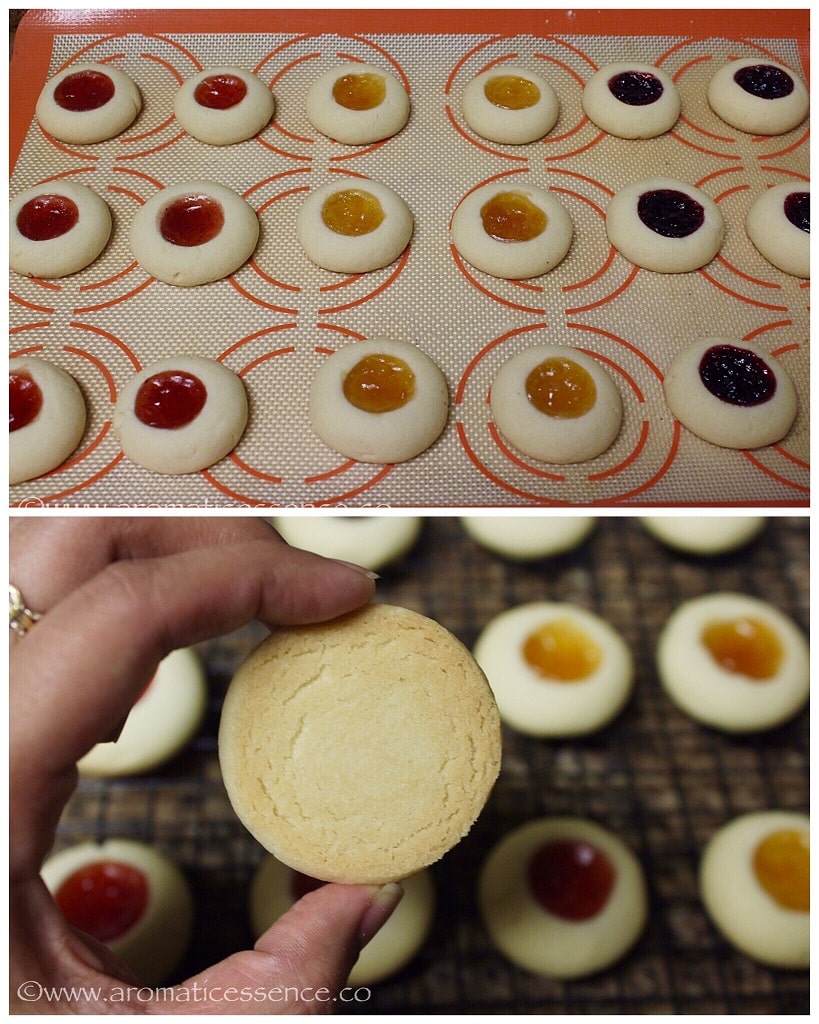
STEP BY STEP INSTRUCTIONS TO MAKE EGGLESS THUMBPRINT COOKIES | BUTTER AND JAM THUMBPRINTS | SHORTBREAD BUTTER THUMBPRINT COOKIES
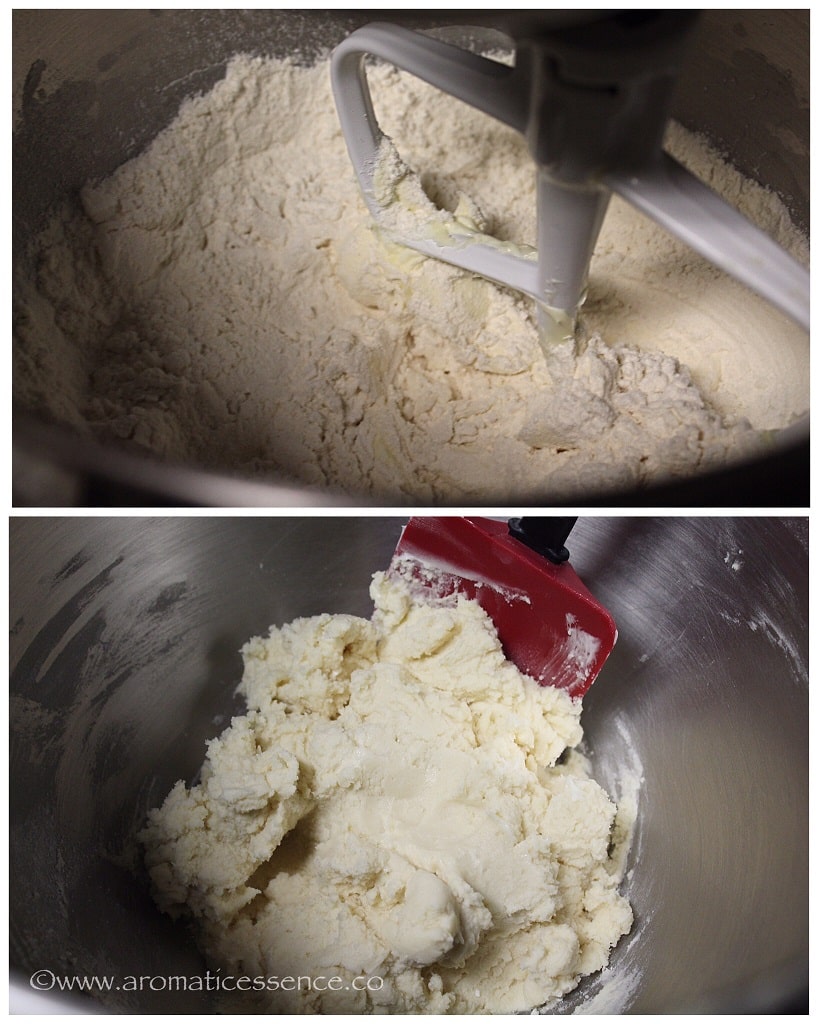
1.Line a baking sheet with Silpat or parchment paper. Sift the flour, cornstarch, and salt in a large mixing bowl.

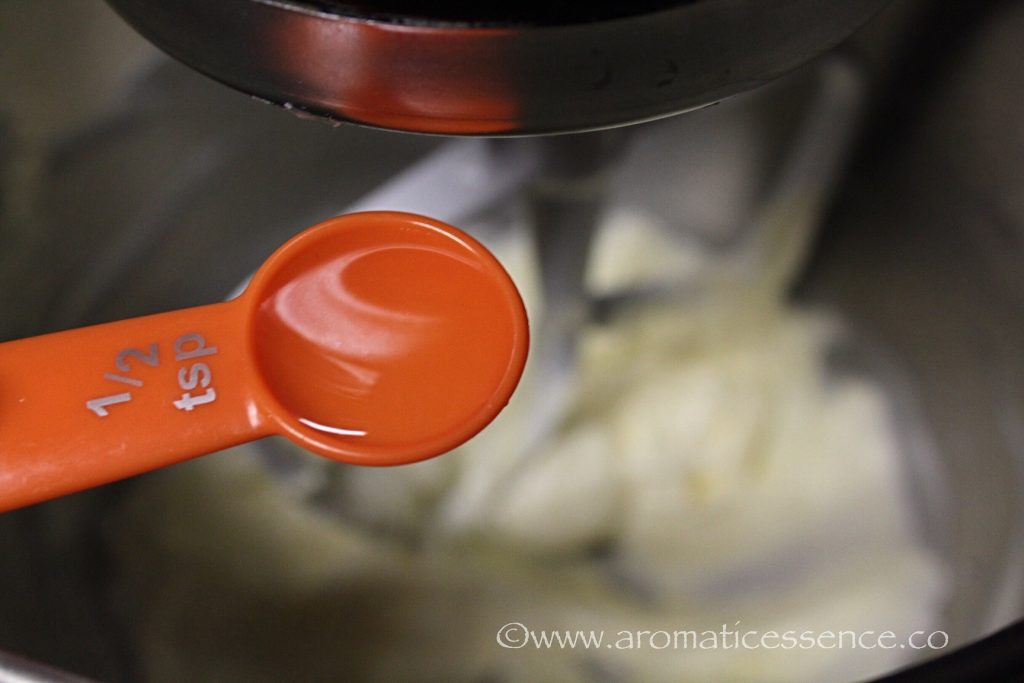
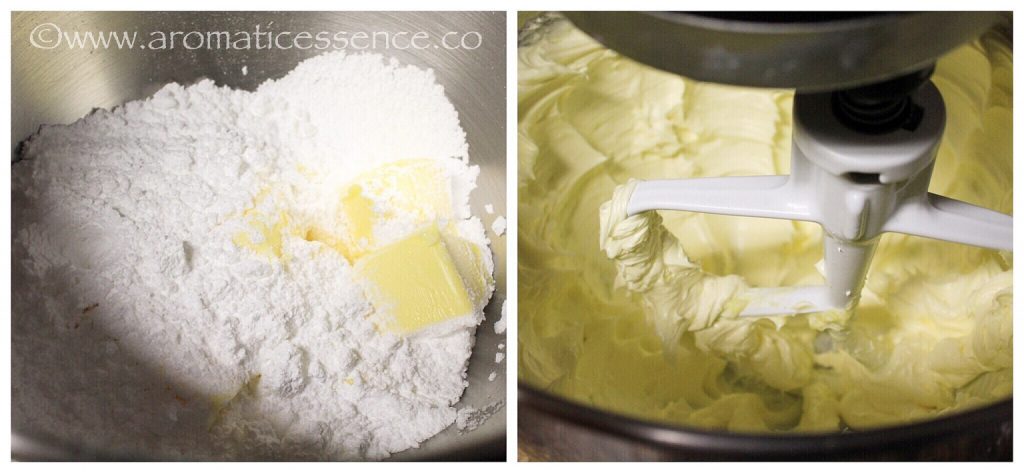
2.Place butter in the bowl of your stand mixer (you can use your hand mixer or a whisk too), sift in powdered sugar, beat on low heat initially, until the powdered sugar is mixed with the butter, then increase the speed to medium and beat until pale, light and creamy, scraping down the bowl in between.

3.Add vanilla extract and mix well.
4.Now, switch to the lowest speed and add the dry ingredients in two parts, scraping down the bowl in between until well mixed. Gently bring the dough together. Do not knead. If at all the dough is dry, sprinkle few teaspoons of milk at a time, do not add too much. I didn’t require any milk. The dough should be soft.
5.Preheat the oven to 350 degrees F/180 degrees C. Shape the dough into 1 inch balls. I used a tablespoon and half to measure out the dough and form the balls, just so they are all uniform. Place the balls on the baking tray, about 2-inches apart.

6.Make an indentation in the center of each cookie gently, using your thumb or the back of a rounded 1/4 teaspoon. If the edges crack, simply fix it with your fingers. Or just leave it as it is, it doesn’t really matter.

7.Fill the centers of the cookies with jam right up to the brim, about 1/4 teaspoon.

8.Bake for 13-15 minutes or just until the edges are golden brown. Let it stand on the cookie sheet for about a minute, then transfer to a cooling rack and cool completely.
NOTE
- The butter should be soft but not so soft that it is mushy. If you push the butter with your finger, it should slide with some resistance, leaving a dent behind. That is the correct consistency of the butter to be used in this recipe. Leave it for no more than 1 hour on the countertop to reach this stage. When the butter is too soft, you may end up using more flour as the dough might be sticky. Simply avoid this situation by ensuring the butter is not too soft.
- If the jam is too firm, transfer it to a microwave safe bowl and microwave for about 10 seconds or transfer to a heavy bottomed pot over medium-low heat, stir it well to loosen it and fill the cookies. Make sure it is not very hot.
- If it is too hot and humid where you live, you may want to refrigerate the cookies after making the indentation. Doing so will prevent the cookies from spreading while baking. Add the jam after the refrigerating the cookies and bake as directed.
HOW TO MAKE EGGLESS THUMBPRINT COOKIES | JAM COOKIES? | THUMBPRINT BISCUITS RECIPE?

Eggless Thumbprint Cookies | Shortbread Thumbprint Cookies | Rosenmunnar
Ingredients1x2x3x
Measuring cup used, 1 cup = 250 ml, 1 tsp = 5 ml
- 1 cup all-purpose flour, spooned and leveled
- 2 tbsp cornstarch
- 1/2 cup unsalted butter softened (leave the butter on the counter top, until soft)
- 1/2 cup Confectioner’s sugar/powdered sugar, you may even reduce it to 1/3 cup if you prefer less sweeter cookies
- 1/2 tsp vanilla extract
- 1/4 tsp salt, skip if using salted butter
- 1/4 to 1/3 cup jam/jelly/preserves, of choice
Instructions
- Line a baking sheet with Silpat or parchment paper. Sift the flour, cornstarch, and salt in a large mixing bowl.
- Place butter in the bowl of your stand mixer (you can use your hand mixer or a whisk too), sift in powdered sugar, beat on low heat initially, until the powdered sugar is mixed with the butter, then increase the speed to medium and beat until pale, light and creamy, scraping down the bowl in between.
- Add vanilla extract and mix well.
- Now, switch to the lowest speed and add the dry ingredients in two parts, scraping down the bowl in between until well mixed. Gently bring the dough together. Do not knead. If at all the dough is dry, sprinkle few teaspoons of milk at a time, do not add too much. I didn’t require any milk. The dough should be soft.
- Preheat the oven to 350 degrees F/180 degrees C. Shape the dough into 1 inch balls. I used a tablespoon and half to measure out the dough and form the balls, just so they are all uniform. Place the balls on the baking tray, about 2-inches apart.
- Make an indentation in the center of each cookie gently, using your thumb or the back of a rounded 1/4 teaspoon. If the edges crack, simply fix it with your fingers. Or just leave it as it is, it doesn’t really matter.
- Fill the centers of the cookies with jam right up to the brim, about 1/4 teaspoon.
- Bake for 13-15 minutes or just until the edges are golden brown. Let it stand on the cookie sheet for about a minute, then transfer to a cooling rack and cool completely.
Notes
- The butter should be soft but not so soft that it is mushy. If you push the butter with your finger, it should slide with some resistance, leaving a dent behind. That is the correct consistency of the butter to be used in this recipe. Leave it for no more than 1 hour on the countertop to reach this stage. When the butter is too soft, you may end up using more flour as the dough might be sticky. Simply avoid this situation by ensuring the butter is not too soft.
- If the jam is too firm, transfer it to a microwave safe bowl and microwave for about 10 seconds or transfer to a heavy bottomed pot over medium-low heat, stir it well to loosen it and fill the cookies. Make sure it is not very hot.
- If it is too hot and humid where you live, you may want to refrigerate the cookies after making the indentation. Doing so will prevent the cookies from spreading while baking. Add the jam after the refrigerating the cookies and bake as directed.

I hope you guys enjoyed this easy thumbprint cookie recipe. I would love to hear from you if you try them out.
Please feel free to share your feedback with photos and suggestions to me at aromaticessence77@gmail.com
You can also follow me on :
Facebook @ Aromaticessence
Pinterest @ Aromatic Essence
Instagram @ aromatic_essence77
Twitter @ freda_dias
Regards,
Freda
Linzer cookies- buttery, nutty, and tender cookies sandwiched between tart raspberry jam, a classic Austrian Christmas treat!

As promised in my Thumbprint cookie post, I have a couple of more cookies to share with y’all. For today, it is this eggless Linzer cookie recipe . I have been meaning to make these for a long time, and yet never got around to trying them. In fact, I got these Wilton Linzer cookie cutters last year from Walmart after the Christmas sale, and since then it’s just been lying around. Every time I’d remove a baking tray or a pan, or cupcake liners, and these cutters would just stare at me, begging to be used.
I tried the recipe that came on the cover of these cutters, which had eggs. And then I tried making them again without the eggs, and frankly, the difference is negligible. So, I decided to skip the eggs altogether.

- WHAT IS A LINZER COOKIE?
- AUSTRIAN LINZER COOKIES
- HOW TO STORE LINZER COOKIES?
- CAN YOU FREEZE LINZER COOKIES?
- YOU MAY ALSO LIKE THESE EASY EGGLESS COOKIE RECIPES
- STEP BY STEP INSTRUCTIONS TO MAKE EGGLESS LINZER COOKIES | LINZER BISCUITS | RASPBERRY LINZER COOKIES
- HOW TO MAKE LINZER COOKIES | LINZER SANDWICH COOKIES?
- Linzer Cookies Recipe {Eggless} | Linzer Augen Recipe
WHAT IS A LINZER COOKIE?
Linzer sablés/ Linzer Augen or “Linzer eyes” are a cookie-sized version of the classic Austrian dessert Linzer Torte, a tart that consists of a short, crumbly crust made of flour, unsalted butter, egg yolks, lemon zest, cinnamon, and lemon juice, and ground nuts, usually hazelnuts, but even walnuts or almonds are used. Traditionally the torte is filled with black currant preserves, though redcurrant jam, plum butter, raspberry, or apricot jam is also used. It is topped with a thin dough in a criss-cross pattern to create a lattice. {Sourec- Wiki )
So in short, Linzer cookies use the same recipe as Linzer Torte but are presented in a cookie form.

AUSTRIAN LINZER COOKIES
Linzer cookies do require a little bit of patience, as the dough needs to be rolled and then cut out, but the resultant cookies will surely please you. It is worth all that time and effort.
The Linzer cookie dough recipe uses,
- Flour
- Sugar
- Butter
- Almond flour/meal
- And almond extract
For vegan Linzer cookies, swap the butter with vegan butter.

This is almost like a shortbread Linzer cookie, with the addition of almond flour. For a fun twist from the traditional look of the jam peeking through the cut-out, make Linzer thumbprint cookies instead. That will save you the time from rolling out the dough. Make 1-inch balls from the Linzer cookie dough and make an indentation in the middle of the dough ball with your thumb or the back of 1/4 teaspoon measuring spoon and fill it with your favorite jam, before or after baking. The best of both cookies 😀
And hey, before you know it, Valentine’s will be here, you could make some Linzer heart cookies. Fill them with the traditional raspberry jam or Nutella to make Nutella Linzer cookies. Either way, I think these heart-shaped Linzer cookies would make an adorable and cute edible gift to your loved ones 🙂

HOW TO STORE LINZER COOKIES?
Store the cookies in a single layer with wax paper or parchment paper in between each layer. The jam will soften the cookies a little, they sort of turn soft and chewy which is still good nonetheless.
If you like your cookies crisp, fill in the jam and sandwich the cookies just before serving.
CAN YOU FREEZE LINZER COOKIES?
Yes, you can definitely freeze these almond Linzer cookies in an airtight container for up to three months. Follow the instructions I’ve mentioned in this thumbprint cookies post .
You may freeze the cookies without the jam. When you are ready to serve, let the cookies come to room temperature, and then add the jam and sandwich the cookies.
- Eggless Bourbon biscuits
- Eggless badam pista biscuits, Karachi bakery style
- Coconut cookies
- Nankhatai (Indian shortbread cookies)
- Swedish Thumbprint cookies
While you can easily buy Linzer cookies, I’d say make them instead. You’d whip up more cookies at home in the same amount of money that you’d spend on buying them. A little bit of patience and you will be rewarded with happy smiles and lots of love 🙂
STEP BY STEP INSTRUCTIONS TO MAKE EGGLESS LINZER COOKIES | LINZER BISCUITS | RASPBERRY LINZER COOKIES
1.In a small bowl, combine flour, almond flour, cinnamon, and salt. Whisk well to combine the dry ingredients.

2.In the bowl of your stand mixer with a paddle attachment, beat the butter and confectioner’s sugar, until light and fluffy, scraping the bowl as needed. You may use a hand mixer or a hand whisk too.
3.Add the almond extract and continue beating for another 30 seconds.

4.Switch to the lowest speed and add the dry ingredients, mix just until combined.

5.Gather the dough into two discs, flatten it out to about 1 inch in thickness. Wrap in a plastic wrap and refrigerate it for about 2 hours on until firm enough to roll out.

6.Prehet the oven to 350 degrees F/180 degrees C. Line a baking tray with Silpat or parchment paper. Remove the cookie dough from the refrigerator and let it stand for about 10 minutes. Place the cookie dough between two parchment papers, and roll to about 1/4 inch thickness.

7.Cut the dough with 3 inch round cutter and transfer to a baking tray.

8.Roll out the other dough and make cutouts with the 3 inch round cutter with insert, transfer to a second baking sheet.

9.Form scraps into a disc, chill for another 30 minutes and reroll.

10.Bake for 10-12 minutes or until light golden brown. Remove the baking sheet from the oven, let the cookies cool on the sheet for 2 minutes, then transfer to a wire rack and let it cool completely.


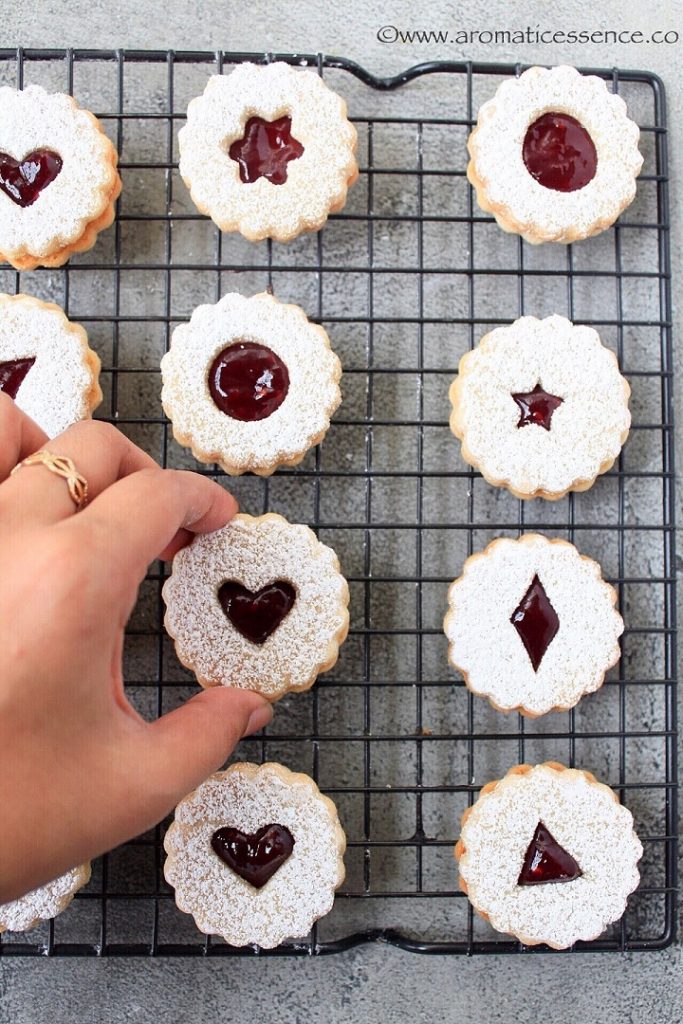
11.Dust powdered sugar on cookies with cut-outs.

12.Spread about 1 teaspoon of jam on the bottom halves of the cookies.

13.Sandwich both the cookies by pressing them gently.

NOTE
- You may reduce the sugar to 3/4 cup for less sweet cookies.
HOW TO MAKE LINZER COOKIES | LINZER SANDWICH COOKIES?

Linzer Cookies Recipe {Eggless} | Linzer Augen Recipe
Ingredients1x2x3x
Measuring cup used, 1 cup = 250 ml, 1 tsp = 5 ml
- 2 cups / 10 oz / 285 grams all-purpose flour, spooned & leveled
- 1/2 cup / 1.6 oz / 48 grams almond flour/meal
- 1 cup / 8 oz / 225 grams unsalted butter, softened
- 1 cup / 5 oz / 140 grams confectioner’s/powdered/icing sugar*, plus more for dusting the cookies
- 1/2 tsp almond extract, or 1 tsp vanilla extract
- 1/4 tsp ground cinnamon
- 1/4 tsp salt
- 1/2 cup raspberry jam, seedless preferably
Instructions
- In a small bowl, combine flour, almond flour, cinnamon, and salt. Whisk well to combine the dry ingredients.
- In the bowl of your stand mixer with a paddle attachment, beat the butter and confectioner’s sugar, until light and fluffy, scraping the bowl as needed. You may use a hand mixer or a hand whisk too.
- Add the almond extract and continue beating for another 30 seconds.
- Switch to the lowest speed and add the dry ingredients, mix just until combined.
- Gather the dough into two discs, flatten it out to about 1 inch in thickness. Wrap in a plastic wrap and refrigerate it for about 2 hours on until firm enough to roll out.
- Preheat the oven to 350 degrees F/180 degrees C. Line a baking tray with Silpat or parchment paper. Remove the cookie dough from the refrigerator and let it stand for about 10 minutes. Place the cookie dough between two parchment papers, and roll to about 1/4 inch thickness.
- Cut the dough with 3 inch round cutter and transfer to a baking tray.
- Roll out the other dough and make cutouts with the 3 inch round cutter with insert, transfer to a second baking sheet. Form scraps into a disc, chill for another 30 minutes and reroll.
- Bake for 10-12 minutes or until light golden brown. Remove from the baking sheet from the oven, let the cookies cool on the sheet for 2 minutes, then transfer to a wire rack and let it cool completely.
- Dust powdered sugar on cookies with cut-outs.
- Spread about 1 teaspoon of jam on the bottom halves of the cookies.
- Sandwich both the cookies by pressing them gently.
Notes
- Recipe slightly adapted from Wilton Linzer cookie recipe
- You may reduce the sugar to 3/4 cup for less sweet cookies.

Did you enjoy this easy Linzer cookie recipe ? Do share your feedback with me if you try it out. I’d love to know how it went! You can write to me at aromaticessence77@gmail.com
You can also follow me on :
Regards,
Freda
