Bread rolls | stuffed bread potato rolls | aloo bread roll , a crispy and crunchy snack that’s perfect to satiate those small, mid-afternoon hunger pangs or great as an evening snack. Oh ! and these are a healthier version since they are air-fried.

Bread rolls | aloo roll | masala bread roll are a much loved Indian snack. Potatoes are known as aloo in Hindi . Spiced potato mixture is stuffed in a moist bread slice, given an oblong shape and deep fried. Ahh … delicious indeed! We all know anything DEEP FRIED is not very healthy ! Nonetheless, these make for a lovely snack to go along with your cuppa, or if you are feeling indulgent, probably you could enjoy these for breakfast on a lazy weekend.

As a child, I have fond memories of these bread rolls. Well, Mom wouldn’t really prepare these at home, as frankly, she never really made anything that required deep frying. Very rarely would that be a sight in her kitchen! However, sometimes we would sometimes purchase it from the local vendors. Watching them preparing the bread rolls was a treat in itself. One could hardly resist the urge to indulge in some of those piping hot bread rolls and bread Pakoras and other delicious goodies! Served with some spicy green chutney and ketchup, sheer bliss!!

I’m really not a fan of deep-fried foods and I rarely make them at home, although I do have my share of it when we dine outside. And that works just as well 🙂 I recently got this air fryer, it had been on my to buy list for a very long time. After a lot of thought, I finally decided to go for it, despite the lack of counter space in my kitchen. Heck !! I had to buy another table to accommodate this, but I have no complaints. I have been enjoying all my favorite fried foods at home. Potato fries, potato wedges, samosa’s, crisp fried okra and I intend trying so many more.

Thanks, Mom for posing so patiently for this pic 🙂
There are so many Indian potato recipes from snacks to desserts. It is that one veggie, that I guess everyone has stocked up in their pantry. Enjoy it fried, mashed, baked, as a binding agent in croquettes, vadas or stuffed in bread or parathas, either way, it is always delicious.
This bread roll recipe is always a favorite with kids. I sure did enjoy them as a kid and now I’m glad to see my son enjoy it as much! You can sneak in other veggies, or also add some shredded cheese to increase that yum factor.
For now, let’s move on to the recipe to make these delicious, guilt-free, air-fried bread rolls.
- LOOKING FOR MORE EVENING SNACKS WITH BREAD RECIPES? YOU MAY ENJOY THESE
- STEP BY STEP INSTRUCTIONS TO MAKE INDIAN STYLE BREAD ROLLS | STUFFED BREAD POTATO ROLLS | BREAD POTATO CUTLET
- HOW TO MAKE INDIAN STYLE BREAD ROLLS?
- Indian Bread Rolls Recipe | Air-Fried Indian Stuffed Bread Potato Rolls
LOOKING FOR MORE EVENING SNACKS WITH BREAD RECIPES? YOU MAY ENJOY THESE
- Chilli cheese toast
- Cream cheese sandwich bites
- Veg mayonnaise sandwich
- Cheese Corn Toast
STEP BY STEP INSTRUCTIONS TO MAKE INDIAN STYLE BREAD ROLLS | STUFFED BREAD POTATO ROLLS | BREAD POTATO CUTLET
1.Heat oil in a skillet, add cumin seeds, let it crackle.

2.Add ginger garlic paste along with finely chopped green chillies.

3.Add finely chopped onions, sauté until translucent.

4.Add green peas and sauté for a minute on medium heat.

5.Add turmeric, red chilli, cumin & coriander powder. Sauté for another 30 seconds on medium-low heat.

6.Mash potatoes coarsely with your fingers and add to the pan.

7.Also add salt, amchur powder, and garam masala. Mix well.

8.Sprinkle lemon juice (if using that instead of amchur powder) and cilantro leaves, mix and switch off the heat. Let the stuffing cool down to room temperature.

9.Divide this potato mixture into 9 equal cylindrical shaped patties.

10.Preheat the air fryer at 350 F/180 degrees C for 3 mins. Take some water in a shallow dish, dip the bread slightly in water, and remove it out immediately. If your bread slice is very soft, then do not dip it in water as it will get soggy, instead dip your finger in water and flatten the slice with the help of your moist fingers.

11.Squeeze out all the excess water by pressing the bread slice gently between your palms.

12.Take one potato mix patty and place it in the center of the bread slice.

13.Bring the 4 corners toward the center and seal the rolls, by pressing and squeezing gently. Make sure that the potato stuffing is completely enclosed in the bread slice. The slight moisture in the bread will help seal the rolls well.

14.Place the rolls in air fryer basket. Brush the remaining 1 tbsp of oil on all sides of the bread rolls.

15.Bake for about 15 minutes or until golden brown from all sides.
Stove-top method – Heat sufficient oil in a wok/kadai. Make sure that the oil is very hot. Deep fry the prepared rolls, keep turning sides. It should take about 1-2 minutes to attain a golden brown color If the oil is not sufficiently hot, the bread rolls will absorb a lot of oil. Test one roll, to set the correct temperature of the oil for deep frying.
You may also shallow fry these instead of deep frying, keep flipping the rolls until they are golden brown on all sides. Or you can also use the ebelskiver pan/paniyaram pan to fry these with minimal oil.

HOW TO MAKE INDIAN STYLE BREAD ROLLS?

Indian Bread Rolls Recipe | Air-Fried Indian Stuffed Bread Potato Rolls
Ingredients1x2x3x
Measuring cup used, 1 cup = 250 ml, 1 tsp = 5 ml
- 2 Yukon gold potatoes, about 2 cups of mashed potatoes
- 1/2 tsp cumin seeds
- 1/2 tbsp ginger garlic paste
- 1 green chillI, finely chopped (adjust as per desired heat)
- 1/2 cup frozen green peas
- 1/4 tsp turmeric powder
- 1/4 tsp red chilli powder/cayenne pepper
- 1/4 tsp cumin powder
- 1/4 tsp garam masala
- 1/2 tsp amchur powder, or 1 tsp lemon juice
- 1 tsp coriander powder
- 1/2 cup finely chopped onions
- 2-3 tbsp chopped cilantro/coriander leaves
- 9 bread slices, of your choice
- 1 + 1 tbsp oil
Instructions
- Heat oil in a skillet, add cumin seeds, let it crackle.
- Add ginger garlic paste along with finely chopped green chillies.
- Add finely chopped onions, sauté until translucent.
- Add green peas and sauté for a minute on medium heat.
- Add turmeric, red chilli, cumin & coriander powder. Sauté for another 30 seconds on medium-low heat.
- Mash potatoes coarsely with your fingers and add to the pan.
- Also add salt, amchur powder, and garam masala. Mix well.
- Sprinkle lemon juice (if using that instead of amchur powder) and cilantro leaves, mix and switch off the heat. Let the stuffing cool down to room temperature.
- Divide this potato mixture into 9 equal cylindrical shaped patties.
- Preheat the air fryer at 350 F/180 degrees C for 3 mins. Take some water in a shallow dish, dip the bread slightly in water, and remove it out immediately. If your bread slice is very soft, then do not dip it in water as it will get soggy, instead dip your finger in water and flatten the slice with the help of your moist fingers.
- Squeeze out all the excess water by pressing the bread slice gently between your palms.
- Take one potato mix patty and place it in the center of the bread slice.
- Bring the 4 corners toward the center and seal the rolls, by pressing and squeezing gently. Make sure that the potato stuffing is completely enclosed in the bread slice. The slight moisture in the bread will help seal the rolls well.
- Place the rolls in air fryer basket. Brush the remaining 1 tbsp of oil on all sides of the bread rolls.
- Bake for about 15 minutes or until golden brown from all sides.
- Stove-top method- Heat sufficient oil in a wok/kadai. Make sure that the oil is very hot. Deep fry the prepared rolls, keep turning sides. It should take about 1-2 minutes to attain a golden brown color If the oil is not sufficiently hot, the bread rolls will absorb a lot of oil. Test one roll, to set the correct temperature of the oil for deep frying.
- You may also shallow fry these instead of deep frying, keep flipping the rolls until they are golden brown on all sides. Or you can also use the ebelskiver pan/paniyaram pan to fry these with minimal oil.

I would love to hear from you! Please feel free to share your feedback with photos and suggestions to me at aromaticessence77@gmail.com
You can also follow me on :
Facebook @ Aromaticessence
Pinterest @ Aromatic Essence
Instagram @ aromatic_essence77
Twitter @ freda_dias
Thanks for stopping by!
Regards,
Freda

Indian Bread Rolls Recipe | Air-Fried Indian Stuffed Bread Potato Rolls
Ingredients
Measuring cup used, 1 cup = 250 ml, 1 tsp = 5 ml
- 2 Yukon gold potatoes, about 2 cups of mashed potatoes
- 1/2 tsp cumin seeds
- 1/2 tbsp ginger garlic paste
- 1 green chillI, finely chopped (adjust as per desired heat)
- 1/2 cup frozen green peas
- 1/4 tsp turmeric powder
- 1/4 tsp red chilli powder/cayenne pepper
- 1/4 tsp cumin powder
- 1/4 tsp garam masala
- 1/2 tsp amchur powder, or 1 tsp lemon juice
- 1 tsp coriander powder
- 1/2 cup finely chopped onions
- 2-3 tbsp chopped cilantro/coriander leaves
- 9 bread slices, of your choice
- 1 + 1 tbsp oil
Instructions
- Heat oil in a skillet, add cumin seeds, let it crackle.
- Add ginger garlic paste along with finely chopped green chillies.
- Add finely chopped onions, sauté until translucent.
- Add green peas and sauté for a minute on medium heat.
- Add turmeric, red chilli, cumin & coriander powder. Sauté for another 30 seconds on medium-low heat.
- Mash potatoes coarsely with your fingers and add to the pan.
- Also add salt, amchur powder, and garam masala. Mix well.
- Sprinkle lemon juice (if using that instead of amchur powder) and cilantro leaves, mix and switch off the heat. Let the stuffing cool down to room temperature.
- Divide this potato mixture into 9 equal cylindrical shaped patties.
- Preheat the air fryer at 350 F/180 degrees C for 3 mins. Take some water in a shallow dish, dip the bread slightly in water, and remove it out immediately. If your bread slice is very soft, then do not dip it in water as it will get soggy, instead dip your finger in water and flatten the slice with the help of your moist fingers.
- Squeeze out all the excess water by pressing the bread slice gently between your palms.
- Take one potato mix patty and place it in the center of the bread slice.
- Bring the 4 corners toward the center and seal the rolls, by pressing and squeezing gently. Make sure that the potato stuffing is completely enclosed in the bread slice. The slight moisture in the bread will help seal the rolls well.
- Place the rolls in air fryer basket. Brush the remaining 1 tbsp of oil on all sides of the bread rolls.
- Bake for about 15 minutes or until golden brown from all sides.
- Stove-top method- Heat sufficient oil in a wok/kadai. Make sure that the oil is very hot. Deep fry the prepared rolls, keep turning sides. It should take about 1-2 minutes to attain a golden brown color If the oil is not sufficiently hot, the bread rolls will absorb a lot of oil. Test one roll, to set the correct temperature of the oil for deep frying.
- You may also shallow fry these instead of deep frying, keep flipping the rolls until they are golden brown on all sides. Or you can also use the ebelskiver pan/paniyaram pan to fry these with minimal oil.
Moist, light and delicious red velvet cake with cream cheese frosting is an evergreen classic, that’s the right fit for any special occasion! Here’s a step-by-step recipe for the best eggless red velvet cake from scratch!

It was my DH’s birthday couple of weeks ago and I had made this eggless red velvet cake with tangy cream cheese frosting. We absolutely love that combination for cake and frosting, they just compliment each other so well, don’t you guys agree too?

Even though we eat eggs, I’m loving my recent egg free bakes. I would love to share these with you guys so you can enjoy these fail-proof eggless bakes with your loved ones 🙂 I’ve adapted this recipe from the crazy chocolate cake I had shared a few months earlier and it worked like a charm for this eggless red velvet cake recipe .
The only difference-
- Reduced cocoa powder to 2 Tbsp
- Replaced water with homemade buttermilk, by curdling milk with vinegar.

- WHAT IS RED VELVET CAKE | IS RED VELVET CAKE CHOCOLATE OR VANILLA?
- EGGLESS RED VELVET CAKE INGREDIENTS | WHAT’S IN A RED VELVET CAKE?
- HOW TO MAKE EGGLESS RED VELVET CAKE?
- YOU MAY ALSO LIKE THESE EGGLESS BAKES
- STEP BY STEP INSTRUCTIONS TO MAKE EGGLESS RED VELVET CAKE
- HOW TO MAKE THE BEST EGGLESS RED VELVET CAKE?
- Eggless Red Velvet Cake With Cream Cheese Frosting
WHAT IS RED VELVET CAKE | IS RED VELVET CAKE CHOCOLATE OR VANILLA?
Now, a red velvet cake is basically a mild chocolate cake dyed with red food color, frosted with a traditional French-style butter roux icing. But it isn’t a chocolat-y kind of cake. Theories suggest that the acidic agents used in making this cake reveal the red anthocyanin in cocoa powder, which in turn may also be the source of its name- “ Red Velvet “.

EGGLESS RED VELVET CAKE INGREDIENTS | WHAT’S IN A RED VELVET CAKE?
To make this eggless red velvet cake you will need cake flour, baking soda, cocoa powder, and salt for the dry ingredients. Buttermilk (made by curdling milk with vinegar or lemon juice), oil, sugar, and vanilla extract for the wet ingredients. You will also need quite a lot of red food coloring since that is what makes red velvet cake red.
The cream cheese frosting consists of cream cheese, butter, powdered sugar, and vanilla extract.
I was oblivious of the fact that beets have been used in this cake since World War II. I thought it was a pretty recent attempt to make a healthier, red velvet cake. That is something I’d definitely like to try the next time I make this cake- a red velvet cake with beets. This is not something I bake frequently since so much food color is used. But an occasion calls for a celebration, which is incomplete without a cake.

HOW TO MAKE EGGLESS RED VELVET CAKE?
Once you gather your wet and dry ingredients, just mix both until combined, transfer to your prepared baking tin and bake. I love this ‘muffin method’ of preparing the cake batter. There is no need to use your stand mixer or hand beaters. You just need 2 bowls, a whisk, and a spatula. You have to remember to avoid over mixing the batter in such cases. Sure, there will be lumps, but as far as they are not big and you see no more flour pockets, the cake will turn out just fine, nice and light. Over mixing always results in a dense cake, due to the activation of gluten in the flour, so never over mix a cake or cookie batter.
This homemade eggless red velvet cake was all wiped off within a day! Yes, we do have a big sweet tooth! You would be in the same boat if you baked this ridiculously easy, delicious and moist, eggless red velvet cake with that cream cheese frosting! The cake is all over, and as I’m writing this post, I can’t help but crave for some more of that cake!
This recipe yields a decent 8 inch round cake, which can be halved in 2 layers, layered with generous icing. If you want a taller cake, bake two, 8 inch round cakes, so you have a 4 layered cake. You will also need to double the amount of icing.
You can also make red velvet cupcakes with this recipe, the baking time will be around 18-20 minutes. Keep an eye as each oven is different.
The best icing for red velvet cake is cream cheese frosting if you ask me. But you could use any icing of your choice.
If you are looking for an eggless red velvet cake recipe, look no further. I’m sure you will enjoy this simple red velvet cake recipe 🙂 So go ahead and give it a go!

- Eggless orange cupcakes
- Eggless mango loaf cake
- Eggless chocolate cupcakes
- Eggless marble cake
- Egg-free mango semolina cupcakes
- Date & Walnut cake (eggless)
STEP BY STEP INSTRUCTIONS TO MAKE EGGLESS RED VELVET CAKE
FOR THE EGGLESS RED VELVET CAKE BASE
1.Prepare an 88-inchcake pan. Grease the entire pan with oil and dust with flour. I placed a parchment paper at the bottom, for easy release of the cake from the pan. Also, preheat the oven to 350 F/ 180 C.

2 .Preparation of buttermilk – Measure out 1 cup of milk in your liquid measuring cup. Add 1 tablespoon of distilled white vinegar/lemon juice. Mix and leave it aside for 5-10 minutes. The milk will curdle, It is ready to be used in further steps.

3.Meanwhile, while you wait for the milk to curdle, prepare the dry ingredients. Sift all the dry ingredients from a height, in a mixing bowl. Whisk well and set aside. Sift 2-3 times for a lighter and airy cake.

4.Add the prepared buttermilk, oil, sugar, vanilla extract and red food color in another mixing bowl. Whisk well until everything is well combined and you have a homogeneous mixture.

5.Make a well in the bowl of the dry ingredients, add the wet ingredients to the dry. Mix just until combined and no more flour pockets are visible. Do not over mix, or you will end up with a pretty dense cake.

6.Transfer the batter to a the prepared cake tin, tap to remove air bubbles, bake at 350 F for about 35 minutes or until a toothpick inserted in comes out clean. Transfer to a wire rack, let it cool completely before frosting it.

FOR THE RED VELVET CAKE ICING (CREAM CHEESE FROSTING)
1.In the bowl of your stand mixer fitted with paddle attachment, beat softened butter and cream cheese on medium speed, until light and fluffy, scraping the sides of the bowl occasionally, about 3-4 minutes. You may use an electric hand mixer too.

2.Add vanilla extract and lemon juice.

3.Also sift in 1 cup of powdered sugar, beat on low speed initially, so that the sugar is well incorporated, then increase the speed to medium-high and beat for another 1-2 minutes, scraping the sides of the bowl occasionally.

4.Sift in another cup of powdered sugar, and continue beating on medium-high speed until light and fluffy, another 2-3 minutes. Add more powdered sugar as required, for a thick, creamy and spreadable consistency. I used a total of 2.5 cups of powdered sugar, and it was the right consistency for layering and frosting the cake.


ASSEMBLING THE CAKE
1.You should get a flat-topped cake with this recipe. I sliced a very thin layer since I needed some crumbs for the decor. You can totally skip that and divide the cake into 2 layers with the help of a long serrated knife.

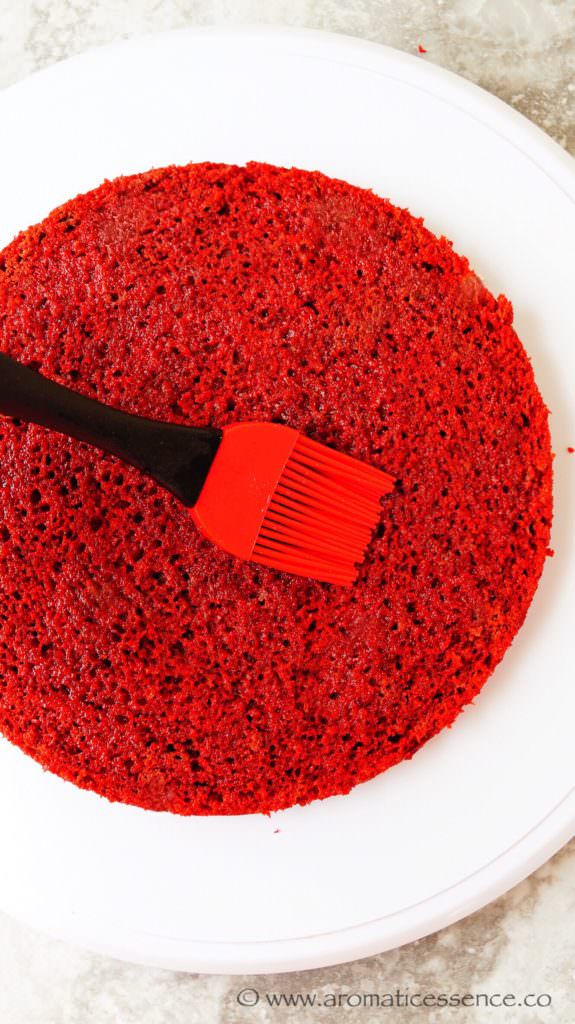
2.Transfer one layer to a turntable or a plate. Brush with sugar syrup.
3.Pipe out the cream cheese frosting using a plain, large piping tip, starting from the outer circumference towards the center. Smooth out the frosting with an offset spatula.

4.Place the second layer of cake, brush with sugar syrup and apply a very thin layer of the frosting on top and the sides of the cake, using an offset spatula. This is the crumb coat which seals stray crumbs before the application of the second and the final layer of frosting. Chill the cake for about 30 minutes or until the crumb coat is firm. Pipe out the cream cheese frosting using the same plain, large piping tip, starting from the outer circumference towards the center. Also, frost the sides. Smooth out the frosting with an offset spatula. Decorate with cake crumbs and grated white chocolate. Refrigerate for about 10-15 minutes, so that the frosting sets well, and you have neat slices.

NOTES
1.The use of cake flour results in light and soft baked goods, due to the low protein content in the flour. It has just 2 ingredients- all-purpose flour and cornstarch. If you can’t find it, you can make your own cake flour. Here is how- Measure out 1 & 1/2 cups of all purpose flour (maida) -spooned and leveled. Then remove 3 tbsp of flour and replace it with 3 tbsp cornstarch. Whisk well. Then sift it along with other dry ingredients.
2.Make sure all the ingredients for the cake and frosting are at room temperature.
3.Here is a tip I follow for flat-topped cakes, it works great all the time. Put a handful of ice cubes in a small baking tin, or make a small box out of aluminum foil. Place it in the lowest rack, just before you begin baking the cake. It works beautifully. This works for any other cake as well. What happens on doing this? The moisture from the melting ice, helps the cake bake evenly, resulting in a flat top.
4.Some more tips… Never open the oven door during baking (as tempted as you may be), for at least the first 30 minutes. Opening the oven door, lets some of the heat out, lowering the temperature inside, which may cause the cake to collapse.
5.To measure the flour, never scoop the flour out directly, you will end up with more flour than called for as it ends up being tightly packed. Always spoon the flour into the cup until it overflows, then level it off with a knife.
6.Do not over mix wet and dry ingredients.

HOW TO MAKE THE BEST EGGLESS RED VELVET CAKE?
Eggless Red Velvet Cake With Cream Cheese Frosting
Ingredients1x2x3x
Measuring cup used, 1 Cup = 250 ml, 1 tsp = 5 ml
Dry ingredients
- 1.5 cups cake flour, spooned and leveled (Refer notes)
- 2 tbsp cocoa powder
- 1 tsp baking soda
- 1/4 tsp salt
Wet ingredients
- 1 cup milk
- 1 tbsp white vinegar/lemon juice
- 1 cup granulated sugar
- 1/3 cup vegetable oil, flavorless (I used canola oil)
- 1 tsp vanilla extract
- 1 tbsp red food color
For the sugar syrup
- 2 to 3 tbsp sugar dissolved in the same amount of water
For the cream cheese frosting
- 1/2 cup / 113 grams unsalted butter, softened
- 1 cup / 226 grams cream cheese, softened
- 2.5 cups confectioner’s/icing sugar, spooned and leveled (adjust as required)
- 1.5 tsp vanilla extract
- 1/2 tsp lemon juice, optional
Other ingredients
- Grated white chocolate, as required for garnish (optional)
Instructions
For the eggless red velvet cake base
- Prepare an 8-inch cake pan. Grease the entire pan with oil and dust with flour. I placed a parchment paper at the bottom, for easy release of the cake from the pan. Also, preheat the oven to 350 F/ 180 C.
- Preparation of buttermilk- Measure out 1 cup of milk in your liquid measuring cup. Add 1 tablespoon of distilled white vinegar/lemon juice. Mix and leave it aside for 5-10 minutes. The milk will curdle, It is ready to be used in further steps.
- Meanwhile, while you wait for the milk to curdle, prepare the dry ingredients. Sift all the dry ingredients from a height, in a mixing bowl. Whisk well and set aside. Sift 2-3 times for a lighter and airy cake.
- Add the prepared buttermilk, oil, sugar, vanilla extract and red food color in another mixing bowl. Whisk well until everything is well combined and you have a homogeneous mixture.
- Make a well in the bowl of the dry ingredients, add the wet ingredients to the dry. Mix just until combined and no more flour pockets are visible. Do not over mix, or you will end up with a pretty dense cake.
- Transfer the batter to the prepared cake tin, tap to remove air bubbles, bake at 350 F for about 35-40 minutes or until a toothpick inserted in comes out clean. Transfer to a wire rack, let it cool completely before frosting it.
For the red velvet cake icing (cream cheese frosting)
- In the bowl of your stand mixer fitted with paddle attachment, beat softened butter and cream cheese on medium speed, until light and fluffy, scraping the sides of the bowl occasionally, about 3-4 minutes. You may use an electric hand mixer too.
- Add vanilla extract and lemon juice.
- Also, sift in 1 cup of powdered sugar, beat on low speed initially, so that the sugar is well incorporated, then increase the speed to medium-high and beat for another 1-2 minutes, scraping the sides of the bowl occasionally.
- Sift in another cup of powdered sugar, and continue beating on medium-high speed until light and fluffy, another 2-3 minutes. Add more powdered sugar as required, for a thick, creamy and spreadable consistency. I used a total of 2.5 cups of powdered sugar, and it was the right consistency for layering and frosting the cake.
Assembling the cake
- You should get a flat-topped cake with this recipe. I sliced a very thin layer since I needed some crumbs for the decor. You can totally skip that and divide the cake into 2 layers with the help of a long serrated knife.
- Transfer one layer to a turntable or a plate. Brush with sugar syrup.
- Pipe out the cream cheese frosting using a plain, large piping tip, starting from the outer circumference towards the center. Smooth out the frosting with an offset spatula.
- Place the second layer of cake, brush with sugar syrup and apply a very thin layer of the frosting on top and the sides of the cake, using an offset spatula. This is the crumb coat which seals stray crumbs before the application of the second and the final layer of frosting. Chill the cake for about 30 minutes or until the crumb coat is firm. Pipe out the cream cheese frosting using the same plain, large piping tip, starting from the outer circumference towards the center. Also, frost the sides. Smooth out the frosting with an offset spatula. Decorate with cake crumbs and grated white chocolate. Refrigerate for about 10-15 minutes, so that the frosting sets well, and you have neat slices.
Notes

I would love to hear from you , please feel free to share your feedback with photos and suggestions to me at aromaticessence77@gmail.com
You can also follow me on :
Facebook @ Aromaticessence
Pinterest @ Aromatic Essence
Instagram @ aromatic_essence77
Twitter @ freda_dias
Regards,
Freda
