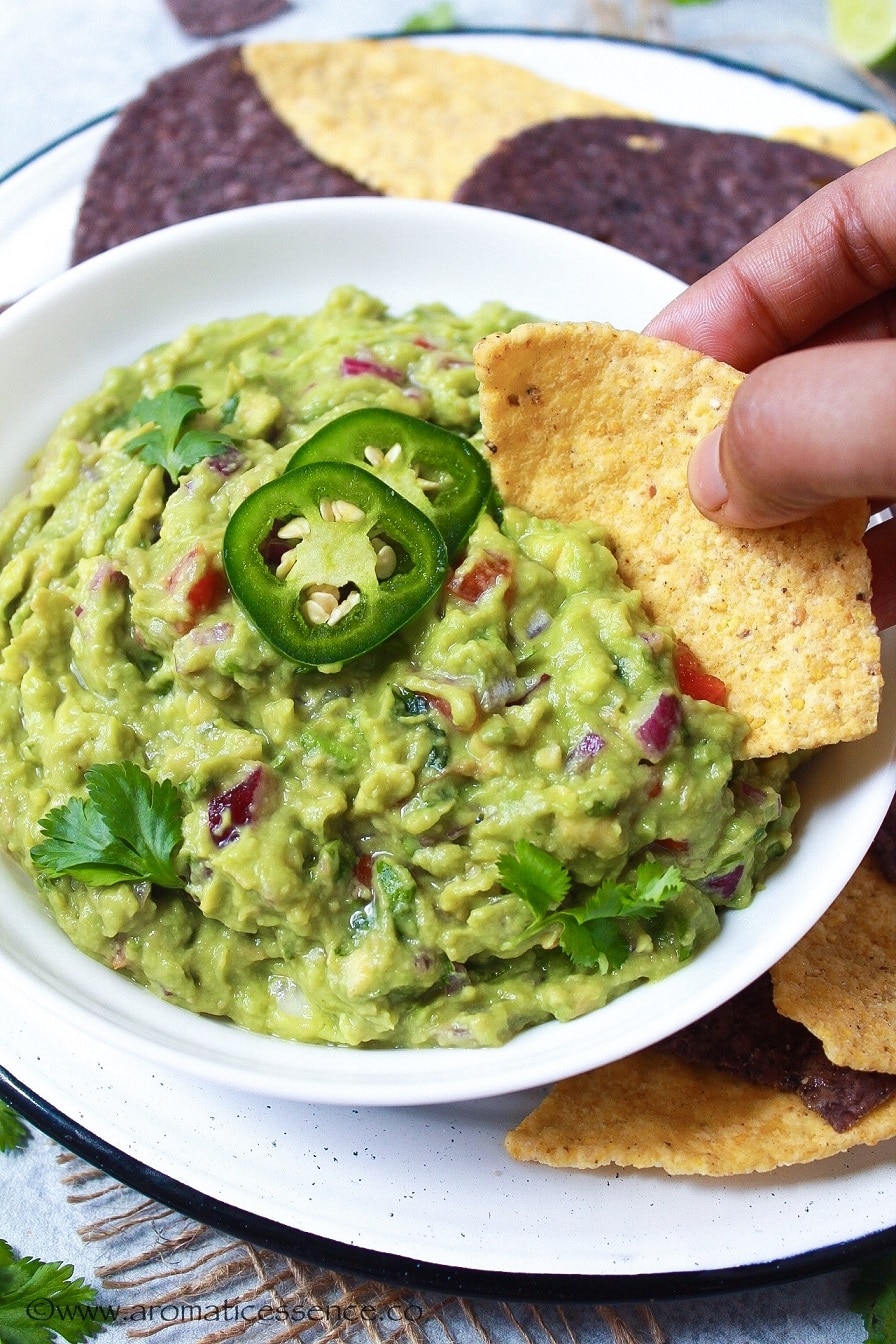
This Mexican guacamole is creamy, delicious, and refreshing. It is made with clean ingredients, and just takes a few minutes to make a batch of fresh guacamole from scratch! Great as a healthy dip with some baked chips or the perfect accompaniment to go along with your favorite Mexican or Tex-Mex meals. Vegan & gluten-free!

A few years ago, avocados were not really a thing in India. I hadn’t even tasted an avocado until I relocated to the US. Besides being popularly used in guacamole, it is used in so many other things in the US.
Now that we moved back to India, I’m so glad to know that things have changed here. We get most of these exotic fruits and vegetables made possible through e-commerce. In fact, they are even available in the local vegetable and fruit markets. This means we can continue to incorporate this exotic fruit (yes! avocado is a fruit) and continue to make guacamole 😀 That is undoubtedly the one thing that I make the most with avocados besides using them in smoothies!
- Ingredients you will need
- What does guacamole taste like?
- Tips to make the best guacamole
- Substitutions in this recipe
- Variations
- Ways to use this Mexican dip
- You may also enjoy these easy dips
- How to make guacamole – Step by step instructions
- Quick FAQs
- How To Make Guacamole
Ingredients you will need
You will need the following ingredients to make this easy Mexican guacamole dip;
- Avocados
- Red onion
- Firm, ripe tomato
- Serrano or Jalapeño pepper
- Lime juice
- Cilantro leaves and tender stems
- Kosher salt
- Ground cumin, which is totally optional

What does guacamole taste like?
Ripe avocados have a very mild sweet taste and a creamy, buttery texture. It’s the other ingredients that you add along with the avocados that contribute to the flavor profile of the guacamole.
This one here is full of robust flavors and textures. It is refreshing with an added zing from the lime zest. My homemade version reminds me of the guacamole I had in the restaurant at one of the Mercados (markets) in Mexico City, it was so basic but oh so good!

Carne asada served with guacamole topped with queso fresco, at a restaurant in a Mexican market.
Tips to make the best guacamole
1. Ripe avocados
Avocados are the primary ingredient for guacamole, so how to select avocados for guacamole?
You have to make sure you start off with good quality, ripe avocados. There are so many varieties of avocado, but Hass avocados are the best for guacamole and that’s what I’ve used.
- Ripe Hass avocados will yield to gentle pressure when squeezed lightly with your palms. They should have a slight give and leave no indentations. Their skin color is a purplish-black and the texture of the skin is a little bumpy.
- Unripe Hass avocados are quite firm and will not yield to any pressure. Also, the skin color is green. These will take about 1-2 days to ripen.
- Overripe Hass avocados as quite soft and mushy and will leave indentations when pressed with your fingers. The skin color is almost black and the flesh might be brown in some spots.
This method of determining the ripeness of avocado, based on the color of its skin is not applicable to other varieties of avocado as they remain green even if they are under-ripe or overripe.
Another method of checking if the avocado is ripe is by removing the stem and examining the color of the flesh underneath.
- If it’s green, it is ripe and ready to be used.
- Brown? Then it is overripe.
- Difficult to pluck the stem? Then it is unripe.
If they aren’t ripe, store them in a brown paper bag, they will ripen faster, in a day or two.
If they are ripe, and you won’t be using them right away, refrigerate them as that will slow down any further ripening.
2. Texture
Skip the food processor or blender to make guacamole. You really don’t want avocado purée for this recipe. A good guacamole is supposed to have some texture.
You can make it chunky or smooth, however, you like it. A regular fork or potato masher is more than enough to help you achieve that.
Traditionally, guacamole is made in a molcajete. The onions, cilantro, peppers, and salt are pounded with a pestle to make a coarse paste. Then the avocado is added and mashed along with the paste to the desired consistency. Guac made this way is really the most flavorful. The entire chemistry changes when ingredients are crushed in a mortar and pestle as opposed to a blender or food processor.
You can replicate that to an extent by using the food processor or blender to finely chop the onions, cilantro, serrano pepper. But it’s still not going to be the same.
I personally prefer to use a bowl, a cutting board, and a knife because I do not have a molcajete or a large mortar and pestle.
3. De-seed the tomatoes
Avoid using the seeds or pulp of the tomatoes, as that will result in watery guacamole.
4. Fresh lime juice
Please try and avoid using bottled lime juice. Freshly squeezed lime juice is so much better in the guac. The acidity balances and cuts through that rich, buttery avocado goodness.
5. Avoid those guacamole seasoning mix packets
Seriously, those have no place in this guacamole recipe. The ingredients are so simple, you might as well give those packets a miss!
6. The right ratios
The perfect guacamole should have the right ratios of ingredients. Too much of onions and it will overpower the entire thing, too much of lime juice and it’s going to be extra tangy, an excess of cilantro will add too much of a herby note overpowering the delicate flavor of the avocado.

Substitutions in this recipe
I love using these ingredients to make guacamole. But I’m sure everyone has their own preference when it comes to some of the ingredients.
Cilantro: I love adding cilantro in salsa or guacamole or just about anything. I’m accustomed to the taste of cilantro because it is the most common herb used in Indian cuisine. If you can’t stand cilantro, you can definitely skip it altogether. Or consider using flat-leaf parsley, mint, or basil to add a herby note to the guac.
Or follow a tip I always suggest. Place diced onions in a bowl of cold water for 10-15 minutes, drain and use. The onions still have their crunch without all that pungency.
Tomatoes: You can leave out the tomatoes if you wish to. Or substitute it with canned petite diced tomatoes or a can of Rotel, just remember to drain the juices. Cherry tomatoes are great too!
Spicy: I used a serrano pepper to spice up this guacamole. You can use jalapeño, with or without seeds, totally up to you! If you don’t have fresh chile peppers, you could also use pickled jalapeños, mild, medium, or hot, depending on your desired spice levels. A dash of cayenne pepper will also add some kick to the guacamole.
Lime juice: Although the traditional recipe uses lime juice, you can swap it with lemon juice if you don’t have any limes.

Variations
I like to keep this dip really basic and simple because I think it’s the best that way!
However, I know sometimes we love to experiment, and that’s not a bad thing. Which is why I have some suggestions for you. Try either of them if you are in the mood to experiment 😀
Cheese: You can garnish the guac with some queso fresco or cotija cheese.
Creamy: Add about 1/4 cup each of either softened cream cheese or sour cream. You can also add both these creamy components for an extra creamy guac. Or keep it healthy by adding 1/4 cup of Greek yogurt instead of cream cheese or sour cream.
Salsa guacamole: Mash the avocados with a pinch of salt, lime juice. Then add about 1/2 cup of mild, medium or hot salsa. Mix it up and serve guacamole salsa!
If you are wondering which salsa to use, then opt for Pico de Gallo which is fresh chopped tomato salsa. Drain the extra liquid and add it to the mashed avocados to avoid watery guacamole. The restaurant type salsa that I shared last week is not suitable here.
Southwestern: Fold in some steamed or roasted corn and black beans along with the other ingredients.
Indian style guacamole: Add a pinch of spices like black salt + chaat masala or coriander + garam masala or curry powder, to taste. You can also throw in some freshly minced ginger root.
Mediterranean inspired: In addition to the onion and tomatoes, add a few tablespoons of diced bell pepper, cucumber, Kalamata olives, dried oregano instead of cumin, red wine vinegar instead of lime juice and crumbled feta cheese!
Tropical fruits: Add finely diced tropical fruits like mango or pineapple to the guacamole. It would add a nice sweet and tangy touch.
Garlic: You can add one or as much as you like of finely minced garlic clove. Despise raw garlic flavor? Then consider adding roasted mashed garlic cloves or 1/4 teaspoon of garlic powder.
Ways to use this Mexican dip
Give me a bowl of guac along with some baked tortilla chips and I’m a happy girl! I enjoy it sans the chips too, devouring every spoonful 😀
If I’m in the mood for healthy snacking, I serve guacamole with crudités instead.
Some of the other ways I love to use guacamole are;
- With nachos
- On tostadas
- In a 7 layer dip
- As a topping for tacos or burritos
- Serve along with fajitas, flautas or quesadillas
- As a spread for toast or sandwich (I swap the mayo for guac in the vegetable mayonnaise sandwiches and the cream cheese for guacamole in these cream cheese sandwich bites )
- Grilled chicken or grilled salmon
- Bruschetta
- Egg salad or deviled eggs
- Tuna salad
You may also enjoy these easy dips
- Greek tzatziki
- Baba ganoush
- Salsa verde
- Restaurant-style salsa
How to make guacamole – Step by step instructions
Step 1: Mash the avocados
Cut 3 avocados lengthwise, around the pit. Remove the pit, and scoop the avocado into a mixing bowl.
Mash with the back of a fork, until is smooth or chunky, depending on the desired consistency.

Step 2: Add the rest of the ingredients and mix
Add 1/4 cup finely chopped red onions, 1 Roma tomato, deseeded, 1/4 cup finely chopped cilantro, 1/2 teaspoon kosher salt, 1/4 teaspoon cumin (optional), 2 tablespoons freshly squeezed lime juice. Mix it well. Taste-test and adjust with more salt, lime juice or cilantro.

Step 3: Dig in

Notes
- Add salt and lime juice, to taste. Start with half of the amount and increase gradually, tasting as you go! You may need more or less lime juice depending on the size of the avocados.
- You can chop the onion, cilantro, and garlic (if using) along with a pinch of salt in the food processor. Then add it to the mashed avocado along with lime juice, diced tomatoes, and more salt, as needed. Mix and serve!
- For a chunkier guacamole, mash half of the avocados to a smooth consistency and dice the remaining into small chunks. Add that along with the rest of the ingredients and mix.
Why does guacamole turn brown? And how to avoid it?
Avocados have a certain enzyme that is responsible for turning it brown when it is exposed to oxygen.
There are a couple of steps you can take to prolong the process, but it is still inevitable to prevent the browning completely.
- Squeeze some lime juice on top of the guac. Place a plastic wrap over the bowl and press it down gently all over the surface of the guacamole, removing as many air bubbles as possible. Cover the bowl and refrigerate.
- If you want to avoid plastic wrap or extra lime juice, try this hack, that I read here . Cover the surface of the guacamole with 1/2 inch of water, cover the bowl and refrigerate. When ready to eat, drain the water, give it a good mix and serve!
You can try either of these methods, the guac will stay well for at least 2-3 days.
However, you may still find brown spots, mostly in places where there was a little air gap. That does not mean the guac has gone bad, simply scoop it out or mix it in and serve!
Can guacamole be made ahead?
Like I mentioned above, prepare the guac and store it using either of the options for no longer than 2 to 3 days.
Can guacamole be frozen?
I do not recommend freezing guacamole as the texture of the onions and tomatoes would change on thawing.
However, you can prepare this partially by mashing the avocados with lime juice. Transfer the mashed avocados in required serving size portions in freezer-safe bags, flatten the bag, removing as much of the air out, and stack them flat.
When you are ready to make some guacamole, remove the frozen bag and place it in a bowl of water to thaw quickly. While that is thawing, prep the rest of your ingredients. Transfer the thawed, mashed avocado into a mixing bowl, add the rest of the ingredients, mix and serve!
If you plan ahead, you can also thaw it in the refrigerator for a few hours.
Is guacamole healthy?
Avocado is the main ingredient in guac and as we know, it is a superfood packed with vitamins, minerals, fiber, and antioxidants.
Even though they are high in fat, most of them is healthy fats that help lower bad cholesterol.
The other ingredients that go into guac have their own health benefits, so when everything is combined, you literally have a bowl of nutritious goodness, that also happens to be vegan and gluten-free.
Having said that, it does not mean that you have to overindulge in something just because it is deemed to be healthy. Moderation is the key, always!
You also need to be mindful of what you eat along with guac. If you pile up on fried chips, that pretty much nullifies the health benefits altogether.
Interesting facts about the origin of guacamole
Guacamole is believed to have been invented by the Aztecs.
When the Spaniards arrived in the New World, they discovered an Aztec sauce called ahuaca-molli ; molli was the Nahautl word for “something mashed or pureed,” while ahuactl referred to testicles or the stone fruit that reminded them of testicles. {Source- Mentalfloss.com , visit the site for more interesting facts}
You can also follow me on Facebook , Pinterest, Instagram & Twitter

How To Make Guacamole
Ingredients1x2x3x
- 3 ripe Hass avocados
- 1 Roma tomato seeded
- 1/4 cup finely chopped red onion
- 1 to 2 serrano chile pepper, seeded and membrane removed, as per desired heat
- 1/4 cup chopped cilantro
- 2 tablespoons lime juice, or to taste
- 1/2 to 3/4 teaspoon Kosher salt, or to taste
- 1/4 teaspoon ground cumin, optional
Instructions
- Cut 3 avocados lengthwise, around the pit. Remove the pit, and scoop the avocado into a mixing bowl.
- Mash with the back of a fork, until it is smooth or chunky, depending on the desired consistency.
- Add the rest of the ingredients. Mix it well. Taste-test and adjust with more salt, lime juice, or cilantro.
- Serve immediately or check FAQ’s listed in the post for storage suggestions. Guacamole is best served at room temperature!
Notes
- Add salt and lime juice, to taste. Start with half of the amount and increase gradually, tasting as you go! You may need more or less lime juice depending on the size of the avocados.
- You can chop the onion, cilantro, and garlic (if using) along with a pinch of salt in the food processor. Then add it to the mashed avocado along with lime juice, diced tomatoes, and more salt, as needed. Mix and serve!
- For a chunkier guacamole, mash half of the avocados to a smooth consistency and dice the remaining into small chunks. Add that along with the rest of the ingredients and mix.


How To Make Guacamole
Ingredients
- 3 ripe Hass avocados
- 1 Roma tomato seeded
- 1/4 cup finely chopped red onion
- 1 to 2 serrano chile pepper, seeded and membrane removed, as per desired heat
- 1/4 cup chopped cilantro
- 2 tablespoons lime juice, or to taste
- 1/2 to 3/4 teaspoon Kosher salt, or to taste
- 1/4 teaspoon ground cumin, optional
Instructions
- Cut 3 avocados lengthwise, around the pit. Remove the pit, and scoop the avocado into a mixing bowl.
- Mash with the back of a fork, until it is smooth or chunky, depending on the desired consistency.
- Add the rest of the ingredients. Mix it well. Taste-test and adjust with more salt, lime juice, or cilantro.
- Serve immediately or check FAQ’s listed in the post for storage suggestions. Guacamole is best served at room temperature!
Notes
- Add salt and lime juice, to taste. Start with half of the amount and increase gradually, tasting as you go! You may need more or less lime juice depending on the size of the avocados.
- You can chop the onion, cilantro, and garlic (if using) along with a pinch of salt in the food processor. Then add it to the mashed avocado along with lime juice, diced tomatoes, and more salt, as needed. Mix and serve!
- For a chunkier guacamole, mash half of the avocados to a smooth consistency and dice the remaining into small chunks. Add that along with the rest of the ingredients and mix.
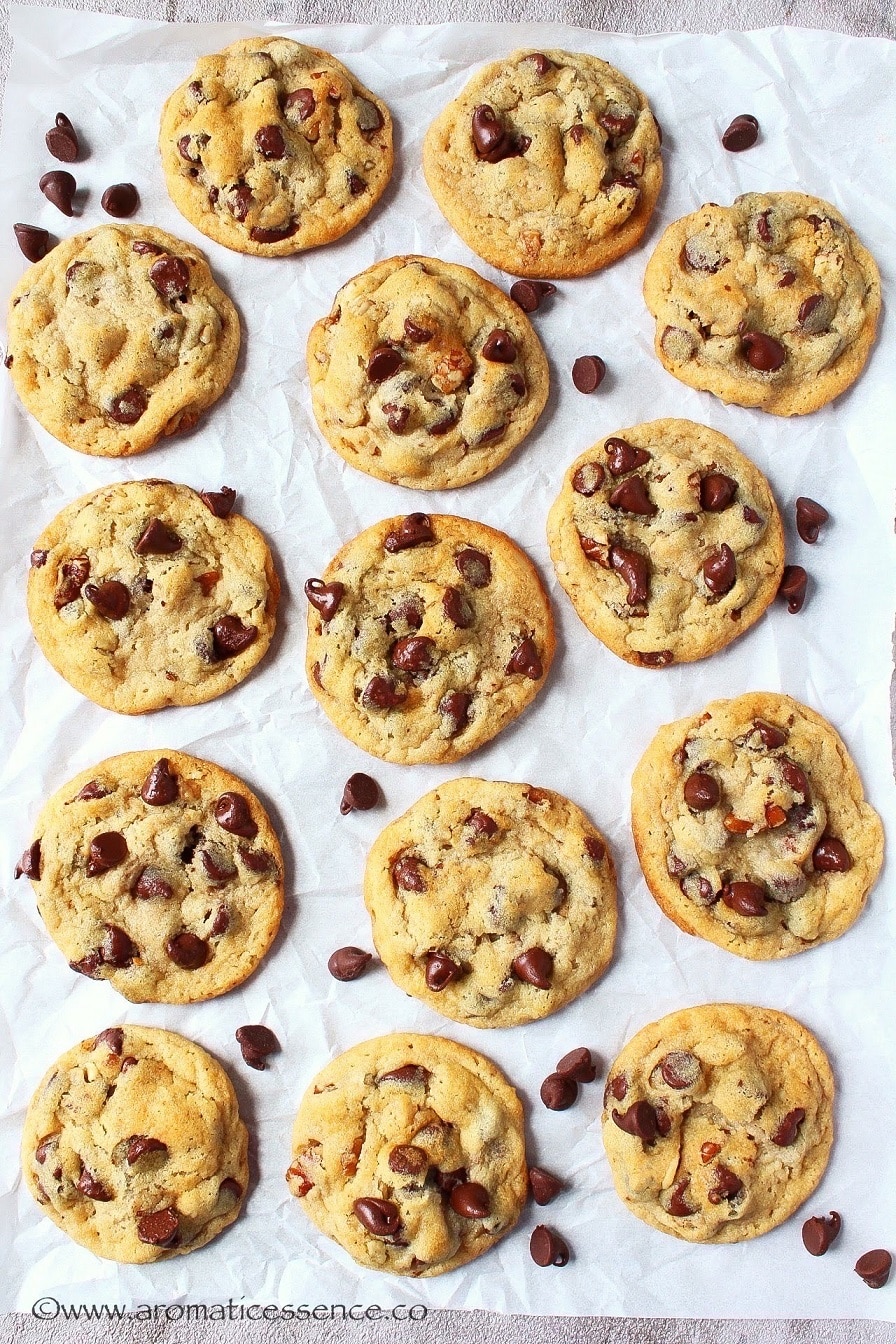
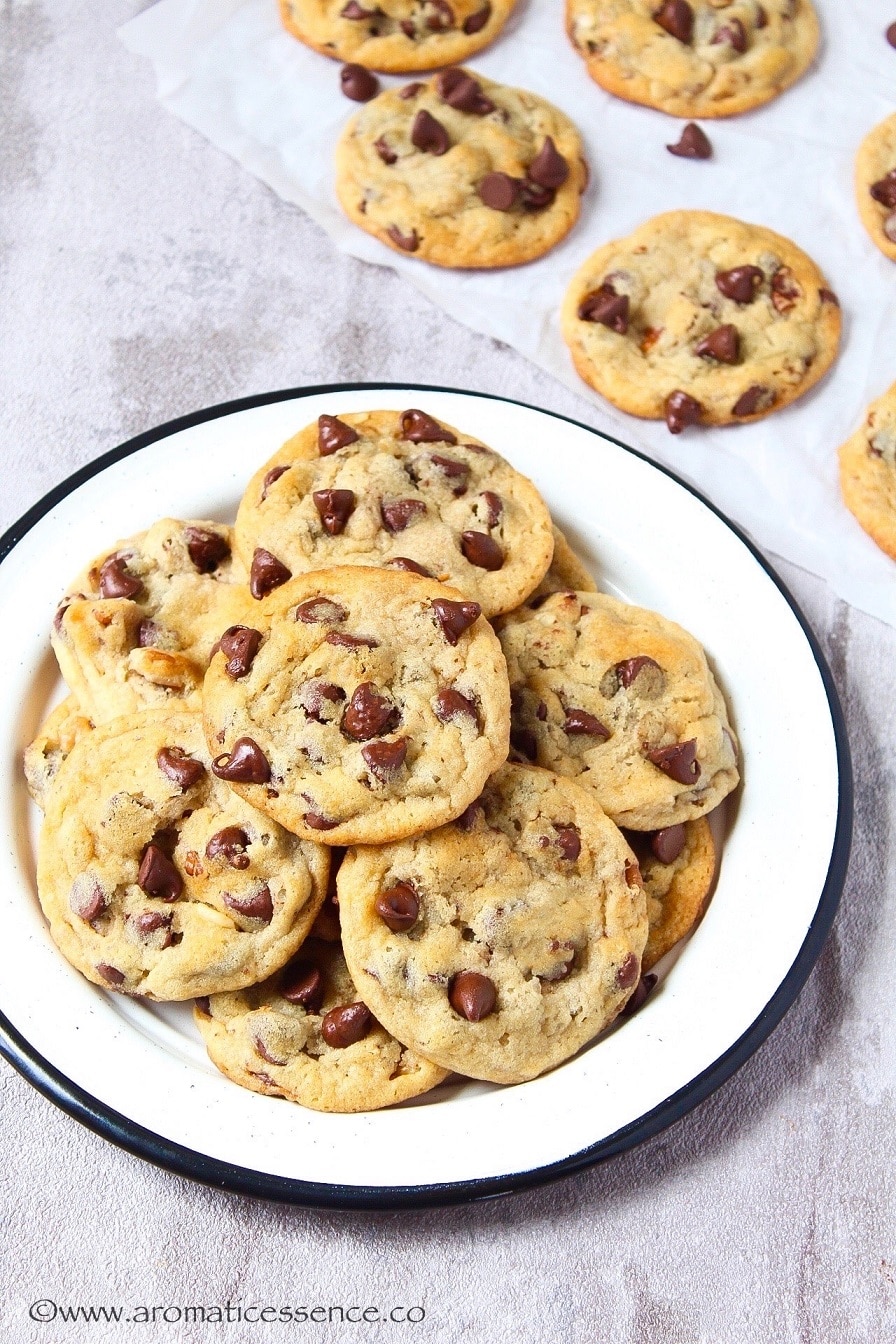
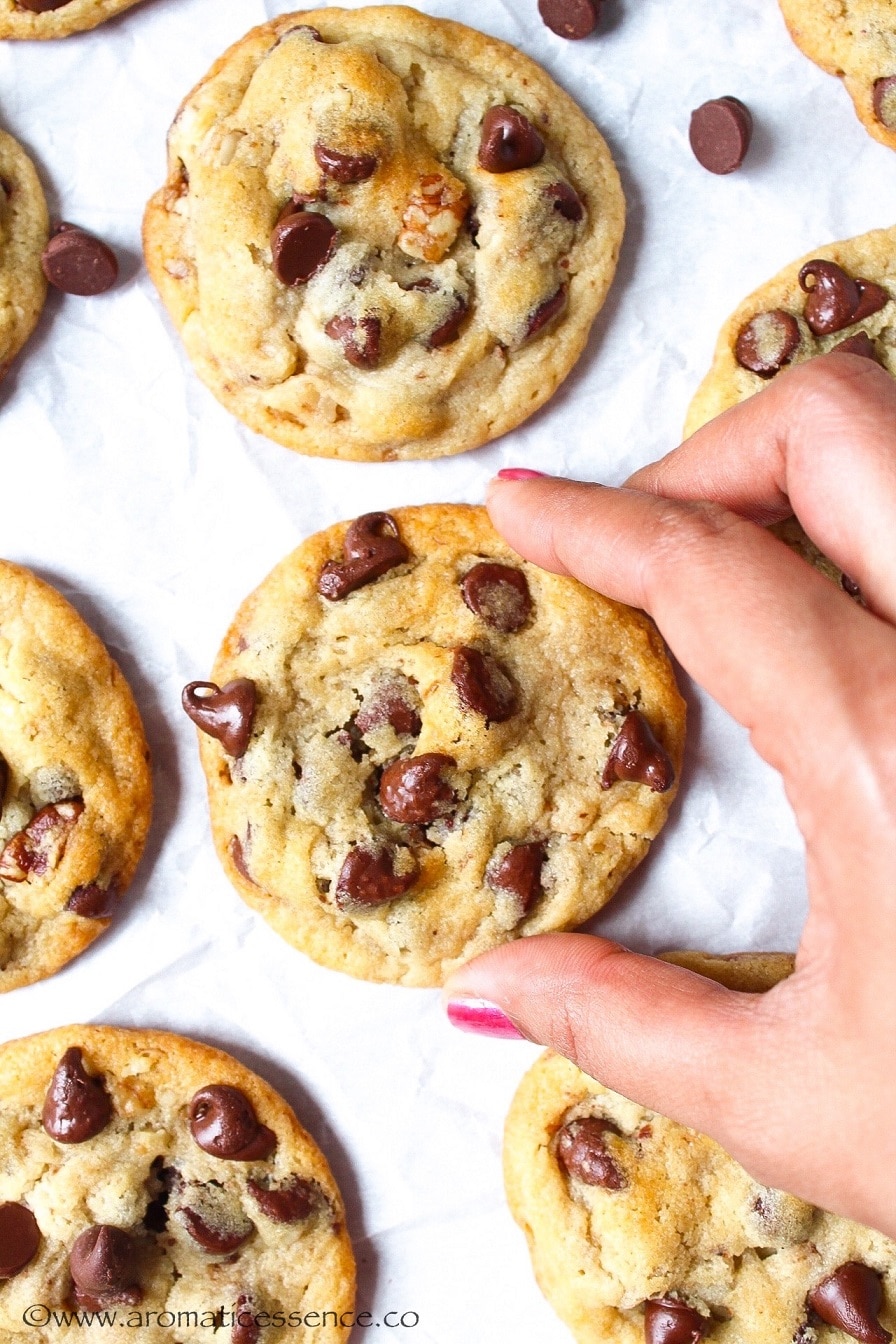
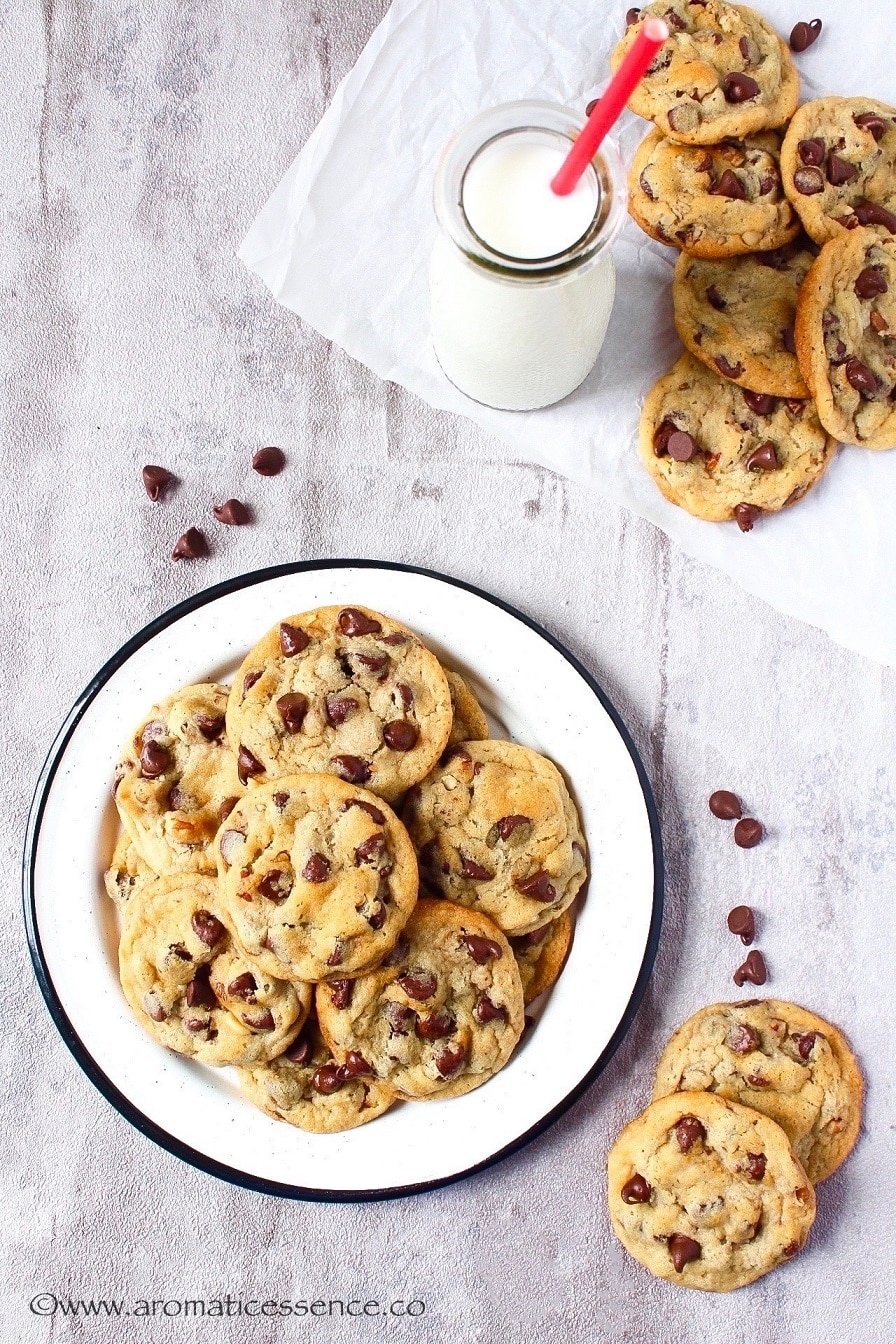
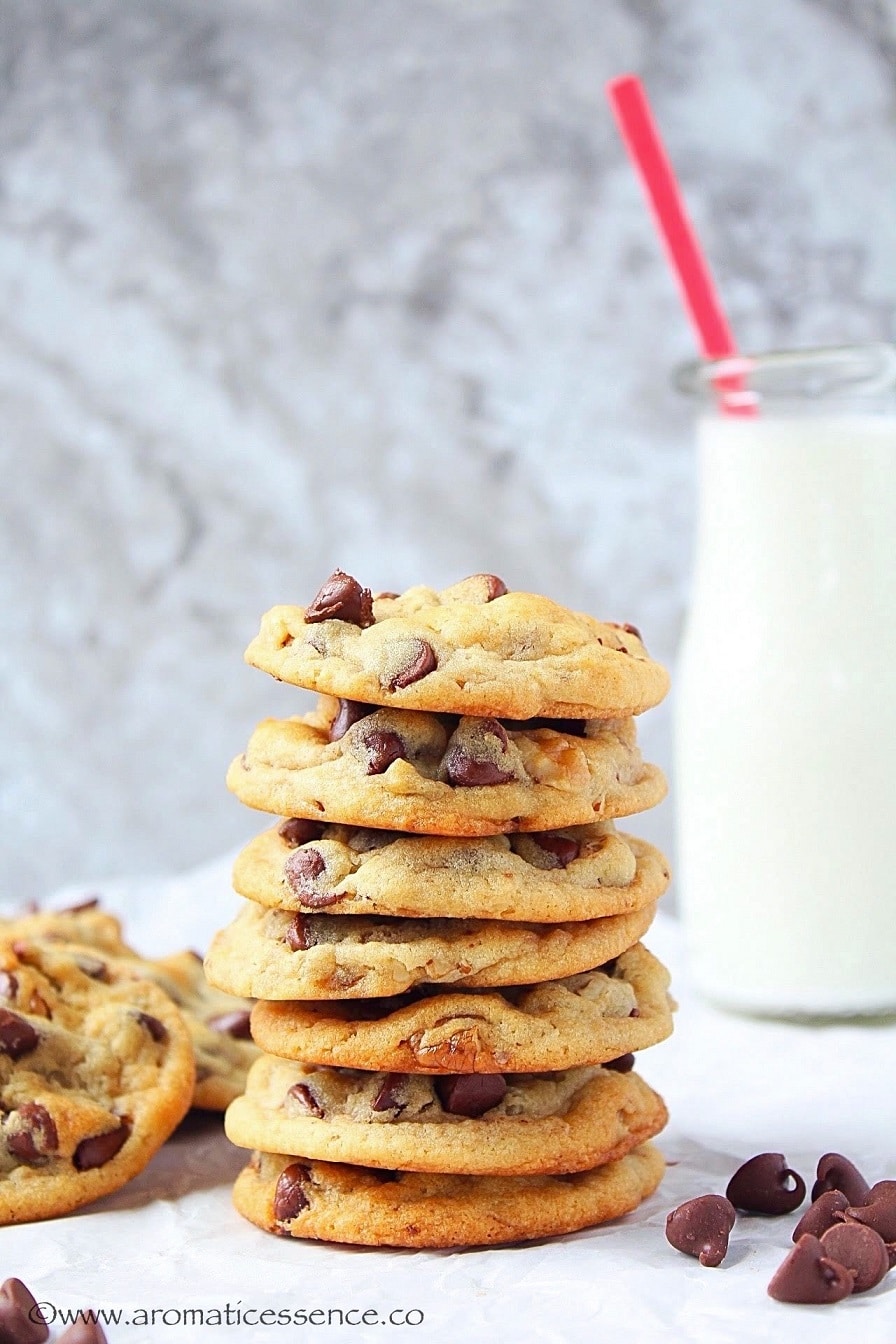
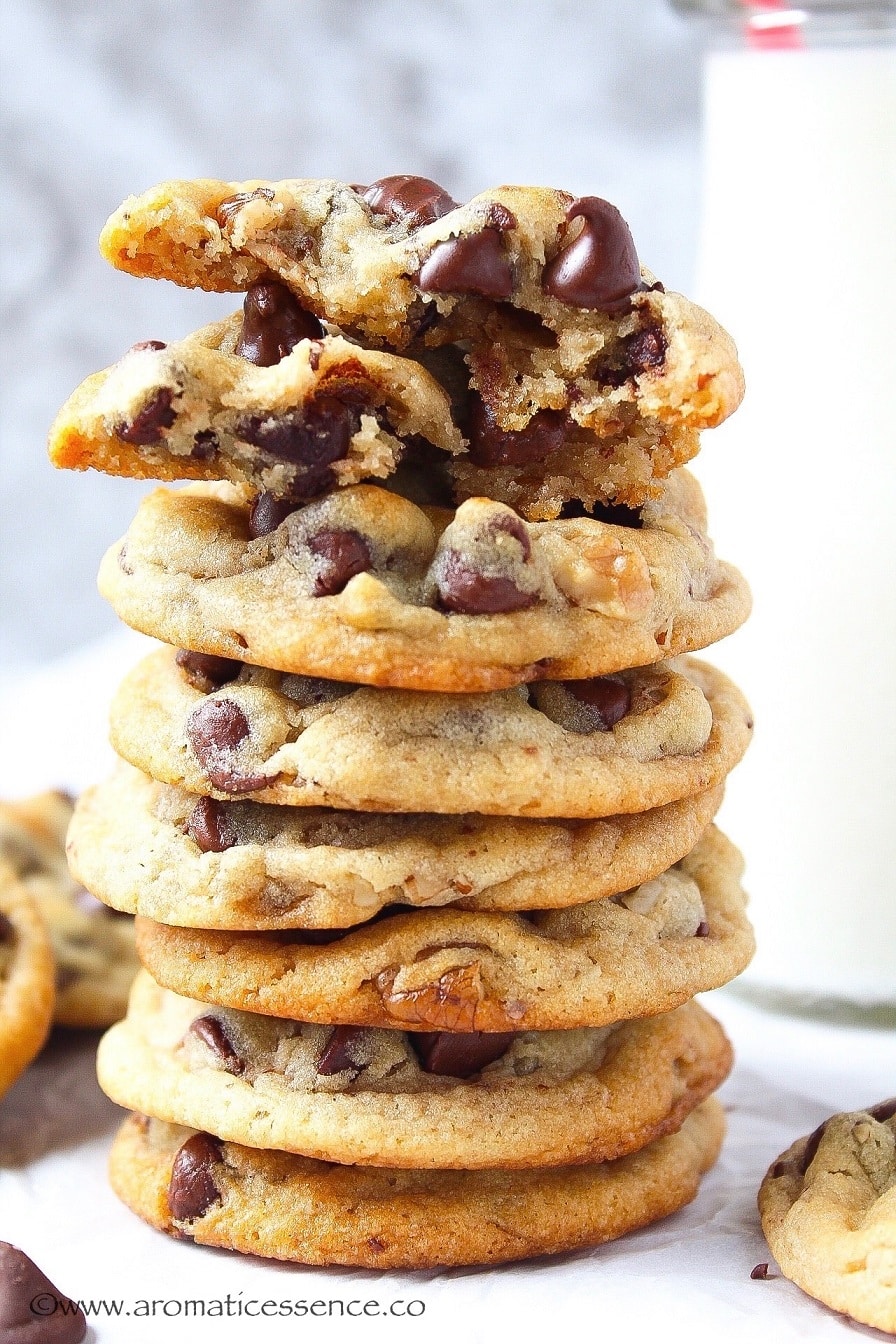
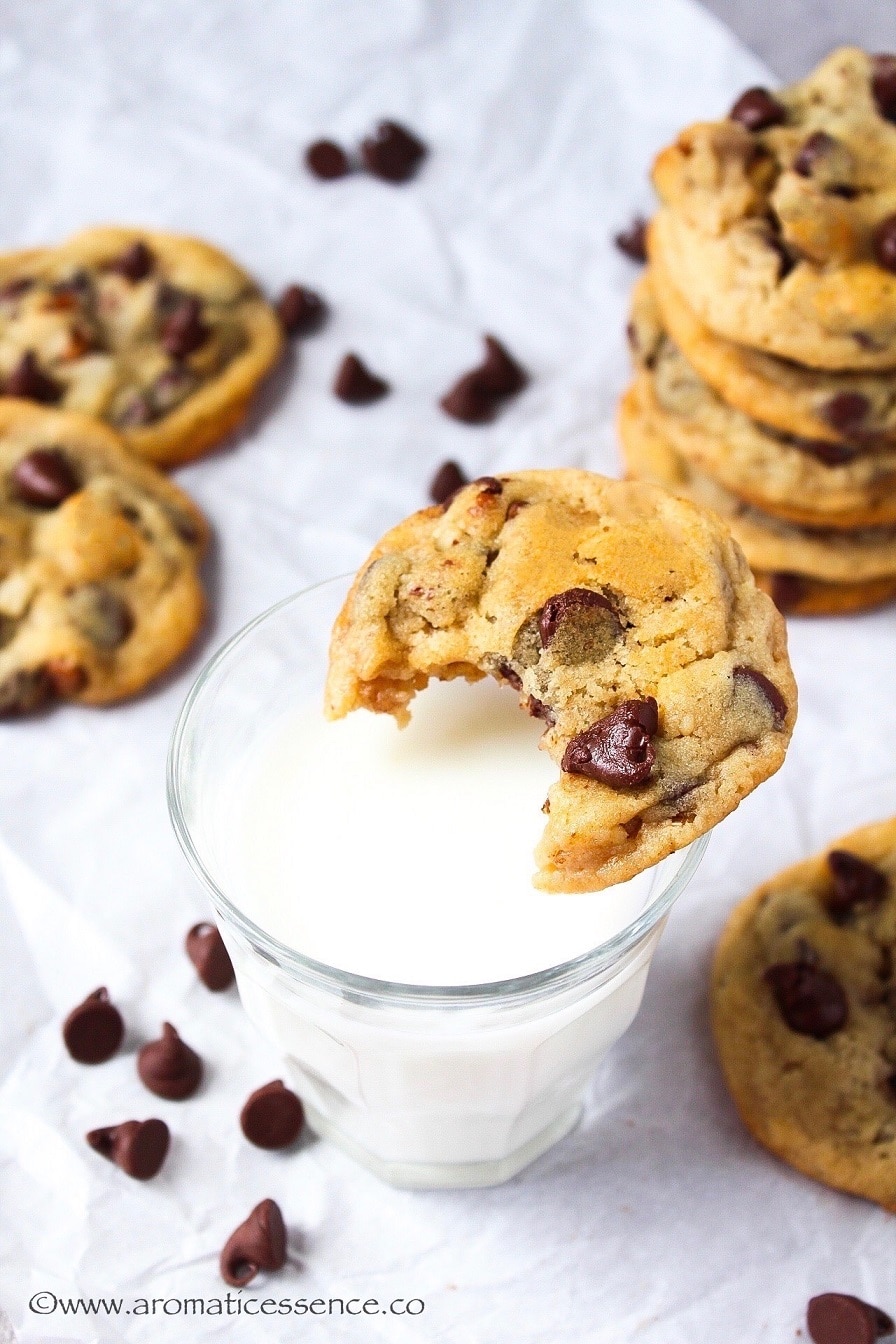
These eggless chocolate chip cookies are buttery, soft, and chewy with crispy edges. Learn how to make these scrumptious eggless choco chip cookies at home from scratch! You definitely won’t miss the eggs at all!
I remember trying a chocolate chip cookie for the first time when I moved to the US. It was so decadent and rich, that I was totally hooked on to it, well, thanks to my sweet tooth.
Until then, the cookies I’ve had in India were the crispy, crunchy, and crumbly kinds. Not that I have any complaints, I’d happily finish a pack of glucose biscuits or Bourbon biscuits with a cuppa chai.
The recipe for eggless chocolate chip cookies is adapted from Nestle’s Toll House chocolate chip cookies. I love that recipe because it is a pretty simple, no-fuss, classic chocolate chip cookie recipe that doesn’t call for any fancy ingredients.
I’ve modified it a bit by swapping the eggs and playing around with the sugar quantities because I wanted a chewier cookie. And, I also chilled the dough for a day, because that chilling time definitely gives the cookies an extra flavor boost, thanks to all the chemistry happening between the ingredients during the resting time.
These cookies are for you if
- You are allergic to eggs
- You ran out of eggs
- Are a vegetarian
- Or simply want to enjoy raw cookie dough without worrying about falling sick. (Although this is pretty much an edible chocolate chip cookie dough since it doesn’t have eggs, I still recommend toasting the flour at 350° F for 7 minutes to kill any bacteria).
I’ve made a lot of batches of chocolate chip cookies with eggs. And to think that this eggless version is just as good is really saying something. We do not miss the eggs in these cookies, just as we don’t miss them in this eggless banana bread or eggless French toast recipe .
Ingredients needed for this egg-free version
- Flour
- Unsalted batter
- Sugars (white and brown)
- Yogurt
- Vanilla extract
- Baking soda
- Salt
- And loads of chocolate chips or if you feeling fancy and gourmet-ish, use a good quality slab of chocolate and cut it into chunks
What have I substituted the eggs for in this cookie recipe?
I used yogurt instead of eggs in this recipe. I’ve been a fan of using yogurt in most of my eggless bakes, and it has never disappointed me .
And I take it from your feedback that you guys love the outcome of these eggless bakes made with yogurt too! So trust me when I say you will love these eggless chocolate chip cookies 🙂

These are the best eggless chocolate chip cookies I’ve ever made, and they never last past 2 days in my house. This is not a very big batch, but you could easily double it, bake half, and freeze the remaining cookie dough to satisfy those out-of-the-blue dessert cravings 😀
How to make chewy eggless chocolate chip cookies from scratch – Step-by-step instructions
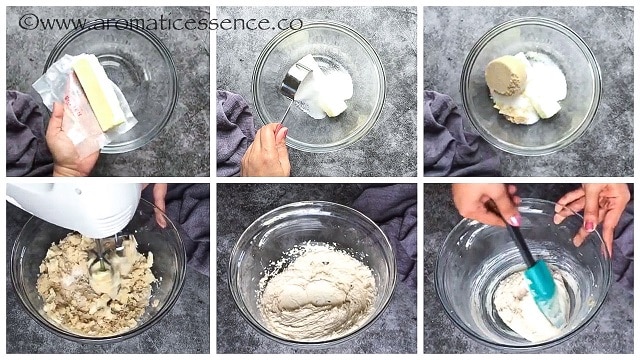
Step 1: Cream butter and sugars
In a large bowl, add 1/2 cup unsalted butter, 1/4 cup granulated sugar and 1/2 cup packed light or dark brown sugar. Beat on medium speed until light and fluffy, about 3-5 minutes, stopping to scrape down the sides of the bowl periodically.
Step 2: Add yogurt and vanilla extract
Add 1/4 cup yogurt and 1 teaspoon of pure vanilla extract, beat on medium speed until well combined.
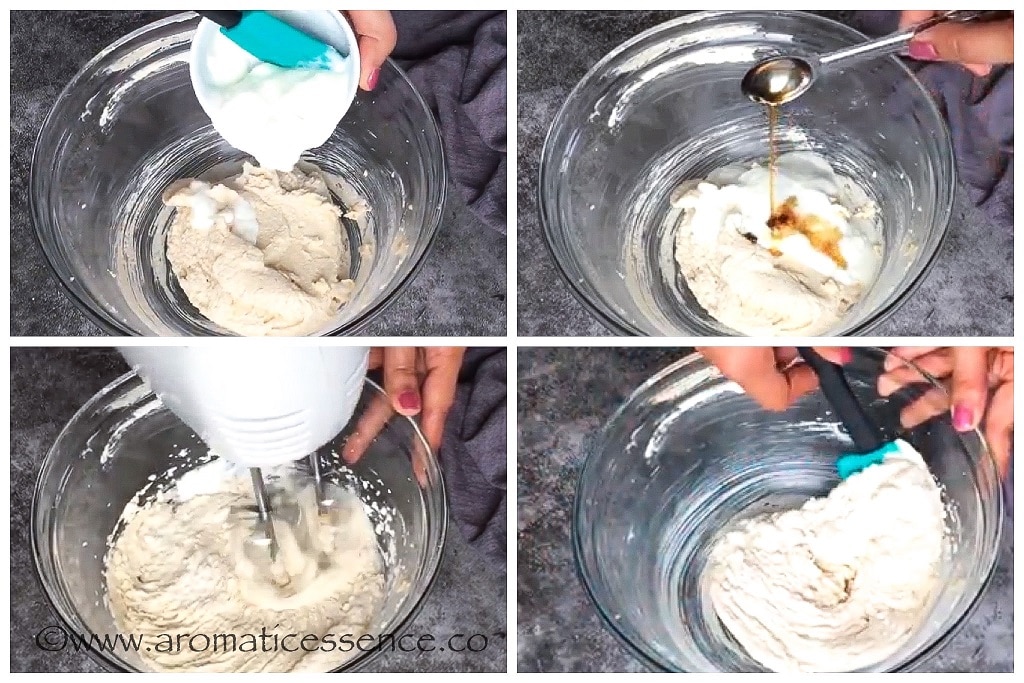
Step 3: Add dry ingredients
Using a sifter or fine-mesh sieve, sift 1 and 1/4 cup all-purpose flour along with 1/2 teaspoon of baking soda and 1/4 teaspoon of kosher salt. Mix on the lowest speed just until combined and no more flour pockets are visible. Avoid over-mixing.
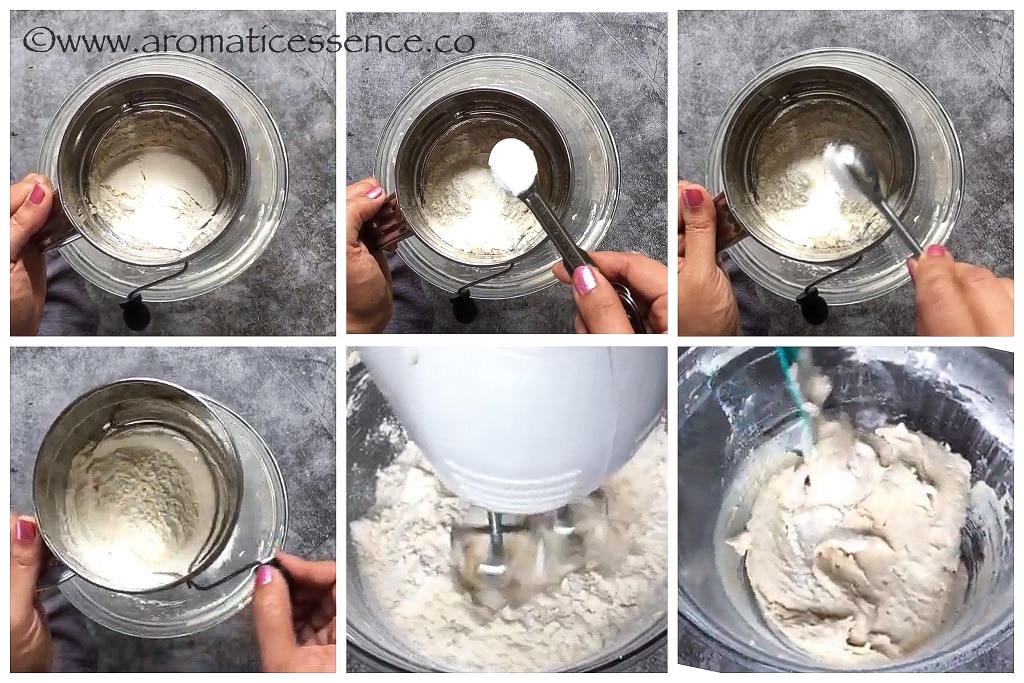
You can whisk the dry ingredients in a separate bowl and then add them to the mixture.
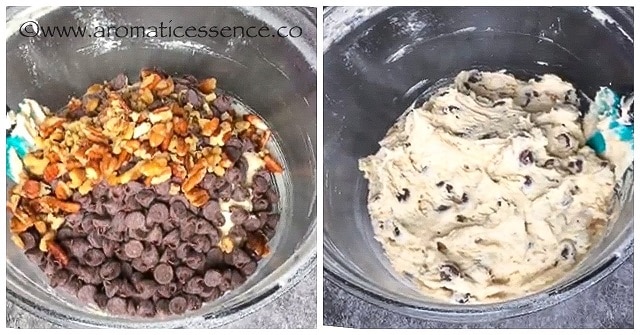
Step 4: Add chocolate chips and chopped nuts
Add 1 cup of chocolate chips or chunks and 1/2 cup of chopped pecans (optional) and fold in gently.
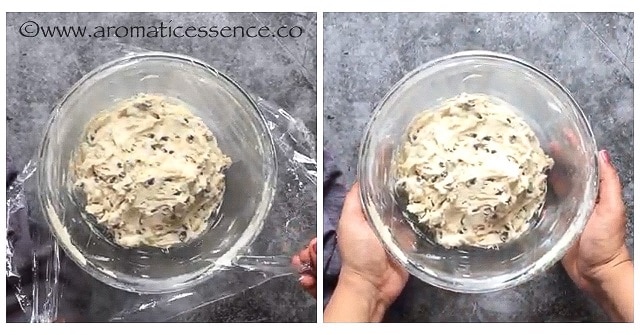
Step 5: Refrigerate the cookie dough
You can go about refrigerating the cookie dough in 2 ways;
- Cover the bowl: Cover the bowl with a cling wrap and refrigerate for a minimum of 2 hours to 24-48 hours for best results. You may refrigerate the dough for a maximum of 5 days.
- Scoop the dough balls and refrigerate: Using a cookie scoop, drop spoonfuls of cookie dough on a rimmed baking tray lined with parchment paper and refrigerate for 2 to 24-48 hours. Remember to cover the baking tray containing the cookie dough balls with plastic wrap to prevent the dough from drying out and absorbing odors.
Step 6: Bake
Preheat the oven at 375° F for 10 minutes.
If you chilled the dough in the bowl:
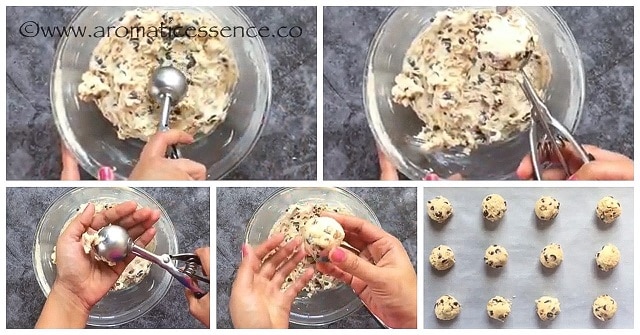
- Remove the bowl from the refrigerator and let it sit on the counter for 10-15 minutes, the dough will be hard but will soften a bit which will make it easy to scoop the dough.
- Scoop the cookie dough using a cookie scoop, and roll it between your palms to form a ball. The rolling is optional, if you want round cookies, or else simply scoop it straightway onto the parchment-lined baking tray or cookie sheet.
- Top each cookie dough with more chocolate chips and bake at 375° F on the middle rack for 9-11 minutes (or a few minutes longer depending upon the size of the dough ball) until the edges turn golden brown and the centers remain soft.
- While the first batch is baking, scoop up the rest of the dough, roll them into balls, and place them on another baking tray lined with parchment paper, cover with plastic wrap, and refrigerate while the first batch bakes.
- This will help firm up the dough balls which may soften during the scooping and shaping process.
- When the first batch is done baking and cooling, transfer the dough balls onto the baking tray (make sure it’s not hot) and bake.
- If you have more than one baking tray or sheet, you can prep the second batch about 2-3 minutes before the first batch is done.
If you chilled individual balls of cookie dough:
- When ready to bake, transfer the dough balls to a baking tray lined with parchment paper or silicon mat, leaving enough space between each ball of dough and bake.
- You can let it sit on the counter for 10 minutes to soften a bit or flatten them slightly so that they don’t stay dome-shaped.
- Follow the baking instructions as mentioned above.
- When the first batch is done, continue baking with the leftover batch of dough balls in the refrigerator.
Step 7: Cool
Leave the cookies on the baking tray for 2 minutes, then transfer to a wire rack and let them cool completely.


Storage instructions
Room temperature: Once the cookies have completely cooled down, transfer them to an airtight container in a single layer, and place parchment paper or wax paper between each layer of cookies to prevent them from sticking against each other. They will last for about 3 days. I do not recommend storing for more than 3 days as the cookies will go stale.
Freeze: You can freeze cookie dough for up to 3 months. If you are unsure of finishing off the batch of cookies, you can bake half of it and freeze the remaining half of the cookie dough following either of the methods;
- Freezing the whole chunk of dough:
Transfer the dough to an airtight container, label, and freeze.
Or transfer the cookie dough to a cling wrap, flatten it out and shape it into a square or circular disc. Cover it well ensuring there is no air gap. Place it in the freezer for up to 3 months.
Thaw in the refrigerator for a few hours, then scoop or slice pieces of dough and follow the baking steps under instructions.
- Shape the dough into a log and freeze:
Shape the cookie dough into a log as you would with slice-and-bake cookies. Wrap it tightly with cling wrap or parchment paper, place it in a freezer-safe bag, label, and freeze.
When you are ready to bake, defrost the log for 10-15 minutes on the counter or about 3-4 hours in the refrigerator. Then slice and bake!
- Freeze cookie dough balls:
You also have an option of freezing individual cookie dough balls. To do that you would follow the same instructions under point 2 of step 5, but you would freeze it for 1-2 hours until the dough is rock solid. Place all the frozen dough balls in a resealable freezer-safe bag or an airtight container.
This is a super handy option when you want to eat just one or two cookies, remove the required number of dough balls, pop them on a baking tray, and bake, adding an additional 1-2 minutes to the total baking time. There is no need to thaw the dough ball, but you could leave it on the counter for 10-15 minutes if you want to.
Recipe Tips to make the best egg-free chocolate chip cookies
Room temperature ingredients: You must have all the ingredients at room temperature before proceeding with the recipe.
Measure the flour correctly: If using a measuring cup to measure the flour, remember to fluff the flour in the container and then spoon it into your measuring cup till it overflows, then level it off the excess with the back of a butter knife. This way you avoid packing excess flour which could make your cookies dry and dense.
Softened butter: Recipes usually state to use softened butter for baking. So how do you know if your butter is at the right temperature? Test by pressing the butter with your finger, and applying a little pressure. If it leaves an indentation, it is perfect to be used in the recipe. If you finger sides through the butter with zero resistance, it is over-softened. It takes about 30-45 minutes for the butter to soften up.
Test the freshness of baking soda: You can test if your baking soda is fresh by placing about a teaspoon of baking soda in a bowl, add a splash of vinegar over it. If it fizzes, it is fresh and if there’s no activity, it has expired and will not work in the recipe.
Do not cream the butter and sugars too much: Avoid overbeating the butter and sugars. We do need those air pockets to leaven the cookies but we also don’t need an excess amount of air which will cause the cookies to rise quickly and collapse after baking. 3-5 minutes is more than enough for the entire creaming process.
Avoid over-mixing the dry ingredients with the creamed mixture: Once you add the dry ingredients to the creamed mixture, avoid over-mixing. Always mix until you see no more flour pockets. Over-mixing results in the formation of gluten strands in the dough which only gives rise to a batch of tough and dense cookies!
Refrigerate the cookie dough: Doing so enhances the flavor of the cookie. But most importantly, it helps prevent the cookies from spreading too much yielding a thicker and chewy cookie. When you chill the cookies, the fat i.e. butter solidifies and melts slowly as soon as the cookie dough hits the oven. If you don’t chill the dough the cookies will definitely spread and might be fragile enough to fall apart.
Leave enough space between each ball of cookie dough: Unlike slice-and-bake cookies, these chocolate chip cookies spread to an extent on baking. So, remember to keep enough distance between each scoop of cookie dough on the baking tray. If you are baking these eggless chocolate chip cookies for the first time and really have no clue about this part, test a trial batch placing one ball of cookie dough and check how much it spreads on baking. You can then adjust accordingly.
Avoid overbaking: Keep an eye on the cookies while they are baking. Pull them out of the oven when the edges begin to turn golden brown, the centers will look under-baked and that is what you want. The cookies will continue to bake as they cool. For that soft, chewy, and gooey center, avoid overbaking!
Why did my cookies turn flat?
There could be a couple of reasons why cookies spread a little too much and turn flat;
- You used less flour
- You added more butter
- The dough was warm
- You over beat the butter and sugar mixture
- You used a hot baking tray
Why are my cookies dome-shaped?
This could happen due to either or a combination of reasons;
- The dough is too cold
- You used more flour
- You used baking powder instead of baking soda
Troubleshoot: Let the dough sit at room temperature for 10-15 minutes before baking. If you already put cold dough in the oven, flatten the cookies with a fork halfway through baking.
Can I use salted butter instead of unsalted?
I prefer to use unsalted butter because that way you can control the amount of salt in the dough. The salt content varies from brand to brand. If it really doesn’t bother you as much, you may use salted butter, and skip the salt called for in the recipe.
Can I use dark or light brown sugar?
You can use either depending on what you have in your pantry. Dark brown sugar has a higher content of molasses than light brown sugar. So, cookies made with dark brown sugar will have that rich, deep, caramelized, and complex, toffee flavor, whereas the ones made with light brown sugar will have a milder flavor.
Can I substitute the brown sugar with white sugar?
You can swap the brown sugar with the same amount of white sugar in this recipe. But keep in mind that the texture of the cookies will change drastically. Cookies made with some amount of brown sugar tend to be chewier and moister. The cookies will be crispier instead if you only use white sugar. The other ingredients will also need to be altered for the thin and crispy cookies. So use this substitution as a last resort.
Can I use baking powder instead of baking soda in this recipe?
You can, but again, that would change the chemistry of the ingredients resulting in cakey cookies instead of soft and chewy cookies. Not bad if you love the cakey texture of these cookies. You can use 1/2 teaspoon of baking powder instead of baking soda. Please stick to baking soda if you prefer the dense, soft, and chewy cc cookies.
Can I make these vegan?
Yes, you definitely can. Use non-dairy yogurt, vegan butter, and chocolate chips.
If you want to skip using yogurt, you can add a flax egg. To make a flax egg, add 3 tablespoons of warm water to 1 tablespoon of ground flaxseed meal in a bowl and leave it aside for 15 minutes. It will turn gelatinous and can be used instead of the yogurt in this recipe.
You can even swap the yogurt with 3 tablespoons of applesauce instead.
You may also enjoy these eggless cookie recipes
- Thumbprint cookies
- Linzer cookies
- Shortbread cookies
- Bourbon biscuits
- Coconut cookies
- Digestive biscuits
- Slice-and-bake chocolate cookies
- Nankhatai (Indian shortbread cookies)

Eggless Chocolate Chip Cookies
Ingredients1x2x3x
- 1 & 1/4 cup all-purpose flour 175 grams
- 1/2 teaspoon baking soda
- 1/4 teaspoon kosher salt
- 1/2 cup unsalted butter 113 grams
- 1/4 cup granulated sugar or caster sugar 53 grams
- 1/2 cup packed light or dark brown sugar 112 grams
- 1/4 cup full-fat yogurt 58 grams
- 1 teaspoon pure vanilla extract
- 1 cup semi-sweet or bitter-sweet chocolate chips
- 1/2 cup chopped pecans or other nuts of choice
Instructions
- In a large bowl, add unsalted butter, granulated sugar, and brown sugar. Beat on medium speed until light and fluffy, about 3-5 minutes, stopping to scrape down the sides of the bowl periodically.
- Add yogurt and pure vanilla extract, beat on medium speed until well combined.
- Using a sifter or fine-mesh sieve, sift all-purpose flour along with baking soda and kosher salt. Mix on the lowest speed just until combined and no more flour pockets are visible. Avoid over mixing.
- You can whisk the dry ingredients in a separate bowl and then add it to the mixture.
- Add chocolate chips or chunks and chopped pecans (optional) and fold in gently.
- Refrigerate the cookie dough, either by covering the bowl with cling wrap or drop spoonfuls of cookie dough on a rimmed baking tray lined with parchment paper and refrigerate for 2 to 24-48 hours. Cover the baking tray with plastic wrap to prevent the dough from drying out and absorbing odors.
- Preheat the oven at 375° F for 10 minutes.
- Remove the bowl from the refrigerator and let it sit on the counter for 10-15 minutes.
- Scoop the cookie dough using a cookie scoop, roll between your palms to form a ball.
- Top each cookie dough with more chocolate chips and bake at 375° F on the middle rack for 9-11 minutes (or a few minutes longer depending upon the size of the dough ball) until the edges turn golden brown and the centers remain soft.
- If you chilled individual balls of cookie dough, transfer the dough balls to a baking sheet lined with parchment paper or silicon mat, leaving enough space between each ball of dough and bake. You can let it sit on the counter for 10 minutes to soften a bit or flatten them slightly so that they don’t stay dome-shaped. Follow baking instructions as mentioned above.
- When the first batch is done, continue baking with the leftover batch of dough balls in the refrigerator. Make sure the baking tray has cooled down completely before placing the second batch.
- Leave the cookies on the baking tray for 2 minutes, then transfer to a wire rack and let them cool completely.
Video
Notes
- Bake a couple of minutes more for crispy cookies, about 12-15 minutes.
- I do not recommend skipping the chilling part. If you are in a hurry to bake the cookies, chill the dough for at least 30 minutes to prevent it from spreading too much.
- I prefer to bake one batch of cookies at a time for uniform baking. Some ovens have hotspots, and that could affect the outcome of the cookies if you bake multiple batches at a time. You can bake two trays of cookies in a go, but remember to rotate them front to back and switch racks, halfway through baking.
- For my Indian readers, I’d like to mention that the brown sugar available in India is quite different than the ones I’ve used in the US and it is really not great for baking. I recommend using this product (not sponsored nor an affiliate link), easily available on Amazon for that perfectly soft and chewy texture in these cookies.
- Nutrition Disclaimer: Nutrition info listed are approximate values that are calculated using an online nutrition calculator. If you rely on them for your diet, please use your preferred nutrition calculator.
- Measuring cup used, 1 cup = 250 ml, 1 teaspoon = 5 ml
Nutrition

