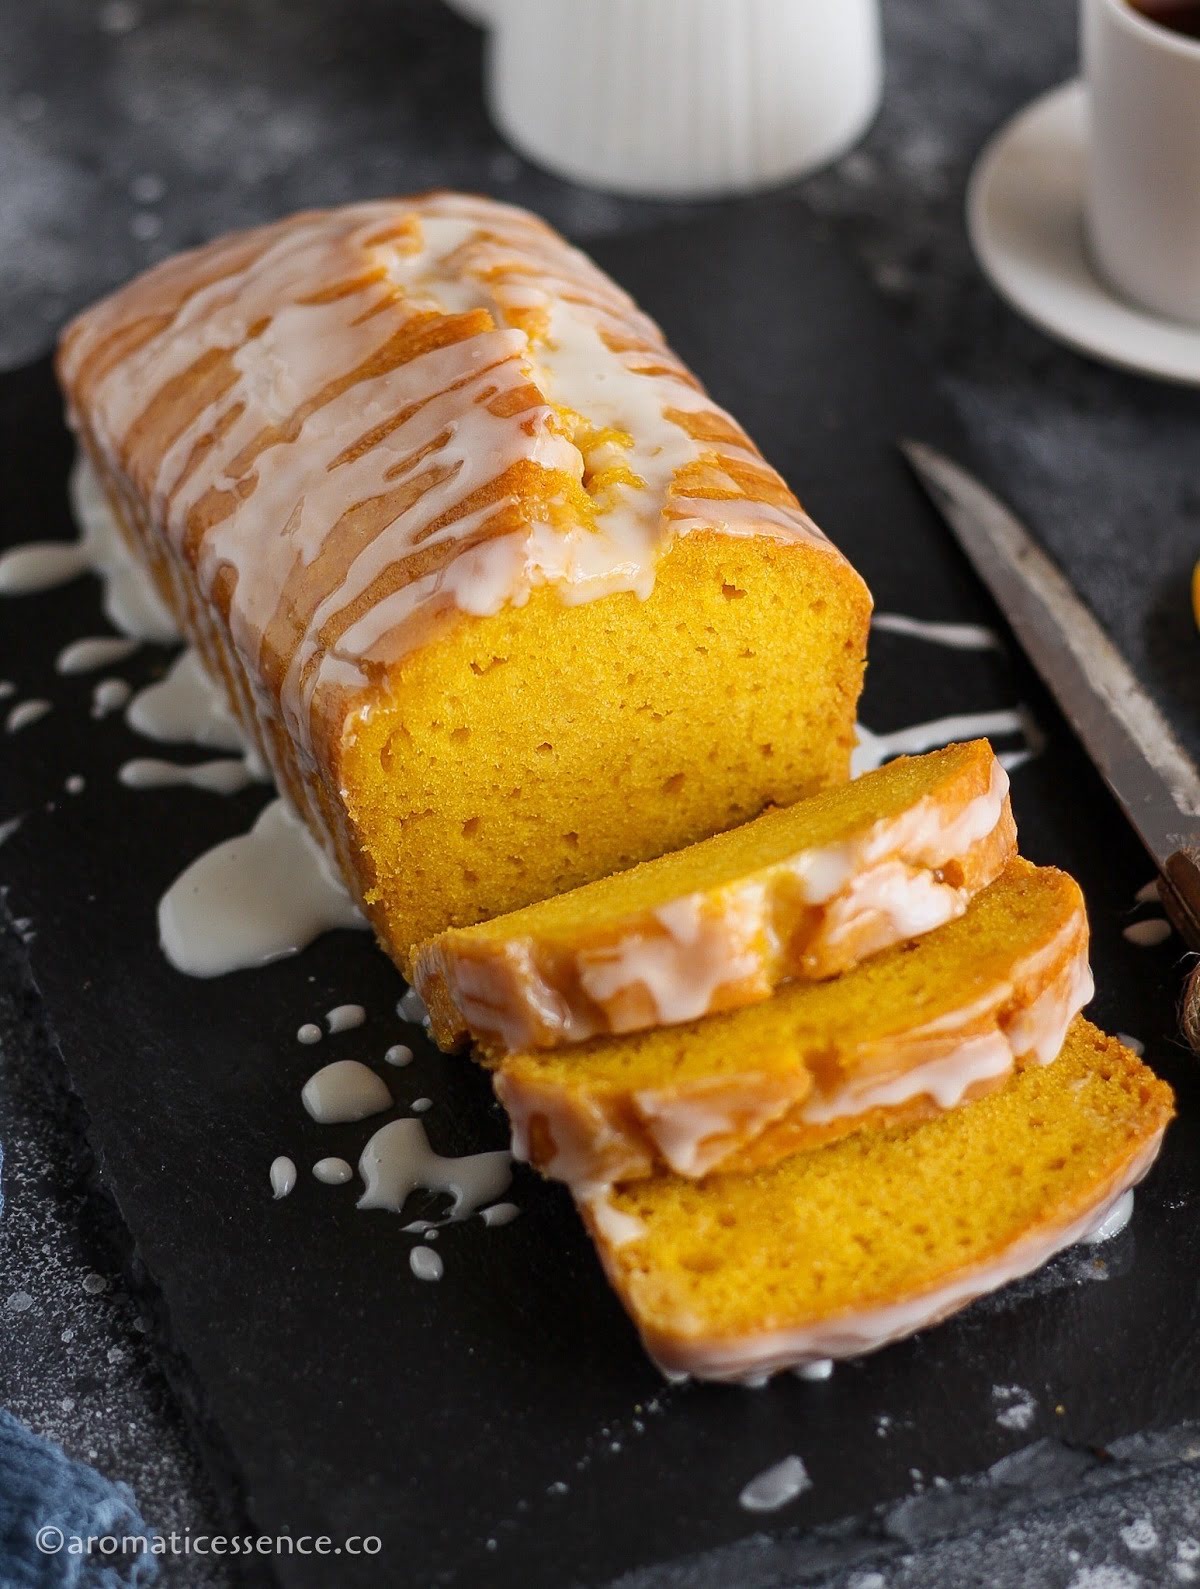
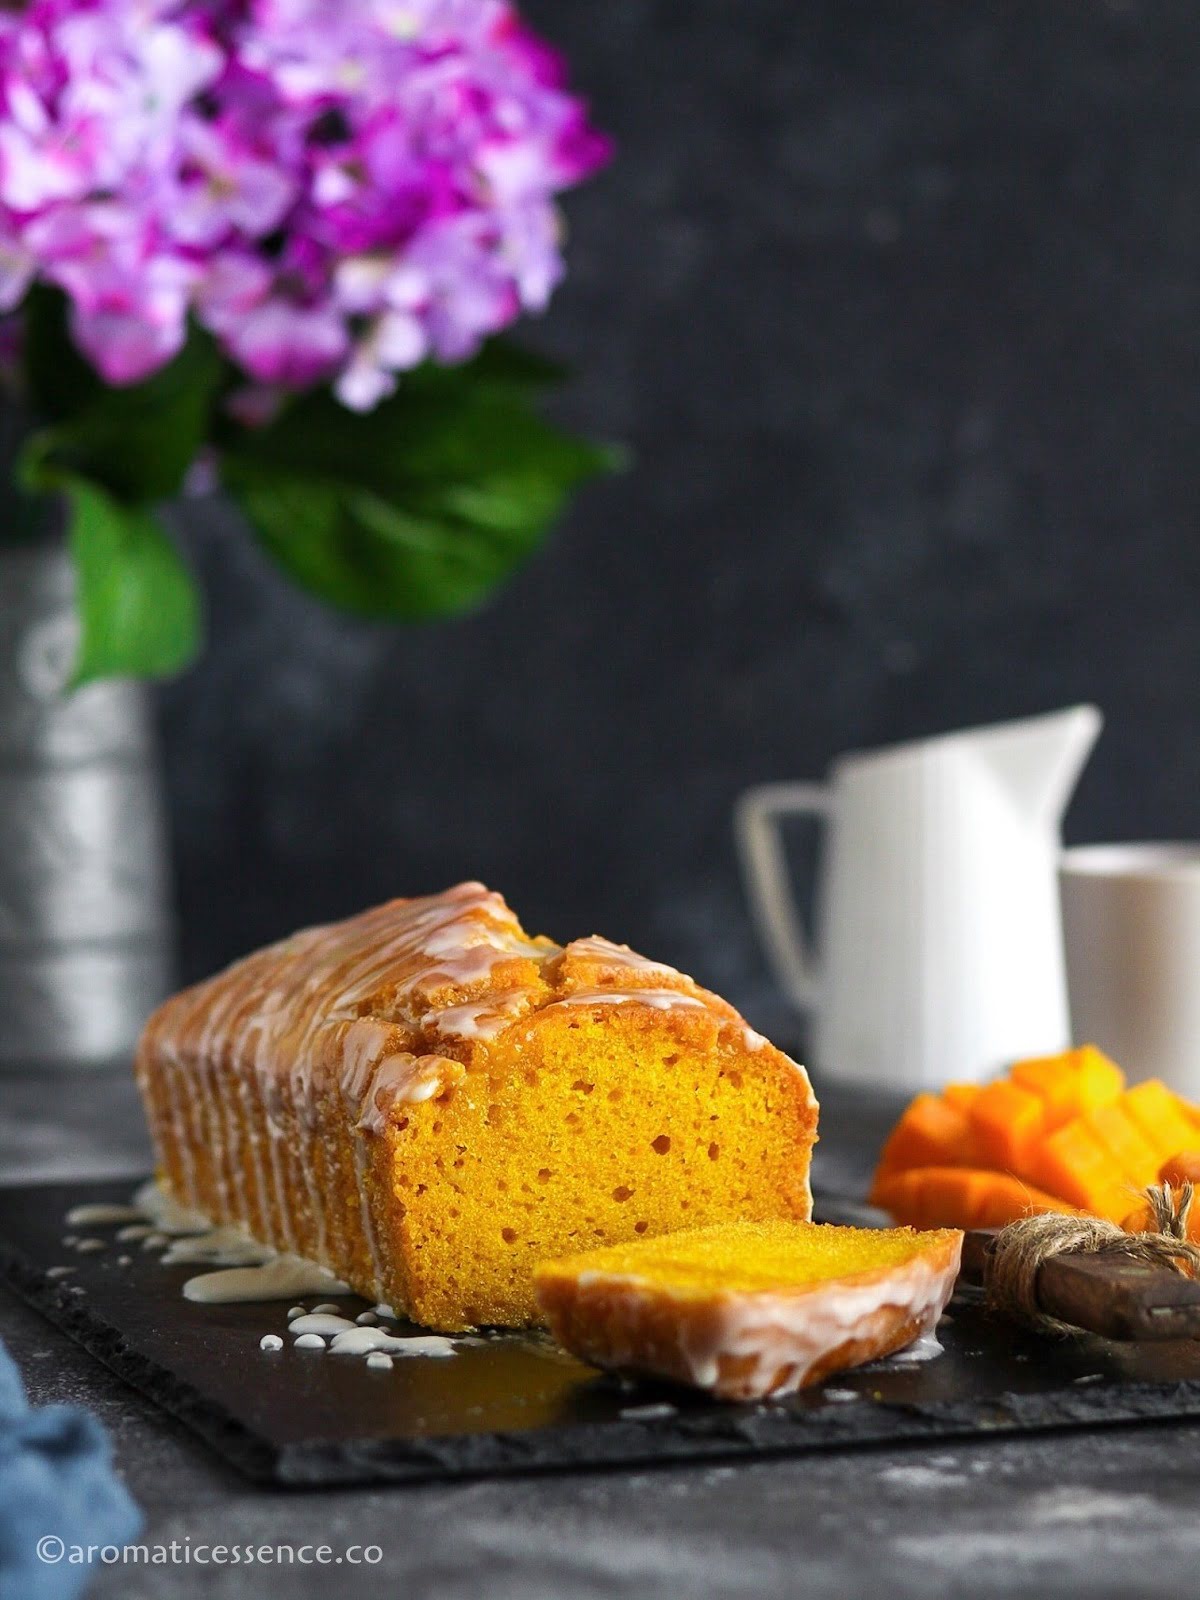
This eggless mango cake with lime glaze is light, moist, and delicious! You will love this easy tropical cake recipe that is made without butter, eggs, or condensed milk!

It’s no secret here that I absolutely love mangoes. Pulpy, juicy, fragrant mangoes, who can resist them? Not this girl!! I can devour them in all forms from savory recipes like mango curry , mango salsa to dessert recipes like this yummy no-bake mango cheesecake .
But if you ask me, honestly my favorite way of enjoying mangoes is eating them as such. The simple things in life 🙂
My love for mangoes cascades into all foods and recipes that are mango-flavored or incorporate it in some manner, which brings us to today’s post!
This mango sponge cake has a nice crumb with a gorgeous yellow hue! So, if you got some fresh mangoes or mango pulp sitting in your pantry, then give this tropical mango cake recipe a go!
Even if you don’t end up making it during the mango season, you can make this cake later with canned mango pulp, it is amazingly delicious as well.
- Why you will love this recipe?
- Ingredients needed
- How to make moist eggless mango cake – Step-by-step instructions
- Serving suggestions
- Storage suggestions
- Recipe tips
- Variations
- Frequently asked questions (FAQs)
- Recipe modifications
- You may also enjoy these eggless cake recipes
- Eggless Mango Cake Recipe
Why you will love this recipe?
This eggless mango cake recipe ;
☑ Does not use any eggs, butter, or condensed milk
☑ Is a simple recipe that calls for basic pantry staples
☑ Does not need any special equipment such as a handheld mixer
☑ Is bursting with mango flavor
☑ Has a lovely crumb texture despite being eggless
☑ Can be made all year round using canned mango pulp
☑ Can be made vegan by swapping the milk with any plant-based milk
Ingredients needed
To make this egg-free mango loaf cake you will need;
Sugar: I’ve used castor sugar since it dissolves quickly. Domino’s cane sugar available in the US is just as good. If using big sugar crystals, please measure or weigh out the specified quantity, powder it and then use it in the recipe.
Leavening agents: Baking powder and baking soda.
Salt: A small pinch of salt enhances the flavor of the cake.
Homemade buttermilk: Adds moisture to the cake and tenderizes the cake crumb. Homemade buttermilk is simply made by mixing vinegar with whole milk. More info on this can be found in the detailed step-by-step process below.
Neutral flavored oil: I’ve used sunflower oil here. Oil helps to keep the cake moist. Avoid oils that have a strong flavor, for instance, olive oil as it will mar the taste of the mangoes.
Ground cardamom: I’ve flavored this mango cake with ground cardamom. It gives the cake an Indian touch. You may skip it if you like. I’ve listed some alternatives in the Variations section of this post.
For the lime glaze: You will need Confectioner’s sugar or icing sugar and some lime juice for the glaze.

How to make moist eggless mango cake – Step-by-step instructions
Step 1: Preheat the oven and prepare the loaf pan
Preheat the oven to 350° F / 180° C, and position a rack in the middle of the oven. Grease a loaf pan with little oil and line with parchment paper. (My loaf pan dimensions- 9 x 5 x 2inches). ( Photos 1 and 2 )

Step 2: Preparation of buttermilk and the dry ingredients
Measure ½ cup of whole milk, and add ½ tablespoon vinegar. Mix well and set aside for 5 to 10 minutes. In the meanwhile, prep your dry ingredients. ( Photos 3 and 4 )

In a mixing bowl, sift 1½ cups of cake flour (refer to notes to make your own), 1½ teaspoon baking powder, ½ teaspoon baking soda, ¼ teaspoon table salt, and ½ teaspoon ground cardamom from a height. Whisk well and set aside. ( Photos 5 to 12 )


Step 3: Combine wet ingredients
After 15 to 10 minutes, the buttermilk will curdle. It is ready to be used in the recipe.
In another mixing bowl, add ¾ cup of mango pulp, ⅓ cup oil, ¾ cup castor sugar, and prepared buttermilk. ( Photos 13 to 17 )
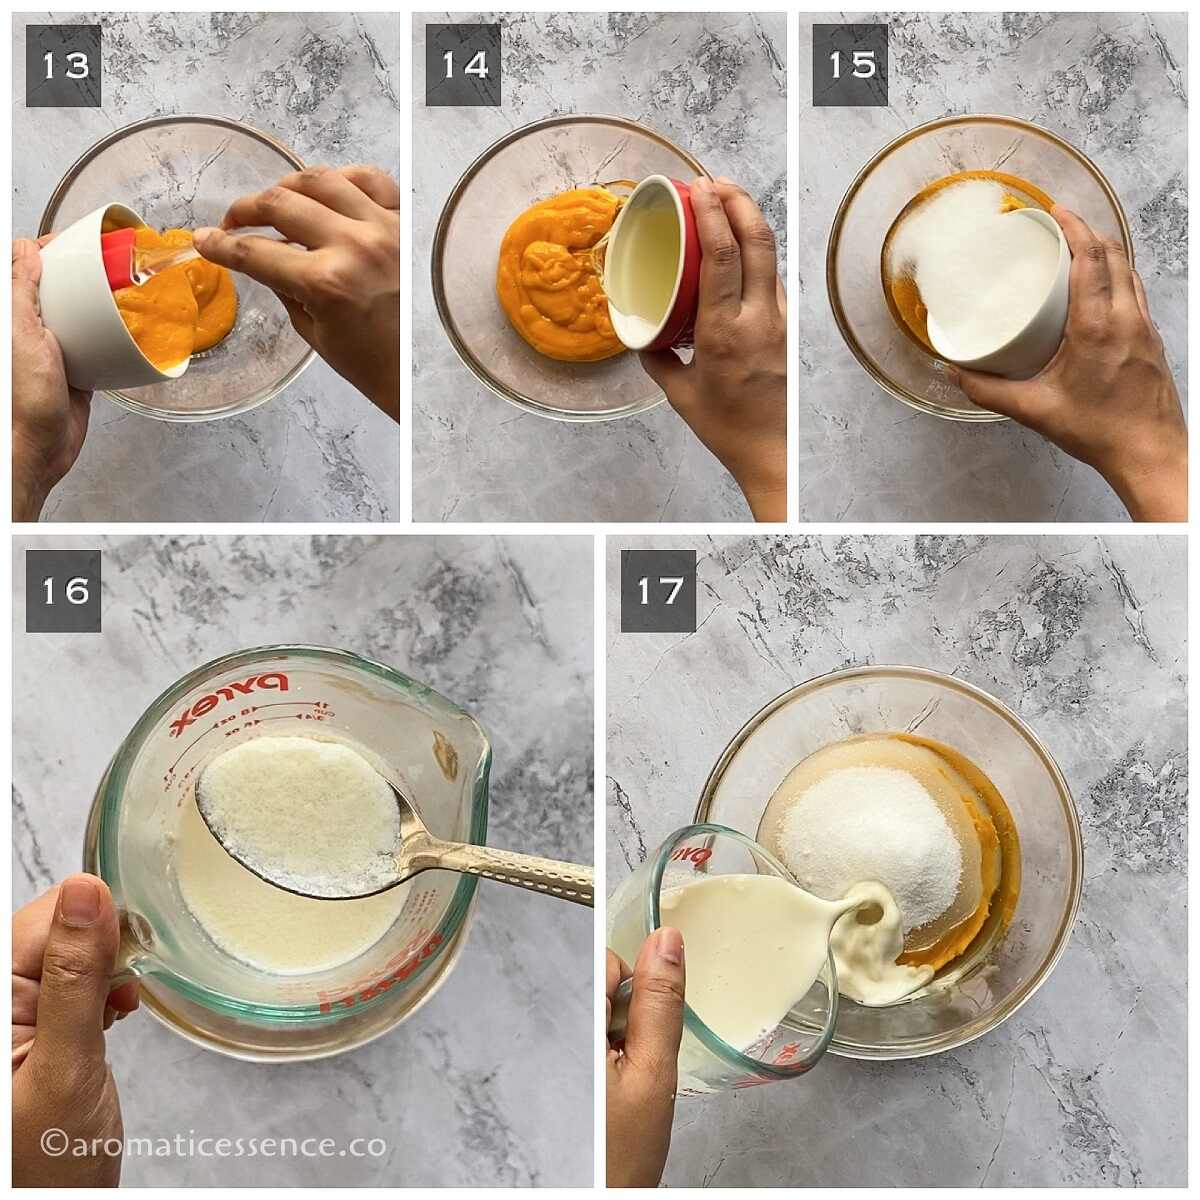
Whisk well until everything is well combined and you have a homogeneous mixture. ( Photos 18 and 19 )

Step 4: Combine wet and dry ingredients
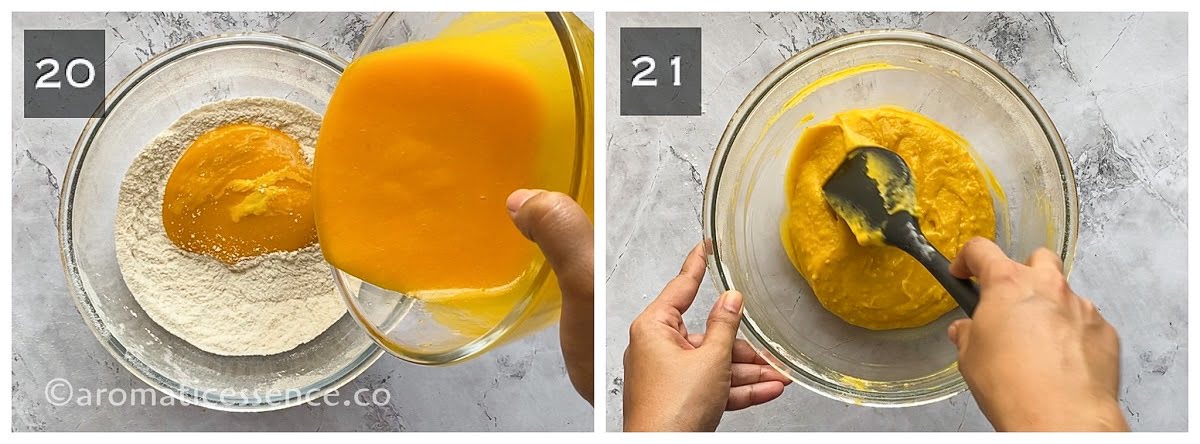
Pour the wet ingredients over the dry ingredients. Mix just until combined and no more flour pockets are visible. Do not over-mix, or you will end up with a pretty flat cake. A few lumps are okay in the batter. ( Photos 20 and 21 )
Step 5: Bake
Transfer the batter to the prepared loaf pan, and smooth the surface with a spatula. Tap the pan against the countertop to remove any air bubbles. ( Photos 22 to 24 )
Bake at 350° F/180° C for about 50-55 minutes or until a toothpick inserted comes out clean. ( Photo 25 )

Transfer the cake to a cooling rack. Let it cool down in the pan for 10 minutes, then remove it from the pan and cool on the rack completely. ( Photos 26 and 27 )

Step 6: Lime glaze
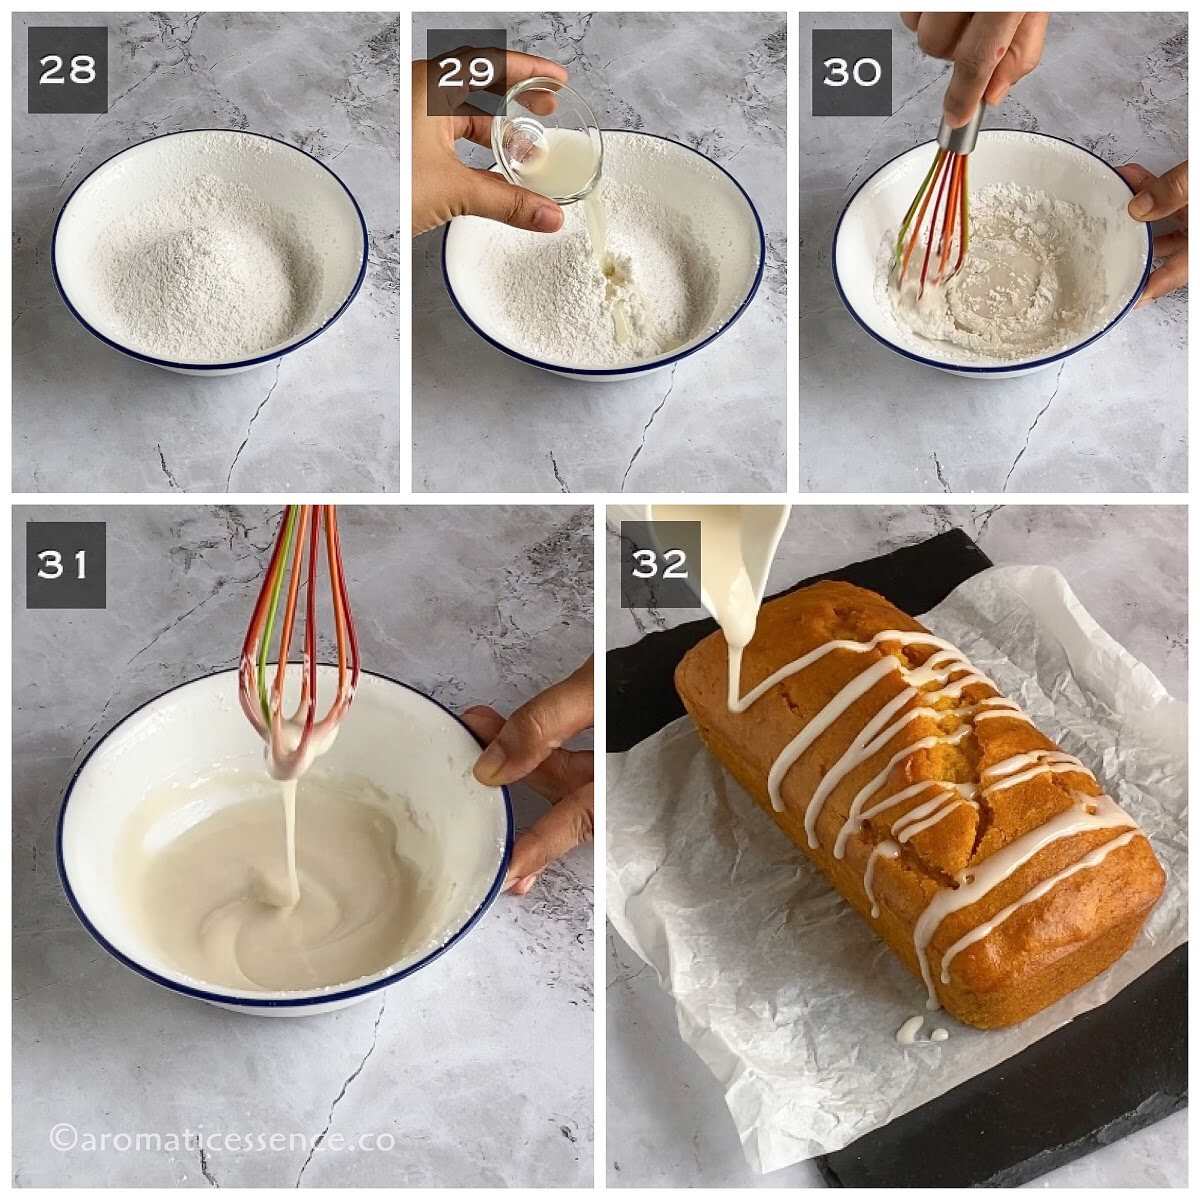
In a mixing bowl, add ½ cup sifted icing sugar and 1 to 1½ tablespoons lime juice. Whisk well until you have a smooth and pourable consistency. ( Photos 28 to 31 )
If it is too runny, add more icing sugar. If it is too thick, thin it out with a few teaspoons of lime juice. You can also some lime zest if you like.
Once the cake has cooled down completely, drizzle the glaze over the loaf. ( Photo 32 )
Slice and enjoy!
Serving suggestions
Serve a slice or two of this yummy mango loaf cake with a cup of tea or coffee.
You can also serve it with a dollop of whipped cream and a drizzle of fresh mango pulp or aamras.
It also pairs well with a scoop of vanilla or mango ice cream!
Storage suggestions
This eggless mango cake will last for about 3 to 4 days in an airtight container at room temperature.
For longer shelf life, refrigerate the slices in an airtight container for up to 5 days. Bring to room temperature before serving.
Recipe tips
Mangoes: Mangoes are the star of this recipe. So be sure to use only the best mangoes. It should be ripe, sweet, and pulpy. Avoid overripe mangoes or the fibrous, stringy variety. Also, be sure to taste the freshly made mango pulp, as you may need to add more or less sugar accordingly for the cake batter.
Mango essence: For a pronounced mango flavor, you can add about 1 teaspoon of mango essence.
Room temperature ingredients: Always start with room temperature ingredients in any baking recipe unless otherwise stated. Room temperature ingredients combine better with each other.
Measure the flour accurately: The best way to do this is by using a weighing scale. In case you don’t have one then follow these steps to measure out the flour.
- Fluff the flour in the container with a spoon.
- Spoon the flour into your measuring cup until it reaches the top. Never scoop the flour directly into your measuring cup as you end up packing way more flour than the recipe calls for.
- Use the back of a knife to level off the top of the measuring cup.
Line your pan with parchment paper for easy removal of the cake: This makes it easy to just lift the cake out of the pan, rather than turning it upside down on a cooling rack and then flipping it over again.
Avoid a dense cake: This method of mixing wet and dry ingredients is known as the muffin mixing method. The important point to remember here is to mix the wet and dry ingredients only until combined and no flour pockets are visible. A few tiny lumps in the batter are completely fine. Resist the urge to keep mixing until you see a super smooth batter. Doing so will just knock out the air bubbles from the batter and result in a very dense cake.
Never open the oven door while the cake is baking: Opening the oven door multiple times during baking will cause temperature fluctuations due to which the cake can collapse.
Clean slices: A baked cake right out of the oven is fragile. If you cut it while it’s still warm, it may crack or fall apart. You have to allow the cake to cool down completely before slicing it.

Variations
Make a layered frosted mango cream cake: This cake holds well if you intend to frost it. Bake the cake in two 8-inch round or square cake pans or three 6-inch round pans (for a taller cake). The baking time will be less, around 30-35 minutes, so keep an eye out.
Soak the cake layers with sugar syrup. Whipped cream, cream cheese, mango mousse, and buttercream icing all pair well with this fresh mango cake. So choose whatever you prefer to add between the cake layers. You can top the cream layer with some chopped mango pieces or mango pudding. After you stack your cake layers, do a crumb coat and finish off with the final icing. Decorate the cake as per your choice.
Make muffins or cupcakes: You can use the same batter to make standard-sized eggless mango cupcakes. The baking time will be around 18 to 20 minutes
Bundt cake: I’ve made this recipe in a 6-cup bundt pan and it worked out beautifully! Again you will need to keep an eye out on the baking time. It takes around 35-40 minutes. For a fuss-free cake that is simple and still looks beautiful, try using a bundt pan.
Nuts or chocolate chips: You can throw in a handful of nuts like chopped walnuts, pecans, etc, or chocolate chips in the batter. Be sure to coat the nuts or chocolate chips with a teaspoon of flour in order to keep them from sinking to the bottom of the loaf pan. You can also sprinkle slivered pistachios on top before baking.
Cardamom powder: Flavor the cake with other ingredients like vanilla extract or other spices like ground cinnamon, ginger, etc.
Suji mango cake: Try making this cake with suji (semolina) for another delicious variation. Check out this eggless mango semolina cupcake for the recipe.

How to make cake flour?
To make your own cake flour, measure out 1½ cups of all-purpose flour, then remove 3 tablespoons of the flour and replace it with 3 tablespoons of cornstarch/cornflour. Mix well, and that’s it!
How to make this eggless mango cake in the pressure cooker?
Use a 5-liter pressure cooker, and remove the gasket and the weight. Cover the bottom of the cooker with about a cup of salt. Place a heat-proof stand. Close the cooker with the lid, and preheat on medium heat for 10 minutes.
Transfer the batter to a 7 or 8-inch round or square cake pan. Place the cake pan (no need to cover the cake pan) carefully with the help of tongs. Excercise precaution as the cooker is hot.
Secure the lid of the cooker tightly (no gasket nor weight). Cook on medium heat for 35 minutes. Check for doneness test with a toothpick. If it is not done after 35 to 45 minutes, bake it for 5-10 minutes more.
Can I use wheat flour instead of cake flour?
Yes, you can swap the cake flour with wheat flour or atta. But, you will need to alter the recipe as wheat flour absorbs more liquid. So, while I haven’t tried it, what I can suggest from my experience of baking an eggless wheat cake is that you will need to add approx 1/4 cup or so extra liquid (milk/buttermilk).
Why is my homemade buttermilk not curdling?
If you use cold milk, it might not curdle. Make sure you use room temperature milk.
Can I use canned mango pulp instead of fresh mango pulp?
Yes, of course! Just make the following changes;
Buttermilk: Decrease it to 1/4 cup. You can skip the homemade buttermilk (milk+vinegar) and use whole milk instead.
Sugar: Decrease it to 2/3 cup. This also depends on your own preference. 2/3 cup will yield a mildly sweet cake, if you want a sweeter cake, increase the sugar to 3/4 cup.
Can I substitute oil with butter?
Yes, you may. The reason I prefer using oil here is that it makes the cake moist. But if you prefer the rich, buttery flavor, feel free to use melted unsalted butter. If using salted butter, simply skip the salt.
Why is the color of my mango cake not as yellow as the ones in the pics?
Why is the top of my cake browning quickly?
This could happen if your oven is overheating. Simply cover the pan with aluminum foil and continue baking until the cake is done. Keep an eye out every 5 minutes.
To avoid this problem, I suggest using an oven thermometer while preheating the oven to make sure your oven is reaching the desired temperature.
Why is my cake dry?
Chances are that you overbaked the cake, and hence it’s dry. Use a skewer to poke some holes into the cake, and drizzle some simple syrup (1:1 sugar to water) to make it moist. You can reduce the sugar in the syrup to cut back on the sweetness since the cake is already sweet.
Can I substitute the vinegar with lemon juice to make the buttermilk?
Yes, you most certainly can. Use the same amount of lemon juice in lieu of vinegar.
Can I double this recipe?
I have not tried to double this recipe. Sometimes, a baking recipe does not work well when doubled.
How to make fresh mango pulp for this cake?
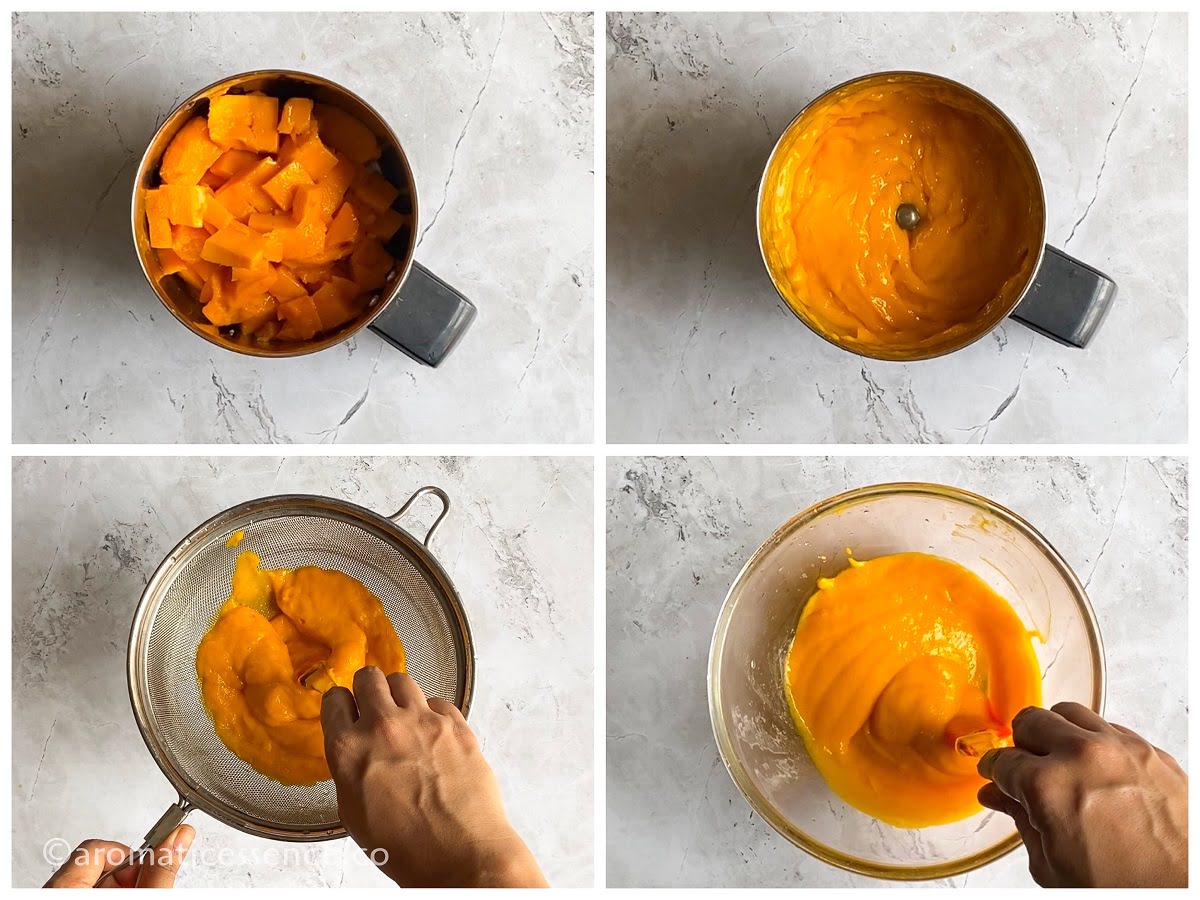
Slice one side of the mango about 1/4 inch away from the stem. Repeat with the other side of the mango. Score a grid-like pattern on the flesh without cutting all the way through the skin. Use a spoon to scoop out the flesh in a bowl. Cut vertically on both sides of the seed, using a paring knife, gently remove the flesh and add it to the bowl. Discard the seed. You can find a photo tutorial for this in my mango salsa post .
Add the mango chunks to a blender and blend to a smooth pulp. Avoid adding water while blending. Add a few tablespoons only if you need to facilitate blending.
Next, pass the pulp through a fine-mesh sieve, and the pulp is ready to be used in the recipe. (Refer to pictorial below)
Recipe modifications
This eggless mango cake recipe was first published on April 20th, 2017 using canned mango pulp (Deep’s brand available in the US). I’ve updated this recipe to use fresh mango pulp to benefit all my readers at large. This post has also been updated with new images, video, and additional information.
In India, there is no dearth of sweet and fragrant mangoes during the summer season. So, I just had to try making this cake with fresh mangoes.
From what I found out, the recipe did not work as well with fresh mangoes. The consistency of fresh mango pulp and canned mango pulp differs to a great extent. The consistency of canned mango pulp is thinner like aam ras. After many trials, I believe this is the best eggless mango cake!
So here’s what I changed if you are interested to know;
Flour: Used cake flour instead of all-purpose flour. I thought it made the cake a lot lighter and much better in terms of texture.
Sugar: I had to increase the sugar to 3/4 cup since I used fresh mangoes. The original 2/3 cup quantity of sugar did not provide enough sweetness to the cake. Also, canned mango pulp is already sweet, so obviously, the recipe needed to be modified.
Milk: I had to double the quantity of milk to account for the thickness of the fresh mango pulp. And while milk was okay, I went a step further and improvised the recipe further using homemade buttermilk. The buttermilk made a big difference in the cake and gave it a softer texture.
I’ve also added another component in the form of a lime glaze. The zesty lime glaze pairs insanely well with the subtle flavor of the mangoes and takes this cake to a new level. So, I highly recommend you consider adding the glaze too 🙂
You may also enjoy these eggless cake recipes
Marble Cake
Rava Cake/Semolina Cake
Red Velvet Cake
Crazy chocolate cake (No milk/eggs/butter)
Date and Walnut cake
Orange cupcakes
Have you made this recipe?
I would love to hear from you! Please be sure to share your feedback and/or give this recipe a rating in the comment below. Your reviews help others know the recipe better too.
You can also FOLLOW me on Facebook , Pinterest, Instagram & Twitter

Eggless Mango Cake Recipe
Ingredients1x2x3x
Dry ingredients:
- 1½ cup cake flour, 213 grams, I made my own, refer notes
- 1½ teaspoons baking powder
- ½ teaspoon baking soda
- ½ teaspoon green cardamom powder or 1 teaspoon vanilla extract
- ¼ teaspoon salt
Wet ingredients:
- ¾ cup castor sugar 167 grams
- ¾ cup fresh mango pulp, 170 grams (For canned mango pulp, refer notes)
- ½ cup whole milk 125 ml
- 1½ teaspoons vinegar or lemon juice
- ⅓ cup vegetable oil 70 grams
Lime glaze
- ½ cup Confectioner’s/icing sugar
- 1 to 1½ tablespoon lime juice, adjust as per desired consistency
Instructions
- Preheat the oven to 350° F / 180° C, and position a rack in the middle of the oven. Grease a loaf pan with little oil and line with parchment paper.
- Measure ½ cup of whole milk, and add vinegar. Mix well and set aside for 5 to 10 minutes. In the meanwhile, prep your dry ingredients.
- In a mixing bowl, sift cake flour (refer to notes to make your own), baking powder, baking soda, table salt, and ground cardamom from a height. Whisk well and set aside.
- After 15 to 10 minutes, the buttermilk will curdle. It is ready to be used in the recipe.
- In another mixing bowl, add mango pulp, oil, castor sugar, and prepared buttermilk.
- Whisk well until everything is well combined and you have a homogeneous mixture.
- Pour the wet ingredients over the dry ingredients. Mix just until combined and no more flour pockets are visible. Do not over-mix, or you will end up with a pretty flat cake. A few lumps are okay in the batter.
- Transfer the batter to the prepared loaf pan, and smooth the surface with a spatula. Tap the pan against the countertop to remove any air bubbles.
- Bake at 350° F/180° C for about 50-55 minutes or until a toothpick inserted comes out clean.
- Transfer the cake to a cooling rack. Let it cool down in the pan for 10 minutes, then remove it from the pan and cool on the rack completely.
Lime glaze
- In a mixing bowl, add sifted icing sugar and 1 to 1½ tablespoons lime juice. Whisk well until you have a smooth and pourable consistency.
- If it is too runny, add more icing sugar. If it is too thick, thin it out with a few teaspoons of lime juice. You can also some lime zest if you like.
- Once the cake has cooled down completely, drizzle the glaze over the loaf. Slice and enjoy!
Video
Notes
If using canned mango pulp, make the following changes;
To make your own cake flour , measure out 1½ cups of all-purpose flour, then remove 3 tablespoons of the flour and replace it with 3 tablespoons of cornstarch/cornflour. Mix well, and that’s it!
Kindly refer to the serving suggestions , storage instructions , recipe tips , variations , and FAQs for more info related to this post!
Nutrition Disclaimer: The nutrition info listed are approximate values that are calculated using an online nutrition calculator. If you rely on them for your diet, please use your preferred nutrition calculator.
Measuring cup used, 1 Cup = 250 ml, 1 tsp = 5 ml
Nutrition

Eggless Mango Cake Recipe
Ingredients
Dry ingredients:
- 1½ cup cake flour, 213 grams, I made my own, refer notes
- 1½ teaspoons baking powder
- ½ teaspoon baking soda
- ½ teaspoon green cardamom powder or 1 teaspoon vanilla extract
- ¼ teaspoon salt
Wet ingredients:
- ¾ cup castor sugar 167 grams
- ¾ cup fresh mango pulp, 170 grams (For canned mango pulp, refer notes)
- ½ cup whole milk 125 ml
- 1½ teaspoons vinegar or lemon juice
- ⅓ cup vegetable oil 70 grams
Lime glaze
- ½ cup Confectioner’s/icing sugar
- 1 to 1½ tablespoon lime juice, adjust as per desired consistency
Instructions
- Preheat the oven to 350° F / 180° C, and position a rack in the middle of the oven. Grease a loaf pan with little oil and line with parchment paper.
- Measure ½ cup of whole milk, and add vinegar. Mix well and set aside for 5 to 10 minutes. In the meanwhile, prep your dry ingredients.
- In a mixing bowl, sift cake flour (refer to notes to make your own), baking powder, baking soda, table salt, and ground cardamom from a height. Whisk well and set aside.
- After 15 to 10 minutes, the buttermilk will curdle. It is ready to be used in the recipe.
- In another mixing bowl, add mango pulp, oil, castor sugar, and prepared buttermilk.
- Whisk well until everything is well combined and you have a homogeneous mixture.
- Pour the wet ingredients over the dry ingredients. Mix just until combined and no more flour pockets are visible. Do not over-mix, or you will end up with a pretty flat cake. A few lumps are okay in the batter.
- Transfer the batter to the prepared loaf pan, and smooth the surface with a spatula. Tap the pan against the countertop to remove any air bubbles.
- Bake at 350° F/180° C for about 50-55 minutes or until a toothpick inserted comes out clean.
- Transfer the cake to a cooling rack. Let it cool down in the pan for 10 minutes, then remove it from the pan and cool on the rack completely.
Lime glaze
- In a mixing bowl, add sifted icing sugar and 1 to 1½ tablespoons lime juice. Whisk well until you have a smooth and pourable consistency.
- If it is too runny, add more icing sugar. If it is too thick, thin it out with a few teaspoons of lime juice. You can also some lime zest if you like.
- Once the cake has cooled down completely, drizzle the glaze over the loaf. Slice and enjoy!
Video
Notes
If using canned mango pulp, make the following changes;
To make your own cake flour , measure out 1½ cups of all-purpose flour, then remove 3 tablespoons of the flour and replace it with 3 tablespoons of cornstarch/cornflour. Mix well, and that’s it!
Kindly refer to the serving suggestions , storage instructions , recipe tips , variations , and FAQs for more info related to this post!
Nutrition Disclaimer: The nutrition info listed are approximate values that are calculated using an online nutrition calculator. If you rely on them for your diet, please use your preferred nutrition calculator.
Measuring cup used, 1 Cup = 250 ml, 1 tsp = 5 ml
Nutrition
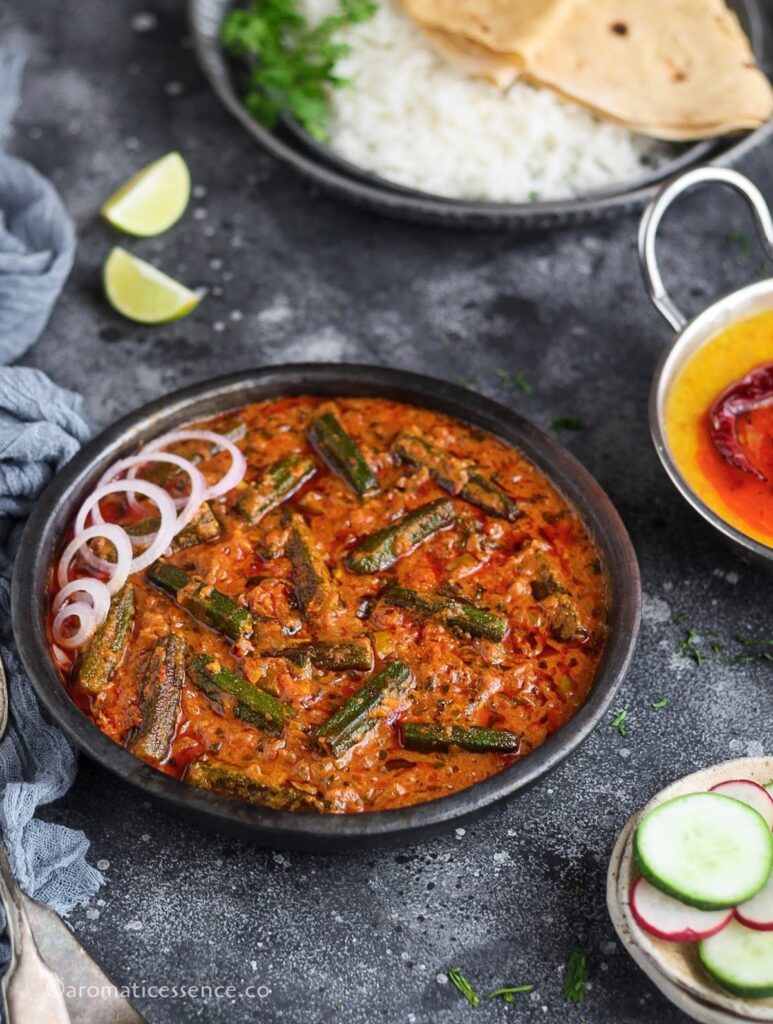
Bhindi masala gravy is a delicious North Indian dish made with okra simmered in a spiced onion-tomato gravy! Learn how to make restaurant-style bhindi masala at home in this step-by-step photo and video tutorial.
If you are an okra fan, you are going to love this Indian okra curry. If you have not tried okra before, this easy bhindi masala gravy recipe will definitely be the one you would want to try.
Bhindi is undoubtedly one of the most common vegetables used in Indian cooking. There are a number of bhindi recipes that have different flavor quotients and they all taste amazing. Be it a simple bhindi sabzi, a dry version of this recipe, bhindi kadhi, aloo bhindi, bhindi kurkuri, bindi salan, bhindi raita, or dahi bhindi.
- What is Bhindi Masala?
- Why should you try this recipe?
- Ingredients needed
- How to make Punjabi bhindi masala gravy – Step-by-step instructions
- Serving suggestions
- Storage Instructions
- Recipe Tips
- Variations
- Frequently Asked Questions (FAQs)
- Recipe Modifications
- You may also enjoy these bhindi recipes
- Bhindi Masala Gravy Recipe
What is Bhindi Masala?
I doubt this dish needs any introduction. But if you have not heard of this dish let me familiarize you with it. Bhindi masala is a North Indian style of preparing okra.
Okra is known as bhindi in Hindi and masala in this context refers to the typical Punjabi, spiced onion-tomato base flavored with spices and fresh and dried herbs. The masala base can also be used to make other dishes like aloo baingan, aloo gobhi, mushroom masala, etc.
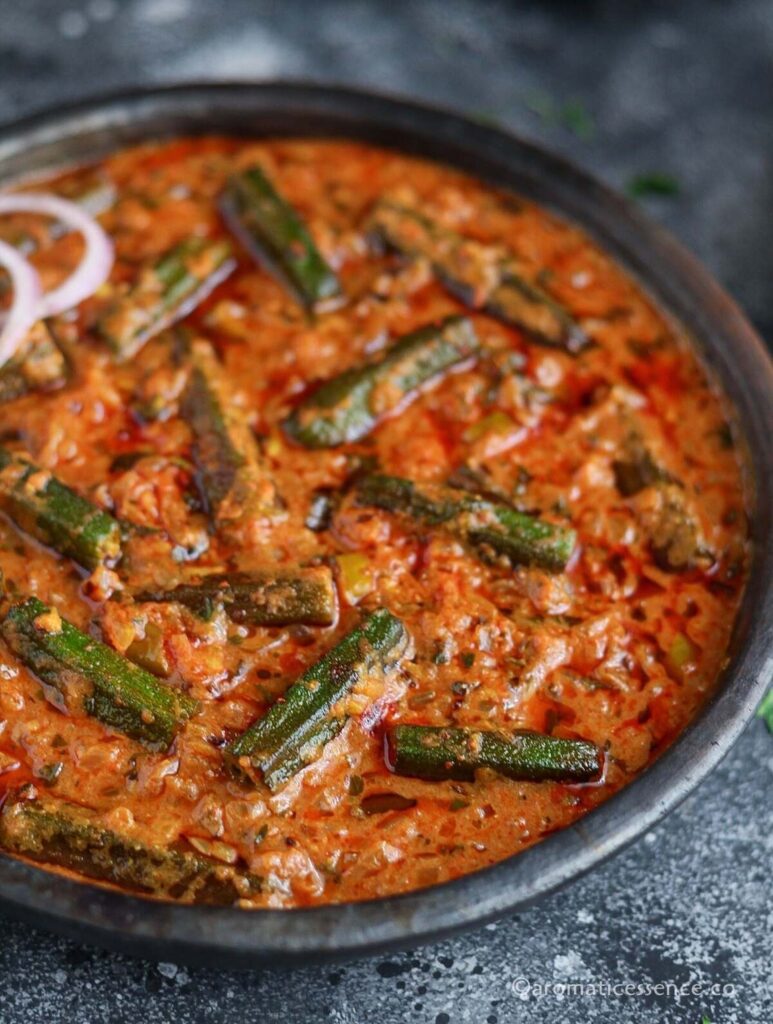
Here, okra is cooked in a spicy, and slightly tangy semi-thick curry. This okra curry recipe is packed with flavors that will definitely tantalize your taste buds! I’m sure you will be making it often once you try this recipe!
Most folks normally make a semi-dry version of this recipe. But the recipe I’m sharing with you is more of a restaurant-style preparation. We enjoyed this gravy from a restaurant once, and since then it’s been a favorite. I’ve tried to replicate the flavors and pretty much managed to nail the recipe.
If you love okra as much as I do, I’m sure you will love this restaurant-style bhindi masala recipe too. So next time you get some okra, give this recipe a go!

Why should you try this recipe?
☑ This is a tried and tested recipe that’s been popular on the blog for a long time.
☑ If you are looking for restaurant-worthy flavors!
☑ Besides being a delicious veggie, okra offers numerous health benefits.
☑ Can be adapted to make it vegan.
☑ It is also gluten-free.
☑ The recipe can be easily scaled for the desired number of servings (cooking time will increase a bit).
☑ Makes for a great lunch box option or perfect for weeknight dinners.
Ingredients needed
To make this delicious bhindi curry, you will need;
Okra: Okra is also known as lady’s fingers. I suggest using fresh, tender okra pods for this recipe. They tend to be more flavorful and less slimy.
Onions and tomatoes: These form the base of the gravy. I’ve used red onions which are typically used in Indian cooking. You could also use yellow, white onions, or shallots. As for the tomatoes, make sure you use, ripe and pulpy tomatoes.
Green chilies: I’ve used a mild variety of chilies.
Ginger and garlic: I’ve used homemade coarsely crushed ginger and garlic which adds a better flavor. You can also use the store-bought paste if you are pressed for time.
Basic Indian spices: These include cumin seeds, ground turmeric, Kashmiri red chili powder, cumin, coriander, kasuri methi, and garam masala, along with salt.
Dahi or yogurt: Adds a light, creamy texture and a subtle tang.
Cooking fat: I’ve used sunflower oil for this recipe. But feel free to use your preferred oil.
Coriander leaves: Add a fresh element to the gravy.

How to make Punjabi bhindi masala gravy – Step-by-step instructions
Step 1: Prepare okra
Wash and pat dry 250 grams of okra with a kitchen napkin (It should be completely dry). Cut off the crown and tip, and cut the okra into 1 to 2-inch pieces depending on how you like them. Be sure to check for worms inside the pods, and discard the pods if you find any. ( Photos 1 to 4 )

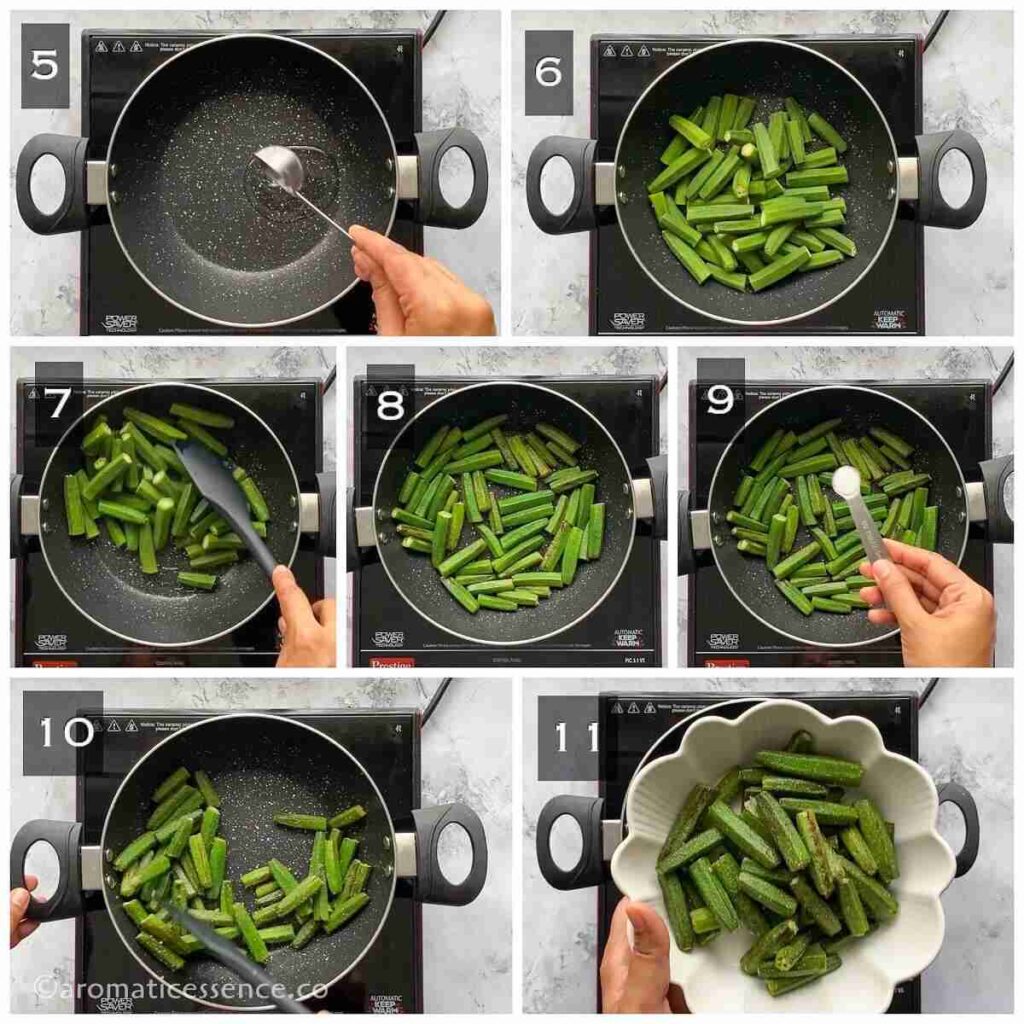
Step 2: Saute the okra
Heat 1 tablespoon of oil in a skillet over medium heat. Shallow fry the okra, stirring occasionally, until they shrink, develop color around the edges, and are about 80% cooked. ( Photos 5 to 8 )
Add salt and mix well. Transfer the bhindi to another bowl and set it aside. ( Photos 9 to 11 )
Step 3: Punjabi onion-tomato base
Heat the remaining 3 tablespoons of oil in a heavy-bottomed pan/kadai over medium heat. ( Photo 12 )
Once the oil has heated, add 1 teaspoon of cumin seeds, and allow it to splutter. ( Photo 13 )
Next, add 1 cup of finely chopped onions and sauté until golden brown. ( Photos 14 to 16 )
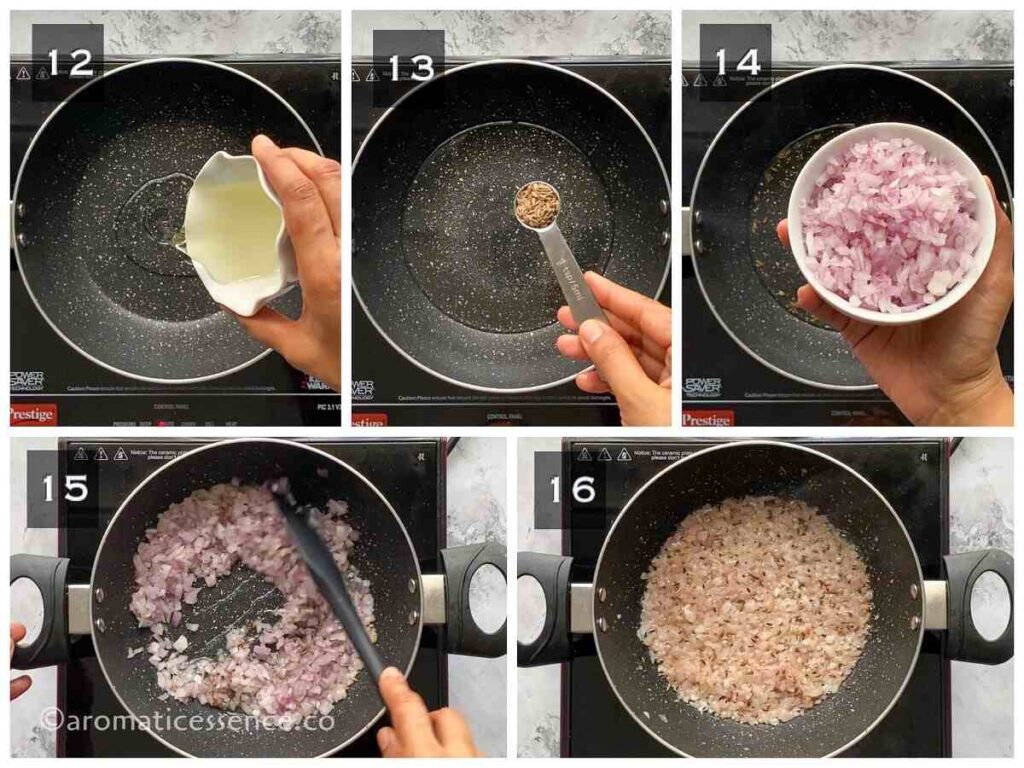
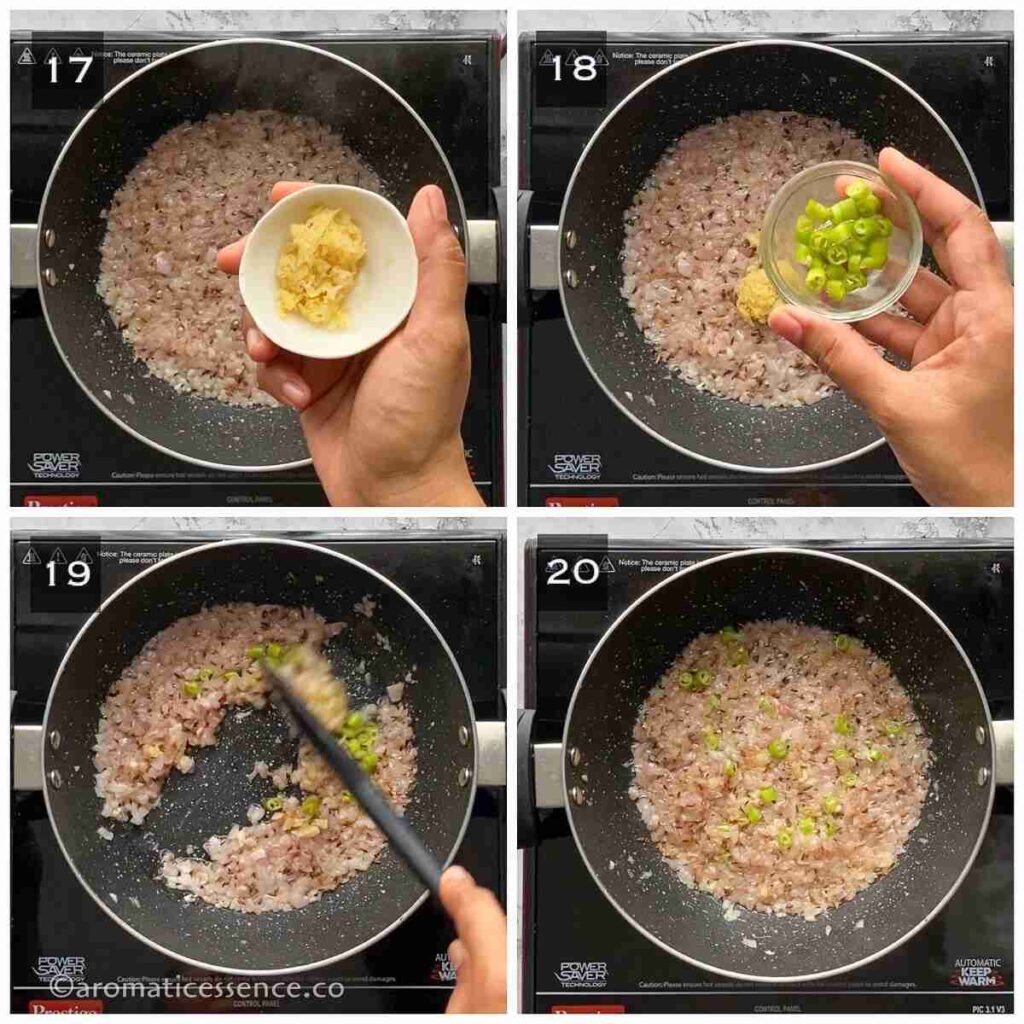
Add 2 teaspoons of coarsely crushed ginger-garlic paste and 2-3 slit or finely chopped green chilies, and sauté until the ginger-garlic is fragrant. ( Photos 17 to 20 )
Add 1/2 teaspoon of turmeric powder, 2 teaspoons of coriander powder, 1 teaspoon of Kashmiri red chilli powder, and 1/2 teaspoon of roasted cumin powder. Sauté over medium heat for another minute. ( Photos 21 to 26 )
Add a splash of water if needed to prevent the spices from burning.
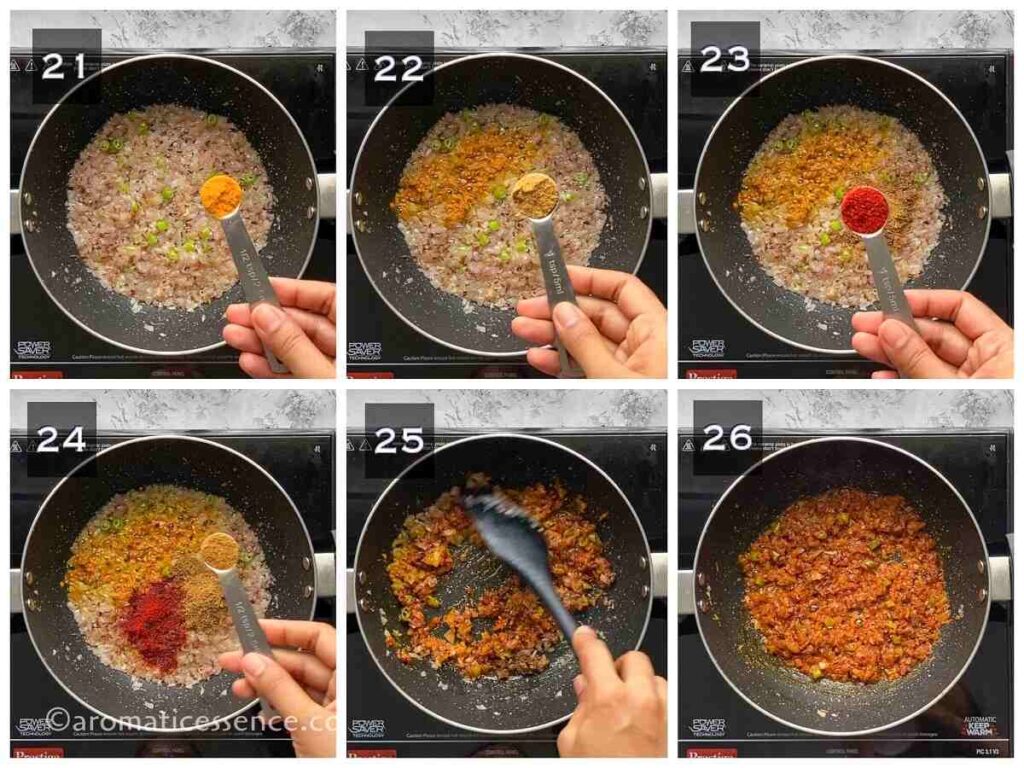
Add 3/4 cup of tomato puree and mix well. ( Photos 27 and 28 )
Cover the pan and cook on medium heat for 1-2 minutes. ( Photo 29 )
Remove the lid and sauté until the oil separates. ( Photos 30 to 32 )

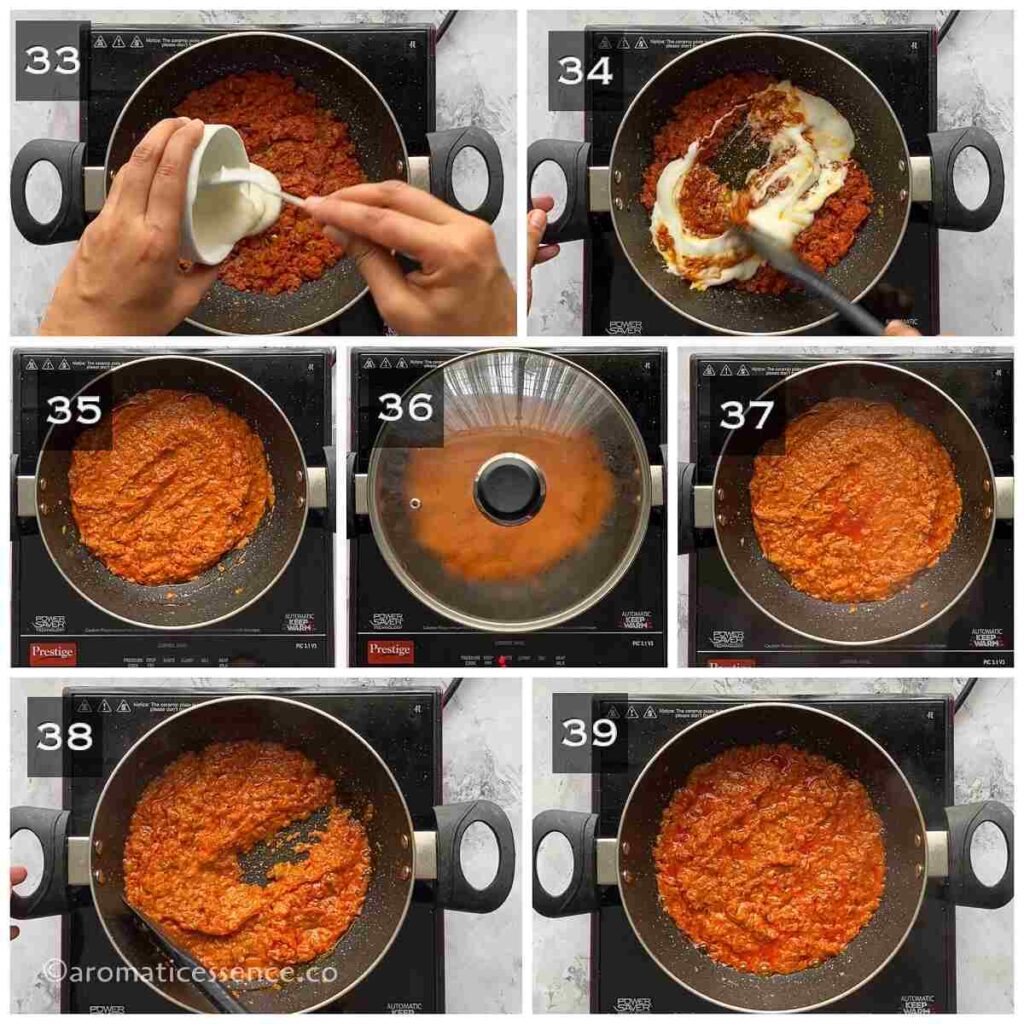
Switch off the heat, and add 1/4 cup whisked dahi/yogurt. Mix it well. ( Photos 33 to 35 )
Switch on the heat, cover, and cook on low heat for 1-2 minutes. ( Photo 36 )
When you remove the lid you will notice specks of oil on top of the masala. ( Photos 37 )
Continue cooking, until oil separates from the sides. ( Photos 38 and 39 )
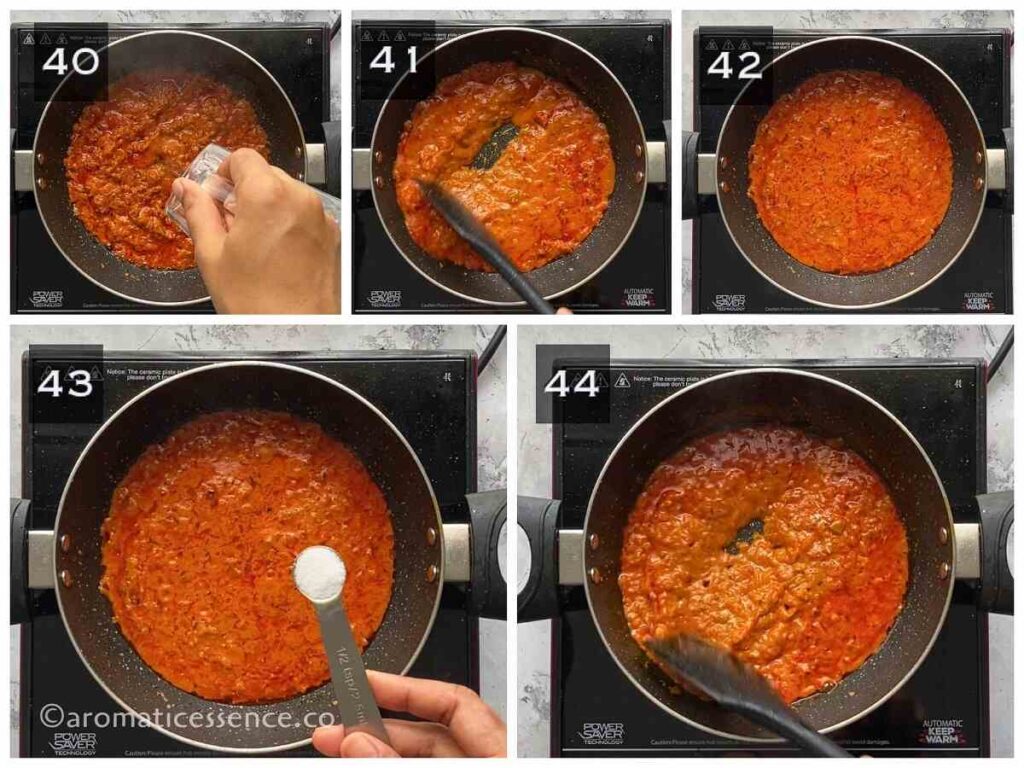
Add about 1/4 to 1/2 cup water (adjust as per desired consistency), mix it well, and let the gravy come to a boil. ( Photos 40 to 42 )
Season the gravy with salt and mix well. Add salt accordingly as salt is also added to the bhindi in the 2nd step. ( Photos 43 and 44 )
Step 4: Add fried okra to the gravy
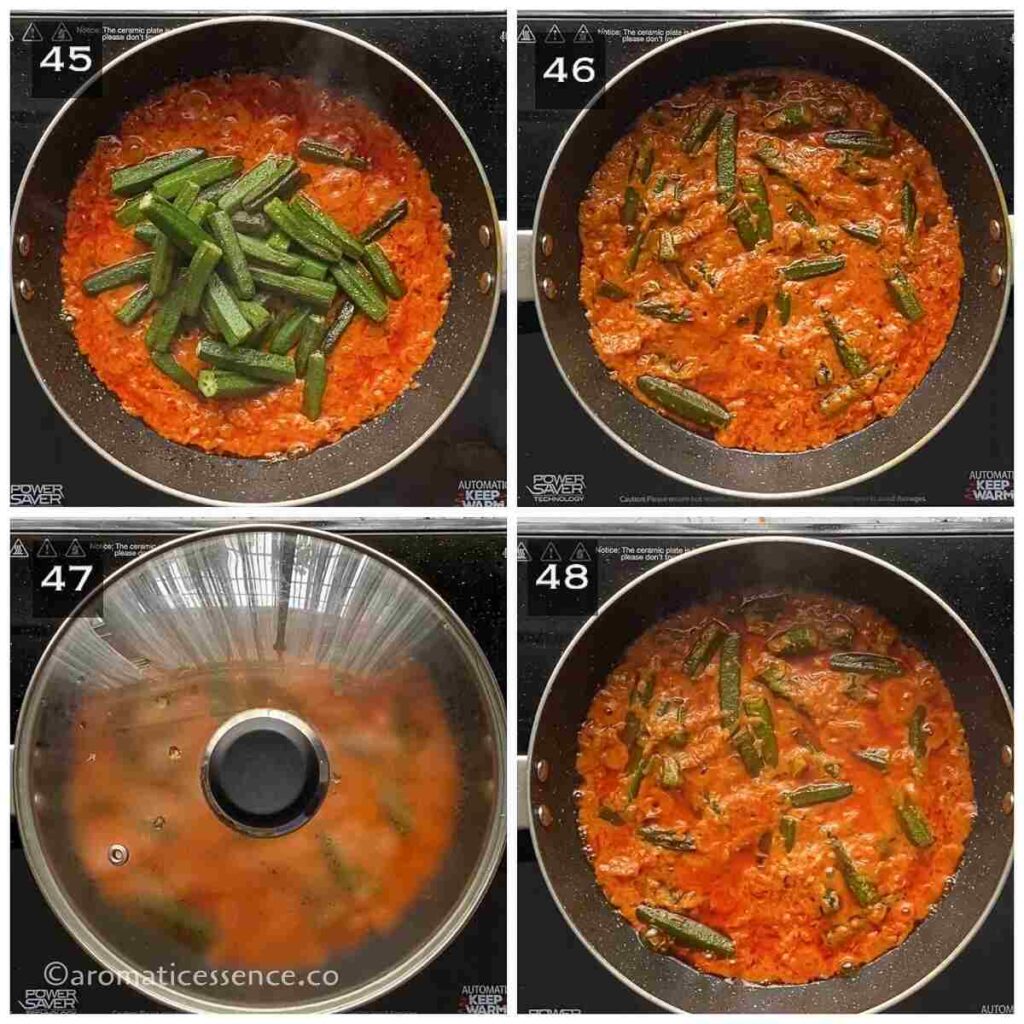
Add the fried okra, and mix well, simmer on low heat, covered, for 2-3 minutes or longer depending on your desired doneness. ( Photos 45 to 48 )
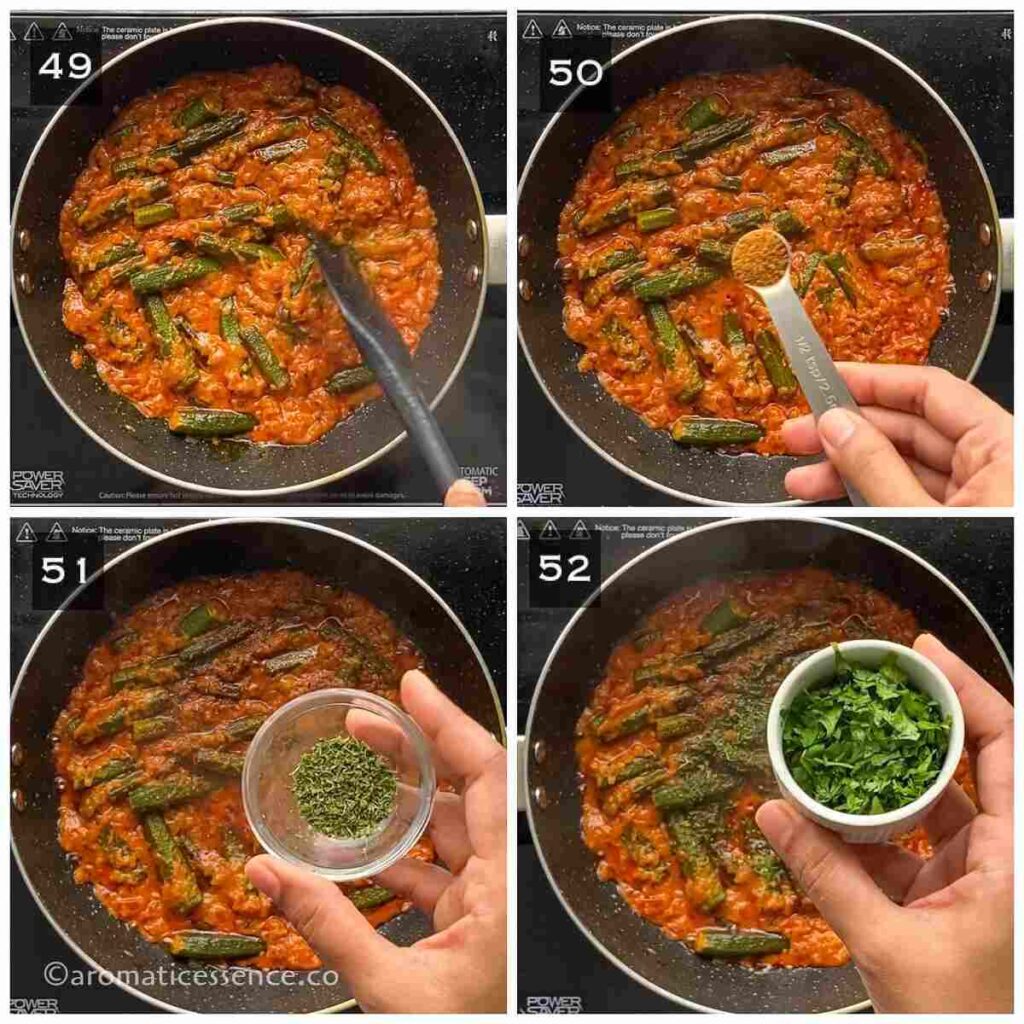
Give everything a gentle mix and add 1/2 teaspoon of garam masala, 1/2 teaspoon of crushed kasuri methi, and 2-3 tablespoons of finely chopped coriander leaves. ( Photos 49 to 52 )
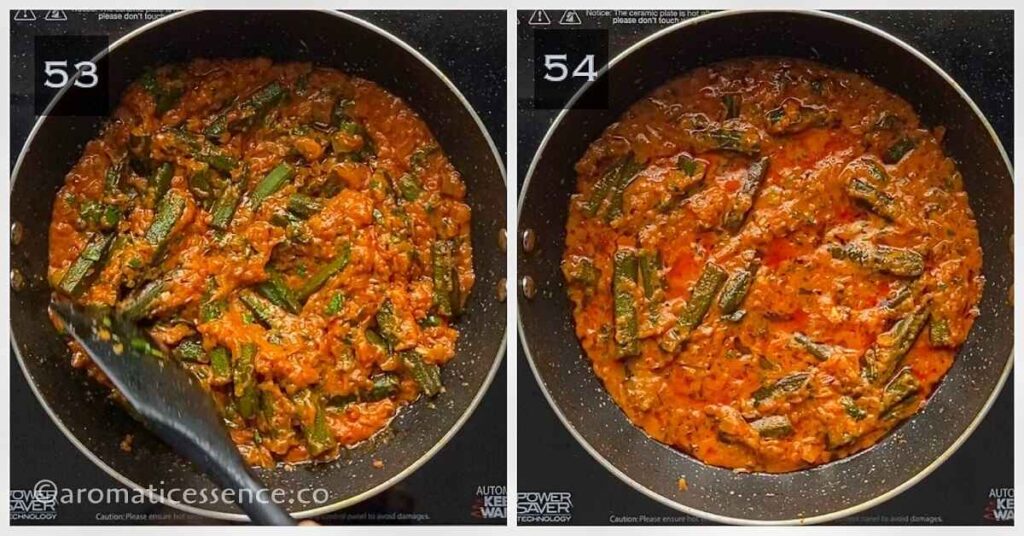
Mix well and cook on medium-low heat for a few more seconds. ( Photos 53 to 54 )
Check for seasonings, and adjust salt if required. If it is too tangy, add a pinch of sugar. If you prefer a more tangy flavor, squeeze lime juice.
Serve hot!
Serving suggestions
Bhindi masala paired with rice and dal is pure comfort food! You can savor this delicious bhindi masala gravy with chapati, roti, naan, paratha, poori , or any other flatbread.
You can also pair it with some jeera rice, brown rice, or plain steamed rice.
Consider making it a part of a thali by serving it along with rice, dal , flatbread of choice, yogurt or raita , salad, pickle, and some dessert. Wash it all down with a big glass of chaas (spiced buttermilk)! A good nap after this meal is guaranteed 😀

Pictured here, is bhindi masala gravy served with garlicky toor dal tadka, rice, chapati, and sliced cucumber and radishes.
Storage Instructions
This recipe makes a small batch enough to serve 2 to 3 people as a main dish or 3 to 4 people if serving as a side dish or as a part of a thali. So having leftovers is highly unlikely. However if you double the batch, and end up with leftovers, refrigerate it in an airtight container for up to 3 days.
Reheat over the stovetop or in the microwave until thoroughly heated through. Add a splash of water if needed as this gravy thickens as it sits.
Recipe Tips
Here are a few of my tips to help you make the BEST bhindi masala recipe!
Okra: Since okra is the hero of this recipe, be sure to use fresh, small tender okra pods. Look out for pods that are about 3 to 4 inches long and have smooth, bright green skin, free of any bruises or blemishes. The tail of the pods should snap easily and not bend, that’s an easy way to gauge if they are fresh. The larger pods tend to be tough and fibrous and are best used in stews, gumbo, etc.
A good quality pan: Use a good quality pan, nonstick, or cast iron to prevent the bhindi from sticking at the bottom of the pan.
Avoid cooking okra on high heat: Cooking on high heat will brown the exterior of the okra pods quickly. This will not help in getting rid of the sliminess which is the primary reason for this extra step. Also, avoid stirring the okra too frequently, as that can make the okra slimy.
Do not cover the pan: Avoid covering the pan while sauteing the bhindi initially as it retains steam and increases moisture which in turn will make the bhindi slimy.
Cooking oil: You can replace the vegetable oil with mustard oil for authentic North Indian flavor.
Do not skimp on the oil: You will need the quantity of oil specified to saute the bhindi. Sauteing helps reduce the sliminess, so do not try to cut back on the oil in this step. You can cut back on the oil in the gravy preparation to cut back on calories. You may also air fry or roast the okra in the oven.
Switch off the heat when adding dahi (curd): High heat may cause the curd to split. Always turn down the heat or switch off the heat and then add the curd. Mix it well and increase the heat. Make sure you whisk the curd before adding it to the masala. Also, try and use fresh dahi as sour dahi may make the dish too tangy.
Cut back on the cooking time: You can start preparing the gravy while sauteing the bhindi simultaneously. It will reduce your overall cooking time to quite an extent.
Variations
Dry version: For the dry version, skip the yogurt and water. After the onion-tomato base seasoned with spices is ready, simply add the sauteed okra and toss it around. You may add about 1/2 teaspoon of amchur powder here along with the other spices or finish off the dish with a squeeze of lemon juice.
Add potatoes: After frying the bhindi, shallow fry about 1.5 to 2 cups of diced potato. Cook until golden brown and almost cooked through. Set aside and add it to the gravy along with the bhindi. Increase the water to adjust the consistency of the gravy if needed or skip the water and make a dry aloo bhindi version.
No-onion and garlic version: For a Jain version, follow the recipe as such, simply skip the onion and garlic. Add 1/4 teaspoon hing (asafoetida) along with the cumin.
Spices: Feel free to customize the quantities of spices and herbs as per your desired flavor. If you prefer more heat, add 1 teaspoon of red chili powder along with the Kashmiri chili powder. You can also use the dark green spicy green chilies instead of the light ones.
A richer gravy: For a creamy, rich variation, add 1/4 cup of cashew paste after you add the yogurt. You can also add 2 tablespoons of fresh cream or heavy cream at the end.
How do you cook okra without it being slimy?
The sliminess or gummy, gel-like substance in okra is known as mucilage which contains soluble fibers.
Follow these steps to the T to avoid the problem of sliminess so that you can enjoy this healthy vegetable more often!
- First and foremost, wash the okra pods very well and drain the water completely.
- Then pat dry the pods thoroughly with a clean kitchen napkin or paper towel. I mean really well, they should be completely dry. You can lay them on a tray lined with paper towels and allow them to air dry for some time or overnight. This could save some of your time if you plan in advance.
- Next, time to chop the bhindi! Use a dry cutting board and a dry, sharp knife. Also, make sure that your hands are completely dry.
- It is not unusual to notice that the knife gets sticky while chopping the okra. Simply wipe the knife with a paper towel and continue chopping the rest of the pods.
- For a recipe like this, it is best to saute the okra in oil separately over medium-low heat before adding it to the dish. Sauteing in cooking fat of any sort will reduce the sliminess to a great extent.
- Avoid over-stirring diced okra while cooking as it releases more slime.
- Add salt towards the end to avoid slimy okra. If you add salt to the okra initially, it will release moisture.
- Make sure you cook okra uncovered while sauteing it. Covering the pan will retain the steam, and as you know by now moisture needs to be avoided at all stages while handling this vegetable.
- Souring agents like amchur powder, lime or lemon juice, yogurt, kokum, tamarind, etc. added while cooking also helps in reducing the slime.
Can I use frozen okra for this recipe?
This recipe is best made with fresh okra. For frozen okra, thaw them first and then spread them out on a tray lined with paper towels or a clean kitchen napkin. Pat dry until most of the moisture is gone. You will need additional 2-3 minutes to help crisp up the okra.
Is this dish spicy?
This bhindi masala gravy recipe is not spicy at all. I’ve used light green chilies which are very mild. Moreover, I’ve used Kashmiri chili powder, which adds a vibrant red color without the heat.
Recipe Modifications
This bhindi masala gravy recipe was first published on Sep 18, 2018, and was updated on July 1, 2022, to include new images, a video tutorial, and additional information. The recipe has been modified slightly, here are the changes;
- I’ve skipped adding amchur powder (dry mango powder) this time and left it as an optional ingredient. This recipe was developed using finely diced Roma tomatoes and US yogurt which is more creamy than tart. Hence a little bit of amchur powder was added for the tangy flavor. Indian tomatoes and dahi provide the right tartness to this dish that is well balanced with the spices. Hence, no need for an additional souring agent.
- Replaced the chopped tomatoes with tomato puree.
You may also enjoy these bhindi recipes
- Dahi bhindi
- Bharli bhendi

Bhindi Masala Gravy Recipe
Ingredients1x2x3x
Measuring cup used, 1 Cup = 250 ml, 1 tsp = 5 ml
- 3 to 4 tablespoons oil, divided
- 250 grams Okra/bhindi
- 1 teaspoon cumin seeds
- 1 cup finely chopped onion, approx 135 grams
- 2 teaspoons coarsely crushed ginger garlic paste, 4 garlic cloves and 1 inch ginger
- 2-3 green chillies (mild or spicy), slit lengthwise or finely chopped
- 1/2 teaspoon turmeric powder
- 2 teaspoons coriander powder
- 1/2 teaspoon roasted cumin powder
- 1 teaspoon Kashmiri chilli powder
- 3/4 cup tomato puree made by blending 200 grams tomatoes
- 1/4 cup yogurt, regular dairy if not vegan or your favorite non-dairy yogurt
- Salt, to taste
- 1/2 teaspoon garam masala
- 1/2 teaspoon crushed kasoori methi
- 1/2 teaspoon amchur powder/Juice of half a lime, optional, if you prefer more tangy flavor
- 2-3 tbsp chopped coriander leaves
Instructions
- Wash and pat dry okra with a kitchen napkin (It should be completely dry). Cut off the crown and tip, and cut the okra into 1 to 2-inch pieces depending on how you like them. Be sure to check for worms inside the pods, discard the pods if you find any.
- Heat 1 tablespoon of oil in a skillet over medium heat. Shallow fry the okra, stirring occasionally, until they shrink, develop color around the edges, and are about 80% cooked.
- Add salt and mix well. Transfer the bhindi to another bowl and set it aside.
- Heat the remaining 3 tablespoons of oil in a heavy-bottomed pan/kadai over medium heat.
- Once the oil has heated, add cumin seeds, and allow it to splutter.
- Next, add finely chopped onions and sauté until golden brown.
- Add ginger-garlic paste and finely chopped green chilies, and sauté until the ginger-garlic is fragrant.
- Add turmeric powder, coriander powder, Kashmiri red chilli powder, and roasted cumin powder. Sauté over medium heat for another minute.
- Add a splash of water if needed to prevent the spices from burning.
- Add tomato puree and mix well. Cover the pan and cook on medium heat for 1-2 minutes.
- Remove the lid and sauté until it the oil separates.
- Switch off the heat and add whisked dahi/yogurt. Mix it well
- Switch on the heat, cover, and cook on low heat for 1-2 minutes.
- When you remove the lid you will notice specks of oil on top of the masala. (
- Continue cooking, until oil separates from the sides.
- Add about 1/4 to 1/2 cup water (adjust as per desired consistency), mix it well, and let the gravy come to a boil.
- Season the gravy with salt and mix well. Add salt accordingly as salt is also added to the bhindi.
- Add the fried okra, and mix well, simmer on low heat, covered, for 2-3 minutes or longer depending on your desired doneness.
- Give everything a gentle mix and add garam masala, crushed kasuri methi, and finely chopped coriander leaves. Mix well and cook on medium-low heat for a few more seconds.
- Check for seasonings, and adjust salt if required. If it is too tangy, add a pinch of sugar. If you prefer a more tangy flavor, squeeze lime juice. Serve hot!
Video
Notes
- Nutrition Disclaimer: The nutrition info listed are approximate values that are calculated using an online nutrition calculator. If you rely on them for your diet, please use your preferred nutrition calculator.
- Kindly refer to the serving suggestions , storage instructions , recipe tips , variations , and FAQs for more info related to this post!
