Date rolls are a classic East Indian sweet prepared popularly during Christmas. These dainty and delicious date roll cookies are made by wrapping dates stuffed with walnuts in a buttery pastry and baked to golden perfection!

These date rolls are yet another classic Indian Christmas sweet, that is not only made by the East Indian community, but is quite popular amongst most Goan and Mangalorean households as well.
Date roll cookies often make an appearance on ‘ kuswar ‘ (traditional Goan Christmas platter) to be shared with friends, family, and distributed amongst neighbors.

Honestly, I have never made them before. This time I tried a small batch at home and was very pleased with the way they turned out. So I decided to share it on the blog. Well better late than never, right?
I have already shared most of the traditional Goan Christmas sweets on the blog already. I will link them up in the post below.

- Ingredients needed
- Why you will love these date rolls?
- How to make date rolls for Christmas- Step by step process
- Storage
- Recipe tips
- Variations
- More traditional Christmas sweets to include in your ‘kuswar’
- Date Rolls | Date Roll Cookies
Ingredients needed
To make these traditional East Indian style date rolls, you will need,
Butter: I’ve used salted butter for this recipe. If using unsalted butter, add a pinch of salt.
Icing sugar: Also known as powdered sugar or Confectioner’s sugar, different names for the same thing.
Egg: You will need two eggs, one whole egg for the pastry dough, and just the yolk of the other egg to brush the pastry.
All-purpose flour: Use plain flour and not self-rising flour as we don’t need the leavening agents i.e. baking powder or soda for this recipe.
Dates: Use a soft variety of dates for this recipe. Medjool dates would be great here, I’ve used Omani dates which also work very well. The hard ones can dry out even more in the oven, so avoid using those.
Walnuts: Walnuts are used for stuffing the dates before wrapping them in the pastry dough. Cut the walnut into halves and stuff one half in each date.

Why you will love these date rolls?
✓ These date nut rolls are;
✓ Very addictive
✓ Easy to make
✓ A great activity to get your kids involved in helping out during the festivities
✓ Perfect for gifting friends and family

How to make date rolls for Christmas- Step by step process
Step 1: Prepare the pastry
In a large mixing bowl, add 100 grams salted butter and 75 grams icing sugar. Beat on low speed until the sugar has incorporated, then increase the speed to medium-high and beat till the mixture is light and fluffy, scraping down the sides and bottom of the bowl once or twice. ( Photos 1 to 5 )

Next, add one egg and 1/2 teaspoon vanilla extract, continue beating at medium-high speed until well incorporated. ( Photos 6 to 9 )

Add 250 grams all-purpose flour (sifted) in 2 batches, beating on low speed with each addition until the dough looks crumbly. ( Photos 10 to 14 )
Using your fingers, bring the mixture together. ( Photo 15 )

Divide the dough into two parts. Shape each half roughly into a square. Flatten it out a bit, wrap it in cling film. Refrigerate the dough for 30 minutes. ( Photos 16 and 17 )

Step 2: Stuff the pitted dates
Cut about 20 walnuts in halves. Insert half a walnut in the center of the date. Repeat with the rest of the dates and walnut halves. ( Photos 18 to 21 )

Step 3: Prepare the date rolls
Preheat the oven to 350° F/180° C for 15 minutes. Work with a portion of the dough. On a clean work surface, roll out the dough to about 1/8 inch in thickness.
If you find that the dough is sticking to the rolling pin, cover it with another parchment paper and continue rolling. ( Photos 22 to 25 )

Trim off the edges. Cut into 1.5-inch strips, or as per the size of the dates. ( Photos 26 to 28 )

Place a date on one edge of the strip, roll until it is completely wrapped in the dough and has a slight overlap. Cut off the strip, and gently press to seal the roll. ( Photos 29 to 33 )

Repeat the same process with the rest of the dough and the dough scraps. ( Photos 34 to 37 )

Step 4: Bake
Place it on a baking tray lined with parchment paper or a silicon mat.
Add an egg yolk to a bowl. Add two teaspoons of water, whisk it together.
Brush each roll with egg wash. This is optional, but it adds a lovely golden brown color to the crust. Bake at 350° F/180° C for 20 to 25 minutes or until the top is lightly golden. ( Photos 39 to 41 )
Baking time will depend upon the thickness of the dough.

Step 5: Cool and serve
Allow the date rolls to cool on the baking tray for 5 minutes. Then transfer to a wire rack, let them cool down completely. ( Photos 43 and 44 )

Storage
Date rolls will keep well in an airtight container, at room temperature for up to 2 weeks.
Recipe tips
This recipe is pretty easy and difficult to mess up. Nonetheless, I have four simple tips to share with you.
Avoid over kneading or overmixing the dough: Overkneading will develop gluten in the flour. That will make the rolls tough instead of a light and crumbly, shortbread-like texture. All you need to do is just bring the dough together.
Chill the dough: The dough is pretty soft and needs to be refrigerated for a little while. The dough will be a lot easier to work with. Also, since the butter is slightly cold, the cookies won’t spread as much in the oven.
Allow the rolls to cool completely: The date pastry rolls will crisp up once they have cooled completely. Avoid storing warm date rolls in a jar or container as they will cause them to steam inside the jar, which in turn will make the rolls soggy and soft. Always store any sort of cookies once they have come to room temperature.

Variations
- Different nuts: Feel free to use other nuts like cashew nuts, pecans, almonds, macadamia, Brazil nuts, etc instead of walnuts. I personally love the classic pairing of date and walnuts!
- Date and nut paste: Add the nuts to a food processor, and pulse to break them down. Then add the pitted dates and process until the mixture comes together. Roll the date-nut paste into a log. Cut as per the size of the pastry. Use that for the stuffing instead of a whole date.
- Coconut: Add some desiccated coconut to the above date-nut mixture for another delicious variation.
- Flavors: You can add some pumpkin pie spice mix, all-spice etc, to the date-nut mixture. If you are not making the date-nut log, then you can flavor the pastry dough with a hint of these spices.
- Chocolate: For a gourmet touch, you can drizzle some melted chocolate over the rolls.

More traditional Christmas sweets to include in your ‘kuswar’
- Marzipan (no-cook/egg-free)
- Bebinca
- Guava cheese
- Milk Cream
- Coconut Toffee
- Baath cake
- Doce de grao (chana dal fudge)
- Karanji/Neureos
- Kormolas
- Shankapali
- No-cook coconut ice
- Rich fruit cake
- Walnut fudge
- Kalkal
You can also follow me on Facebook , Pinterest, Instagram & Twitter
Wishing everyone a Merry Christmas and a Happy New Year! Have a lovely time <3

Date Rolls | Date Roll Cookies
Ingredients1x2x3x
- 100 grams salted butter
- 75 grams icing sugar sifted
- 1 large egg 65 g
- 1/2 teaspoon vanilla extract
- 250 grams all-purpose flour sifted
- 40 dates, pitted
- 20 whole walnut kernels
Egg wash
- 1 egg yolk
- 2 teaspoons water or milk
Instructions
- In a large mixing bowl, add the butter and icing sugar. Beat on low speed until the sugar has incorporated, then increase the speed to medium-high and beat till the mixture is light and fluffy, scraping down the sides and bottom of the bowl once or twice.
- Next, add in the egg and vanilla extract, continue beating at medium-high speed until well incorporated.
- Add flour (sifted) in 2 batches, beating on low speed with each addition until the dough looks crumbly.
- Using your fingers, bring the mixture together.
- Divide the dough into two parts. Shape each half roughly into a square. Flatten it out a bit, wrap it in cling film. Refrigerate the dough for 30 minutes.
- Cut the walnuts in halves. Insert half a walnut in the center of the date. Repeat with the rest of the dates and walnut halves.
- Preheat the oven to 350° F/180° C for 15 minutes. Work with a portion of the dough. On a clean work surface, roll out the dough to about 1/8 inch in thickness.
- If you find that the dough is sticking to the rolling pin, cover it with another parchment paper and continue rolling.
- Trim off the edges. Cut into 1.5-inch strips, or as per the size of the dates.
- Place a date on one edge of the strip, roll until it is completely wrapped in the dough and has a slight overlap. Cut off the strip, and gently press to seal the roll.
- Repeat the same process with the rest of the dough and the dough scraps.
- Place it on a baking tray lined with parchment paper or a silicon mat.
- Add an egg yolk to a bowl. Add two teaspoons of water, whisk it together.
- Brush each roll with egg wash. This is optional, but it adds a lovely golden brown color to the crust. Bake at 350° F/180° C for 20 to 25 minutes or until the top is lightly golden. Baking time will depend upon the thickness of the dough.
- Allow the date rolls to cool on the baking tray for 5 minutes. Then transfer to a wire rack, let them cool down completely.
Video
Notes
.

Date Rolls | Date Roll Cookies
Ingredients
- 100 grams salted butter
- 75 grams icing sugar sifted
- 1 large egg 65 g
- 1/2 teaspoon vanilla extract
- 250 grams all-purpose flour sifted
- 40 dates, pitted
- 20 whole walnut kernels
Egg wash
- 1 egg yolk
- 2 teaspoons water or milk
Instructions
- In a large mixing bowl, add the butter and icing sugar. Beat on low speed until the sugar has incorporated, then increase the speed to medium-high and beat till the mixture is light and fluffy, scraping down the sides and bottom of the bowl once or twice.
- Next, add in the egg and vanilla extract, continue beating at medium-high speed until well incorporated.
- Add flour (sifted) in 2 batches, beating on low speed with each addition until the dough looks crumbly.
- Using your fingers, bring the mixture together.
- Divide the dough into two parts. Shape each half roughly into a square. Flatten it out a bit, wrap it in cling film. Refrigerate the dough for 30 minutes.
- Cut the walnuts in halves. Insert half a walnut in the center of the date. Repeat with the rest of the dates and walnut halves.
- Preheat the oven to 350° F/180° C for 15 minutes. Work with a portion of the dough. On a clean work surface, roll out the dough to about 1/8 inch in thickness.
- If you find that the dough is sticking to the rolling pin, cover it with another parchment paper and continue rolling.
- Trim off the edges. Cut into 1.5-inch strips, or as per the size of the dates.
- Place a date on one edge of the strip, roll until it is completely wrapped in the dough and has a slight overlap. Cut off the strip, and gently press to seal the roll.
- Repeat the same process with the rest of the dough and the dough scraps.
- Place it on a baking tray lined with parchment paper or a silicon mat.
- Add an egg yolk to a bowl. Add two teaspoons of water, whisk it together.
- Brush each roll with egg wash. This is optional, but it adds a lovely golden brown color to the crust. Bake at 350° F/180° C for 20 to 25 minutes or until the top is lightly golden. Baking time will depend upon the thickness of the dough.
- Allow the date rolls to cool on the baking tray for 5 minutes. Then transfer to a wire rack, let them cool down completely.
Video
Notes
This Instant Pot Thai Yellow Curry is creamy, aromatic, and flavorful, packed with tender chicken and veggies. Pair it with some white rice for a delicious and wholesome meal that is perfect for busy weeknight dinners.

Have you ever tried to recreate your favorite Thai restaurant dishes at home? If you haven’t yet then this Instant Pot yellow curry would be a great place for you to start. It is not as spicy as the green and red counterparts, making it perfect for folks who avoid spicy foods.
This Instant Pot Thai yellow curry is delicious, warm, mildly spiced, and comforting. It is everything you’d want from a curry. To top it off, the weather is just right to enjoy some delicious curry recipes. Honestly, we enjoy curries all year round at home!
To make any sort of Thai curry you need a curry paste which is usually made by pounding ingredients in a certain order in a big mortar and pestle. Grinding the ingredients in a blender does not yield the same results, but kind of works in a pinch.
Sometimes, it is not easy to source the ingredients that go into an authentic Thai paste. So, I think it’s perfectly fine to use jarred or canned curry pastes. In fact, as per my knowledge, most people in Thailand do use packaged curry pastes.
These readymade pastes are as close to the real deal and a true savior at times when you don’t want to cook a Thai curry from scratch.
If you are lucky enough to source most of the ingredients and are feeling adventurous, you can easily make a big batch of this yellow curry paste and freeze it in ice cube trays, use two to three cubes to make a pot of curry!

- Why you will love this recipe?
- Ingredients needed
- How to make Instant Pot Thai Yellow curry with chicken – Step by step process
- Storage suggestions
- Serving suggestions
- Recipe Notes and tips
- Frequently asked questions (FAQs)
- You may also enjoy these Instant Pot curry recipes
- Instant Pot Thai Yellow Curry With Chicken
Why you will love this recipe?
This Instant Pot Thai yellow curry
✓ Is quick and easy, tastes pretty close to your favorite restaurant-style Thai curry
✓ Is mildly spiced as compared to the green or red Thai curry
✓ Does not need a lot of prep work
✓ Satisfies your curry cravings
✓ Can be made into a wholesome one pot meal by cooking the rice using the Pot in pot (PIP) method

Ingredients needed
To make this delicious Instant Pot yellow chicken curry you will need;
Cooking fat: I’ve used coconut oil. You can use any other oil of your choice.
Thai yellow curry paste : I love Mae ploy Thai curry paste. I used this while I was in the US. Unfortunately, it is not easy to source it where I’m at, so I’ve used whatever is available here (Blue Elephant brand) which worked equally well if not better.
Aromatics: Minced ginger and garlic! These are optional ingredients, but it builds the base flavor, so I recommend adding them.
Ground turmeric: Though the curry paste already has turmeric, I love to add a little more. It enhances the color of the curry. Never add too much turmeric or it can make the curry taste bitter. A little goes a long way!
Chicken: I’ve used boneless chicken breasts. Even boneless chicken thighs would be great here!
Coconut milk: A can of full-fat unsweetened coconut milk was used for this recipe. Coconut milk is added in two steps. In the first step, we need the thick coconut cream that’s on the top of the can to cook the curry paste. And in the second step, we use the rest of the liquid for the curry.
Vegetables: Traditionally Thai yellow chicken curry is made with potatoes. So that’s what I’ve used. I’ve also added carrots and red bell pepper. Some notes on the veggies;
- Onions: I’ve used red onions, but yellow or white would be good too.
- Potatoes: I’ve used yellow potatoes, but you can also use Russets if you like your potatoes to be a bit firmer.
- Carrots: Make sure you cut the carrots at least 1/2 inch thick or they will turn too soft. You could also use baby carrots.
Thai basil leaves: These have a strong, anise flavor as compared to sweet basil leaves. They add a pop of freshness to the curry. You may substitute with sweet basil if you can’t find them.
Kaffir lime leaves and lime juice: These add a zesty flavor that’s not too lemony but just enough to add a hint of brightness and acidity to the creamy coconut curry. I sourced mine from my DH’s garden 😀
Other ingredients: You will also need some fish sauce (don’t worry it will not make the curry taste fishy!) and palm sugar to balance the sweet, salty, and savory flavors.
Coconut cream: I love to add coconut cream towards the end as it makes the curry slightly creamier and richer.

How to make Instant Pot Thai Yellow curry with chicken – Step by step process
Step 1: Saute aromatics
Press the ‘SAUTE’ button, and set it to ‘NORMAL’. Once it displays, ‘HOT’, add 1 tablespoon of coconut oil. ( Photo 1 )
Add 1/2 tablespoon minced ginger and 1 tablespoon minced garlic, saute until fragrant, about 30-45 seconds. ( Photos 2 and 3 )

Step 2: Fry Thai yellow paste with coconut cream and ground turmeric
Add 3 tablespoons of curry paste, 1/2 cup thick coconut cream (from the top of the can), and 1/2 teaspoon ground turmeric. ( Photos 4 to 7 ).
Mix until well combined, fry the paste until the oil separates from the sides. ( Photos 8 and 9 )
Note: If you’ve already shaken up the coconut milk can, simply add 1/2 cup of the coconut milk and fry the paste.

Step 3: Add chicken and other ingredients (coconut milk, fish sauce, palm sugar, veggies, and kaffir lime leaves)
Add 1 lb diced chicken, mix well, cook for 1-2 minutes. ( Photos 10 and 11 )

Note: If you have any browned bits stuck at the bottom of the pot, be sure to deglaze it with about 1/4 cup of chicken stock to avoid any potential ‘BURN’ error. If not, proceed with the recipe.
Add the rest of the coconut milk (use a spatula or spoon if needed to scrape out everything). Mix well. ( Photos 12 to 13 )
Add 1 tablespoon of fish sauce and 1 tablespoon of palm sugar. ( Photos 14 and 15 )

Also, add 1 cup diced potatoes, 1 cup diced carrots, and 3-4 kaffir lime leaves (bruised lightly or torn). ( Photos 16 to 19 )

Mix well. Make sure the potatoes and carrots are chunky or they will get too soft. ( Photos 20 and 21 )

Step 4: Pressure cook
Press ‘CANCEL’ to switch off the “SAUTE’ mode.
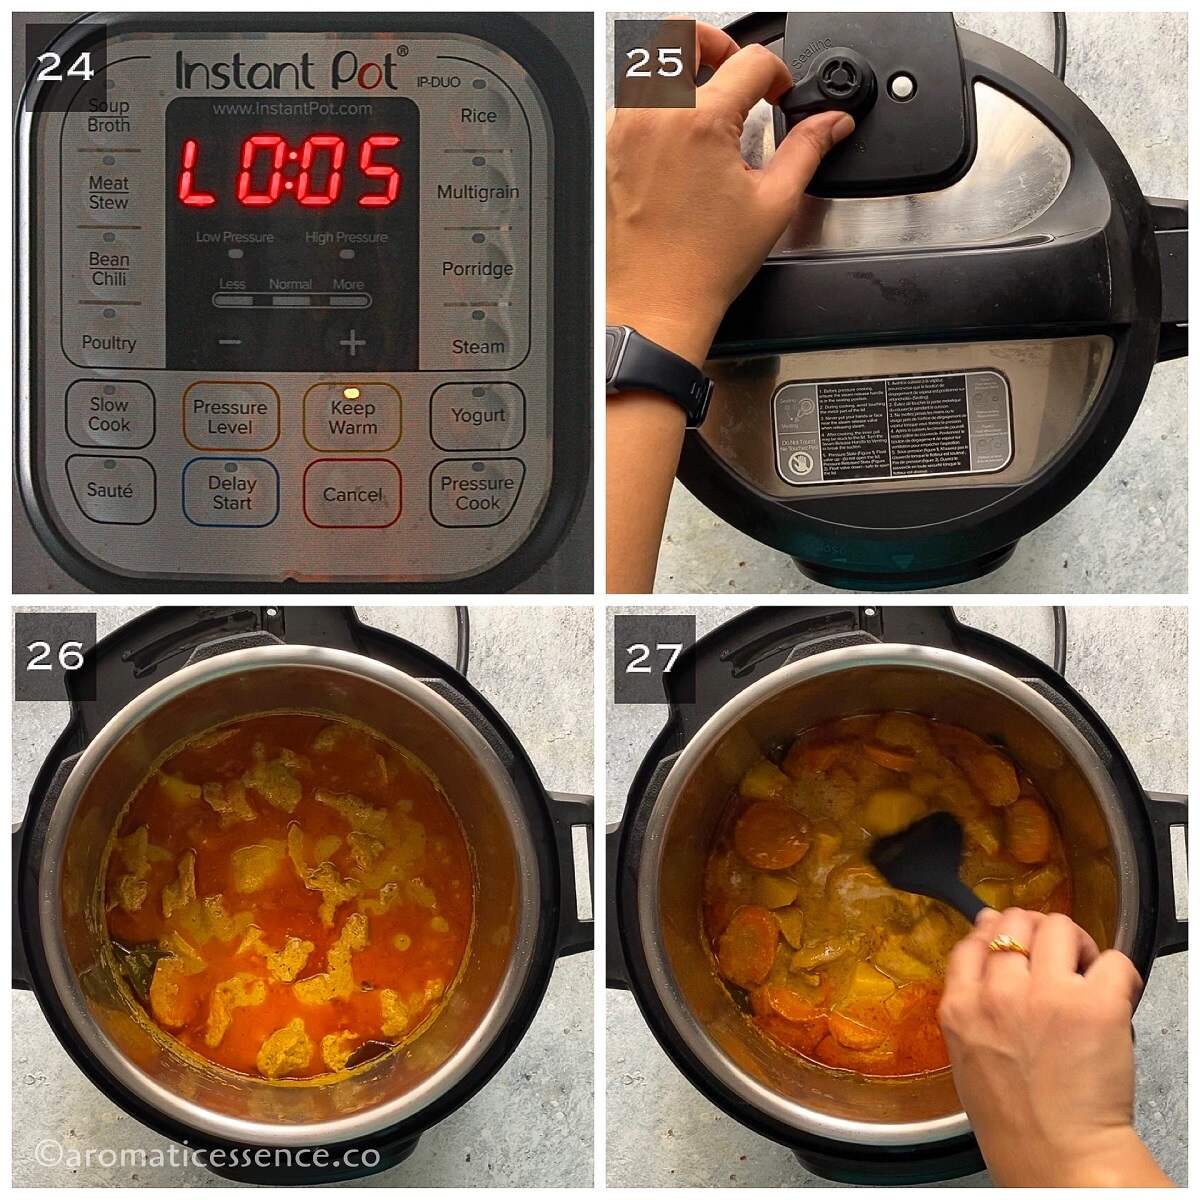
Close the lid of the Instant Pot. Set the valve to ‘SEALING’. ( Photo 22 )
Pressure cook on high for 5 minutes. It will take some time for the pressure to build up (about 10 minutes), after which the timer will begin. ( Photo 23 )

Step 5: Natural pressure release (NPR) for 5 minutes followed by quick release
Once the cooking cycle is complete, let the pot depressurize for 5 minutes. Then do a quick release of the leftover pressure as per the manufacturer’s instructions. Press ‘CANCEL’ and switch off the IP. ( Photos 24 and 25 )
Once the silver pin drops, turn the knob to ‘VENTING’ and open the lid away from you.
You will find a layer of oil floating on top which is perfectly fine. Mix it well. ( Photos 26 and 27 )
Step 6: Add remaining ingredients
Turn on the ‘SAUTE’ mode, check for seasoning. Adjust with more fish sauce and/or palm sugar as required. I added another 1/2 tablespoon of fish sauce. ( Photos 28 and 29 )
I did not add more palm sugar as it was good enough for us. Mix well.
Next, add 1/2 cup of diced onions and 1/2 cup of sliced bell pepper, mix well, cook for 2 to 3 minutes, or until the veggies turn crisp-tender. ( Photos 30 and 31 )

Switch off the Instant Pot. Add 2 tablespoons of coconut cream and mix. ( Photos 32 and 33 )
Next, add 1/2 to 1 tablespoon lime juice, and 1/4 cup Thai basil leaves. Mix gently. ( Photos 34 and 35 )

Step 7: Serve
Check for seasoning again and adjust if needed. Serve hot. ( Photos 36 and 37 )
Check out some serving suggestions mentioned below.

Storage suggestions
Store leftovers in an airtight container in the refrigerator for up to 2 to 3 days.
I do not suggest freezing the curry, as the veggies would become limp and mushy and the potatoes would turn mealy. If you intend to freeze the curry, leave out the veggies. It will freeze well in an airtight container or freezer-safe bag for up to 3 months.
Thaw overnight in the refrigerator.
The curry thickens on refrigeration. Warm it in the microwave or transfer the curry to a pot and simmer on low heat until heated through. You can add 1/2 cup stock or coconut milk to thin it out. If you prefer a thinner curry, add 1 cup stock/coconut milk.
Serving suggestions
Serve this Instant Pot Thai yellow curry with;
- Rice: Jasmine, basmati, plain white rice, or brown rice. They all pair well with this Instant Pot yellow curry. Brown rice would not work for the PIP method, so you can cook that separately over the stove-top if you prefer brown rice.
- Quinoa
- Rice stick noodles
- Cauliflower rice
- With a flatbread of your choice

Recipe Notes and tips
Thai yellow paste: If you’d wish to recreate restaurant-worthy flavors at home, I strongly suggest using Mae Ploy or Meesri brand of Thai paste.
Refrigerate the can of coconut milk: Do not shake the can of coconut milk. You will need the thick coconut cream layer to cook the curry paste.
Fry the paste well: This is the most important step of this recipe. I experimented and tried to make it a dump-and-go recipe, but it didn’t work well. I highly suggest you do fry the Thai paste with the thick coconut cream. It helps in bringing out the flavor of the paste.
Heat: If you like a spicy curry, you will need to add Thai bird eye chilies, jalapeños, or serrano peppers (finely diced or slit lengthwise) along with the minced ginger and garlic in step 1.
Palm sugar: This sugar has a caramel-like distinct flavor that’s not as sweet as regular granulated sugar. You can substitute it with brown sugar.
Kaffir lime leaves: These leaves are aromatic and have a citrus flavor. You will need to tear the leaves to help release their citrus flavor. You can also bruise them lightly and add them to the curry. Kaffir lime leaves are easily available in Asian stores in the freezer section. If you can’t find it, skip it and add more lime juice toward the end. You can also substitute it with a teaspoon of lemon or lime zest.
Avoid overcooking after adding the veggies: The vegetables will continue cooking in the residual heat. Cook, depending on the thickness of the veggies. You want them to be crisp-tender. You could also saute them separately in a skillet or roast them in the oven and then add them to the curry.
Red/Green curry paste: You can use the same procedure to make Thai red or green curry!

Don’t I need extra liquid besides the coconut milk for the recipe?
I’ve tested this recipe with and without chicken stock. The recipe works perfectly fine without the additional stock. Generally speaking, Thai curries are not as thick as Indian curries. So it comes down to your personal preference.
If you prefer a thinner sauce, add 1/3 to 1/2 cup of chicken stock. If you prefer a thicker sauce, simply follow the recipe as is.
Since the newer Instant Pots are more sensitive to the “BURN’ error, I suggest adding about 1/3 cup of stock. You can always thicken the curry either by simmering it on ‘SAUTE’ mode or adding a cornstarch slurry or coconut cream towards the end.
Can I double the recipe?
Yes, you can! Just make sure that you don’t exceed the max line. The cooking time will stay the same.
Can I double the quantity of vegetables?
Yes, you can. But please note that you may not have enough sauce. You may need to add about half a can more of coconut milk. It may dilute the overall flavor of the curry, especially if you start off with less curry paste. Experiment and see what works for you.
Be sure to add quick-cooking vegetables like frozen green peas, snow peas, snap peas, squash, zucchini, etc after pressure cooking or they will turn too mushy.
How can I make a vegetarian version of this Instant Pot yellow curry?
Make sure you use a curry paste that does not contain shrimp paste. From the list of ingredients mentioned on the label, Mae Ploy and Maesri yellow curry pastes are vegan.
For a vegetarian version, swap the chicken with firm tofu and reduce the pressure cooking time to a minute with quick release. Use vegan fish sauce, soy sauce, or coconut aminos. Also, use vegetable stock in place of chicken stock. You can also use a can of drained and rinsed chickpeas.
Can I skip the curry paste and use curry powder instead?
No, you cannot use them interchangeably in this recipe. It will change the entire flavor and consistency of the curry. Additionally, Thai paste has a lot more ingredients as compared to curry powder. Yellow Thai paste is made with galangal, shallots, lemongrass, Thai chilies, garlic, coriander roots, shrimp paste, kaffir lime leaves, and spices.
You can add a teaspoon or two of curry powder along with the ground turmeric to enhance the flavor of the curry. But, you cannot use it as a substitute for Thai paste.
How can I fix a spicy Thai curry?
This curry is about 2/5 in terms of spiciness. Even my kids enjoy this Instant Pot yellow curry. If you are unsure, start off with 2 tablespoons of Thai yellow paste. If it is too spicy, you can do a couple of things like;
- Add more coconut cream or coconut milk towards the end.
- Adjust with more sugar and lemon juice to balance out the heat.
How to make this curry on the stovetop?
Use a heavy-bottomed pot or a dutch oven. Follow the same procedure up to step 3. Instead of pressure cooking, cover the pot with a lid, and cook for 15 to 20 minutes, stirring occasionally, or until the chicken and potatoes are cooked through. Then add the remaining ingredients.
You may also enjoy these Instant Pot curry recipes
Instant Pot chana masala
Instant pot brown lentil curry
You can also follow me on Facebook , Pinterest, Instagram & Twitter

Instant Pot Thai Yellow Curry With Chicken
Equipment
- Instant Pot DUO60 6 Qt 7-in-1
Ingredients1x2x3x
- 1 tablespoon coconut oil or vegetable oil
- 1/2 tablespoon minced ginger
- 1 tablespoon minced garlic
- 2.5 oz Thai yellow curry paste 3 tablespoons, you can use between 2 to 4 tbsp curry paste depending on your spice tolerance
- 1/2 teaspoon ground turmeric
- 13.5 oz can of full-fat unsweetened coconut milk refer notes
- 1-2 tablespoons fish sauce
- 1-2 tablespoons palm sugar substitute with brown sugar
- 4 kaffir lime leaves or 1 teaspoon of lime zest
- 1 lb boneless chicken breasts or thighs cut into 1.5-inch chunks
- 1 cup of diced potatoes 2 inch chunks
- 1 cup diced carrots 1/2 to 1-inch chunks
To be added after pressure cooking
- 1/2 cup red onion cut into chunks
- 1/2 cup sliced red bell pepper
- 2 tablespoons coconut cream optional
- 1/2 to 1 tablespoon lime juice
- 1/4 cup loosely packed Thai basil leaves
Instructions
- Press the ‘SAUTE’ button, and set it to ‘NORMAL’. Once it displays, ‘HOT’, add coconut oil.
- Add minced ginger and minced garlic, and saute until fragrant.
- Add 1/2 cup thick coconut cream (from the top of the can), curry paste, and ground turmeric. Mix until well combined, fry the paste until the oil separates from the sides.
- Note: If you’ve already shaken up the coconut milk can, simply add 1/2 cup of the coconut milk and fry the paste.
- Add diced chicken, mix well, cook for 1-2 minutes.
- Note: If you have any browned bits stuck at the bottom of the pot, be sure to deglaze it with about 1/4 cup of chicken stock. If not, proceed with the recipe.
- Add the rest of the coconut milk (use a spatula or spoon if needed to scrape out everything). Mix well.
- Add 1 tablespoon of fish sauce and 1 tablespoon of palm sugar.
- Add diced potatoes, diced carrots, and kaffir lime leaves (bruised lightly or torn).
- Mix well. Make sure the potatoes and carrots are chunky or they will get too soft.
- Press ‘CANCEL’ to switch off the “SAUTE’ mode.
- Close the lid of the Instant Pot. Set the valve to ‘SEALING’. Pressure cook on high for 5 minutes. It will take some time for the pressure to build up (about 10 minutes), after which the timer will begin.
- Once the cooking cycle is complete, let the pot depressurize for 5 minutes. Then do a quick release of the leftover pressure as per the manufacturer’s instructions. Press ‘CANCEL’ and switch off the IP. Once the silver pin drops, turn the knob to ‘VENTING’ and open the lid away from you.
- Turn on the ‘SAUTE’ mode, check for seasoning. Adjust with more fish sauce and/or palm sugar as required. I add another 1/2 tablespoon of fish sauce. I did not add more palm sugar as it was good enough for us. Mix well.
- Next, add diced onions and sliced bell pepper, mix well, cook for 3 minutes, or until the veggies turn crisp-tender.
- Switch off the Instant Pot. Add 2 tablespoons of coconut cream (optional), lime juice, and Thai basil leaves. Mix gently.
- Check for seasoning again and adjust if needed. Serve hot.
