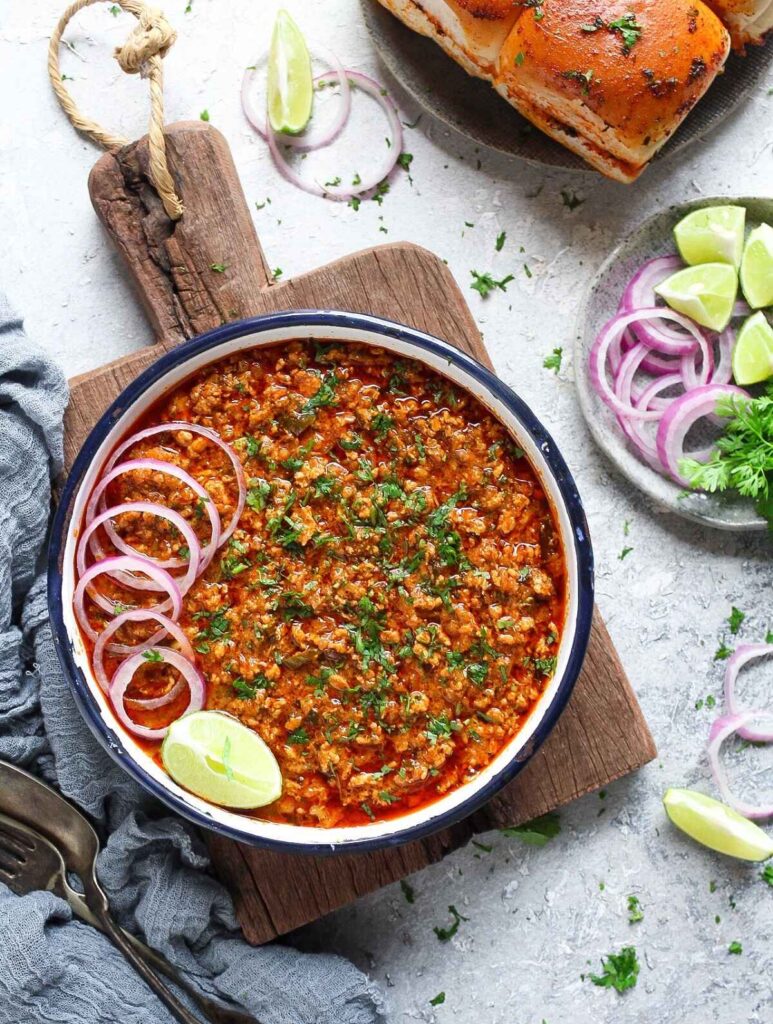
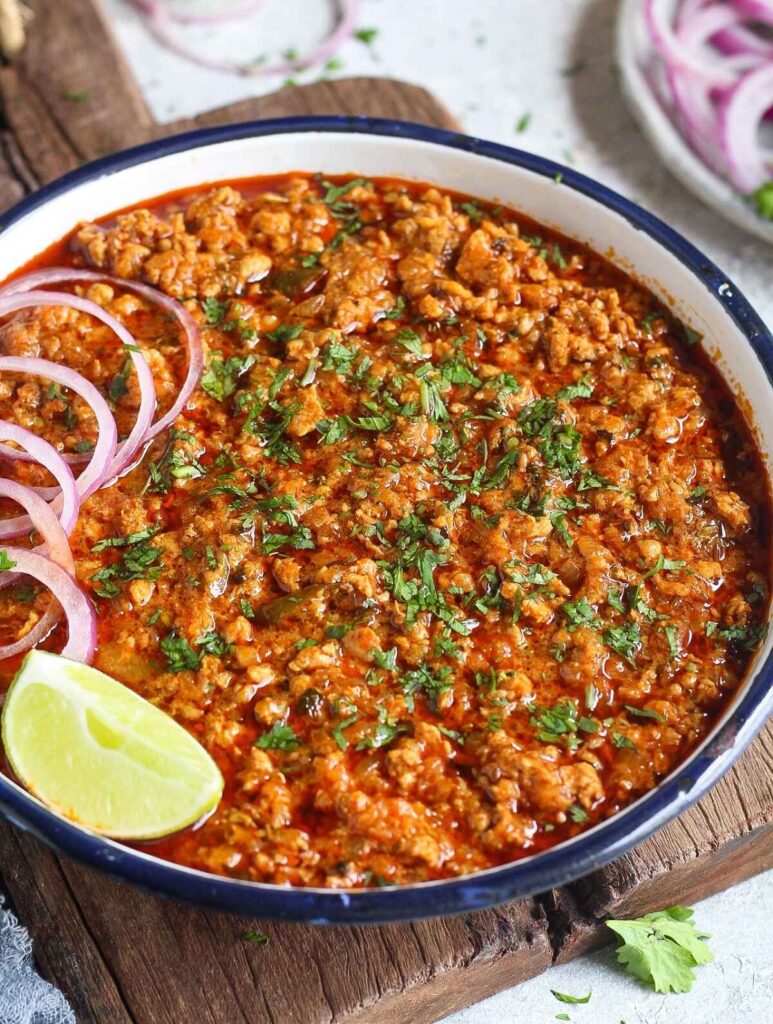
Chicken keema masala is a delicious Indian-style minced chicken curry, packed with bold, savoury, and robust flavors. It is made with minced chicken, aromatics, tomatoes, curd, and a blend of Indian spices. Serve with bread or rice for a filling and hearty, busy weeknight meal!
Minced meat is pretty versatile and a great ingredient to have around in the freezer. It comes in handy to make quick recipes.
I love using chicken keema to make recipes like chicken seekh kebab , chicken galouti kebab , chapli kebab, meatball curry, nargisi kofta curry , etc to name a few.
Why you will love this recipe?
☑ It is a delicious way to transform bland and boring minced chicken using basic ingredients
☑ Can be made ahead
☑ It is a very comforting dish
☑ Leftovers are great to make so many other delicious recipes (check recipe tips for suggestions)
☑ It can be adapted to suit your personal preference
Ingredients needed
To make this chicken kheema masala recipe, you will need;
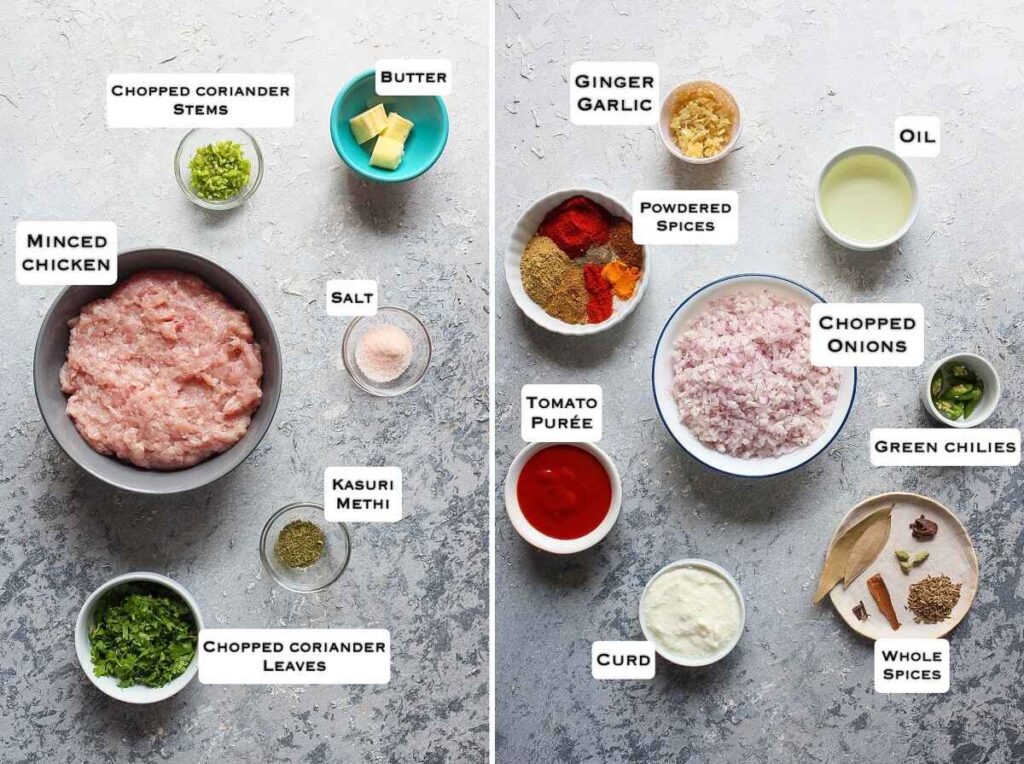
- Ground chicken: I’ve used packaged minced chicken that I source online from Licious (not sponsored, it is what I genuinely love using).
- Aromatics: These are the usual suspects, i.e. onions, ginger, and garlic. I’ve used red onions and coarsely crushed the ginger and garlic in a mortar and pestle. You may use store-bought or homemade ginger garlic paste instead.
- Spices: You will need whole spices like bay leaves, cloves, cinnamon, black cardamom, green cardamom, and cumin seeds along with powdered spices like coriander, cumin, red chili, Kashmiri chili, garam masala powder, salt, and black pepper.
- Tomatoes: I’ve used readymade tomato puree, but you can puree 2 fresh tomatoes, and use that instead. You may also use canned crushed tomatoes or 2 tablespoons of tomato paste instead. It adds a tangy taste to the keema. But you may skip it if you wish to.
- Curd or yogurt: Adds a subtle tanginess, along with some richness and creaminess to the dish.
- Herbs: Dried fenugreek leaves add an earthy flavor and fresh coriander leaves add an element of freshness. I’ve also added a bit of tender coriander stems as it has more flavour than the leaves.
- Cooking fat: I’ve used oil, but you can also use ghee or a combination of oil plus ghee. You can also use mustard oil, heat on medium-low heat until smoky.
- Butter: You will also need some butter to finish off the dish!
There are many ways to make this recipe, some don’t include curd, some skip the whole spices, and some make it with a green spice paste (check out my green masala keema recipe ).
I personally love the green masala keema, but this version is an adaption of my Mom-in-law’s recipe and it leans more toward the North Indian flavors. It is simple and delicious and I really hope you will give it a go! I’m pretty certain it will make the cut to your weekly rotation meals!
How to make chicken keema masala – Step-by-step process
Step 1: Onion-tomato masala
Heat 3 to 4 tablespoons oil in a kadai on medium heat. Add whole spices and cumin seeds, and saute for a few seconds until the spices are aromatic. ( Photos 1 and 2 )
Add 2 cups of finely chopped onions, and saute until they turn golden brown. ( Photos 3 and 4 )
Add 2 tablespoons of crushed ginger garlic, and saute until the raw smell vanishes. ( Photos 5 and 6 )

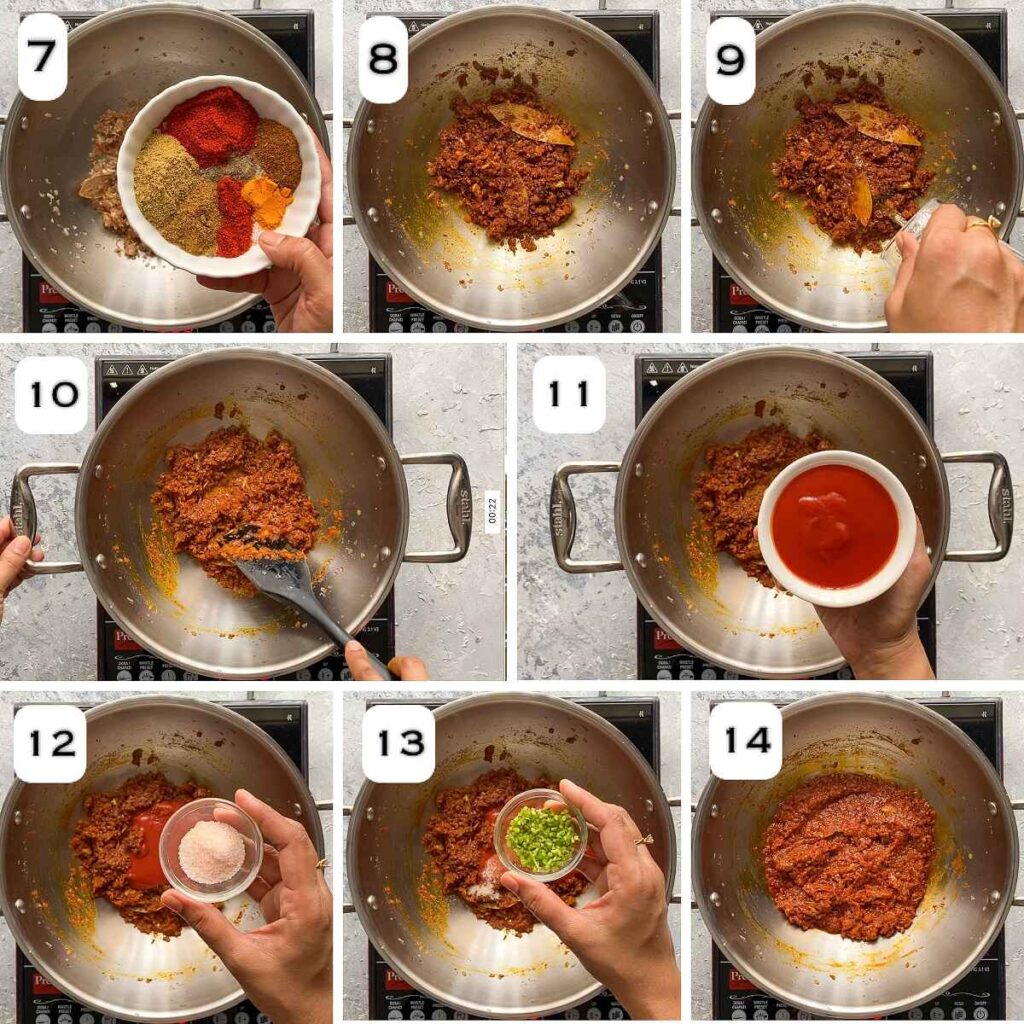
Add 1 tablespoon of coriander powder, 1 tablespoon Kashmiri red chili powder, 1 teaspoon of cumin powder, ½ teaspoon spicy red chili powder, 1 teaspoon of garam masala, ¼ teaspoon of turmeric, and ¼ teaspoon of black pepper, and saute on medium-low heat for another 30 seconds. ( Photos 7 and 8 )
Pro tip for the novice cook: Since there are quite a number of powdered spices in this step, I recommend measuring out the spices beforehand in a small bowl instead of adding them individually. This will help to prevent the spices from burning.
Add about 1/4 cup of water to prevent the spices from burning. ( Photos 10 and 11 )
Add ½ cup of tomato puree, salt to taste, and 1 to 2 tablespoons of chopped coriander stems. ( Photos 11 to 13 )
Mix well, and cook on medium heat, stirring frequently, until the fat separates. ( Photo 14 )
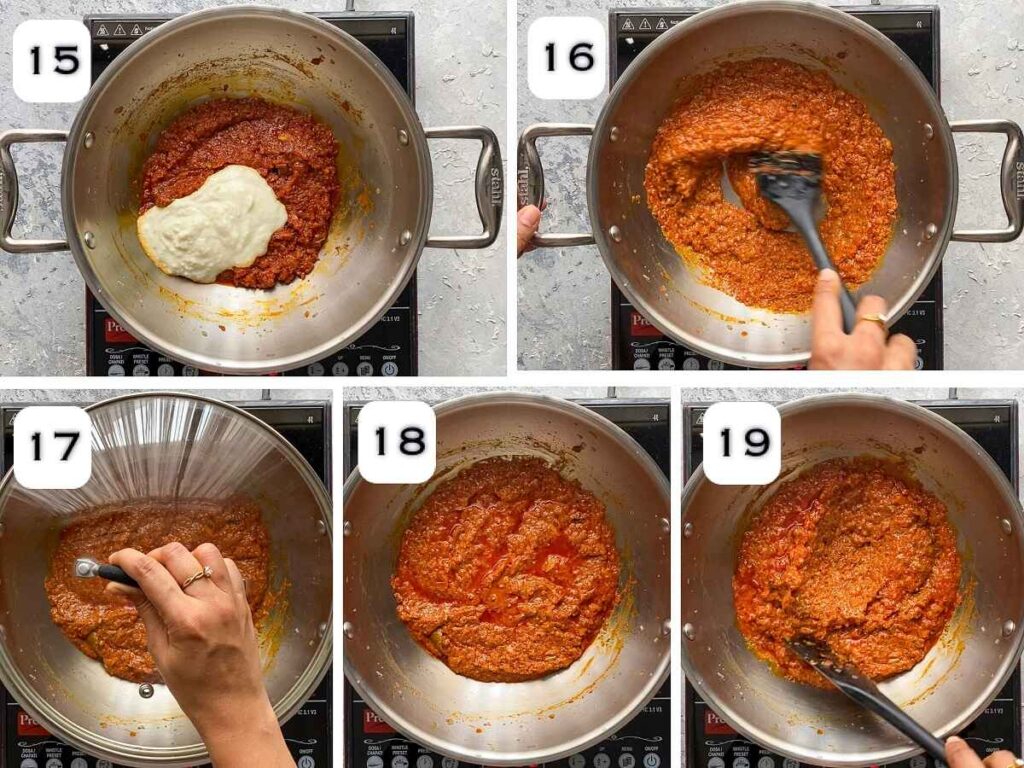
Turn down the heat to low, add ½ cup of whisked curd, mix well, cover, and cook for another 1-2 minutes. ( Photos 15 to 17 )
Open the lid, and give it a good mix. ( Photos 18 and 19 )
Step 2: Combine minced chicken with onion-tomato base and cook
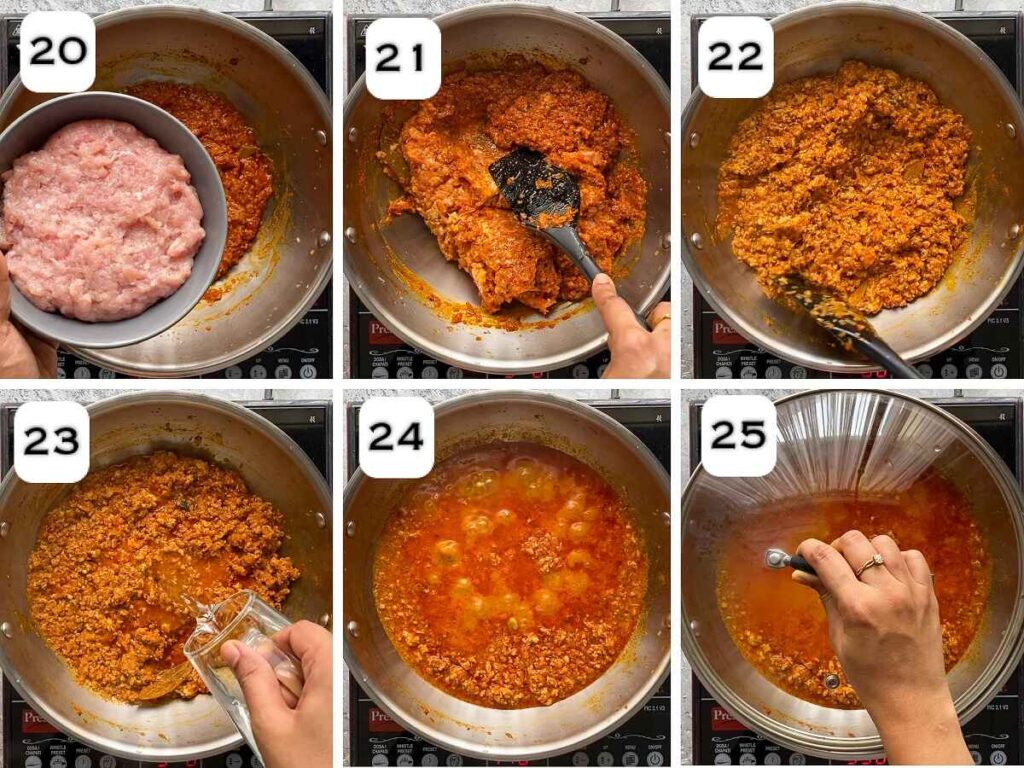
Add 450 grams of minced chicken, and mix on medium-low heat, breaking it with a spatula to ensure even cooking until well incorporated with the masala. Be sure to stir constantly to prevent the formation of lumps. ( Photos 20 and 21 )
Pro tip: Be sure to lower the heat while adding the keema or you will end up with big chunks of keema.
Then increase the heat to medium-high and keep cooking for another 7 to 8 minutes. ( Photo 22 )
Add 1 cup hot water, mix well, and bring to a boil. Reduce the heat to low, cover, and simmer, stirring occasionally for another 10 minutes. ( Photos 23 to 25 )
Step 3: Add the remaining ingredients
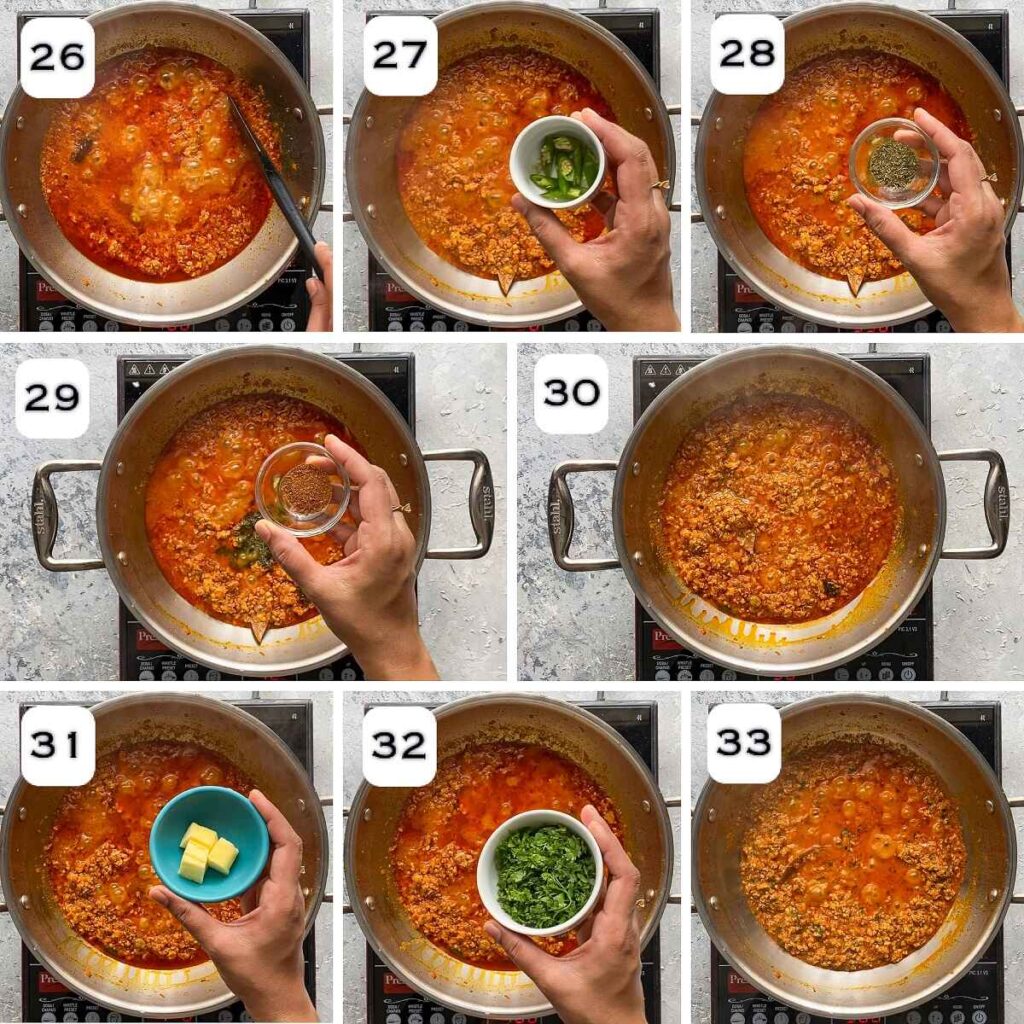
Open the lid (you may skim off some of the oil floating on top if you wish to) and give it a good mix. ( Photo 26 )
Add 2 chopped green chilies, ½ teaspoon of crushed kasuri methi, and the remaining ½ teaspoon of garam masala. ( Photos 27 to 28 )
Mix well and cook for another 2 minutes. Taste and adjust seasonings if needed. ( Photo 30 )
Finally, add 1 tablespoon cubed butter and ¼ cup chopped coriander leaves. Mix well and switch off the heat. ( Photos 31 to 33 )
Serve hot with pav!
Serving suggestions
I love serving this yummy chicken keema masala with some buttered and toasted pav along with some onion rings and lemon wedges on the side.
You can also serve it with steamed rice, jeera rice, or vegetable pulao .
Mop it up with bread like baguette, sourdough dinner rolls, or flatbreads like parathas, rumali roti, chapati, kulcha , naan, etc!
Another delicious option is to stuff them between sliders to make an Indian version of sloppy joes!

Storage instructions
- Refrigerator: Once the chicken keema has cooled down completely, transfer it into an airtight container, and refrigerate for up to 5 days.
- Freeze: You may also portion individual servings of chicken keema in freezer-safe zip top bags or containers. Remember to label the contents and freeze for up to 2 months. Thaw overnight in the fridge.
- Reheat: Reheat leftover or thawed chicken keema in a pan over medium heat, stirring frequently, until heated through. You may also reheat it in the microwave.
Recipe Tips
Use a heavy-bottomed pot: There is a lot of roasting in this recipe, so please be sure to use a heavy-bottomed pot or a good quality nonstick pot. This will prevent the ingredients from burning at the bottom of the pot.
Bhuno the ingredients well: We all love shortcuts, don’t we? Unfortunately, there is none when it comes to bhuno which is a Hindi word to roast or stir-fry ingredients like spices, vegetables, or meat over medium heat. Be sure to cook the ingredients really well, do not rush through the process. You can splash some water in between if at any point, you feel that the ingredients are sticking to the bottom of the pot. When you see the oil separating, it is a good indication that the masala is well-cooked.
Shortcut version: The good news is that you can use premade onion tomato or bhuna masala. Make this versatile masala base in bulk, freeze them in ice trays, and use the frozen bhuna masala cubes to make this dish or any other North Indian recipe. Saute about 3/4 cup of the bhuna masala in a little oil, add curd, cook well, and then add the chicken mince, and follow the rest of the recipe. Convenient, isn’t it?
Do not skimp on the onions: Caramelized onions add a depth of flavor and a hint of sweetness to the recipe. It may seem like a lot, but it reduces on caramelizing.
Tomatoes: You may skip the tomatoes if you wish to.
Curd: Try and use fresh curd. It should not be sour.
Spice tolerance: This recipe is not very spicy. You can increase the heat by increasing the spicy red chili powder, and black pepper, and using dark green chilies instead of mild green ones.
Consistency: We like a semi-thick consistency of chicken keema masala. If you like a saucier curry, add more water. Likewise, if you prefer a dry version, use 1/2 cup of water instead of 1 cup and cook until most of the moisture evaporates.
Make it creamy: You can add about 2 to 3 tablespoons of cream toward the end of the cooking process to add some richness and creaminess to the keema.
Transform leftovers: This is the best kind of leftovers you can have in your fridge. You can use leftover chicken keema to make quesadillas, tacos, burritos, sandwiches (grilled or open-faced), paratha, or wraps, as a topping for pizzas, naan pizza, etc. You can also use them to make keema puffs or keema samosas. Just be sure to dry off the excess liquid while making these recipes. Also, do pick out the whole spices before using this keema as stuffing, biting into whole spices is not a very pleasant experience.
Variations
- Mint leaves: You can also add a handful of fresh mint leaves along with the coriander leaves.
- Chicken keema matar: You can add about 1/2 cup of frozen green peas (matar) toward the end of cooking, and cook for another 2 to 3 minutes.
- Aloo keema: You can also add about 2 medium diced potatoes just before adding the water.
- Keema shimla mirch: You can add about 200 grams of diced capsicum (bell pepper) cubes.
- Aloo keema matar: You can add both potatoes and green peas.
- Tawa keema: Add a tablespoon of pav bhaji masala along with the other spices.
- Greens: You can add some chopped fresh methi leaves, spinach leaves, collard greens, kale, or dill leaves for some variation.
What is chicken keema?
Chicken keema or chicken qeema is a delicious minced meat preparation featuring tender and juicy minced chicken in a spicy, flavorful, and robust onion-tomato-based sauce, seasoned with an array of spices and fresh and dried herbs.
You can enjoy it as a dry preparation or as a semi-thick curry, depending on your personal preference.
Generally, keema or qeema refers to minced meat or ground meat in Hindi. Keema may be made from almost any kind of meat. Keema is popular not only in India but also in Pakistan and Bangladesh.
Can I make this recipe in the Instant Pot?
Yes, you can! Switch on the Instant Pot and set the ‘SAUTE’ button to ‘MEDIUM’. Follow the same steps as above right up to browning the ground chicken. Then add 1 cup of hot water, and give it a good mix. Make sure that there are no browned bits stuck at the bottom of the pot.
Close the lid of the Instant Pot and press ‘CANCEL’, set the valve to ‘SEALING’, and pressure cook on ‘HIGH’ for 4 minutes. Let the pressure release naturally for 10 minutes.
Press ‘SAUTE’ and add the remaining ingredients. If you prefer a thicker curry, adjust the consistency by simmering for a few more minutes.
How to make this recipe in a stovetop pressure cooker?
Follow the same steps as above right up to browning the ground chicken. Then add 1/2 cup of hot water, and give it a good mix. Pressure cook on medium-high heat for 2 to 3 whistles. Let the pressure release naturally. Open the lid and add the remaining ingredients.
Is chicken keema good for health?
Since chicken keema is made with lean meat, it is a healthier alternative to mince made with red meat. However, I’d suggest cutting back on the oil and spices to make this a bit lighter.
How to make a vegetarian version of this recipe?
Swap the chicken mince with soy/TVP granules. You can also use mushrooms, cauliflower rice, or a combination of these to make a vegetarian version. Cooking time will reduce, and skip the water or use it sparingly as the veggies may turn mushy.
How to grind chicken at home without a meat grinder?
Try and use chicken thighs instead of breasts for a flavorful and juicy chicken keema. Cut the chicken pieces into small chunks. Depending on the size of your food processor, work in batches if needed. Place the chunks in a food processor and pulse until you reach your desired consistency of the minced meat. I suggest keeping it coarse. Avoid using a blender as you’ll end up with a chicken paste.
You can also finely chop the chicken pieces using a sharp knife.

Chicken Keema Masala Recipe
Ingredients1x2x3x
- 3 to 4 tablespoons oil
- 2 bay leaves
- 3 cloves
- 1 inch cinnamon
- 1 black cardamom crushed
- 3 green cardamom
- 1 teaspoon cumin seeds
- 2 cups finely chopped onion 250 grams
- 2 tablespoons coarsely crushed ginger garlic 20 grams
- ½ cup tomato puree 110 grams
- Salt to taste, I’ve used 1½ tsp of pink Himalayan salt
- 1 tablespoon chopped coriander stems
- ½ cup whisked curd room temperature
- 450 grams minced chicken thaw for 30 mins if refrigerated
- 1 cup hot water adjust as per desired thickness of curry
- 2 green chilies
- ½ teaspoon crushed kasuri methi
- ¼ cup chopped coriander leaves
- 1 tablespoon unsalted butter
Spice mix
- 1 tablespoon coriander powder
- 1 tablespoon Kashmiri chili powder or paprika
- 1 teaspoon cumin powder
- ½ teaspoon red chili powder or cayenne adjust as per desired spice level
- 1½ teaspoon garam masala divided
- ¼ teaspoon turmeric
- ¼ teaspoon black pepper
Instructions
Onion-tomato masala
- Heat oil in a kadai on medium heat. Add whole spices and cumin seeds, and saute for a few seconds until the spices are aromatic.
- Add finely chopped onions, and saute until they turn golden brown.
- Add crushed ginger garlic, and saute until the raw smell vanishes.
- Add the spice mix and saute on medium-low heat for another 30 seconds.
- Pro tip for the novice cook: Since there are quite a number of powdered spices in this step, I recommend measuring out the spices beforehand in a small bowl instead of adding them individually. This will help to prevent the spices from burning.
- Add about 1/4 cup of water to prevent the spices from burning.
- Add tomato puree, salt to taste, and chopped coriander stems. Mix well and cook on medium heat, stirring frequently, until the fat separates.
- Turn down the heat to low, add whisked curd, mix well, cover, and cook for another 1-2 minutes. Open the lid, and give it a good mix.
Combine minced chicken with onion-tomato base and cook
- Add minced chicken, and mix on medium-low heat, breaking it with a spatula to ensure even cooking. until well incorporated with the masala. Be sure to stir constantly to prevent the formation of lumps.
- Pro tip: Be sure to lower the heat while adding the keema or you will end up with big chunks of keema.
- Then increase the heat to medium-high and keep cooking for another 7 to 8 minutes.
- Add 1 cup hot water, mix well, and bring to a boil. Reduce the heat to low, cover, and simmer,stirring occasionally. for another 10 minutes.
Add the remaining ingredients
- Open the lid (you may skim off some of the oil floating on top if you wish to) and give it a good mix.
- Add chopped green chilies,crushed kasuri methi, remaining ½ teaspoon of garam masala.
- Mix well and cook for another 2 minutes. Taste and adjust seasonings if needed
- Finally, add cubed butter and chopped coriander leaves. Mix well and switch off the heat. Serve hot with pav!
Video
Notes
Nutrition

Chicken Keema Masala Recipe
Ingredients
- 3 to 4 tablespoons oil
- 2 bay leaves
- 3 cloves
- 1 inch cinnamon
- 1 black cardamom crushed
- 3 green cardamom
- 1 teaspoon cumin seeds
- 2 cups finely chopped onion 250 grams
- 2 tablespoons coarsely crushed ginger garlic 20 grams
- ½ cup tomato puree 110 grams
- Salt to taste, I’ve used 1½ tsp of pink Himalayan salt
- 1 tablespoon chopped coriander stems
- ½ cup whisked curd room temperature
- 450 grams minced chicken thaw for 30 mins if refrigerated
- 1 cup hot water adjust as per desired thickness of curry
- 2 green chilies
- ½ teaspoon crushed kasuri methi
- ¼ cup chopped coriander leaves
- 1 tablespoon unsalted butter
Spice mix
- 1 tablespoon coriander powder
- 1 tablespoon Kashmiri chili powder or paprika
- 1 teaspoon cumin powder
- ½ teaspoon red chili powder or cayenne adjust as per desired spice level
- 1½ teaspoon garam masala divided
- ¼ teaspoon turmeric
- ¼ teaspoon black pepper
Instructions
Onion-tomato masala
- Heat oil in a kadai on medium heat. Add whole spices and cumin seeds, and saute for a few seconds until the spices are aromatic.
- Add finely chopped onions, and saute until they turn golden brown.
- Add crushed ginger garlic, and saute until the raw smell vanishes.
- Add the spice mix and saute on medium-low heat for another 30 seconds.
- Pro tip for the novice cook: Since there are quite a number of powdered spices in this step, I recommend measuring out the spices beforehand in a small bowl instead of adding them individually. This will help to prevent the spices from burning.
- Add about 1/4 cup of water to prevent the spices from burning.
- Add tomato puree, salt to taste, and chopped coriander stems. Mix well and cook on medium heat, stirring frequently, until the fat separates.
- Turn down the heat to low, add whisked curd, mix well, cover, and cook for another 1-2 minutes. Open the lid, and give it a good mix.
Combine minced chicken with onion-tomato base and cook
- Add minced chicken, and mix on medium-low heat, breaking it with a spatula to ensure even cooking. until well incorporated with the masala. Be sure to stir constantly to prevent the formation of lumps.
- Pro tip: Be sure to lower the heat while adding the keema or you will end up with big chunks of keema.
- Then increase the heat to medium-high and keep cooking for another 7 to 8 minutes.
- Add 1 cup hot water, mix well, and bring to a boil. Reduce the heat to low, cover, and simmer,stirring occasionally. for another 10 minutes.
Add the remaining ingredients
- Open the lid (you may skim off some of the oil floating on top if you wish to) and give it a good mix.
- Add chopped green chilies,crushed kasuri methi, remaining ½ teaspoon of garam masala.
- Mix well and cook for another 2 minutes. Taste and adjust seasonings if needed
- Finally, add cubed butter and chopped coriander leaves. Mix well and switch off the heat. Serve hot with pav!
Video
Notes
Nutrition
Ribbon cake is a soft, moist, and dense cake, popular in most local Goan bakeries. It has a rich and buttery flavor with a tender crumb. The colorful layers which resemble ribbons are a characteristic feature of this cake, and hence the name!

Ribbon cake is often served alongside wafers(chips/crisps), patties, and some chutney sandwiches at most Goan celebrations or special occasions be it a birthday party, get-together, or any other gathering.
The cross-section of the vibrant and colorful layers revealed on slicing a loaf of ribbon cake is truly a feast for the eyes! No two slices are the same, as each slice has a unique ribbon pattern.
If you are not a fan of the traditional Christmas fruit cake or know of someone who doesn’t like it either but would still like to bake a cake for Christmas, then do try this super simple Goan ribbon cake. It will make a wonderful addition to your ‘ kuswar ‘ (Goan Christmas sweet platter).

- Ingredients
- Instructions
- Variations
- Storage
- Top tips
- FAQ
- Related
- Ribbon Cake
Ingredients
This is a basic pound cake recipe. A basic pound cake recipe calls for a pound each of butter, sugar, eggs, and flour. I’ve scaled down the recipe as per the capacity of my loaf pan.
Here is what you’ll need to make this cake recipe.

- All-purpose flour: I’ve used regular all-purpose flour. You can also use cake flour for a lighter crumb.
- Butter: Use unsalted and softened butter.
- Sugar: Castor or granlated cane sugar. If using icing sugar, use the same quantity, but do sift it.
- Eggs: Make sure to use room-temperature eggs.
- Leaveners: Though not traditionally used, I’ve used some baking powder to make this pound cake a bit lighter.
- Salt: Skip if using salted butter.
- Vanilla extract: Adds a wonderful flavor and aroma to the cake.
- Gel colors: Just a drop of red and green gel colors to create the ribbon effect.
Please see the recipe card for the complete list of ingredients and quantities.
Instructions
1- Preheat the oven to 350°F/180°C and position a rack in the middle of the oven. Grease an 8×4 inch loaf pan with a little butter and line it with parchment paper leaving about 1 to 2 inches of overhang on both sides.
2- In a medium mixing bowl, sift 150 grams of all-purpose flour, 1 teaspoon baking powder, and 1/4 teaspoon salt.
3- Whisk until well combined.

4- In a large mixing bowl, add 150 grams of unsalted, softened butter and 150 grams of castor sugar.
5- Using a handheld mixer, cream butter, and sugar on medium-high speed until light and fluffy, about 3 to 5 minutes.
6- Scrape down the sides and bottom of the bowl with a spatula once or twice.

7- Add eggs, one at a time, beating for about 1 minute on medium speed after each addition.
8- Add the last egg along with 1 teaspoon vanilla extract, beating for 1 minute on medium speed until well combined. (Total of 3 eggs used)
9- Scrape down the sides and bottom of the bowl with a spatula.

10- Add dry ingredients to the butter mixture in two parts.
11- Fold dry ingredients with the butter mixture gently after each addition, just until combined and no more flour streaks are visible.
12- Measure out 2/3 cup of the batter and transfer it into 2 small bowls. (1/3 cup batter per bowl)
13- Add a drop of red and green gel color to each bowl. Mix gently.

14- Spoon 1/3 portion of the white batter into the prepared pan, and smooth out the surface evenly using a spatula.
15- Next, spoon in the pink-colored batter and smooth out the surface with a spatula.
16- Repeat with 1/3 portion of the white batter.
17- Repeat step 15 but now with the green-colored batter.
18- Add the remainder of the white batter and smooth out the surface evenly.
19- Tap the loaf pan a couple of times on the countertop to eliminate any air bubbles.
20- Bake in a preheated oven at 350°F/180°C for 45 to 50 minutes or until a toothpick inserted in the center of the loaf comes out clean.
21- When the cake is baked, transfer the loaf pan to a wire cooling rack. Let the cake cool in the loaf pan for 15 minutes. Lift the cake out of the pan and allow it to cool completely on a wire rack. Once cooled, slice and enjoy with a cup of tea or coffee!

Variations
This cake recipe is pretty basic, yet delicious! If you want to spruce it up, here are some suggestions listed below. Feel free to use one or mix and match to make your version of this Goan ribbon cake.
- Flavor – Feel free to add different flavors to the different layers of this cake. You can use peppermint, butterscotch, almond extract, or lemon zest and lemon extract for a citrus flavor, etc.
- Color – While pink and green ribbons are distinctive layers of this cake, you may use your preferred colors other than the colors used in the recipe. You can also add a little color to the white batter instead of leaving it plain.
- Nuts: Fold in a handful of chopped nuts like cashew nuts, almonds, or walnuts in the batter for a nutty texture.
- Dried fruits: Raisins, dried blackcurrants, dried blueberries, dried cranberries, etc would make a lovely addition to this cake.
- Chocolate – You can make a chocolate ribbon pound cake by adding a couple of tablespoons to 2/3 portions of the batter.
- Spice it up: You may add pumpkin pie spice mix, apple pie spice mix, ground cinnamon, cloves, nutmeg, cardamom, etc for a hint of spice to the cake.
- A dusting of icing sugar: This will give the cake a festive touch!
- Top it with glaze: You can top the loaf with a glaze of your choice, like a simple vanilla glaze, lemon glaze, chocolate glaze, cream cheese glaze, etc.
Have fun experimenting with these suggestions!

Storage
Room temperature: This ribbon cake will keep well in an airtight container at room temperature for up to 2 to 3 days.
Refrigeration: For a longer shelf life, you may refrigerate the cake in an airtight container for up to 1 week. Bring to room temperature before serving.
Freezing: Once the cake has cooled down completely, wrap the cake loaf or individual cake slices in cling wrap and then aluminum foil, place it in a freezer-safe bag, and freeze for up to 2 months. Be sure to label the contents. Thaw overnight in the refrigerator or at room temperature before serving. Do not refreeze! Avoid thawing it in the microwave as it affects the cake’s texture and moisture.
Top tips
Weigh your ingredients: For best results, I highly recommend you weigh your ingredients for this recipe. I have tried to provide the measurements of volume in cups as well for those of you who don’t have a weighing scale, but I have to warn you that it is approximate, and may vary if your cup volumes differ from mine. This in turn will affect the outcome of the cake.
Softened butter: It should feel slightly cool to the touch. It should not be mushy, melty, greasy, or shiny. To check, press the butter with your finger, if it leaves an indent with little resistance, it is softened. If it slides through easily, it is too soft.
Eggs: This recipe uses equal parts of butter, sugar, eggs, and flour. I’ve used 3 medium eggs for this recipe. The total weight of 3 medium-sized eggs without the shells was 150 grams which is the same as the weight of each of the ingredients. If needed, you can adjust the quantity of the other ingredients according to the weight of the eggs.
Avoid overmixing the batter: Never overmix the batter as it will result in a very tough and chewy cake. As long as there are no flour streaks, a few tiny lumps are perfectly fine in the batter.
To achieve the ideal ribbon effect: Ensure that you layer and spread the batters evenly. You can use a wooden skewer to swirl the batters ever so gently for the marbled effect.
Clean slices: Always allow the cake to cool down completely before slicing. Slicing a warm cake may cause it to crumble and fall apart.
For a more moist cake: You can add about 1/4 cup of milk or buttermilk in this recipe. Alternate adding wet and dry ingredients, beginning with dry and ending with dry ingredients. Also, you may replace about 25 grams of the butter with vegetable oil to keep the cake moist for longer.

Can I make an eggless version of this cake?
I haven’t tried an eggless version of this cake yet, but you can follow my eggless marble cake for an egg-free version. Follow the same process of separating the batter into 3 parts and coloring 2 parts.
Can I use whole wheat flour instead of all-purpose flour?
You may use it, but it will make the texture of the cake denser. I suggest using a 50:50 ratio of all-purpose flour and whole wheat flour. You may add some milk/buttermilk to adjust the consistency of the batter.
Why is my cake crumbly?
The cake can turn dry and crumbly if you overmix or overbake it. Do keep an eye on the cake after 35-40 minutes, as each oven is different. To fix a dry cake, poke holes over the surface and drizzle a simple syrup over it. I suggest making a lemon simple syrup to balance out the extra sweetness in the cake from the simple syrup.
Related
You may also enjoy these easy cake recipes:
- Rava Cake | Sooji Cake | Semolina Cake (Eggless)
- Eggless Mango Cake Recipe
- Cranberry Orange Loaf With Orange Glaze (Eggless)
- Atta Cake (Eggless Wheat Cake With Jaggery)

Ribbon Cake
Ingredients1x2x3x
- 150 grams unsalted, softened butter 2/3 cup
- 150 grams castor sugar/granulated sugar 2/3 cup
- 3 medium eggs (total weight 150 grams without shell)
- 150 grams all-purpose flour 1 cup + 1 tablespoon
- 1 teaspoon baking powder
- 1/4 teaspoon salt
- 1 teaspoon vanilla extract
- red food color
- green food color
Instructions
- Preheat the oven to 350°F/180°C and position a rack in the middle of the oven. Grease an 8×4 inch loaf pan with a little butter and line it with parchment paper leaving about 1 to 2 inches of overhang on both sides.
- In a medium mixing bowl, sift 150 grams of all-purpose flour, 1 teaspoon baking powder, and 1/4 teaspoon salt. Whisk until well combined.
- In a large mixing bowl, add 150 grams of unsalted, softened butter and 150 grams of castor sugar.
- Using a handheld mixer, cream butter, and sugar on medium-high speed until light and fluffy, about 3 to 5 minutes.
- Scrape down the sides and bottom of the bowl with a spatula once or twice.
- Add eggs, one at a time, beating for about 1 minute on medium speed after each addition.
- Add the last egg along with 1 teaspoon vanilla extract, beating for 1 minute on medium speed until well combined.
- Scrape down the sides and bottom of the bowl with a spatula.
- Add dry ingredients to the butter mixture in two parts.
- Fold dry ingredients with the butter mixture gently after each addition, just until combined and no more flour streaks are visible.
- Measure out 2/3 cup of the batter and transfer it into 2 small bowls. (1/3 cup batter per bowl)
- Add a drop of red and green gel color to each bowl. Mix gently.
- Spoon 1/3 portion of the white batter into the prepared pan, and smooth out the surface evenly using a spatula.
- Next, spoon the pink-colored batter and smooth out the surface with a spatula.
- Repeat with 1/3 portion of the white batter.
- Repeat step 15 but now with the green-colored batter.
- Add the remaining 1/3 of the white batter and smooth out the surface evenly.
- Tap the loaf pan a couple of times on the countertop to eliminate any air bubbles.
- Bake in a preheated oven at 350°F/180°C for 45 to 50 minutes or until a toothpick inserted in the center of the loaf comes out clean.
- When the cake is baked, transfer the loaf pan to a wire cooling rack. Let the cake cool in the loaf pan for 15 minutes. Lift the cake out of the pan and allow it to cool completely on a wire rack. Once cooled, slice and enjoy with a cup of tea or coffee!
