These no-bake boondi cheesecake shots have a buttery biscuit base, layers of sweet and tangy, mousse-like cheesecake filling, and sweet boondi. They look super adorable and are so easy to make!

Fusion desserts have gained a lot of popularity in recent years in India. You will come across many wonderful fusion dessert creations from the kitchens of exquisite hotels to home chefs.
Sweet boondi by itself is a scrumptious treat, however, I wanted to put it to use in some fusion desserts. Hence, this no-bake boondi cheesecake served in shot glasses was a no-brainer.
I am sure you are going to love this combination of soft and juicy sweet boondi with the creamy, velvety, sweet, and subtle tangy flavor of the cheesecake. It is seriously so delicious!
This fusion dessert is perfectly balanced and not overly sweet to give you a sugar rush. Since most Indian desserts are really sweet, pairing it with a tangy component offsets the sweetness.
Serving this dessert in shot glasses makes for the ideal serving size. It is just enough to satiate those sweet cravings post lavish festive lunch or dinner parties.
Shot glass desserts leave very little room for overindulgence, unless, of course, you decide otherwise 😀
- Why should you try this recipe?
- Ingredients needed
- How to make no-bake boondi cheesecake shots – Step-by-step process
- Storage instructions
- Recipe Variations
- You may also enjoy these quick Indian desserts
- Boondi Cheesecake Shots
Why should you try this recipe?
These boondi cheesecake shots;
☑ Make for an irresistible festive fusion treat
☑ Look impressive, and beautiful
☑ Are eggless and need no baking
☑ Really easy to put together
☑ Can be made ahead
☑ Are perfect to serve a large gathering, simply assemble them in small disposable cups
☑ Are very adaptable
Ingredients needed
To make this delicious no-bake boondi cheesecake shots, you will need;
Sweet boondi: I’ve used homemade boondi, but you could source it from the mithai stores too.
Biscuits: For the crust, I’ve used digestive biscuits. Feel free to use your preferred biscuits.
Butter: You need some melted and cooled butter for the crust.
Cream cheese: Try and use full-fat cream cheese for the best results. I’ve used the Indian brand, D’lecta cream cheese to make these cheesecake shots.
Heavy cream: Since we don’t really get heavy cream in India, I’ve used non-dairy cream. This is usually sweetened so, I’ve cut back on the sugar. You will need to use more sugar if using regular heavy cream.
Sugar: Use only castor or powdered/confectioner’s sugar so that it dissolves easily into the cream cheese.
Salt: Just a pinch to bring out all the delicious flavors!
Lemon juice: Adds a tiny hint of tang which we love in our cheesecake. This is optional, feel free to skip it if you wish to.
Rabdi essence: To enhance the ‘mithai’ flavors in this cheesecake!
Garnishes: I’ve just used some slivered pistachios and dried rose petals to make it look festive. You can also use edible silver and silver or gold flakes.

How to make no-bake boondi cheesecake shots – Step-by-step process
Step 1: Cheesecake crust
Transfer the biscuit crumbs to a medium-sized bowl. Add 1 tablespoon of sugar and mix well. ( Photos 1 and 2 )
Next, add 2 tablespoons of melted butter and mix until it resembles wet sand. ( Photos 3 and 4 )
Add about 2 teaspoons of the crumbs to each serving glass or jar, and press it down to pack it firmly. ( Photos 5 and 6 )
Refrigerate while you prepare the cheesecake filling.

Step 2: Cheesecake filling
Add 1 cup (225 grams) of softened cream cheese to a big mixing bowl. Also, add 1/4 cup of castor sugar or powdered sugar along with a pinch (about 1/8 teaspoon) of salt. ( Photos 7 to 9 )
Using an electric mixer, beat on low speed initially to combine everything well. ( Photo 10)
Then increase the speed to medium-high, and beat until the cream cheese mixture is smooth, light, and fluffy.
Use a silicon or rubber spatula to scrape the sides and bottom of the bowl once or twice in between. ( Photo 11 )
Add 2 teaspoons of lemon juice (optional) and 1/4 teaspoon of rabdi essence. ( Photos 12 and 13 )
Beat until well combined. ( Photos 14 and 15 )

In another medium-sized mixing bowl, add 3/4 cup of heavy cream. ( Photo 16 )
Beat at high speed until stiff peaks form. ( Photos 17 )
Fold the whipped cream into the cream cheese mixture in two batches, just until well combined. You should get around 2 and 3/4 cups of cheesecake filling. ( Photos 18 and 19 )
The mixture should be light and fluffy! You can cover the bowl with cling wrap and refrigerate at this point until you are ready to assemble or you may simply assemble the cheesecake shots right away!

Step 3: Assemble
Remove the serving glasses from the fridge.
Pipe the cheesecake layer over the crust. ( Photo 20 )
Add 2 teaspoons of sweet boondi, followed by another layer of cheesecake filling and 2 more teaspoons of sweet boondi. ( Photos 21 and 2 2)
You may just add one layer each of the cheesecake filling and sweet boondi instead of 2 layers. If using taller serving glasses, feel free to make more layers!
Repeat with the remaining shot glasses. Cover loosely and refrigerate for 2 to 3 hours.
Just before serving, you may decorate with some whipped cream and garnish with slivered pistachios or nuts of choice and/or dried rose petals. ( Photos 23 )

Storage instructions
It’s best to assemble these shots and refrigerate them for about 2-3 hours before serving.
Store leftover cheesecake shots covered, in the refrigerator for up to 1 day.
I do not suggest storing it for longer than that, as the sugar coating on the boondi melts and will form a layer of liquid over the cheesecake layer.

Recipe Variations
The sky is the limit when it comes to making Indian fusion desserts! You can mix and match and create your own unique combination. Here are some ideas to get you started!
Mithai layer: For this fusion dessert, you can swap the sweet boondi with crushed ladoos, like motichoor ladoo, crumbled rajbhog, coconut ladoo , crushed peda , mawa burfi , kaju katli, gajar halwa, or crumbled or angoori gulab jamun. Try and pick a colorful mithai so it creates a nice contrast against the white creamy layer.
Creamy layer: You can swap the cheesecake layer with shrikhand, rabri, kheer, seviyan kheer, custard , or sweetened whipped cream flavored with little saffron.
Biscuit base: You can skip this altogether or make a biscuit plus nut base, or date and nut base. Feel free to add a pinch of spices like cardamom, nutmeg, cinnamon, etc to flavor the crust. For that extra Indian touch, you can also swap the butter with melted ghee.
Garnishes: Go big on the garnishes by adding caramel shards, chocolate decorations, or cashew praline (find the recipe in my butterscotch cake post) for a gourmet touch.

You may also enjoy these quick Indian desserts
Motichoor ladoo parfait
No-cook rabri
Fruit cream
Have you made this recipe?
I would love to hear from you! Please be sure to share your feedback and/or give this recipe a rating in the comment below. Your reviews help others know the recipe better too.
You can also FOLLOW me on Facebook , Pinterest, Instagram & Twitter

Boondi Cheesecake Shots
Ingredients1x2x3x
- 225 grams sweet boondi
For the cheesecake crust
- 3/4 cup digestive biscuit crumbs, 12 biscuits
- 2 tablespoons melted butter, 28 grams
- 1 tablespoon castor or powdered sugar, 14 grams
For the cheesecake filling
- 1 cup full-fat cream cheese, 225 grams
- ¼ cup castor sugar, 56 grams
- Pinch of salt
- 2 teaspoons lemon juice, 10 ml, optional
- ¼ teaspoon rabdi essence
- ¾ cup whipping cream, approx 190 ml
Other ingredients (optional)
- Whipped cream, as required
- Slivered or coarsely chopped nuts
- Edible dried rose petals
Instructions
Cheesecake crust
- Transfer the biscuit crumbs to a medium-sized bowl. Add sugar and mix well.
- Next, add melted butter and mix until it resembles wet sand.
- Add about 2 teaspoons of the crumbs to each serving glass or jars, and press it down to pack it firmly.
- Refrigerate while you prepare the cheesecake filling.
Cheesecake filling
- Add softened cream cheese to a big mixing bowl. Also, add sugar along with a pinch (about 1/8 teaspoon) of salt.
- Using an electric mixer, beat on low speed initially to combine everything well.
- Then increase the speed to medium-high, and beat until the cream cheese mixture is smooth, light, and fluffy.
- Use a silicon or rubber spatula to scrape the sides and bottom of the bowl once or twice in between.
- Add lemon juice (optional) and rabdi essence. Beat until well-combined.
- In another medium-sized mixing bowl, add heavy cream. Beat at high speed until stiff peaks form.
- Fold the whipped cream into the cream cheese mixture in two batches, just until well combined. You should get around 2 and 3/4 cups of cheesecake filling.
Assemble
- Remove the serving glasses from the fridge.
- Pipe the cheesecake layer over the crust.
- Add 2 teaspoons of sweet boondi, followed by another layer of cheesecake filling and 2 more teaspoons of sweet boondi.
- You may just add one layer each of the cheesecake filling and sweet boondi instead of 2 layers. If using taller serving glasses, feel free to make more layers!
- Repeat with the remaining shot glasses. Cover loosely and refrigerate for 2 to 3 hours.
- Just before serving, you may decorate with some whipped cream and garnish with slivered pistachios or nuts of choice and/or dried rose petals.
Video
Notes

Boondi Cheesecake Shots
Ingredients
- 225 grams sweet boondi
For the cheesecake crust
- 3/4 cup digestive biscuit crumbs, 12 biscuits
- 2 tablespoons melted butter, 28 grams
- 1 tablespoon castor or powdered sugar, 14 grams
For the cheesecake filling
- 1 cup full-fat cream cheese, 225 grams
- ¼ cup castor sugar, 56 grams
- Pinch of salt
- 2 teaspoons lemon juice, 10 ml, optional
- ¼ teaspoon rabdi essence
- ¾ cup whipping cream, approx 190 ml
Other ingredients (optional)
- Whipped cream, as required
- Slivered or coarsely chopped nuts
- Edible dried rose petals
Instructions
Cheesecake crust
- Transfer the biscuit crumbs to a medium-sized bowl. Add sugar and mix well.
- Next, add melted butter and mix until it resembles wet sand.
- Add about 2 teaspoons of the crumbs to each serving glass or jars, and press it down to pack it firmly.
- Refrigerate while you prepare the cheesecake filling.
Cheesecake filling
- Add softened cream cheese to a big mixing bowl. Also, add sugar along with a pinch (about 1/8 teaspoon) of salt.
- Using an electric mixer, beat on low speed initially to combine everything well.
- Then increase the speed to medium-high, and beat until the cream cheese mixture is smooth, light, and fluffy.
- Use a silicon or rubber spatula to scrape the sides and bottom of the bowl once or twice in between.
- Add lemon juice (optional) and rabdi essence. Beat until well-combined.
- In another medium-sized mixing bowl, add heavy cream. Beat at high speed until stiff peaks form.
- Fold the whipped cream into the cream cheese mixture in two batches, just until well combined. You should get around 2 and 3/4 cups of cheesecake filling.
Assemble
- Remove the serving glasses from the fridge.
- Pipe the cheesecake layer over the crust.
- Add 2 teaspoons of sweet boondi, followed by another layer of cheesecake filling and 2 more teaspoons of sweet boondi.
- You may just add one layer each of the cheesecake filling and sweet boondi instead of 2 layers. If using taller serving glasses, feel free to make more layers!
- Repeat with the remaining shot glasses. Cover loosely and refrigerate for 2 to 3 hours.
- Just before serving, you may decorate with some whipped cream and garnish with slivered pistachios or nuts of choice and/or dried rose petals.
Video
Notes
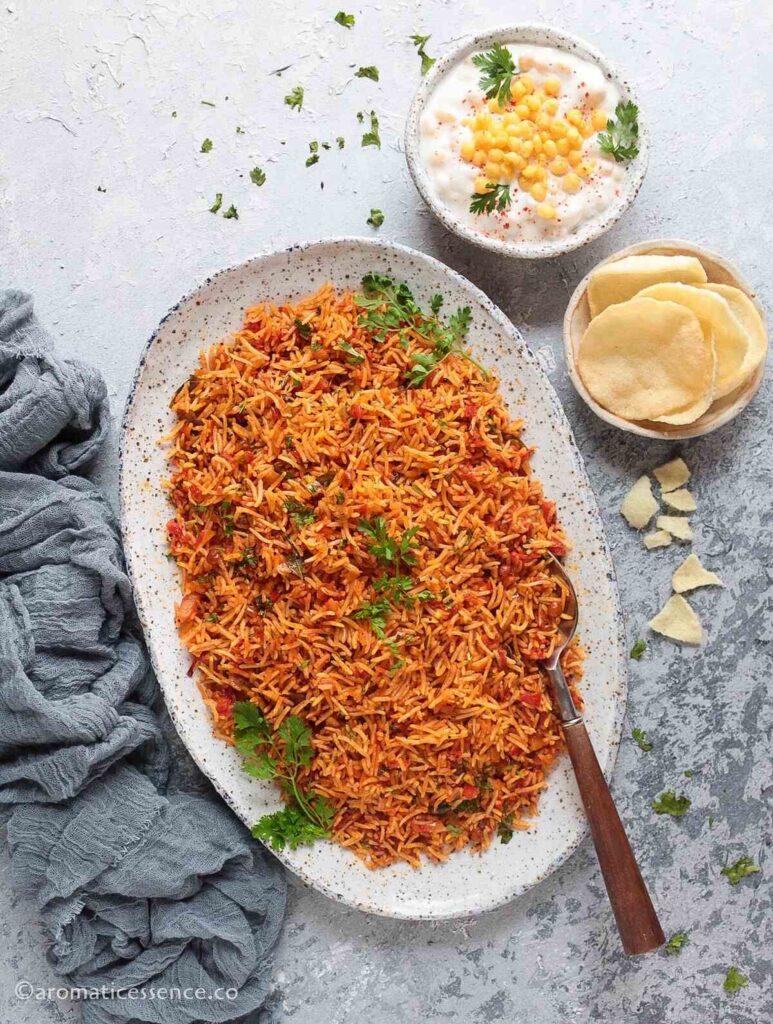
Tomato rice (thakkali sadam) is a quick, easy, and flavorful South Indian rice recipe made using cooked rice, ripe plum tomatoes, and a few spices.
One-pot rice dishes are a life savior for me during busy weekdays. Now that I’m juggling between my kids having different school timings, I do not get the time to make an elaborate meal.
This easy tomato rice is a quick meal to put together if you have some leftover rice sitting in the fridge.
Pair it with boondi raita or any other raita along with some crispy rice papadum and pickle! It makes for such a super flavorful and filling meal. Sometimes, I deliberately make extra rice just to make these quick rice recipes!
There are a number of rice recipes made all over India. And this tomato rice happens to be one of our absolute favorites.
- What is thakkali sadam?
- Ingredients needed
- Why make it?
- How to make tomato rice (thakkali sadam) – Step-by-step instructions
- Serving Suggestions
- Storage instructions
- Recipe Tips And Variations
- Frequently asked questions
- You may also enjoy these Indian rice recipes
- Tomato Rice | Thakkali Sadam
What is thakkali sadam?
‘Thakkali’ means tomatoes and ‘sadam’ or ‘sadham’ means cooked rice in Tamil.
So basically precooked rice is tossed in a spiced onion-tomato masala to make thakkali sadam.
Tomato rice is one of the most popular rice dishes in the state of Tamil Nadu in Southern India.
It is interesting to note that there are different versions of tomato rice prepared all over the world.
The other version that I’ve tried is Mexican red rice. Then there are also Greek, Israeli, Portuguese, Malay, Vietnamese versions, and probably even more which I’ve yet to come across.

Ingredients needed
To make this recipe, you will need
Rice: Traditionally, short-grained rice is used in this recipe. But I’ve used basmati rice.
Tomatoes: I’ve used desi tomatoes which are perfect to add that hint of tang required in this recipe.
Lentils: Urad dal and chana dal are the most common lentils used in tempering South Indian dishes.
Mustard seeds and cumin seeds: For the tempering.
Spices: This rice dish is minimally spiced so that the tomato flavor shines through. You will just need some hing (asafoetida), turmeric powder, Kashmiri chili powder (mainly added for color), salt, and a very tiny pinch of garam masala, which is optional.
Cooking fat: I’ve used sunflower oil and ghee in this recipe. You can use your preferred cooking oil.
Aromatics: You will need some finely chopped onions, minced ginger, and garlic. You can also use ginger garlic paste. Ginger and garlic are optional, but I love adding them. You can skip the onion and garlic for a Jain version.
Other ingredients: You will also need some curry leaves for the tempering and coriander leaves to add some fresh flavor and also garnish the rice.

Why make it?
☑ Quick, easy, and flavorful
☑ A delicious way to use up leftover rice
☑ Perfect to be packed in the lunchbox
☑ Made with simple pantry ingredients
☑ Can be adapted to make it vegan and gluten-free
How to make tomato rice (thakkali sadam) – Step-by-step instructions
Step 1: Tempering
Add 2 to 3 tablespoons of oil in a heavy-bottomed pot over medium heat.
Let it heat up a bit, then add 3/4 teaspoon of mustard seeds (rai) and allow them to pop. Next, add 1/2 teaspoon of cumin seeds, and allow them to crackle. ( Photos 1 and 2 )
Lower the heat and add 1 teaspoon each of chana dal and urad dal, saute on medium-low heat, until the lentils begin to turn a nice golden brown. ( Photos 3 and 4 )

Next, add 1/8 teaspoon hing, 1 tablespoon of minced garlic, 1 teaspoon of minced ginger, 2 sprigs of curry leaves, and 2 green chilies, and saute until the raw smell of ginger and garlic goes away. ( Photos 5 to 10 )

Step 2: Saute onion, tomatoes, and spices
Next, add 3/4 cup of chopped onions, and saute until translucent. ( Photos 11 and 12 )
Then add 2 cups of chopped tomatoes, and salt, and mix well. Cover and cook for 2-3 minutes on medium-low heat. ( Photos 13 and 14 )
Open the lid, and cook, stirring occasionally until the tomatoes turn mushy and the oil separates from the sides. ( Photo 15 )

Then add 1 teaspoon of Kashmiri chili powder, 1/8 teaspoon of turmeric, and 1/4 teaspoon of garam masala, mix well, and cook for another 30 seconds. ( Photos 16 to 19 )
Add 2 tablespoons of chopped coriander leaves, mix well and cook for another few seconds. ( Photos 20 and 2 1)
Make sure that there is no moisture at this stage. If the tomato masala is watery, it will make the entire dish mushy.

Step 3: Mix cooked rice with onion-tomato masala
Add 3 to 3.5 cups of cooked basmati rice and 1 tablespoon of ghee, and mix it well with the masala. ( Photos 22 and 2 3)
Cover, and simmer on low heat for 2-3 minutes. ( Photo 24 )
Switch off the heat and leave it undisturbed for another 10 minutes.
Add the remaining 2 tablespoons of coriander leaves, and fluff the rice gently. ( Photos 25 and 26 )
Dish out and serve with raita.

Serving Suggestions
Thakkali sadam is a delicious standalone dish. It doesn’t need many sides.
You can serve it as is, or along with some;
- Boondi raita, onion tomato raita , or any other raita of your choice
- Plain yogurt
- Kachumber or a light salad
- Fryums or papadum
- Pickle
- An omelet or fried egg
Storage instructions
Leftovers: Refrigerate leftovers in an airtight container for up to 2 days. Reheat in a microwave (add a splash of water) or over the stovetop on medium-low heat until thoroughly heated through.

Recipe Tips And Variations
Rice: This recipe is best made with precooked rice as it is done traditionally. Using raw rice for this recipe to make it from scratch makes this more of a tomato pulao. If making it from scratch, use the correct quantity of rice and water.
If using freshly cooked rice for this recipe: Make sure you allow it to cool down completely or the rice grains might break when you mix it with tomato masala and the entire dish will turn mushy.
Tomatoes: This recipe tastes best when made with ripe, plum, and slightly tart tomatoes. Desi tomatoes work best here, but if using other varieties like Hybrid, Roma, etc, you may add about 2- 3 tablespoons of fresh tamarind extract to add that required tang. Or you may squeeze some lemon juice in the end!
Cook the tomatoes well: It is important to cook the tomatoes really well or the dish won’t taste right. Cook the tomatoes until the oil separates which is a good indicator that the masala is cooked well. Add a splash of water if needed to prevent the masala from sticking to the bottom of the pot and continue cooking till the oil separates from the sides.
Avoid adding too many spices: It overpowers the flavor of the tomatoes. if you want to, you may add whole spices like cinnamon, cloves, and cardamom. I’ve skipped adding it as I didn’t want to give it that pulao flavor profile.
Pinch of sugar: This can be added to balance out the tartness of the tomatoes.
Make it vegan & gluten-free: Skip the ghee or swap it with vegan ghee and skip the hing or make sure you are using gluten-free hing.
Add vegetables: You can add 1 cup of mixed vegetables like diced carrots, peas, cauliflower, corn, mushroom, etc, to make it even more wholesome.
Nuts: You can also add some cashew nuts and peanuts to the tempering to add some crunch to this recipe for textural contrast.

Can I use other varieties of rice to make this recipe?
Of course, yes! You can use any variety of rice for this recipe. Sona masoori, surti kolam, ponni rice, seeraga samba, parboiled rice, or even brown rice works great. If rice is not your thing, you may even swap it with cooked quinoa or millets.
Can I make this in the stovetop pressure cooker or Instant Pot?
Traditionally this South Indian tomato rice is mde with cooked rice. But you can most certainly make it with raw rice. As I mentioned above it will be more of a tomato pulao or tomato bath recipe.
Here are the instructiuons;
Rinse 1 cup of basmati rice under running water, until the water runs clear. Soak in enough water for 20-30 minutes. In the meanwhile prep your ingredients.
For the stovetop pressure cooker: After you are done with the tomato masala, add the rinsed and drained rice and saute for 1-2 minutes.
Next, add 1.5 to 1.75 cups of water (1.5 cups will give distinct rice grains, and 1.75 cups of water will yield softer rice) and mix well. Check for salt and adjust if needed at this stage. The water should taste salty. Cover the cooker with the lid and pressure cook on medium heat for 2 whistles. Let the cooker depressurize on its own before opening the lid. Fluff the rice with a fork.
For the Instant Pot: Add 1 to 1.25 cups water, depending on how soft you like the rice. Cook on high pressure for 4 minutes, followed by 10 minutes of NPR (natural pressure release).
Please note that this quantity of water works best for basmati rice. Some varieties of rice need more water and a longer time to cook. So use the kind of rice you have worked with before or you will either end up with either mushy rice or al dente rice.
Is it spicy?
This recipe is not very spicy since I’ve not used the spicy variety of green chilies, or chili powder. There is some amount of heat from the ginger in this recipe. Kashmiri chili powder adds a beautiful red color sans the heat.
If you prefer more heat, add spicy green chilies, red chili powder (the spicy variety), and black pepper powder.
Can I use canned tomatoes?
Though fresh tomatoes work best in this recipe, canned ones will work in a pinch. You can use a 14.5 oz can of diced or crushed tomatoes.
What about using fresh tomato puree?
It is absolutely fine to use tomato puree too. To save time, you can blend the tomatoes and use the puree instead of dicing them up. But make sure you cook it really well until the oil separates.
You may also enjoy these Indian rice recipes
Palak rice
Pudina rice
Bagara rice
Mushroom pilaf
Have you made this recipe?
I would love to hear from you! Please be sure to share your feedback and/or give this recipe a rating in the comment below. Your reviews help others know the recipe better too.
You can also FOLLOW me on Facebook , Pinterest, Instagram & Twitter

Tomato Rice | Thakkali Sadam
Ingredients1x2x3x
- 3 cups cooked basmati rice, 375 grams approx
- 2 to 3 tablespoons oil
- 3/4 teaspoon mustard seeds
- ½ teaspoon cumin seeds
- 1 teaspoon urad dal
- 1 teaspoon chana dal
- 1/8 teaspoon hing
- 1 teaspoon minced ginger
- 1 tablespoon minced garlic
- 2 sprigs curry leaves
- 2 green chilies, slit lengthwise
- 3/4 cup finely chopped onion, 120 grams
- 2 cups finely chopped tomatoes, 325 grams
- 1 teaspoon salt, or to taste
- 1 teaspoon Kashmiri red chili powder
- 1/8 teaspoon turmeric
- 1/4 teaspoon garam masala
- 4 tablespoons finely chopped coriander leaves
Instructions
Tempering
- Add oil in a heavy-bottomed pot over medium heat.
- Let it heat up a bit, then add mustard seeds and allow them to pop. Next, add cumin seeds, and allow them to crackle.
- Lower the heat and add chana dal and urad dal, saute on medium-low heat, until the lentils begin to turn a nice golden brown.
- Next, add hing, minced garlic, minced ginger, curry leaves, and green chilies, and saute until the raw smell of ginger and garlic goes away.
Saute onion, tomatoes, and spices
- Next, add chopped onions, and saute until translucent.
- Then add chopped tomatoes, and salt, and mix well. Cover and cook for a 2-3 minutes on medium-low heat.
- Open the lid, and cook, stirring occasionally until the tomatoes turn mushy and the oil separates from the sides.
- Then add turmeric, Kashmiri chili powder, and garam masala, mix well and cook for another 30 seconds.
- Add half of the coriander leaves, mix well and cook for another few seconds.
- Make sure that there is no moisture at this stage. If the tomato masala is watery, it will make the entire dish mushy.
Mix cooked rice with onion-tomato masala
- Add the rice and ghee, and mix it well with the masala.
- Cover, and simmer on low heat for 2-3 minutes.
- Switch off the heat and leave it undisturbed for another 10 minutes.
- Add the remaining coriander leaves, and fluff the rice gently.
- Dish out and serve with raita.
