This eggless atta cake (whole wheat cake) is a nutty, soft and moist, delicious, tea time cake. You will love this healthy cake made without any refined flour, refined sugar, or even eggs. Check out the quick, step-by-step video to make this easy wheat flour and jaggery cake at home!

I’m super excited to share a healthier cake recipe with you guys! This eggless atta cake is made with 100% whole wheat flour and naturally sweetened with jaggery.
A celebration is incomplete without some sort of cake in my opinion, be it birthdays or anniversaries or any other special day. And if you refrain from enjoying a piece of cake due to various dietary restrictions, then you definitely need to try this healthier alternative.
I was always under the impression that cakes made with wheat flour are just not that great. But guess what? I was so wrong! That perception changed when I tried this eggless date and walnut whole wheat cake .
While there isn’t much difference in calories between refined flour i.e all-purpose flour (maida) and whole wheat flour, the latter is relatively healthier as it contains fiber, vitamins, and minerals.
I love baking simple tea-time loaf cakes, as they are hassle-free and require less effort as compared to a frosted cake. I lack the patience for those kinds of bakes but do reserve them for special occasions.

- Recipe inspiration
- Why you will really love this whole wheat jaggery cake?
- Ingredients needed for this homemade atta cake recipe
- How to make eggless atta cake – Step by step process
- Serving suggestions
- Storage instructions
- My top tips to make the wheat cake
- Frequently asked questions (FAQs)
- You may also enjoy these tea-time loaf cakes
- Atta Cake (Eggless Wheat Cake With Jaggery)
Recipe inspiration
I actually tasted this eggless whole wheat jaggery cake for the first time just a couple of weeks ago when my friend, Aarti prepared it for one of our neighbor’s send-off to Kenya. It was so good that I requested her for the recipe to which she happily obliged.
I have been wanting to share a healthier cake recipe for quite some time now and this atta cake fits the bill perfectly! Just look at that beautiful crumb 🙂
While I have nothing against eggs, I thought of skipping them here since a lot of you prefer eggless bakes.
Why you will really love this whole wheat jaggery cake?
- My number one reason- there’s no all-purpose flour, sugar, condensed milk, or even eggs and yet this cake turns out perfect every single time!
- It is so easy to make and tastes really delicious even though most of the ingredients are refined-free.
- A slice of this wheat cake is great on its own or serve along with a cup of hot tea or coffee
- A healthier snack or dessert alternative instead of sugar-laden cookies or other junk food snacks
- Doesn’t require any special skills nor equipment. See instructions in FAQ to bake this in your stovetop pressure cooker.

Ingredients needed for this homemade atta cake recipe
You need simple ingredients to make this delicious wheat and jaggery cake. Let’s have a look at them;
Whole wheat flour: Whole wheat flour is known as gehu ka atta or chakki atta in India. It is made by grinding whole wheat grains into a fine powder. This atta is used in making rotis, chapatis, parathas, and other Indian flatbreads.
Jaggery: Also known as ‘ gur ‘ in Hindi. It is a healthier substitute for refined sugar and works really well in this recipe. It lends a deep and rich flavor to the cake.
Leavening agents: These are the usual ingredients i.e. baking powder and baking soda. I don’t suggest skipping either as they help the cake rise.
Salt: A small pinch to bring out the other flavors of the cake.
Flavoring agents: I’ve used pumpkin pie spice mix which is a blend of cinnamon, ginger, allspice, nutmeg, and cloves. I love the warm flavors it adds to this simple atta gur cake. The spices compliment the deep and rich flavors of the jaggery really well! I’ve also added some pure vanilla extract!
Yogurt: This is a substitute for the eggs in this recipe and it works really well. You won’t miss the eggs! Additionally, it also helps in making the cake soft and moist.
Fat: I’ve used sunflower oil in this recipe because it makes the cake moist. You can use any other neutral cooking oil like canola, corn oil, etc. Don’t use olive oil in this recipe as wheat flour is quite nutty and that will sort of clash with the strong flavor of the olive oil.
Liquid: I’ve used whole dairy milk for the liquid part in the recipe.

How to make eggless atta cake – Step by step process
Make sure all your ingredients are at room temperature!
Step 1: Prepare the cake pan
Position a rack in the center of the oven. Preheat the oven to 180° C/350° F. Grease and line a 9×5-inch loaf pan with parchment paper. (The dimensions of my loaf pan are 10 x 4.5 inches) (Photo 1)

Step 2: Sift the dry ingredients
Sift 1.5 cups of wheat flour, 1.5 teaspoons of baking powder, 1/2 teaspoon of baking soda, 1/2 teaspoon salt, and 1 teaspoon of pumpkin pie spice mix in a large bowl. (Photos 2 to 7)
Whisk until well-combined. (Photo 8)

Step 3: Liquid ingredients
In a medium-sized bowl, add 1/2 cup of yogurt and 1 cup of jaggery powder. Beat on medium speed until the jaggery has dissolved. I’ve used a hand mixer, but a regular whisk will also be fine. (Photos 9 to 11)

Add 1/3 cup oil, 1 teaspoon pure vanilla extract, beat on medium speed until incorporated. (Photos 12 to 15)

Step 4: Add dry ingredients and milk alternately
To the jaggery-yogurt-oil mixture, add dry ingredients and milk alternately, starting with flour and ending with flour. (Flour in 3 additions and milk in two additions). Mix just until you see no more flour pockets. Do not overmix the batter! A few lumps are absolutely fine. (Photos 16 to 25)
You can add a handful of chopped nuts at this point, and fold it gently. with a spatula.


Transfer the batter to the prepared cake pan. (Photo 26)
Smooth out the surface with a spatula. (Photo 27)
Tap the pan on the counter 3-4 times to eliminate any air bubbles. (Photo 28)
Top with slivered pistachios and almonds or any other nuts of your choice. (Photo 29)

Step 5: Bake
Bake at 180° C/350° F for 40-45 minutes or until a toothpick inserted in the center of the cake comes out clean. (Photo 30)

Transfer to a wire rack. Cool the cake in the pan for 15 minutes, remove the cake from the pan and let it cool completely on the wire rack. (Photos 31 and 32)

Slice and enjoy with a cup of tea or coffee!
Serving suggestions
Serve a slice of this eggless atta cake as such, it is delicious on its own, or pair it alongside tea/coffee or milk for kids.
For a decadent treat, spread some butter, or any nut butter, drizzle a little honey. Chocolate hazelnut spread such as Nutella is also a good option.
You can also bake the cake in a round pan, slice the cake into two layers and frost it with your favorite icing recipe. But that would beat the purpose of keeping it healthy IMHO.

Storage instructions
Slice the cake and store the slices in an airtight container for 1 to 2 days. Honestly, it never lasts that long around here 😀
Refrigerate for up to 5 days to prolong its shelf life, especially since it’s so hot and humid these days. Bring to room temperature before serving.
My top tips to make the wheat cake
The spoon and sweep method to measure out the flour: Fluff the flour within the container, then spoon it into your dry measuring cup, level it off with the back of a knife. I prefer using my weighing scale when it comes to baking. But I’ve also included measurements in volume for those of you that use standard measuring cups
Jaggery: My powdered jaggery was not lumpy, so I used it as such, straight out of the packet. If your jaggery has big lumps, then it is best to sift it before using it in the recipe. This will ensure that the jaggery powder dissolves well in the batter.
Milk quantity in batter : Wheat flour needs extra hydration because it contains wheat germ and bran which absorb more liquid. The quality of atta differs from one brand to another. So if you feel the batter is too thick, add a few tablespoons more of milk. Refer to the video for an idea of the batter consistency.
Avoid overmixing: Never overmix a cake batter. Overmixing will result in a really dense cake. Mix only until you see no flour pockets in the batter.
Let the baked cake rest: It is important to let the cake rest in the tin for at least 15 minutes. Then transfer to a wire rack to cool down completely. The cake is delicate after it is out of the oven and trying to remove it out of the pan may cause it to crack and fall apart.
Oven temperature and timing: Every oven is different. I always use an oven thermometer while preheating the oven to make sure I’m baking at the right temperature. I use a 52-liter OTG, and my cake was done in 40 minutes. Keep a tab after 35 minutes. Avoid opening the oven door frequently as that will result in a temperature fluctuation affecting the cake.

How to make this atta cake without the oven?
You can make this atta cake in the pressure cooker instead. Use a 5-liter pressure cooker, remove the gasket and the weight. Cover the bottom of the cooker with about a cup of salt. Place a heat-proof stand. Close the cooker with the lid, and preheat on medium heat for 10 minutes.
Depending on the size of your cooker, a loaf pan may or may not fit. So use a round or square baking pan. Place the cake pan (no need to cover the cake pan) carefully with the help of tongs. Excercise precaution as the cooker is hot. Secure the lid of the cooker tightly (no gasket nor weight). Cook on medium heat for 35 minutes. Check for doneness test with a toothpick. If it is not done after 35 to 40 minutes, bake it for 5-10 minutes more.
How to make a vegan version of this cake?
Swap the yogurt and milk with your favorite plant-based alternatives.
Can I use ghee instead of oil in this recipe?
Yes, you most certainly can. I tested this recipe with melted ghee and it worked just as well. So why haven’t I finalized that in the recipe? Simply because I found that the finished product was much better with the inclusion of oil.
The cake was moister as compared to the one I made with ghee. It’s totally your call, you can use either. The quantity stays the same. You can also use melted butter if you wish to.
I don’t have powdered jaggery, can I use regular jaggery?
Yes, you can! Grate the jaggery and use the same amount stated in the recipe.
Can I bake this atta cake in a round or square cake pan?
Yes, you can. Use a 7 or 8-inch round or square cake pan. Baking time will reduce because of increased surface area, so keep a tab after 35 minutes.
Can I make this wheat cake with eggs instead?
Yes, you most certainly can. Substitute the yogurt with 2 eggs. The rest of the process and recipe will stay the same.
What can I substitute the yogurt with?
I have not tried another substitute here. But 2 overripe mashed bananas would work as a great substitute, but it will also lend some banana flavor to the cake. Flax egg might also work, though I’ve yet to try that alternative.
Why does the top of this wheat cake crack?
A cracked top is absolutely normal for such cakes or quick breads (eg: pumpkin bread, banana bread, etc). This wheat cake is a type of quick bread. Quick bread is any type of bread that is leavened by baking powder or soda instead of yeast.
This happens because the crust sets faster than the insides of the cake. As the cake continues to bake and rise, it pushes through the crust thus causing it to crack. This phenomenon does not alter the texture nor taste of the final baked good. In fact, it is a good sign for quick breads. I think the crack makes the loaf look rustic adding a lot of character to it.
You won’t observe much of a crack in a round or square pan, as you have a larger surface area as compared to a loaf pan.
Why does my cake taste bitter?
Also, make sure, your atta flour is fresh. Avoid using sour yogurt.
Is this cake dense? How can I make this cake less dense?
You have to understand that this cake is made entirely with wheat flour, so expect it to be slightly dense. But it is not dry or crumbly. Rather it is soft, moist, and delicious at the same time. You can do a couple of these things to make it less dense if you wish to;
- Resist the urge to overmix the batter to a smooth consistency. That’s the most common problem for dense cakes! Overmixing activates the gluten strands resulting in a dense and chewy baked good.
- Add 1 teaspoon of vinegar, in the end, mix the batter well and bake it immediately.
- You can also add 1 teaspoon vinegar to the quantity of milk specified and let it sit for 10 minutes. This will result in buttermilk which can be used in the recipe. Add the dry ingredients and buttermilk alternately to the yogurt and jaggery mixture.
- Replace half of the wheat flour with all-purpose flour. I’ve not tried this out yet, and I think the quantity of milk will reduce by few tablespoons, so add the milk gradually.
You may also enjoy these tea-time loaf cakes
Rava cake
Eggless marble cake
Eggless mango loaf cake
Banana bread without eggs
Pumpkin bread without eggs
You can also follow me on Facebook , Pinterest, Instagram & Twitter

Atta Cake (Eggless Wheat Cake With Jaggery)
Ingredients1x2x3x
Make sure all your ingredients are at room temperature!
Dry ingredients
- 1.5 cups whole wheat flour 200 grams
- 1.5 teaspoon baking powder
- 1/2 teaspoon baking soda
- 1/4 teaspoon salt
- 1 teaspoon pumpkin pie spice mix, refer notes to make your own spice blend
Wet ingredients
- 1/2 cup yogurt 125grams
- 1 cup jaggery powder 165 grams
- 1/3 cup oil 66 grams
- 1 teaspoon vanilla extract 5 ml
- 3/4 cup whole milk 180 ml
Optional ingredients
- 1 tbsp slivered pistachios
- 1 tbsp slivered almonds
Instructions
- Position a rack in the center of the oven. Preheat the oven to 180° C/350° F. Grease and line a 9x5-inch loaf pan with parchment paper.
- Sift wheat flour, baking powder, baking soda, salt, and pumpkin pie spice mix in a large bowl.
- Whisk until well-combined.
- In a medium-sized bowl, add jaggery powder and yogurt. Beat on medium speed until the jaggery has dissolved. I’ve used a hand mixer, but a regular whisk will also be fine.
- Add oil, and pure vanilla extract, beat on medium speed until incorporated.
- To the jaggery-yogurt-oil mixture, add dry ingredients and milk alternately, starting with flour and ending with flour.
- Add the flour in three additions and milk in two additions. Mix just until you see no more flour pockets. Do not overmix the batter! A few lumps are absolutely fine.
- You can add a handful of chopped nuts at this point, and fold it gently. with a spatula.
- Transfer the batter to the prepared cake pan. Smooth out the surface with a spatula. Tap the pan on the counter 3-4 times to eliminate any air bubbles.
- Top with slivered pistachios and almonds or any other nuts of your choice.
- Bake at 180° C/350° F for 40-45 minutes or until a toothpick inserted in the center of the cake comes out clean.
- Transfer to a wire rack. Cool the cake in the pan for 15 minutes, remove the cake from the pan and let it cool completely on the wire rack.
- Slice and enjoy with a cup of tea or coffee!
Video
Notes
Nutrition

Atta Cake (Eggless Wheat Cake With Jaggery)
Ingredients
Make sure all your ingredients are at room temperature!
Dry ingredients
- 1.5 cups whole wheat flour 200 grams
- 1.5 teaspoon baking powder
- 1/2 teaspoon baking soda
- 1/4 teaspoon salt
- 1 teaspoon pumpkin pie spice mix, refer notes to make your own spice blend
Wet ingredients
- 1/2 cup yogurt 125grams
- 1 cup jaggery powder 165 grams
- 1/3 cup oil 66 grams
- 1 teaspoon vanilla extract 5 ml
- 3/4 cup whole milk 180 ml
Optional ingredients
- 1 tbsp slivered pistachios
- 1 tbsp slivered almonds
Instructions
- Position a rack in the center of the oven. Preheat the oven to 180° C/350° F. Grease and line a 9x5-inch loaf pan with parchment paper.
- Sift wheat flour, baking powder, baking soda, salt, and pumpkin pie spice mix in a large bowl.
- Whisk until well-combined.
- In a medium-sized bowl, add jaggery powder and yogurt. Beat on medium speed until the jaggery has dissolved. I’ve used a hand mixer, but a regular whisk will also be fine.
- Add oil, and pure vanilla extract, beat on medium speed until incorporated.
- To the jaggery-yogurt-oil mixture, add dry ingredients and milk alternately, starting with flour and ending with flour.
- Add the flour in three additions and milk in two additions. Mix just until you see no more flour pockets. Do not overmix the batter! A few lumps are absolutely fine.
- You can add a handful of chopped nuts at this point, and fold it gently. with a spatula.
- Transfer the batter to the prepared cake pan. Smooth out the surface with a spatula. Tap the pan on the counter 3-4 times to eliminate any air bubbles.
- Top with slivered pistachios and almonds or any other nuts of your choice.
- Bake at 180° C/350° F for 40-45 minutes or until a toothpick inserted in the center of the cake comes out clean.
- Transfer to a wire rack. Cool the cake in the pan for 15 minutes, remove the cake from the pan and let it cool completely on the wire rack.
- Slice and enjoy with a cup of tea or coffee!
Video
Notes
Nutrition
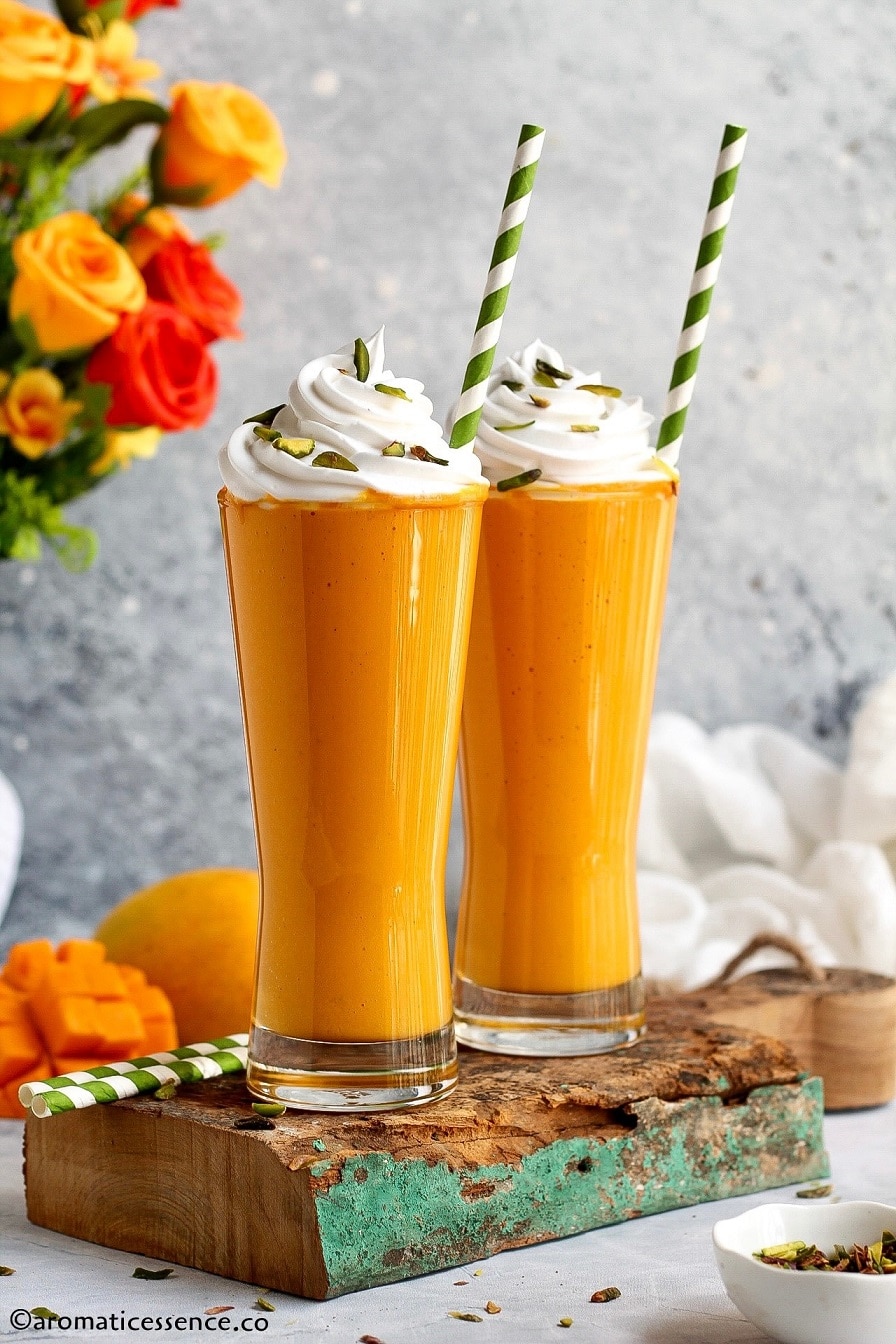
Slurp up a tall glass of this refreshing, creamy, and luscious mango shake made with fresh, ripe, seasonal mangoes, milk, sugar, and a touch of cardamom. This is a pretty simple and basic recipe for a mango shake with milk. Be sure to check out more delicious variations listed in the post below!

One of the best things about summers in India are mangoes. The sweet, golden, juicy mangoes are the only thing I look forward to during Indian summers.
Sweet and ripe mangoes can be enjoyed on their own or can be incorporated in many recipes from beverages, salads to desserts.
Although mangoes are a bit heavy on the wallet at the moment, I still went ahead and bought a dozen Alphonso mangoes, just coz we couldn’t wait to savor this fruit.
I love making the most of this fruit in the form of a simple milkshake. It is insanely easy and loved by everyone in the house.
Moreover, mango season lasts for a very short time, so we like to enjoy it to the fullest.

- Why should you try this recipe
- Ingredients needed
- How to make mango shake with ice cream – Step by step process
- Variations of this recipe
- Frequently asked questions
- You may also enjoy these mango recipes
- Mango Shake | How To Make Mango Milkshake
Why should you try this recipe
✔ It’s mango season and that is reason enough to whip up this recipe!
✔ This mango shake without ice cream is simple and needs very few ingredients.
✔ Always a hit with toddlers, kids, or adults alike.
✔ Tastes heavenly!
✔ Great for breakfast as it keeps you full for longer.
✔ Also makes for a refreshing beverage to beat the heat.
✔ Most of all, so easy to make! Make it at home using clean and fresh ingredients!
Ingredients needed
For this homemade mango shake, you need four ingredients;
Mangoes: I’ve used Alphonso mangoes here, simply because it makes the best mango shake. You can use any mangoes, just be sure to use the ones that are ripe, sweet, and less fibrous. If using fibrous varieties, its best to strain the mango pulp and then blend it with the milk.
Milk: I’ve used full-fat dairy milk. You can use any kind of milk, toned, skim, fat-free, 1%, etc, they all work well. If using fresh milk, boil, cool, and then use it in the recipe. You can also veganize this recipe by using your favorite plant-based milk such as soy milk, oat milk, almond milk, cashew nut milk, light coconut milk, etc
Sugar: Just a touch to add more sweetness. You can skip it if the mangoes are really sweet. You can also sweeten it with honey, agave nectar, or stevia, or condensed milk for a decadent treat.
Cardamom: This is a totally optional ingredient, but I love adding a pinch of cardamom powder to give it that Indian touch. Besides, mango and cardamom pair really well, don’t you agree? It’s the most common spice used to flavor up Indian desserts, and it does a great job flavoring up this fresh mango shake as well.
Optional ingredients: Whipped cream and slivered pistachios for garnishing.

How to make mango shake with ice cream – Step by step process
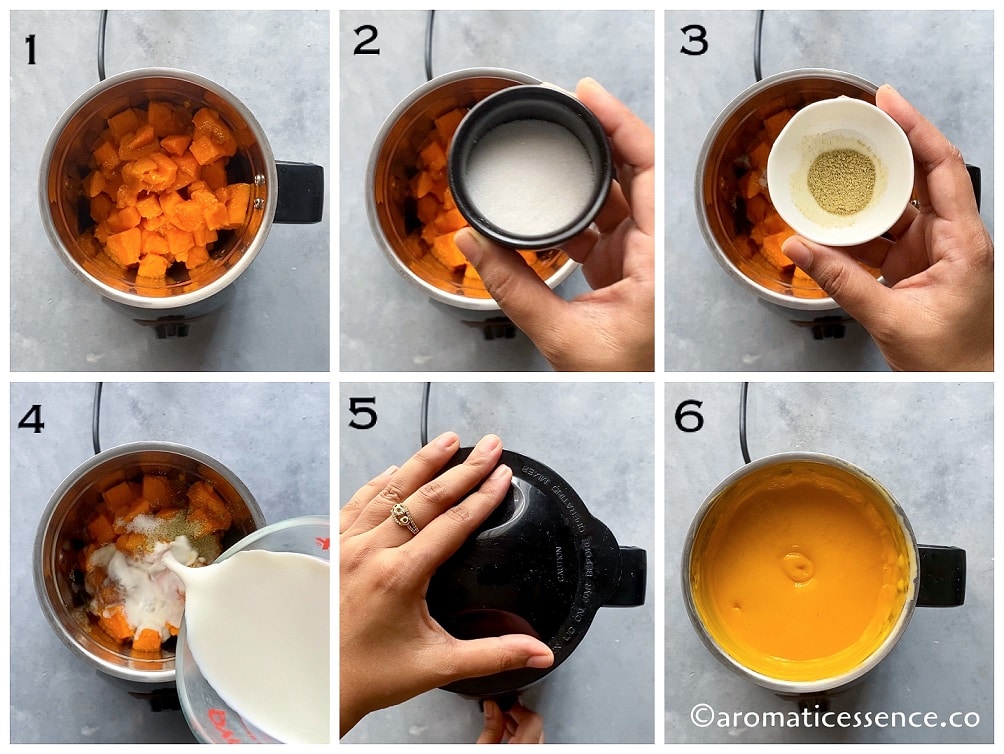
Step 1: Blend all the ingredients
Add 2 cups diced mangoes, 1 tablespoon of sugar, 1/8 to 1/4 teaspoon ground cardamom, and 3/4 cup chilled milk in a blender. (Photos 1 to 4)
Blend until smooth and creamy. If it is too thick, add the remaining 1/4 cup milk and blend again. (Photos 5 and 6)
Step 2: Serve
Transfer the mango milkshake to serving glass, top with whipped cream, and slivered pistachios! (Photos 7 and 8)

Variations of this recipe
Store-bought mango pulp: If you live abroad, it’s best to make this mango milkshake with canned mango pulp or frozen mango pulp that you are most likely to find at Indian stores. Opt for Alphonso or Kesari mango pulp. Keep in mind, that most of these canned mango pulps already contain sugar. Read the labels, and adjust or eliminate sugar in this recipe.
Cream: For a richer and creamier milkshake, you can throw in a few tablespoons of fresh cream (malai) or heavy cream. I prefer to top the milkshake with whipped cream as that’s how my kids prefer it. I think it also looks top-notch restaurant-quality!
Rooh afza: Drizzle 1-2 teaspoons of rooh afza syrup, and swirl the glass to create a random pattern. Pour the milkshake, and enjoy another simple variation.
Vanilla flavored: If you don’t like cardamom, add some vanilla extract instead or about 2 scoops of vanilla ice cream.
Other flavors: Mango also pairs well with other warm spices such as cinnamon and nutmeg. A tablespoon of saffron-infused milk would add a royal touch!
Finely chopped nuts: After blending the ingredients, add 1 to 2 tablespoons of chopped assorted nuts such as almonds, pistachios, and cashew nuts. Mix with a spoon, and serve. This will add another layer of texture in contrast to the smooth and creamy mango shake.
Other fruits: I also love to swap half of the mangoes with banana or strawberry for some variation in flavor. Banana also makes the shake thicker.
Mango milkshake popsicles: For a yummy frozen treat, pour the milkshake in popsicle molds, and freeze.
Consistency of the milkshake : Feel free to increase the mangoes for a thicker shake with more mango flavor, or increase the milk if you don’t prefer as much of a mango flavor and also want a thinner consistency. You can also throw in some ice cubes to thin it out.

How to cut a mango?

I’d shared an easy pictorial to cut mango on my mango salsa post. Adding it here once again.
Can I mix mango with milk?
As per Ayurveda, it is not advisable to mix fruit with milk as it can cause digestive issues. However, I like to take this theory with a pinch of salt. Most Indians have had mango milkshake made with dairy milk for years now. Plant-based milk was not available so easily as it is today in big cities in India.
It is fine to mix mango and milk, but just make sure you use a ripe and sweet mango. Never mix semi-sweet, sour, or raw mango with milk as they can cause the milk to curdle.
Everybody is different. What agrees with me may not agree with you. So you are the best judge to decide how you’d like to make this recipe.
If this is your first time making this milkshake and you aren’t sure if using milk is a good idea, then simply use your favorite vegan milk. It will hardly affect the overall taste.
Which is the best mango for mango shake?
Undoubtedly, Alphonso mangoes are the best kinds to be used in the recipe. The taste, texture, and color are unparalleled with any other variety of mango.
They are called the King of mangoes for a reason here in India, after all! Kesari and Badami mangoes also are good alternatives.
It is really hard to get hold of Alphonso mangoes outside India. I’ve survived 5 years without these mangoes while I was in the US and missed them so much during the summers.
Ataulfo and Champagne mangoes were decent substitutes, but unfortunately, they are nowhere close to the Alphonso variety.
Can I make this mango milkshake without sugar?
Yes, absolutely! You can sweeten the milkshake with your favorite sweetener. You may not even need a sweetener if your mangoes are really sweet.
How to make this milkshake thicker?
Choose either of the methods to make a really thick milkshake;
- With ice cream: Check out this mango mastani post which is nothing but a thick mango milkshake made with the addition of ice cream. Simply follow that recipe if you’d like to include ice cream. You can also make this mango milkshake with mango ice cream, it tastes super delicious!
- Frozen milk cubes: Freeze the milk in an ice cube tray. Blend the frozen milk cubes and chopped mangoes for a really thick milkshake. If required, add some milk to adjust the consistency.
- Frozen mango chunks or pulp: Instead of milk, dice and freeze mango chunks. To do that, dice up mangoes, place them on a baking tray lined with parchment paper. Cover the tray with cling wrap. Freeze for 4 to 5 hours or until firm, then transfer to a zip lock back, label, and freeze for up to 10 to 12 months. You can also make mango pulp and freeze it in individual serving portions.

You may also enjoy these mango recipes
Mango lassi
Mango shrikhand
Eggless mango loaf cake
Eggless mango semolina cupcake
You can also follow me on Facebook , Pinterest, Instagram & Twitter

Mango Shake | How To Make Mango Milkshake
Ingredients1x2x3x
- 350 grams diced mangoes, about 2 cups
- 1 to 2 tablespoons castor sugar, depending on the sweetness of the mangoes
- 1/8 to 1/4 teaspoon ground cardamom
- 3/4 to 1 cup milk
- 1/2 cup Whipped cream, for garnishing. optional
- 1 teaspoon slivered pistachios
Instructions
- Add diced mangoes, sugar, ground cardamom, and 3/4 cup chilled milk in a blender.
- Blend until smooth and creamy. If it is too thick, add the remaining 1/4 cup milk and blend again.
- Transfer the mango milkshake to serving glass, top with whipped cream, and slivered pistachios!
